Editing in Windows Forms Syntax Editor
16 Mar 202324 minutes to read
The EditControl allows end users to modify and edit the text documents and source code files. Some of the important features are:
- Clipboard operations such as cut, copy, and paste operations.
- Undo and redo with grouping actions.
- Selection modes.
- Provides fully functional context menu.
- Indent and outdent functionalities.
- Changes tracking.
- Provides extensive styling support for new line.
- Comment out lines.
- Space indicator.
- Provides complete unicode support.
The following section explains the above listed features.
Clipboard operations
The EditControl provides keyboard and context menu support to cut, copy, and paste. It stores the data in clipboard for cut and copy operations and retrieves the data from clipboard for paste operation.
Keyboard and mouse actions
The keyboard shortcuts for performing cut, copy, or paste operation in the EditControl are done by using respective commands mentioned in the following table.
| Command | Shortcut |
|---|---|
| Copy | CTRL+C, CTRL+INSERT |
| Paste | CTRL+V, SHIFT+INSERT |
| Cut | CTRL+X, SHIFT+DEL |
Programmatic clipboard options
Provides extensive support to cut, copy, or paste the text data programmatically. The following functions and properties in the EditControl facilitates these clipboard operations.
| Functions | Description |
|---|---|
| Copies the selected text content into the clipboard. | |
| Cuts the selected text content from the EditControl and maintains it in clipboard. | |
| Retrieves the copied content from clipboard and pastes it into the EditControl. | |
| Clears all content in the clipboard associated with EditControl. This is generally used immediately after the application loads to clear any junk from the previous clipboard operation. |
| Properties | Description |
|---|---|
| Indicates whether it is possible to perform copy operation or not in the EditControl. | |
| Indicates whether it is possible to perform cut operation or not in the EditControl. | |
| Indicates whether it is possible to perform paste operation or not in the EditControl. |
// Copies the selected text into the clipboard.

this.editControl1.Copy();

// Cuts the selected text contents from EditControl and maintains it in the clipboard.

this.editControl1.Cut();

// Retrieves copied contents from the clipboard and pastes it into EditControl.

this.editControl1.Paste();

// Indicates whether it is possible to perform copy operation in EditControl.

bool canCopy = this.editControl1.CanCopy;

// Indicates whether it is possible to perform cut operation in EditControl.

bool canCut = this.editControl1.CanCut;

// Indicates whether it is possible to perform paste operation in EditControl.

bool canPaste = this.editControl1.CanPaste;

// Clears all contents in the clipboard associated with EditControl.

this.editControl1.ClearClipboard();
' Copies the selected text into the clipboard.
Me.editControl1.Copy()
' Cuts the selected text contents from EditControl and maintains it in the clipboard.
Me.editControl1.Cut()
' Retrieves copied contents from the clipboard and pastes it into EditControl.
Me.editControl1.Paste()
' Indicates whether it is possible to perform copy operation in EditControl.
Dim canCopy as bool = Me.editControl1.CanCopy
' Indicates whether it is possible to perform cut operation in EditControl.
Dim canCut as bool = Me.editControl1.CanCut
' Indicates whether it is possible to perform paste operation in EditControl.
Dim canPaste as bool = Me.editControl1.CanPaste
' Clears all contents in the clipboard associated with EditControl.
Me.editControl1.ClearClipboard()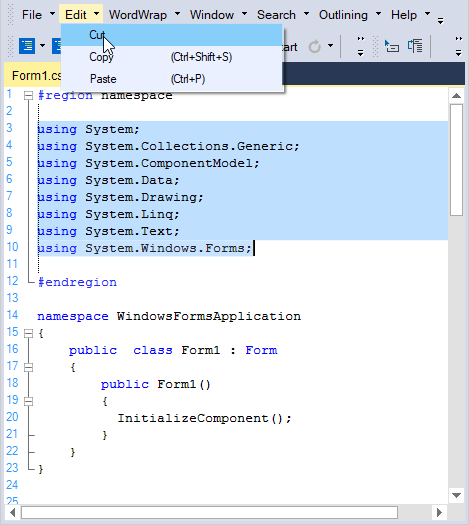
Cryptography
The cryptography of the system is based on the FIPS compliant algorithms for encryption, hashing, and security.
FIPS mode enabled
Follow the steps to enable FIPS in your machine:
1. Click Start, open Control Panel, then click on Administrative Tools.
2. Double-click Local Security Policy.
3. Double-click Local Policies.
4. Click Security Options. Under Policies listed in the right pane, double-click System cryptography: Use FIPS compliant algorithms for encryption, hashing, and signing.
5. Select Enabled to enable FIPS on your machine.
Purpose of EnableMD5 in clipboard operations
When FIPS is enabled, clipboard operations of the EditControl are affected due to the usage MD5 algorithm. To avoid this before enabling FIPS, you must disable the EditControl MD5 algorithm by setting the EnableMD5 property to false.
this.editControl1.EnableMD5 = false;Me.editControl1.EnableMD5 = FalseUndo and redo
Provides keyboard and context menu support for undo and redo operations that erases last change in a document and reinsert it. The CanUndo and CanRedo properties gets a flag that determines whether the undo and redo operations can be performed in the EditControl.
| Command | Shortcut |
|---|---|
| Undo | Performs undo (CTRL+Z) operation. |
| Redo | Performs redo (CTRL+Y) operation. |
// Indicates whether it is possible to Undo in the EditControl.

bool canUndo = this.editControl1.CanUndo;


// Indicates whether it is possible to Redo in the EditControl.

bool canRedo = this.editControl1.CanRedo;
' Indicates whether it is possible to Undo in the EditControl.
Dim canUndo as bool = Me.editControl1.CanUndo
' Indicates whether it is possible to Redo in the EditControl.
Dim canRedo as bool = Me.editControl1.CanRedo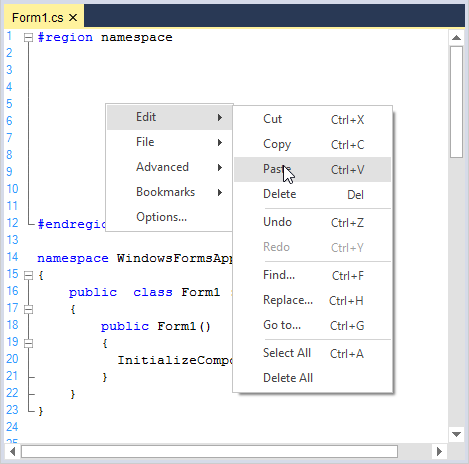
Grouping actions
Grouping actions allows you to specify a set of actions as groups for undo or redo purpose. When an action group is created and a set of actions is added to it, the entire set is considered as one entity. This implies that set of actions can be performed or undone by using the Redo or Undo function call. You can use the UndoGroupOpen, UndoGroupClose, and UndoGroupCancel functions to programmatically manipulate the undo or redo action grouping. Grouping is enabled by using the GroupUndo property of the EditControl. It specifies whether grouping should be enabled or disabled for undo or redo action or not.
| Property | Description |
|---|---|
| Specifies whether grouping should be enabled for undo or redo action or not. |
| Functions | Description |
|---|---|
| Begins a new action group. | |
| Performs undo operation. | |
| Performs redo operation. | |
| Helps to close the action group. |
// Enable grouping for Undo or Redo actions.

this.editControl1.GroupUndo = true;

// Invoke the UndoGroupOpen function to begin a new action group.

this.editControl1.UndoGroupOpen();

// Accomplish Undo operation.

this.editControl1.Undo();

// Accomplish Redo operation.

this.editControl1.Redo();

// Invoke the UndoGroupClose function to close the action group

this.editControl1.UndoGroupClose();
' Enable grouping for Undo or Redo actions.
Me.editControl1.GroupUndo = True
' Invoke the UndoGroupOpen function to begin a new action group.
Me.editControl1.UndoGroupOpen()
' Accomplish Undo operation.
Me.editControl1.Undo()
' Accomplish Redo operation.
Me.editControl1.Redo()
' Invoke the UndoGroupClose function to close the action group
Me.editControl1.UndoGroupClose()Reset undo redo buffer
ResetUndoInfo function in the EditControl helps to reset undo and redo operations. The following table explains this function.
| Functions | Description |
|---|---|
| ResetUndoInfo | Clear the undo buffer. So, the undo operation is not allowed on the contents or actions previously added or performed up to that point. |
NOTE
The undo or redo buffer is cleared after the ‘Save’ operation.
// Clears the Undo buffer.

this.editControl1.ResetUndoInfo();
' Clears the Undo buffer.
Me.editControl1.ResetUndoInfo()Discard undo redo buffer
You can discard an already opened action group by invoking UndoGroupCancel function in the EditControl.
// Helps to cancel an already open action group.

this.editControl1.UndoGroupCancel();
' Helps to cancel an already open action group.
Me.editControl1.UndoGroupCancel()NOTE
Refer to the following sample link that demonstrates the clipboard operations functionalities of the EditControl:
C:\Users\<User>\AppData\Local\Syncfusion\EssentialStudio\Version Number\Windows\Edit.Windows\Samples\Text Operations\Clipboard Operations
Selection modes
The EditControl supports normal selection and rectangular block selection to select the rectangular portion of text instead of whole line like Visual Studio code editor.
Default
This mode enables user to select whole line.
//To Enable Default mode.

this.editControl1.SelectionMode = Syncfusion.Windows.Forms.Edit.SelectionModes.Default;
'To Enable Default mode.
Me.editControl1.SelectionMode = Syncfusion.Windows.Forms.Edit.SelectionModes.Default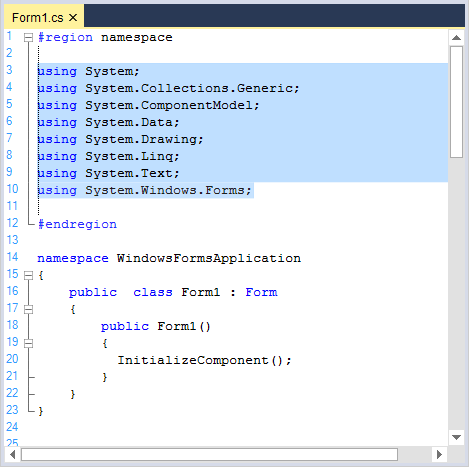
Programmatic selection
SelectAll, StartSelection, and StopSelection functions helps to programmatically select text in the EditControl.
// Selects all text in EditControl.

this.editControl1.SelectAll();
' Selects all text in EditControl.
Me.editControl1.SelectAll()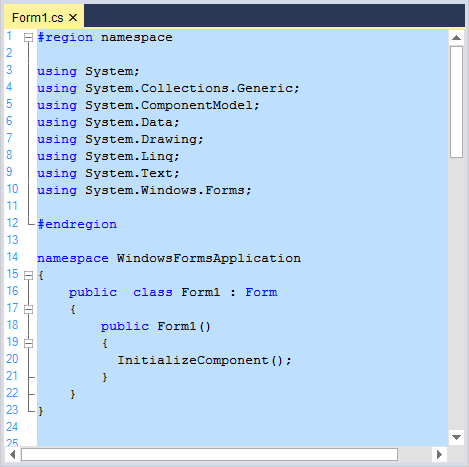
The following code snippet demonstrates how to select the text using StartSelection and StopSelection functions in the EditControl.
this.editControl1.StartSelection(1, 1);
this.editControl1.StopSelection(20, 20);Me.editControl1.StartSelection(1, 1)
Me.editControl1.StopSelection(20, 20)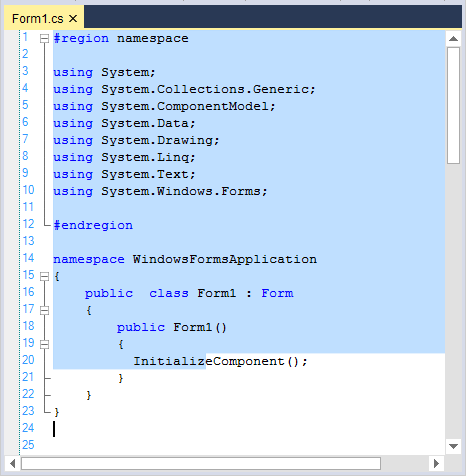
Block
This mode enables user to select a certain rectangle portion instead of whole line. The selection includes all characters captured in the rectangle defined by the first and last characters in the selection. Anything typed or pasted into the selected area is inserted at the same point on each line.
//To Enable Block selection mode.

this.editControl1.SelectionMode = Syncfusion.Windows.Forms.Edit.SelectionModes.Block;
'To Enable Block selection mode.
Me.editControl1.SelectionMode = Syncfusion.Windows.Forms.Edit.SelectionModes.Block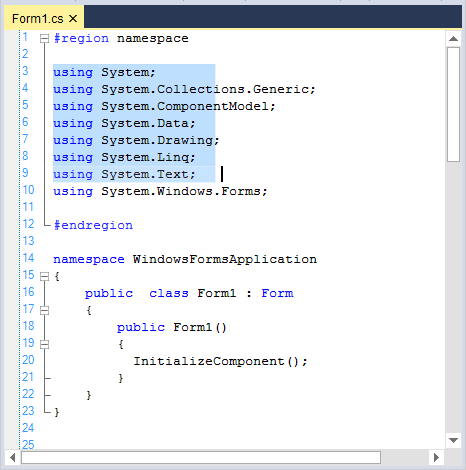
Text handling
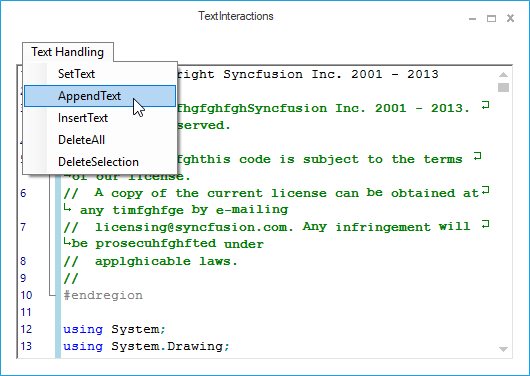
The EditControl offers support for text manipulation operations like appending, deleting, and inserting multiple lines of the text.
Total number of lines
The PhysicalLineCount property helps to find the total number of lines loaded in the EditControl.
Console.WriteLine(this.editControl1.PhysicalLineCount);Console.WriteLine(Me.editControl1.PhysicalLineCount)Visible number of lines
The VisibleLineCount property helps to find visible number of lines in the EditControl. It excludes lines in the collapsed block region.
Console.WriteLine(this.editControl1.VisibleLineCount);Console.WriteLine(Me.editControl1.VisibleLineCount)Append text
Text can be appended to the EditControl by using the following function.
| Functions | Description |
|---|---|
| Appends specified text to the end of the existing contents of the EditControl. |
// Appends the given string to the end of the text in EditControl.

this.editControl1.AppendText(" text to be appended ");
' Appends the given string to the end of the text in the EditControl.
Me.editControl1.AppendText(" text to be appended ")Insert text
Insert mode can be enabled in the EditControl by setting the InsertMode property. Its default value is true. Text can be inserted anywhere inside the EditControl by using the InsertText function. The mode of the INSERT key can be toggled by using the ToggleInsertMode function in the EditControl.
this.editControl1.InsertMode = true;

this.editControl1.InsertText(7, 5, "Inserting Text");

// Toggle the insert mode.

this.editControl1.ToggleInsertMode();Me.editControl1.InsertMode = True
Me.editControl1.InsertText(7, 5, "Inserting Text")
' Toggle the insert mode.
Me.editControl1.ToggleInsertMode()Insert multiple lines
Collection of text lines can be inserted by using the Lines property. The property is explained as follows.
| Property | Description |
|---|---|
| Lines | Lets you to specify multiple lines of text to the EditControl in the form of a string array. This feature is similar to the one in .NET RichTextBox control. |
// Specifies multiple lines of text to the EditControl in the form of a string array.

this.editControl1.Lines = new string[] {" first line ", " second line ", " third line "};
// Specifies multiple lines of text to the EditControl in the form of a string array.
Me.editControl1.Lines = new string[] {" first line ", " second line ", " third line "}Insert text based on conditions
Text can also be inserted based on condition using the following properties.
| Properties | Description |
|---|---|
| Specifies whether drag and drop operations are allowed for the control or not. | |
| Specifies whether inserting text should be allowed at the beginning of the readonly region at the start of new line or not. | |
| Specifies whether the outer file dragged and dropped onto the EditControl should be inserted into the current content. When this property is set to `false`, the current file is closed, and the dropped outer file is opened. | |
| Specifies whether the tab stops should be valued on inserting blocks of the text or not. | |
| Specifies whether the notification message is to be displayed when the outer file is dragged and dropped onto the EditControl or not. |
// Allows text insertion only at the beginning of the ReadOnly region at the start of a new line.

this.editControl1.AllowInsertBeforeReadonlyNewLine = true;

//To set the EditControl that allows to Drag and Dropping files

this.editControl1.AllowDrop = true;

// Specifies whether the outer file dragged and dropped onto the EditControl should be inserted into the current content.

this.editControl1.InsertDroppedFileIntoText = true;

// To hide the notification message displayed when the outer file is dragged and dropped onto the EditControl.

this.editControl1.ShowFileDropNotification = false;
' Allows text insertion only at the beginning of the ReadOnly region at the start of a new line.
Me.editControl1.AllowInsertBeforeReadonlyNewLine = True
'To set the EditControl that allows to Drag and Dropping files
Me.editControl1.AllowDrop = True
‘Specifies whether the outer file dragged and dropped onto the EditControl should be inserted into the current content.
Me.editControl1.InsertDroppedFileIntoText = True
' To hide the notification message displayed when the outer file is dragged and dropped onto the EditControl.
Me.editControl1.ShowFileDropNotification = FalseDelete text
Text can be deleted in the EditControl by using the following functions.
| Functions | Description |
|---|---|
| Deletes a character to the right of the current cursor position. | |
| Deletes a character to the left of the current cursor position. | |
| Deletes a word to the right of the current cursor position. | |
| Deletes a word to the left of the current cursor position. | |
| Deletes all text in the document. | |
| Deletes a specified text. |
// Deletes the character to the right of the cursor.

this.editControl1.DeleteChar();

// Deletes the character to the left of the cursor.

this.editControl1.DeleteCharLeft();

// Deletes a word to the right of the current cursor position.

this.editControl1.DeleteWord();

// Deletes a word to the left of the current cursor position.

this.editControl1.DeleteWordLeft();

// To delete all the text.

this.editControl1.DeleteAll();

// To delete a selection.

this.editControl1.DeleteText(this.editControl1.Selection.Top, this.editControl1.Selection.Bottom);
' Deletes the character to the right of the cursor.
Me.editControl1.DeleteChar()
' Deletes the character to the left of the cursor.
Me.editControl1.DeleteCharLeft()
' Deletes a word to the right of the current cursor position.
Me.editControl1.DeleteWord()
' Deletes a word to the left of the current cursor position.
Me.editControl1.DeleteWordLeft()
' Deletes all the text.
Me.editControl1.DeleteAll()
' Deletes a selection.
Me.editControl1.DeleteText(Me.editControl1.Selection.Top, Me.editControl1.Selection.Bottom)NOTE
Refer to the following sample link that demonstrates the above
Text Handlingfunctionalities of EditControl:
C:\Users\<User>\AppData\Local\Syncfusion\EssentialStudio\Version Number\Windows\Edit.Windows\Samples\Interactive Features\TextInteractions
Indent or outdent
Indentation support helps to format the source code to improve readability. By pressing TAB or SPACE key, the appropriate number of tabs or spaces will be added to the beginning of each line in the selected block. Similarly, when the SHIFT+TAB keys combination is pressed, the added tabs or spaces gets removed.
You can also set the tab size to the desired number of spaces by using the TabSize property in the EditControl. By default, the TabSize property value is set to 2.
// "n" is the integer value specifying the number of spaces.

this.editControl1.TabSize = n;
' "n" is the integer value specifying the number of spaces.
Me.editControl1.TabSize = nThe following functions are used to indent and outdent text in the EditControl.
| Functions | Description |
|---|---|
| Indents the text in a specified range. | |
| Indents the selected text. | |
| Outdent the text in a specified range. | |
| Outdent the selected text. |
// Indents text in the specified range.

this.editControl1.IndentText(new Point(5, 5), new Point(10, 10));

// Indents selected text.

this.editControl1.IndentSelection();

// Outdent text in the specified range.

this.editControl1.OutdentText(new Point(5, 5), new Point(10, 10));

// Outdent selected text.

this.editControl1.OutdentSelection();
' Indents text in the specified range.
Me.editControl1.IndentText(New Point(5, 5), New Point(10, 10))
' Indents selected text.
Me.editControl1.IndentSelection()
' Outdent text in the specified range.
Me.editControl1.OutdentText(New Point(5, 5), New Point(10, 10))
' Outdent selected text.
Me.editControl1.OutdentSelection()Default indentation
Indentation guidelines are vertical lines to connect the matching brackets. This feature can be enabled or disabled by setting the ShowIndentationGuidelines property. Its default value is true. To hide the indentation guidelines in the EditControl, turned off to false. The indent guideline for the current region can also be set by using the ShowIndentGuideline function.
// Indentation Guidelines are displayed.

this.editControl1.ShowIndentationGuidelines = true;

// Hide Indentation Guideline.

this.editControl1.HideIndentGuideline();

// Show Indentation Guideline.

this.editControl1.ShowIndentGuideline();
' Indentation Guidelines are displayed.
Me.editControl1.ShowIndentationGuidelines = True
' Hide Indentation Guideline.
Me.editControl1.HideIndentGuideline()
' Show Indentation Guideline.
Me.editControl1.ShowIndentGuideline()Positioning
Provides support to position the caret to the beginning or end of the indentation block by using the JumpToIndentBlockStart and JumpToIndentBlockEnd functions respectively.
this.editControl1.JumpToIndentBlockStart();

this.editControl1.JumpToIndentBlockEnd();Me.editControl1.JumpToIndentBlockStart()
Me.editControl1.JumpToIndentBlockEnd()Auto indentation
Provides advanced text indentation support to suit the requirements of the user. The properties given in the following table can be used to customize the auto indentation settings of the EditControl.
| Properties | Description |
|---|---|
| Specifies the mode of auto indentation with None, Block, and Smart options. | |
| Specifies a value that specifies whether the indent guideline should be shown automatically after the cursor repositioning or not. |
// Sets the AutoIntentMode.

this.editControl1.AutoIndentMode = Syncfusion.Windows.Forms.Edit.Enums.AutoIndentMode.None;
' Sets the AutoIntentMode.
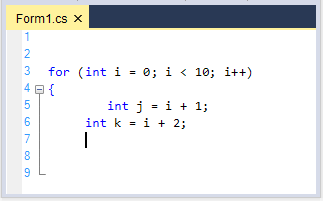
Me.editControl1.AutoIndentMode = Syncfusion.Windows.Forms.Edit.Enums.AutoIndentMode.NoneIf Enter is pressed when the AutoIndentMode is set to None, the text is not indented.
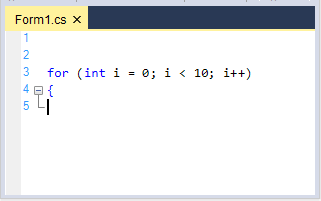
When the AutoIndentMode is set to Smart, the next line is indented by one TabSize from the first column of the previous line on pressing Enter.
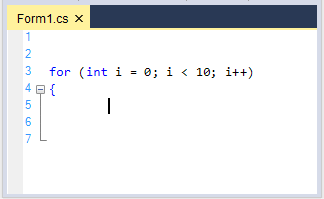
When the AutoIndentMode is set to Block, the next line begins at the same column as the previous line on pressing the ENTER key.
Lexem support for AutoIndent block mode
In the EditControl, the EnableSmartInBlockIndent property ensures the AutoIndent Block mode with respect to the lexem’s config.indent. With this property, the Block mode will work like Smart mode for conditional statements.
When this property is enabled, the lines will be aligned to the position of the previous indented line. The lines will begin at the original start position if disabled. The property is explained in the following table.
| Property | Description |
|---|---|
| EnableSmartInBlockIndent | Specifies a value to make the Block mode work like Smart mode for conditional statements |
// Specifies a value to make the Block mode work like Smart mode for conditional statements.

this.editcontrol1.EnableSmartInBlockIndent = true;
// Specifies a value to make the Block mode work like Smart mode for conditional statements.
Me.editcontrol1.EnableSmartInBlockIndent = TrueThe Auto Indentation characters can also be specified by setting the Indent field to True in the lexem definition of the configuration file, as shown below.
<lexem BeginBlock="{" EndBlock="}" Type="Operator" IsComplex="true" IsCollapsable="true" Indent="true" CollapseName="{...}" IndentationGuideline="true">Customize indent appearance
Indentation guidelines and bracket highlighting blocks can be customized by using the following properties.
| Properties | Description |
|---|---|
| Specifies color of the indent line. | |
| Specifies color of the indent start and end blocks. | |
| Specifies brush for the indentation block background. | |
| Specifies color of indentation block border line. | |
| Specifies style of the indentation block border line. | |
| Specifies whether the indentation block borders should be drawn or not. |
this.editControl1.IndentLineColor = Color.OrangeRed;

this.editControl1.IndentBlockHighlightingColor = Color.IndianRed;

this.editControl1.IndentationBlockBackgroundBrush = new Syncfusion.Drawing.BrushInfo(Syncfusion.Drawing.GradientStyle.BackwardDiagonal, System.Drawing.SystemColors.Info, System.Drawing.Color.Khaki);

this.editControl1.IndentationBlockBorderColor = System.Drawing.Color.Crimson;

this.editControl1.IndentationBlockBorderStyle = Syncfusion.Windows.Forms.Edit.Enums.FrameBorderStyle.DashDot;

this.editControl1.ShowIndentationBlockBorders = true;Me.editControl1.IndentLineColor = Color.OrangeRed
Me.editControl1.IndentBlockHighlightingColor = Color.IndianRed
Me.editControl1.IndentationBlockBackgroundBrush = New Syncfusion.Drawing.BrushInfo(Syncfusion.Drawing.GradientStyle.BackwardDiagonal, System.Drawing.SystemColors.Info, System.Drawing.Color.Khaki)
Me.editControl1.IndentationBlockBorderColor = System.Drawing.Color.Crimson
Me.editControl1.IndentationBlockBorderStyle = Syncfusion.Windows.Forms.Edit.Enums.FrameBorderStyle.DashDot
Me.editControl1.ShowIndentationBlockBorders = True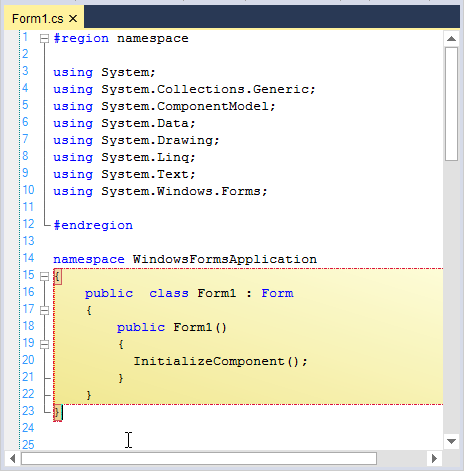
Commands
Provides extensive support for various commands same as Visual Studio code editor.
Default key commands
The keyboard shortcuts for the commands in the EditControl are listed as follows.
| Command | Shortcut |
|---|---|
| Clipboard | |
| Copy | CTRL+C, CTRL+INSERT |
| Paste | CTRL+V, SHIFT+INSERT |
| Cut | CTRL+X, SHIFT+DEL |
| SelectAll | CTRL+A |
| File Operation | |
| Save | CTRL+S |
| SaveAs | CTRL+SHIFT+S |
| New | CTRL+N |
| Open | CTRL+O |
| Printing | |
| CTRL+P | |
| PrintPreview | Printing.PrintPreview |
| Positioning | |
| Go to line | CTRL+G |
| Go to start | CTRL+HOME |
| Go to end | CTRL+END |
| Search and Replace | |
| Find | CTRL+F |
| FindNext | F3 |
| FindSelected | CTRL+F3 |
| Replace | CTRL+H |
| Undo and Redo | |
| Undo | CTRL+Z |
| Redo | CTRL+Y |
| Bookmark | |
| Toggle unnamed bookmark | CTRL+F2, CTRL+K->CTRL+K |
| Go to next bookmark | F2, CTRL+K->CTRL+N |
| Go to previous bookmark | F3, CTRL+K->CTRL+P |
| Toggle named bookmark | CTRL+[index of bookmark] |
| Go to named bookmark | CTRL+SHIFT+[index of bookmark] |
| Bookmark clear | Ctrl+Shift+F2 |
| Tab | |
| Add leading tab | TAB with multiple line selection |
| Remove leading tab | SHIFT+TAB |
| Outlining | |
| Switch on outlining and collapse all | CTRL+M->CTRL+O |
| Switch off outlining | CTRL+M->CTRL+P |
| Toggle outlining | CTRL+M->CTRL+M |
| WhiteSpace | |
| Show white space | CTRL+SHIFT+W |
| Intellisense | |
| Show context prompt | CTRL+SHIFT+SPACEBAR |
| Show context choice | CTRL+SPACEBAR |
The parent form of the EditControl can be closed while pressing Esc key when setting the AcceptsEscape property to false. Its default is true. This operation is performed only when the parent form contains Cancel button.
Performing user-defined action for default command
By using the RegisteringDefaultKeyBindings and ProcessCommand events, you can perform user-defined action for the default command. The following table contains the default command and respective string to use while adding it to commands in the EditControl.
| Command | String |
|---|---|
| Clipboard | |
| Copy | Clipboard.Copy |
| Paste | Clipboard.Paste |
| Cut | Clipboard.Cut |
| SelectAll | Edit.SelectAll |
| File Operation | |
| Save | File.Save |
| SaveAs | File.SaveAs |
| New | File.New |
| Open | File.Open |
| Printing | |
| Printing.Print | |
| Positioning | |
| Go to line | Edit.GoTo |
| Go to start | Navigation.DocumentStart |
| Go to end | Navigation.DocumentEnd |
| Search and Replace | |
| Find | Edit.Find |
| FindNext | Edit.FindNext |
| Replace | Edit.Replace |
| Undo and Redo | |
| Undo | Edit.Undo |
| Redo | Edit.Redo |
| Bookmark | |
| Toggle unnamed bookmark | Edit.Bookmarks.Toggle |
| Go to next bookmark | Edit.Bookmarks.Next |
| Go to previous bookmark | Edit.Bookmarks.Previous |
| Toggle named bookmark | Edit.Bookmarks.Toggle[index of bookmark] |
| Go to named bookmark | Edit.Bookmarks.Switch[index of bookmark] |
| Bookmark clear | Edit.Bookmarks.Clear |
| Tab | |
| Add leading tab | Edit.AddLeadingTab |
| Remove leading tab | Edit.RemoveLeadingTab |
| Outlining | |
| Switch on outlining and collapse all | Edit.Collapsing.On |
| Switch off outlining | Edit.Collapsing.Off |
| Toggle outlining | Edit.Collapsing.Toggle |
| Intellisense | |
| Show context prompt | Editor.ContextPrompt |
| Show code snippets | Editor.CodeSnippets |
| Show context choice | Editor.ContextChoice |
this.editControl1.RegisteringDefaultKeyBindings += new EventHandler(EditControl1_RegisteringDefaultKeyBindings);

// Performing some actions using the ProcessCommandEventHandler events while opening a new file in EditControl.

private void this.EditControl1_RegisteringDefaultKeyBindings(object sender, EventArgs e)
{

     this.editControl1.Commands.Add( "File.Open" ).ProcessCommand += new ProcessCommandEventHandler( Command_Open );

}

// Define the action that needs to be performed.

private void Command_Open()
{

      /* Do the desired task. */

}
AddHandler Me.editControl1.RegisteringDefaultKeyBindings, AddressOf EditControl1_RegisteringDefaultKeyBindings
// Performing some actions using the ProcessCommandEventHandler events while opening a new file in EditControl.
Private Sub Me.editControl1_RegisteringDefaultKeyBindings(ByVal sender As Object, ByVal e As EventArgs)
Me.editControl1.Commands.Add("File.Open").ProcessCommand += New ProcessCommandEventHandler(Command_Open)
End Sub
' Define the action that needs to be performed.
Private Sub Command_Open()
' Do the desired task.
End SubCustom command binding
By using the RegisteringKeyCommands event, you can bind the desired custom keystroke combinations to the desired command.
This following code example registers the “File.Open” command and binds a Ctrl+Q keystroke combination to it.
this.editControl1.RegisteringKeyCommands += new EventHandler(EditControl1_RegisteringKeyCommands);

// Bind custom key combinations to the action name using the RegisteringKeyCommands event.

private void this.EditControl1_RegisteringKeyCommands(object sender, EventArgs e)
{

      this.editControl1.KeyBinder.BindToCommand( Keys.Control | Keys.Q, "File.Open" );

}
AddHandler Me.editControl1.RegisteringKeyCommands, AddressOf EditControl1_RegisteringKeyCommands
' Bind custom key combinations to the action name using the RegisteringKeyCommands event.
Private Sub Me.EditControl1_RegisteringKeyCommands(ByVal sender As Object, ByVal e As EventArgs)
Me.editControl1.KeyBinder.BindToCommand(Keys.Control | Keys.Q, "File.Open")
End SubAccept tab
Provides support to insert the TAB character in the EditControl instead of moving the focus to the next control in the tab order while pressing TAB key. This functionalities can be enabled only when the UseTabs property is true.
| Properties | Description |
|---|---|
| Specifies whether the tab symbol is allowed or spaces should be used instead. Setting this property to `true` allows you to insert tabs whereas, setting to `false` allows you to insert spaces. | |
| Specifies a value that indicates whether tab stops should be used. | |
| Specifies an array of tab stops. |
this.editControl1.UseTabs = true;

this.editControl1.UseTabStops = true;

this.editControl1.TabStopsArray = new int[] { 8, 16, 24, 32, 40};Me.editControl1.UseTabs = True
Me.editControl1.UseTabStops = True
Me.EditControl1.TabStopsArray = New Integer() {8, 16, 24, 32, 40}Insert space or keep tabs
The following functions can be used to convert the spaces in a selected region into tabs and vice versa. Tab symbols can also be added, inserted, or removed from the selected text.
| Functions | Description |
|---|---|
| Adds leading tab symbol to the selected lines, or just inserts the tab symbol. | |
| Removes leading tab symbol (or its spaces equivalent) from the selected lines. |
// Add or insert leading tab symbol to selected lines.

this.editControl1.AddTabsToSelection();

// Remove leading tab symbol from selected lines.

this.editControl1.RemoveTabsFromSelection();
' Add or insert leading tab symbol to selected lines.
Me.editControl1.AddTabsToSelection()
' Remove leading tab symbol from selected lines.
Me.editControl1.RemoveTabsFromSelection()Keep tab character
The TransferFocusOnTab property allows you to specify whether the EditControl should process TAB key as a text input or transfer focus to the next control (by the order of TabIndex property value) on the form or the user control that hosts the EditControl.
// Insert tabs into the EditControl as text input.

this.editControl1.TransferFocusOnTab = false;

// Transfer focus to the next control.

this.editControl1.TransferFocusOnTab = true;
' Insert tabs into the EditControl as text input.
this.editControl1.TransferFocusOnTab = False
' Transfer focus to the next control.
this.editControl1.TransferFocusOnTab = TrueChange tab character size
The TabSize property helps to insert the number of spaces when pressing the TAB key. This functionality is enabled only when the UseTabs property in the EditControl is true.
// Size of the tab in terms of space.

this.editControl1.TabSize = 8;
' Size of the tab in terms of space.
Me.editControl1.TabSize = 8Context menu options
Provides a built-in context menu options to perform editing operations like undo, redo, cut, copy, paste, select all, and so on. It includes some advanced features like indent selection, comment selection, adding bookmarks, and much more.
Default context menu options
Context menu is enabled by using the editControl1.ContextMenuManager.Enabled property. The ContextMenu can be enabled or disabled by using the ContextMenuEnabled property in EditControl. Its default value is true.
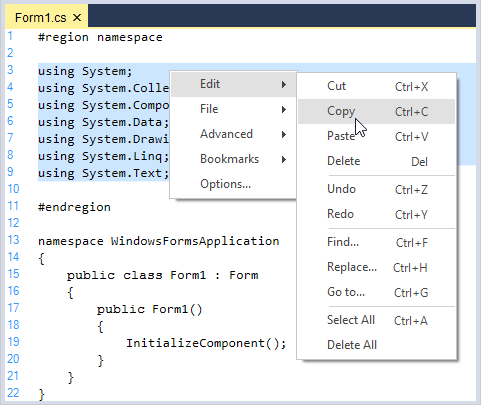
Set the appearance of the context menu by specifying the desired ContextMenuProvider.
// Show Office2003 style context menu.

this.editControl1.ContextMenuManager.ContextMenuProvider = new Syncfusion.Windows.Forms.Tools.XPMenus.XPMenusProvider();

// Show Standard style context menu.

this.editControl1.ContextMenuManager.ContextMenuProvider = new Syncfusion.Windows.Forms.StandardMenusProvider();
' Show Office2003 style context menu
Me.editControl1.ContextMenuManager.ContextMenuProvider = New Syncfusion.Windows.Forms.Tools.XPMenus.XPMenusProvider()
' Show Standard style context menu
Me.editControl1.ContextMenuManager.ContextMenuProvider = New Syncfusion.Windows.Forms.StandardMenusProvider()Remove default context menu
By using the MenuFill event in EditControl, you can remove the default context menu items.
// Handle the MenuFill event which is called each time the context menu is displayed.

this.editControl1.MenuFill += new EventHandler(cm_FillMenu);

private void cm_FillMenu(object sender, EventArgs e)
{

ContextMenuManager cm = (ContextMenuManager) sender;

// To clear default context menu items.

cm.ClearMenu();

}
' Handle the MenuFill event which is called each time the context menu is displayed.
AddHandler Me.editControl1.MenuFill, AddressOf cm_FillMenu
Private Sub cm_FillMenu(ByVal sender As Object, ByVal e As EventArgs)
Dim cm As ContextMenuManager = CType(sender, ContextMenuManager)
' To clear default context menu items.
cm.ClearMenu();Disable particular item from context menu
Context menu item can be disabled by using the SetContextMenuItemEnabled function by passing the following parameters:
- String: Setting ContextMenuItem name by preceding &.
- Bool: Setting the bool value to
trueorfalse.
private void EditControl1_MenuFill(object sender, EventArgs e)
  {
      ContextMenuManager contextMenu = (ContextMenuManager)sender;

      contextMenu.ContextMenuProvider.SetContextMenuItemEnabled("&Edit", false);

  }
Private Sub EditControl1_MenuFill(ByVal sender As Object, ByVal e As EventArgs)
Dim contextMenu As ContextMenuManager = CType(sender, ContextMenuManager)
contextMenu.ContextMenuProvider.SetContextMenuItemEnabled("&Edit", False)
End Sub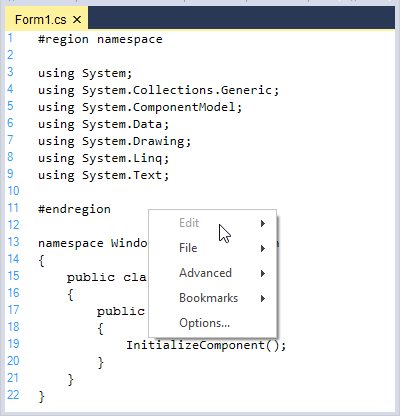
Change shortcut key for context menu options
By using the RegisteringKeyCommands event, you can change the shortcut key for context menu options.
This following code example registers the “Clipboard.Cut” command and binds a Ctrl+L keystroke combination to it.
this.editControl1.RegisteringKeyCommands += new EventHandler(EditControl1_RegisteringKeyCommands);

// Bind custom key combinations to the action name using the RegisteringKeyCommands event.

private void this.EditControl1_RegisteringKeyCommands(object sender, EventArgs e)
{

      this.editControl1.KeyBinder.BindToCommand(Keys.Control | Keys.L, "Clipboard.Cut");

}
AddHandler Me.editControl1.RegisteringKeyCommands, AddressOf EditControl1_RegisteringKeyCommands
' Bind custom key combinations to the action name using the RegisteringKeyCommands event.
Private Sub Me.EditControl1_RegisteringKeyCommands(ByVal sender As Object, ByVal e As EventArgs)
Me.editControl1.KeyBinder.BindToCommand(Keys.Control | Keys.L, "Clipboard.Cut")
End SubNOTE
Refer to the respective command string in the Commands section.
Add custom context menu item
EditControl also provides an extensive support to add the custom context menu items. You can handle the MenuFill event to add Menu Items to the context menu. This is illustrated in the below code snippet.
// Handle the MenuFill event which is called each time the context menu is displayed.

this.editControl1.MenuFill += new EventHandler(cm_FillMenu);

private void cm_FillMenu(object sender, EventArgs e)
{

ContextMenuManager cm = (ContextMenuManager) sender;

// Add a separator.

cm.AddSeparator();

// Add custom context menu items and their Click event handlers.

cm.AddMenuItem("&Find", new EventHandler(ShowFindDialog));
cm.AddMenuItem("&Replace", new EventHandler(ShowReplaceDialog));
cm.AddMenuItem("&Goto", new EventHandler(ShowGoToDialog));

// If you need to get access to the underlying menu provider you can access it using the below given code.

Syncfusion.Windows.Forms.IContextMenuProvider contextMenuProvider = this.editControl1.ContextMenuManager.ContextMenuProvider;

}

// Calling the in-built dialogs.
void ShowFindDialog(object sender, EventArgs e)
{
   this.editControl1.ShowFindDialog();
}

void ShowReplaceDialog(object sender, EventArgs e)
{
   this.editControl1.ShowReplaceDialog();
}

void ShowGoToDialog(object sender, EventArgs e)
{
   this.editControl1.ShowGoToDialog();
}
' Handle the MenuFill event which is called each time the context menu is displayed.
AddHandler Me.editControl1.MenuFill, AddressOf cm_FillMenu
Private Sub cm_FillMenu(ByVal sender As Object, ByVal e As EventArgs)
Dim cm As ContextMenuManager = CType(sender, ContextMenuManager)
' Add a separator.
cm.AddSeparator()
' Add custom context menu items and their Click eventhandlers.
cm.AddMenuItem("&Find", New EventHandler(AddressOf ShowFindDialog))
cm.AddMenuItem("&Replace", New EventHandler(AddressOf ShowReplaceDialog))
cm.AddMenuItem("&Goto", New EventHandler(AddressOf ShowGoToDialog))
' If you need to get access to the underlying menu provider you can access it using the below given code.
Dim contextMenuProvider As Syncfusion.Windows.Forms.IContextMenuProvider = Me.editControl1.ContextMenuManager.ContextMenuProvider
End Sub 'cm_FillMenu
' Calling the in-built dialogs.
Sub ShowFindDialog(ByVal sender As Object, ByVal e As EventArgs)
Me.editControl1.FindDialog()
End Sub
Sub ShowReplaceDialog(ByVal sender As Object, ByVal e As EventArgs)
Me.editControl1.ReplaceDialog()
End Sub
Sub ShowGoToDialog(ByVal sender As Object, ByVal e As EventArgs)
Me.editControl1.GoToDialog()
End Sub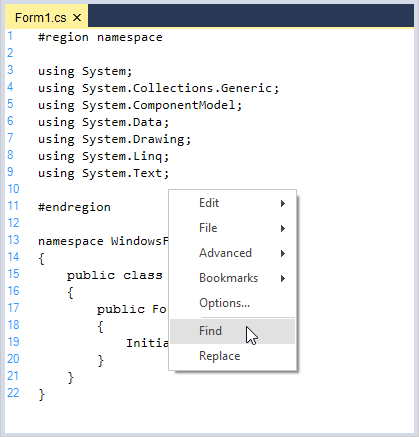
Line modification marker
The EditControl tracks the changed lines by displaying markers at the beginning of modified or inserted lines after the last file save operation. Changed lines marking feature can be enabled by setting the MarkChangedLines property to true. To enable this functionality in the EditControl, the ShowSelectionMargin property should also be enabled.
this.editControl1.MarkChangedLines = true;

this.editControl1.ShowSelectionMargin = true;Me.editControl1.MarkChangedLines = True
Me.editControl1.ShowSelectionMargin = true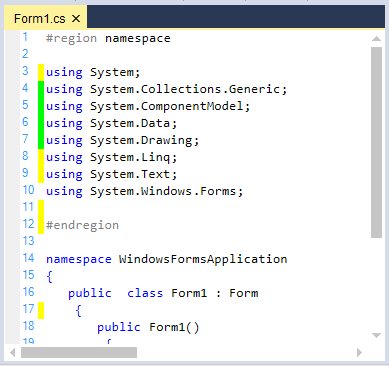
Modified line marker color
The ChangedLinesMarkingLineColor property helps to customize the color for changed lines in the EditControl.
this.editControl1.ChangedLinesMarkingLineColor = Color.Red;Me.editControl1.ChangedLinesMarkingLineColor = Color.Red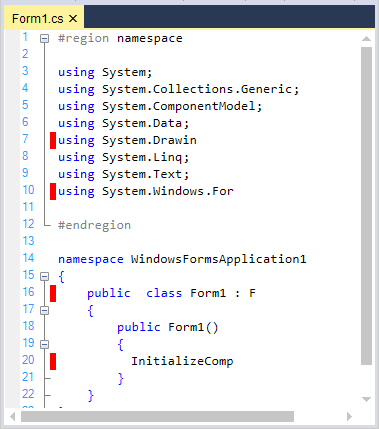
Saved line marker color
The SavedLinesMarkingLineColor property helps to customize the color for saved lines in the EditControl.
this.editControl1.SavedLinesMarkingLineColor = Color.Orange;Me.editControl1.SavedLinesMarkingLineColor = Color.Orange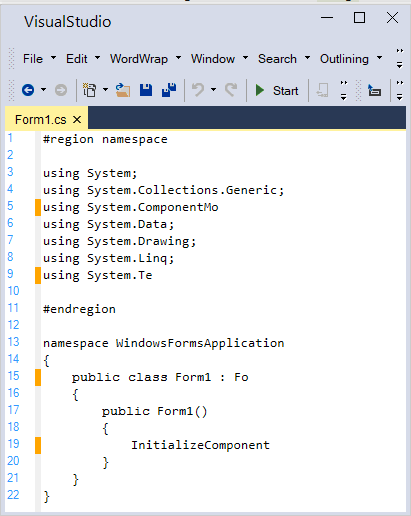
Comment out lines
Provides support for commenting and uncommenting a particular or group of lines. Comments can be set for a single line, selected text, and for text within a specified range by using the following functions.
| Functions | Description |
|---|---|
| Comments single line. | |
| Comments selected text. | |
| Comments text in a specified range. |
this.editControl1.CommentLine(1);

this.editControl1.CommentSelection();

this.editControl1.CommentText(new Point(1, 1), new Point(7, 7));Me.editControl1.CommentLine(1)
Me.editControl1.CommentSelection()
Me.editControl1.CommentText(New Point(1, 1), New Point(7, 7))Comments can be removed by using the following functions.
| Functions | Description |
|---|---|
| UnComments single line. | |
| UnComments selected text. | |
| UnComments text in a specified range. |
this.editControl1.UnCommentLine();

this.editControl1.UncommentSelection();

this.editControl1.UncommentText(new Point(1, 1), new Point(7, 7));Me.editControl1.UnCommentLine()
Me.editControl1.UncommentSelection()
Me.editControl1.UncommentText(New Point(1, 1), New Point(7, 7))))New line styles
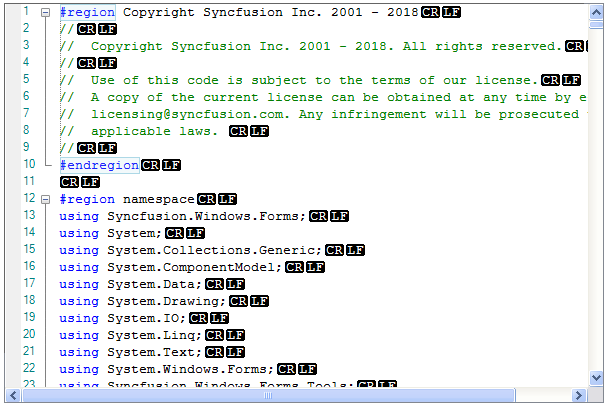
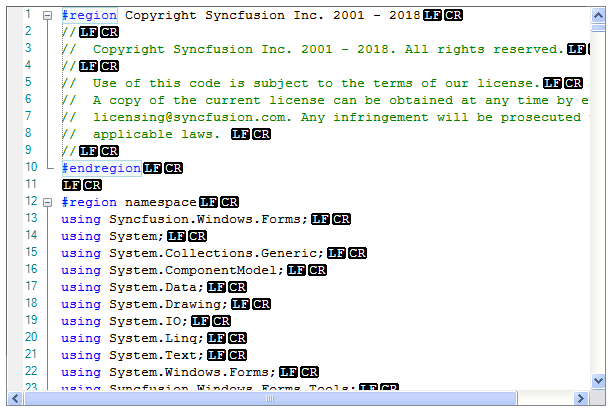
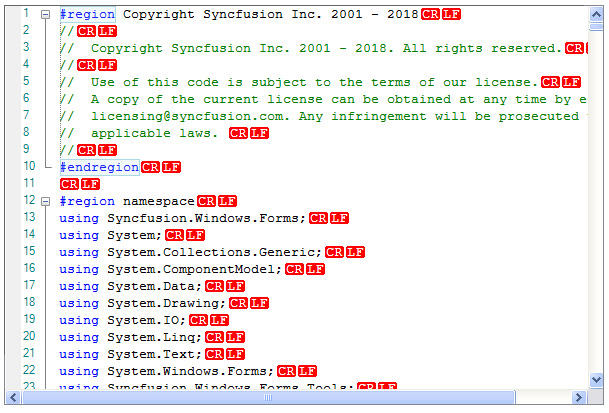
The EditControl allows you to specify a end of line style, or get the currently used end of line style in the text. The SetNewLineStyle method sets the current end of line style in the EditControl. The SetNewLineStyle method accepts values from the NewLineStyle enumerator which has values like Windows, Mac, Unix, and Control. Similarly, the GetNewLineStyle method returns a NewLineStyle enumerator value which indicates the currently used end of line style in the EditControl.
Changing the default end of line style
The DefaultNewLineStyle property is used to apply the end of line style when loading an existing document or creating a new document in the EditControl. The default value of the DefaultNewLineStyle property is Control.
using System;
using System.Drawing;
using System.Windows.Forms;
using Syncfusion.Windows.Forms.Tools;

namespace Edit_demos
{
    public partial class Form1 : Form
    {
        private Syncfusion.Windows.Forms.Edit.EditControl editControl1;
        public Form1()
        {
            InitializeComponent();
            this.editControl1 = new Syncfusion.Windows.Forms.Edit.EditControl();
            this.editControl1.Location = new Point(20, 100);
            this.editControl1.Size = new Size(600, 400);
            this.editControl1.ShowEndOfLine = true;
            this.editControl1.DefaultNewLineStyle = Syncfusion.IO.NewLineStyle.Windows;
            this.editControl1.LoadFile();
            this.Controls.Add(editControl1);
        }
    }
}
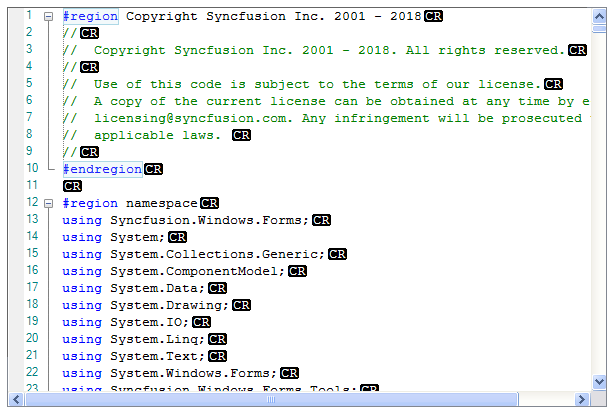
Changing end of line style at runtime
The EditControl allows to change the end of line style at run time by using the SetNewLineStyle method.
using System;
using System.Drawing;
using System.Windows.Forms;
using Syncfusion.Windows.Forms.Tools;

namespace Edit_demos
{
    public partial class Form1 : Form
    {
        private Syncfusion.Windows.Forms.Edit.EditControl editControl1;
        private Syncfusion.Windows.Forms.Tools.ComboBoxAdv comboboxAdv1;
        public Form1()
        {
            InitializeComponent();
            this.editControl1 = new Syncfusion.Windows.Forms.Edit.EditControl();
            this.editControl1.Location = new Point(20, 100);
            this.editControl1.Size = new Size(600, 400);
            this.editControl1.ShowEndOfLine = true;
            this.editControl1.LoadFile();
            this.Controls.Add(editControl1);

            comboboxAdv1 = new Syncfusion.Windows.Forms.Tools.ComboBoxAdv();
            this.comboboxAdv1.Location = new System.Drawing.Point(24, 118);
            this.comboboxAdv1.Size = new Size(120, 80);
            this.comboboxAdv1.Items.Add("Windows");
            this.comboboxAdv1.Items.Add("Mac");
            this.comboboxAdv1.Items.Add("Unix");
            this.comboboxAdv1.Items.Add("Control");
            this.comboboxAdv1.SelectedIndexChanged += ComboboxAdv1_SelectedIndexChanged;
            this.Controls.Add(this.comboboxAdv1);
        }

        private void ComboboxAdv1_SelectedIndexChanged(object sender, EventArgs e)
        {
            if((sender as ComboBoxAdv).SelectedIndex == 0)
                editControl1.SetNewLineStyle(Syncfusion.IO.NewLineStyle.Windows);
            else if ((sender as ComboBoxAdv).SelectedIndex == 1)
                editControl1.SetNewLineStyle(Syncfusion.IO.NewLineStyle.Mac);
            else if ((sender as ComboBoxAdv).SelectedIndex == 2)
                editControl1.SetNewLineStyle(Syncfusion.IO.NewLineStyle.Unix);
            else if ((sender as ComboBoxAdv).SelectedIndex == 3)
                editControl1.SetNewLineStyle(Syncfusion.IO.NewLineStyle.Control);
        }
    }
}
Show or hide the end of line
The EditControl allows to show or hide the end of line style characters by using the ShowEndOfLine property. The default value of ShowEndOfLine property is false
using System;
using System.Drawing;
using System.Windows.Forms;
using Syncfusion.Windows.Forms.Tools;

namespace Edit_demos
{
    public partial class Form1 : Form
    {
        private Syncfusion.Windows.Forms.Edit.EditControl editControl1;
        public Form1()
        {
            InitializeComponent();
            this.editControl1 = new Syncfusion.Windows.Forms.Edit.EditControl();
            this.editControl1.Location = new Point(20, 100);
            this.editControl1.Size = new Size(600, 400);
            this.editControl1.ShowEndOfLine = true;
            this.editControl1.LoadFile();
            this.Controls.Add(editControl1);
        }
    }
}
Appearance customization
The backcolor and fore color of the end of line characters can be customized by using the EndOfLineBackColor and EndOfLineForeColor properties.
using System;
using System.Drawing;
using System.Windows.Forms;
using Syncfusion.Windows.Forms.Tools;

namespace Edit_demos
{
    public partial class Form1 : Form
    {
        private Syncfusion.Windows.Forms.Edit.EditControl editControl1;
        public Form1()
        {
            InitializeComponent();
            this.editControl1 = new Syncfusion.Windows.Forms.Edit.EditControl();
            this.editControl1.Location = new Point(20, 100);
            this.editControl1.Size = new Size(600, 400);
            this.editControl1.ShowEndOfLine = true;
            this.editControl1.DefaultNewLineStyle = Syncfusion.IO.NewLineStyle.Windows;
            this.editControl1.EndOfLineBackColor = Color.Red;
            this.editControl1.EndOfLineForeColor = Color.White;
            this.editControl1.LoadFile();
            this.Controls.Add(editControl1);
        }
    }
}
Note: View sample in GitHub
Space indicators
The EditControl has the ability to indicate whitespace in its contents with default indicators explained as follows:
- Single spaces are indicated by using dots.
- Tabs are indicated by using right arrows.
- Line feeds are indicated by using a special line feed symbol.
Configure the space indicator
You can configure the whitespace indicators by setting the ShowWhiteSpaces property to true. By default, this property is set to false.
| Property | Description |
|---|---|
| ShowWhiteSpaces | Specifies value indicating whether whitespace should be shown as special symbols or not. |
You can also toggle the visibility of the whitespace indicators by using the ToggleShowingWhiteSpaces function.
// Enabling white space indicators.

this.editControl1.ShowWhitespaces = true;

// Toggle the visibility of the white space indicators.

this.editControl1.ToggleShowingWhiteSpaces();
' Enabling white space indicators.
Me.editControl1.ShowWhitespaces = True
' Toggle the visibility of the white space indicators.
Me.editControl1.ToggleShowingWhiteSpaces()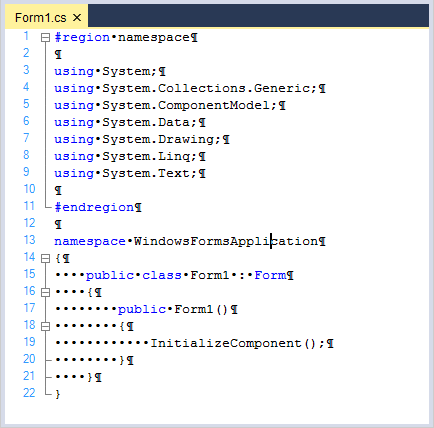
Showing or hiding indicators
You can selectively show or hide the whitespace indicators by using the following sub-properties of the WhiteSpaceIndicators property: ShowSpaces, ShowTabs, and ShowNewLines.
| Properties | Description |
|---|---|
| Indicates whether spaces should be replaced with symbols or not. | |
| Indicates whether tabs should be replaced with symbols or not. | |
| Indicates whether new lines should be replaced with symbols or not. |
// Custom indicator for Line Feed.

this.editControl1.WhiteSpaceIndicators.ShowSpaces = true;

// Custom indicator for Tab.

this.editControl1.WhiteSpaceIndicators.ShowTabs = true;

// Custom indicator for Space Character.

this.editControl1.WhiteSpaceIndicators.SpaceNewLines = true;
' Custom indicator for Line Feed.
Me.editControl1.WhiteSpaceIndicators.ShowSpaces = True
' Custom indicator for Tab.
Me.editControl1.WhiteSpaceIndicators.ShowTabs = True
' Custom indicator for Space Character.
Me.editControl1.WhiteSpaceIndicators.SpaceNewLines = TrueSpace indicator character
You can also set the indicators to indicate single spaces, tabs, and line feeds by using the NewLineString, TabString, and SpaceChar sub-properties of the WhiteSpaceIndicators property as follows.
| Properties | Description |
|---|---|
| Specifies the string that represents line feed in WhiteSpace mode. | |
| Specifies the string that represents Tab in WhiteSpace mode. | |
| Specifies the character that represents line feed in WhiteSpace mode. |
// Custom indicator for Line Feed.

this.editControl1.WhiteSpaceIndicators.NewLineString = "LF";

// Custom indicator for Tab.

this.editControl1.WhiteSpaceIndicators.TabString = "TAB";

// Custom indicator for Space Character.

this.editControl1.WhiteSpaceIndicators.SpaceChar = "s";
' Custom indicator for Line Feed.
Me.editControl1.WhiteSpaceIndicators.NewLineString = "LF"
' Custom indicator for Tab.
Me.editControl1.WhiteSpaceIndicators.TabString = "TAB"
' Custom indicator for Space Character.
Me.editControl1.WhiteSpaceIndicators.SpaceChar = "s"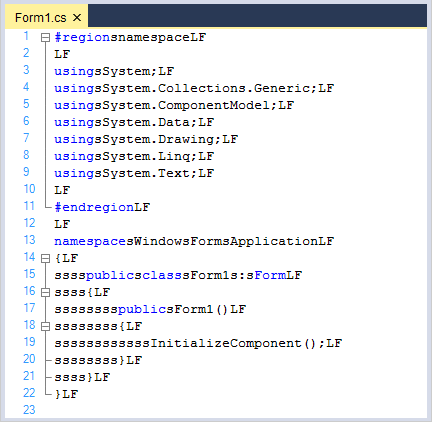
Unicode
Unicode is a standard used to encode all the languages of the world in computers. All Unicode text is saved in UTF-8 format by default. It also supports other text encoding formats specified in the System.Text.Encoding class like ASCII, UTF7, UTF8, and BigEndianUnicode.
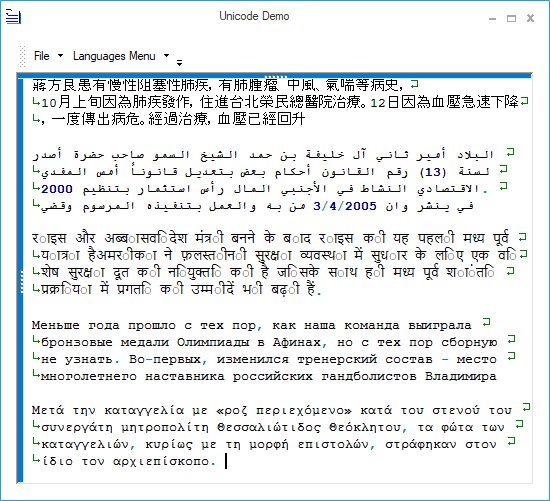
The following screenshot illustrates the use of Chinese, Arabic, Hindi, Russian, and Greek text in the EditControl.
NOTE
Refer to the following sample link that demonstrates the
Unicodesupport in EditControl:
C:\Users\<User>\AppData\Local\Syncfusion\EssentialStudio\Version Number\Windows\Edit.Windows\Samples\Text Operations\Unicode