Localization of Syncfusion® WF Controls
28 Jan 202521 minutes to read
Localization is the process of making application multilingual by formatting the content according to the cultures. This involves configuring the application for a specific language. Culture is the combination of language and location. For example, en-US is the culture for English spoken in United States; en-GB is the culture for English spoken in Great Britain.
Syncfusion® components support localization and have their own neutral resources. These resources can be localized as per the customer requirement and they can be localized in three ways are,
- Using ILocalizationProvider
- Using Satellite Assemblies
- Using .resx file
Using ILocalizationProvider
The following procedure helps to localize the FindDialogBox in the Edit Control:
-
Include the required namespaces at the beginning of the source file.
using Syncfusion.Windows.Forms;
using Syncfusion.Windows.Forms.Edit;
Imports Syncfusion.Windows.Forms Imports Syncfusion.Windows.Forms.Edit -
Create a class that implements the ILocalizationProvider interface defined in the Syncfusion.Windows.Forms namespace in the Syncfusion.Shared.Base.dll.
-
Return the localized versions of the strings corresponding to the string identifiers.
-
String identifiers are defined in the
ResourceIdentifiersand theEditResourceIdentifiersclasses in Syncfusion.Shared.Base and Syncfusion.Edit.Windows assemblies respectively.using Syncfusion.Windows.Forms.Localization.Localizer.EditResourceIdentifiers; using Syncfusion.Windows.Forms.ResourceIdentifiers;Imports Syncfusion.Windows.Forms.Localization.Localizer.EditResourceIdentifiers Imports Syncfusion.Windows.Forms.ResourceIdentifiers -
Leave an empty string for the rest of the identifiers that are not involved in the localization. These identifiers are loaded with a default value.
-
Assign this instance to the
Providerproperty of theLocalizationProviderclass before the InitializeComponent call in the constructor of the application.LocalizationProvider.Provider = new Localizer();LocalizationProvider.Provider = New Localizer() -
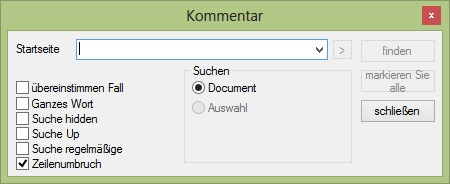
The following code example is a reference to assign Localization string
public string GetLocalizedString(System.Globalization.CultureInfo culture, string name,object obj)
{
    switch (name)
    {
        case Localizer.EditResourceIdentifiers.FDbtnClose:
             return "schließen";
        case Localizer.EditResourceIdentifiers.FDbtnFind:
             return "finden";
        case Localizer.EditResourceIdentifiers.FDbtnMarkAll:
             return "markieren Sie alle";
        case Localizer.EditResourceIdentifiers.FDchkCase:
             return "übereinstimmen Fall";
        case Localizer.EditResourceIdentifiers.FDchkHidden:
             return "Suche hidden";
        case Localizer.EditResourceIdentifiers.FDchkRegular:
             return "Suche regelmäßige";
        case Localizer.EditResourceIdentifiers.FDchkUp:
             return "Suche Up";
        case Localizer.EditResourceIdentifiers.FDchkWholeWord:
             return "Ganzes Wort";
        case Localizer.EditResourceIdentifiers.FDchkWrap:
             return "Zeilenumbruch";
        case Localizer.EditResourceIdentifiers.FDGroupTitle:
             return "Suchen";
        case Localizer.EditResourceIdentifiers.FDMain:
             return "Startseite";
        case Localizer.EditResourceIdentifiers.FDrdbDocument:
             return "Document";
        case Localizer.EditResourceIdentifiers.FDrdbSelection:
             return "Auswahl";
        case Localizer.EditResourceIdentifiers.FDTitle:
             return "Kommentar";
        default:
             return string.Empty;
    }
}
Public Function GetLocalizedString(ByVal culture As System.Globalization.CultureInfo, ByVal name As String, ByVal obj As Object) As String Select Case name Case Localizer.EditResourceIdentifiers.FDbtnClose Return "schließen" Case Localizer.EditResourceIdentifiers.FDbtnFind Return "finden" Case Localizer.EditResourceIdentifiers.FDbtnMarkAll Return "markieren Sie alle" Case Localizer.EditResourceIdentifiers.FDchkCase Return "übereinstimmen Fall" Case Localizer.EditResourceIdentifiers.FDchkHidden Return "Suche hidden" Case Localizer.EditResourceIdentifiers.FDchkRegular Return "Suche regelmäßige" Case Localizer.EditResourceIdentifiers.FDchkUp Return "Suche Up" Case Localizer.EditResourceIdentifiers.FDchkWholeWord Return "Ganzes Wort" Case Localizer.EditResourceIdentifiers.FDchkWrap Return "Zeilenumbruch" Case Localizer.EditResourceIdentifiers.FDGroupTitle Return "Suchen" Case Localizer.EditResourceIdentifiers.FDMain Return "Startseite" Case Localizer.EditResourceIdentifiers.FDrdbDocument Return "Document" Case Localizer.EditResourceIdentifiers.FDrdbSelection Return "Auswahl" Case Localizer.EditResourceIdentifiers.FDTitle Return "Kommentar" Case Else Return String.Empty End Select End Function
Using Satellite Assemblies
Localization is a key feature for providing solutions to global customers. This is true for desktop applications as well as Syncfusion® components. Resources are important for localizing an application as they contain the necessary settings for different languages and cultures. Here Internationalization and localization are different but related concepts.
• Internationalization: Ensuring an application can handle resources (For example, strings) in a language-specific fashion. Internationalization is also known as i18n.
• Localization: Also known as l10n. Localization is the process of customizing an application for specific cultures or regions. It is the adaptation of language, content, and design to reflect the local cultural sensitivities.
Types of cultures
• Invariant: An invariant culture is always culture-insensitive primarily used as a “default” culture and helps to specify the invariant culture with name by using an empty string (“”). It is associated with the English language but not with any particular country or region.
• Neutral: A neutral culture is a culture that is associated with a language but not with a country or region.
• Specific: A specific culture is a culture that is associated with a language and a country or region like, fr-CA and fr-FR. For example, fr is a neutral culture and fr-FR is a specific culture. Note that zh-CHS (simplified Chinese) and zh-CHT (traditional Chinese) are neutral cultures.
Steps to Localize Syncfusion® Components
Syncfusion® components have their own neutral resources, and these resources can be localized as per the needs of the customer. The steps for localizing the Syncfusion® Menu Package are as follows.
-
The neutral resources of every Syncfusion® component are present in the Localization folder of each component’s source code. For the Tools package, the resources are present in the following path assuming that “C:\Program Files\” is the installation path for the Syncfusion® components.
• For Tools.Windows: C:\Program Files\Syncfusion\Essential Studio\34.1.29\Windows\Tools.Windows\Localization\
• For Shared.Base: C:\Program Files\Syncfusion\Essential Studio\34.1.29\Base\Shared.Base\Localization
NOTE
In above section, Latest Essential Studio® version details has been provided. User can refer installed Essential Studio® version instead of mentioned version.
-
Inside the NeutralResources folder, there are four resource files corresponding to the Tools package. These resources contain the string representations for the English culture, both default and neutral.
-
Microsoft Visual Studio.NET ships with a tool called Resource Editor (ResEditor) that can be used to localize the string resources. It provides a graphical interface that allows to construct resource files containing bitmaps, icons, and strings.
-
Compile the source code by using the build.bat command in the Microsoft Visual Studio 2008 Command prompt. The following figure shows how the Resource Editor looks when it first opens.
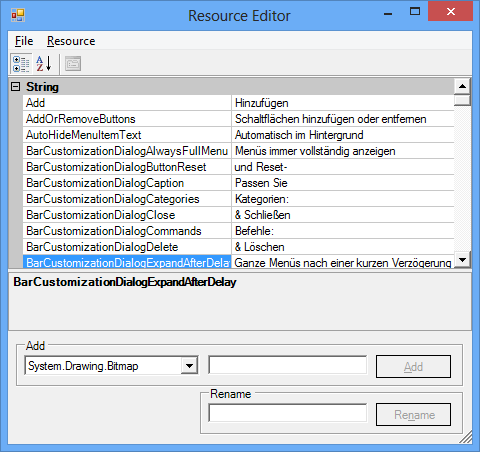
-
By using the Resource Editor, open the resource file, Syncfusion.Windows.Forms.Tools.SR.resources present in the NeutralResources folder. The previous figure shows all string resources displayed in the tool.
-
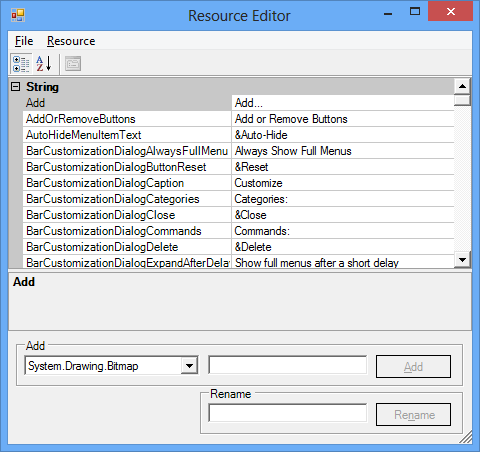
Now, the actual process for localization begins. After opening the resource file in the Resource Editor, start entering the equivalent strings for the required culture. In this example, the German language is used. In the following figure, all the English strings are replaced by their German equivalent. For instance, the German equivalent of Close is “Ended”.
-
Open the Visual Studio.NET command prompt and enter WinRes to open the Windows Resource Localization Editor. WinRes is used to work with Windows Forms resources. The Resource Editor tool cannot be used to edit Windows Forms resources. It can only be used to work with images and string-based resources.
-
Open the other resources by using the WinRes utility and replace the English strings with the German equivalent. The following figure shows the file Syncfusion.Windows.Forms.Tools.XPMenus.CustomizationPanel.resources open in the WinRes tool and with German text. The German text has been added to the form by using the Properties window.

-
Click File -> Save As and select the culture to be localized. In this case, German-Germany. Now, a new resource file with the name
Syncfusion.Windows.Forms.Tools.XPMenus.CustomizationPanel.de-DE.resourcesis added to the source path. -
Repeat the process for other resources and save it. Now, in the Visual Studio.NET Command Prompt, enter the following command and press Enter. Make sure that sf.public snk file is available from the Localization folder.
For Tools.Windows
al /t:lib /culture:de-DE /out:Syncfusion.Tools.Windows.resources.dll /v:19.1.0.54 /delay+ /keyf:sf.publicsnk /embed:Syncfusion.Windows.Forms.Tools.XPMenus.CustomizationPanel.de-DE.resources /embed:Syncfusion.Windows.Forms.MdiWindowDialog.de-DE.resources /embed:Syncfusion.Windows.Forms.Tools.SR.de-DE.resources /embed:Syncfusion.Windows.Forms.Tools.XPMenus.BarCustomizationDialog.de-DE.resourcesFor Shared.Base
   <div class="tabs">

   <ul class="nav nav-tabs" role="tablist">

   <li role="presentation" class=""><a data-target="#oh3jyz3bt5lsozlzpnh5scai0azccova-console" aria-controls="home" role="tab" data-toggle="tab" data-tab-name="CONSOLE" data-original-lang="console">CONSOLE</a></li>

   </ul>

   <div class="tab-content">


   <div role="tabpanel" class="tab-pane" id="oh3jyz3bt5lsozlzpnh5scai0azccova-console" data-original-lang = "console" ><div class="highlight"><pre><code class="prettyprint language-console" data-lang="console"><span></span><span class="go">al /t:lib /culture:de-DE /out:Syncfusion.Shared.Base.resources.dll /v:19.1.0.54 /delay+ /keyf:sf.publicsnk /embed: Syncfusion.Windows.Forms.Localization.SR.de-DE</span></code></pre></div>
   </div>


   </div>

   </div>
-
On successful execution, an assembly file, Syncfusion.Tools.Windows.resources.dll is created.
-
Finally, mark this satellite assembly for verification skipping since, it is not signed with the same strong-name as the product assembly as follows:
sn –Vr Syncfusion.Tools.Windows.resources.dll-
Drop this assembly into an appropriate sub-directory under .EXE’s directory (bin\Debug), based on the naming conventions enforced in .NET. and it can placed in the
de-DEsub-directory when this assembly contains resources from the German (Germany) culture. -
Finally, application can refer German resources during runtime by using the following code example. To change the UI culture of the current thread, add this code in the Forms constructor before the
InitializeComponent().
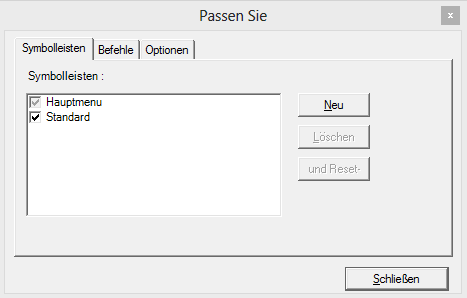
Thread.CurrentThread.CurrentUICulture = new System.Globalization.CultureInfo("de-DE");Thread.CurrentThread.CurrentUICulture = New System.Globalization.CultureInfo("de-DE")- Now, Run the application that contains the Syncfusion® Toolbar and Menu controls and open the Customization dialog. The dialog appears in German as shown in the following figure:
Localize Syncfusion® Windows Forms control using .resx file
You can localize the Syncfusion® Windows Forms Controls by adding resource file for each language.
Changing application culture
When you are changing the application culture, then you can localize the application based on application culture by creating .resx file.
public partial class Form1 : Form
{
    public Form1()
    {
        Thread.CurrentThread.CurrentCulture = new System.Globalization.CultureInfo("de-DE");
        Thread.CurrentThread.CurrentUICulture = new System.Globalization.CultureInfo("de-DE");
        InitializeComponent();
    }
}
Partial Public Class Form1
Inherits Form
Public Sub New()
Thread.CurrentThread.CurrentCulture = New System.Globalization.CultureInfo("de-DE")
Thread.CurrentThread.CurrentUICulture = New System.Globalization.CultureInfo("de-DE")
InitializeComponent()
End Sub
End ClassCreating .resx files
You can create .resx files for any languages by following steps,
NOTE
You can get the default resource files of all Syncfusion® Windows Forms libraries from View resource files in GitHub
-
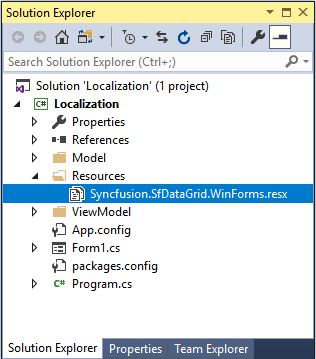
Right click your project and click
New Folderand set name asResources. -
Add Windows Forms Control Localization default resource files of libraries you are using into
Resourcesfolder.
NOTE
Consider you are using
SfDataGridcontrol in your application. Then you need to copy and includeSyncfusion.SfDataGrid.WinForms.resx(SfDataGrid present inSyncfusion.SfDataGrid.WinFormslibrary) file in your application underResourcesfolder. So, now you can know the key names and values of default strings used inSyncfusion.SfDataGrid.WinForms.dlllibrary.
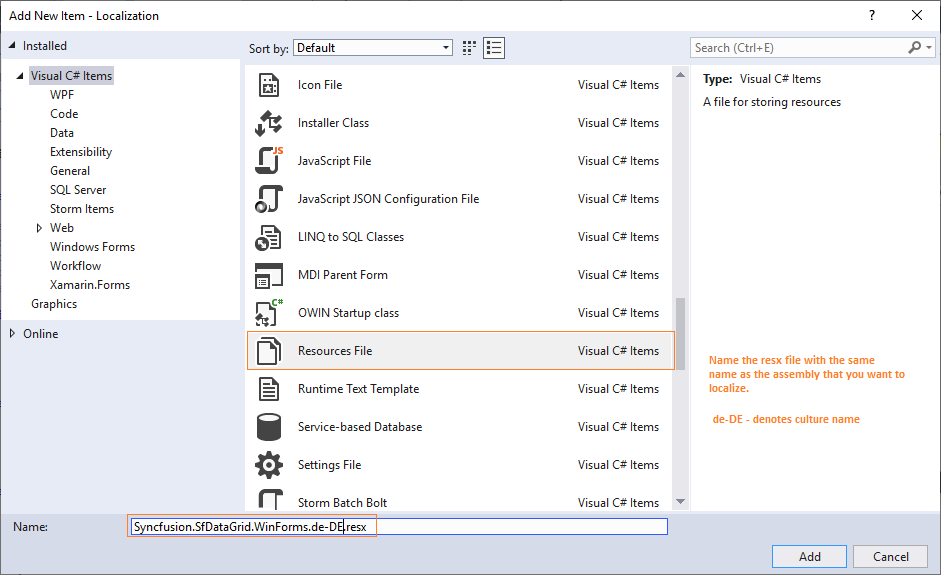
- Now, right click on
Resourcesfolder and selectAddand thenNew Item. In theAdd New Itemwizard, selectResources Fileoption and name the file name asSyncfusion.SfDataGrid.WinForms.<culture name>.resxforGermanculture. For example, you have to give name asSyncfusion.SfDataGrid.WinForms.de-DE.resxforGermanculture. In the same way, add new resource files for other libraries used in your application.
- Now, select
Addand add resource file for German culture inResourcesfolder.
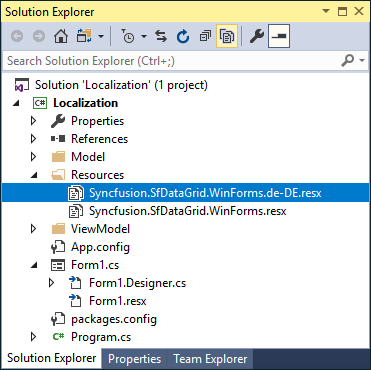
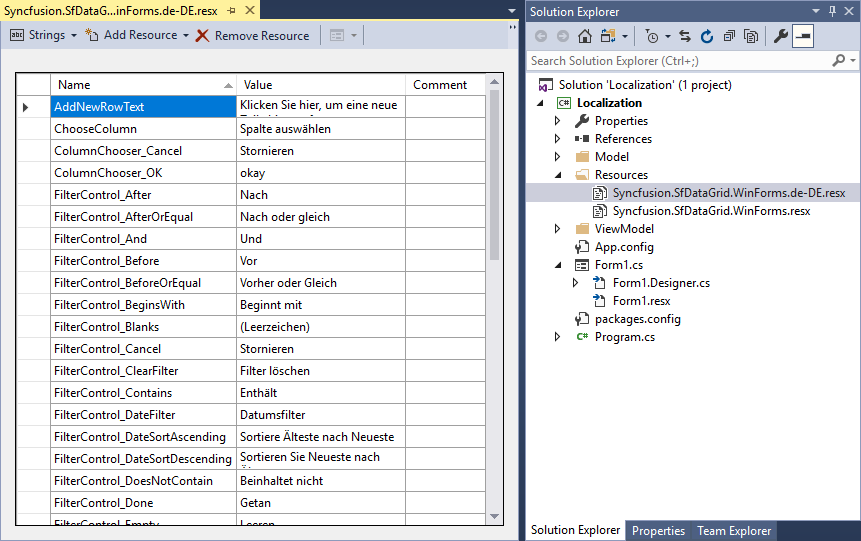
- Now, you can copy the key names from default resource files and change its corresponding value based on the culture.
NOTE
Download demo from View sample in GitHub.
Localize when resource file is present in different namespaces or assemblies
The below table represents that how the resource file need to set if we using our Syncfusion® controls from different assembly or namespace,
| Control Assembly | Code Snippet |
|---|---|
| Syncfusion.Diagram.Windows | DiagramLocalizationResourceAccessor.Instance.SetResources(assembly, "namespace"); |
| Syncfusion.Edit.Windows | EditLocalizationResourceAccessor.Instance.SetResources(assembly, "namespace"); |
| Syncfusion.Grid.Windows | GridLocalizationResourceAccessor.Instance.SetResources(assembly, "namespace"); |
| Syncfusion.Grid.Grouping.Windows | GridGroupingLocalizationResourceAccessor.Instance.SetResources(assembly, "namespace"); |
| Syncfusion.HTMLUI.Windows | HtmlUILocalizationResourceAccessor.Instance.SetResources(assembly, "namespace"); |
| Syncfusion.PdfViewer.Windows | PdfViewerLocalizationResourceAccessor.Instance.SetResources(assembly, "namespace"); |
| Syncfusion.PivotAnalysis.Windows. | PivotAnalysisLocalizationResourceAccessor.Instance.SetResources(assembly, "namespace"); |
| Syncfusion.PivotChart.Windows | PivotChartLocalizationResourceAccessor.Instance.SetResources(assembly, "namespace"); |
| Syncfusion.SfDataGrid.WinForms | DataGridLocalizationResourceAccessor.Instance.SetResources(assembly, "namespace"); |
| Syncfusion.SfListView.WinForms | ListViewLocalizationResourceAccessor.Instance.SetResources(assembly, "namespace"); |
| Syncfusion.SfSmithChart.WinForms | SmithChartLocalizationResourceAccessor.Instance.SetResources(assembly, "namespace"); |
| Syncfusion.Spreadsheet.Windows | SpreadsheetLocalizationResourceAccessor.Instance.SetResources(assembly, "namespace"); |
| Syncfusion.Shared.Base | SharedLocalizationResourceAccessor.Instance.SetResources(assembly, "namespace"); |
| Syncfusion.Tools.Windows | ToolsLocalizationResourceAccessor.Instance.SetResources(assembly, "namespace"); |
And below steps helps you to show how localization can be done at different assemblies or namespaces,
-
Create a .resx files.
-
And add the below code in windows form constructor.
public partial class Form1 : Form
{
    public Form1()
    {
        Thread.CurrentThread.CurrentCulture = new System.Globalization.CultureInfo("de-DE");
        Thread.CurrentThread.CurrentUICulture = new System.Globalization.CultureInfo("de-DE");
        DataGridLocalizationResourceAccessor.Instance.SetResources(GetType().Assembly, "Localization");
        InitializeComponent();
    }
}
Partial Public Class Form1 Inherits Form Public Sub New() Thread.CurrentThread.CurrentCulture = New System.Globalization.CultureInfo("de-DE") Thread.CurrentThread.CurrentUICulture = New System.Globalization.CultureInfo("de-DE") DataGridLocalizationResourceAccessor.Instance.SetResources([GetType]().Assembly, "Localization") InitializeComponent() End Sub End Class -
Then right click the project and create another windows form project named as WindowsFormsApp1.
-
In that project add the button and show the Localization Form in button click event as given below,
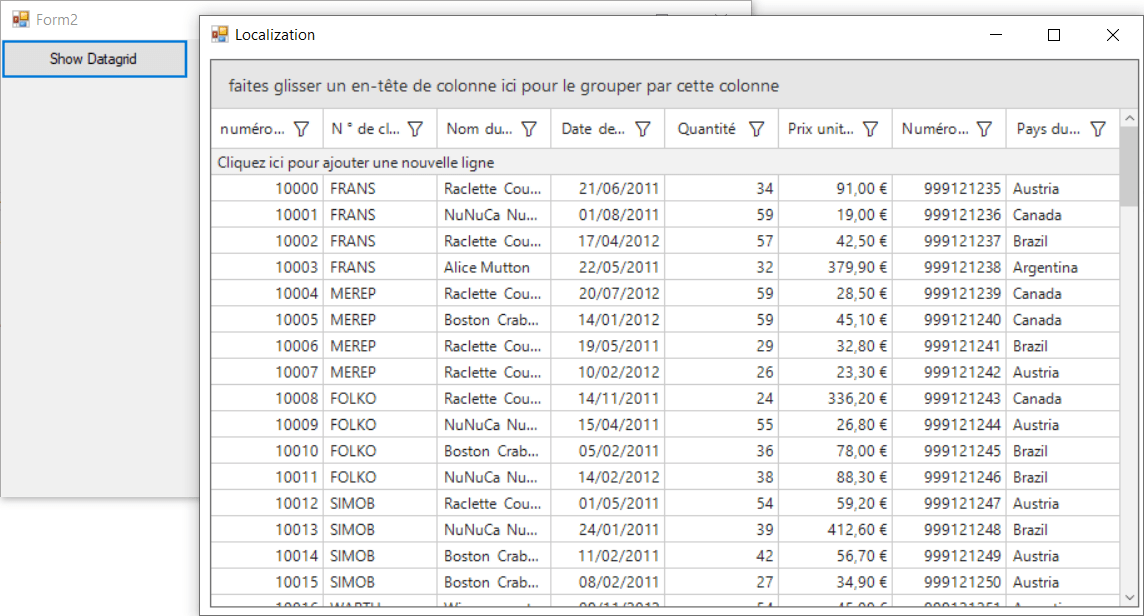
using Localization;
using System;
using System.Windows.Forms;

namespace WindowsFormsApp1
{
    public partial class Form2 : Form
    {
        public Form2()
        {
            Button button = new Button();
            button.Click += button1_Click;
            this.Controls.Add(button);
            InitializeComponent();
        }

        private void button1_Click(object sender, EventArgs e)
        {
            Form1 form1 = new Form1();
            form1.Show();
        }
    }
}
Imports Localization Imports System Imports System.Windows.Forms Namespace WindowsFormsApp1 Public Partial Class Form2 Inherits Form Public Sub New() Dim button As Button = New Button() button.Click += AddressOf button1_Click Me.Controls.Add(button) InitializeComponent() End Sub Private Sub button1_Click(ByVal sender As Object, ByVal e As EventArgs) Dim form1 As Form1 = New Form1() form1.Show() End Sub End Class End Namespace -
Now, set startup project as WindowsFormsApp1 and run the project.
-
Then click the button Appeared in Form. Now, you can see that the text in SfDatagrid gets localized.
Editing default culture settings
You can change the default string of any control by adding the default .resx files (from GitHub) to Resources folder of your application. Syncfusion® Windows Forms controls reads the default string from the .resx files of application if its added.