High DPI Support in Windows Forms Controls
2 Nov 20228 minutes to read
DPI stands for Dots Per Inch is the number of pixels or points rendered in one inch on the interface. The high DPI displays are displayed with an increased number of pixel density compared to the default or standard DPI screen.
DPI awareness
Desktop application fall into two categories based on the DPI awareness:
- Non-DPI aware application
- DPI aware application
Non-DPI aware application
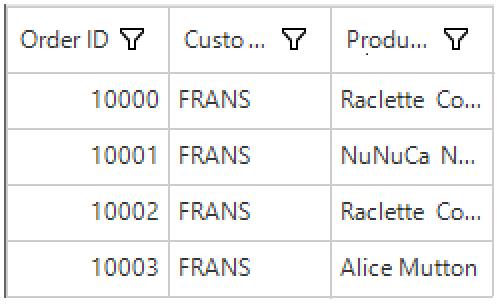
Non-DPI aware applications always render at 96 DPI, scale it up to the actual DPI, and leave entire scaling to the operating system. It keeps your application layout intact at the cost of quality - blurred images and more.
Refer to the following DataGrid sample demo screenshot that runs under 192 DPI with blurred text and icons.
DPI aware application
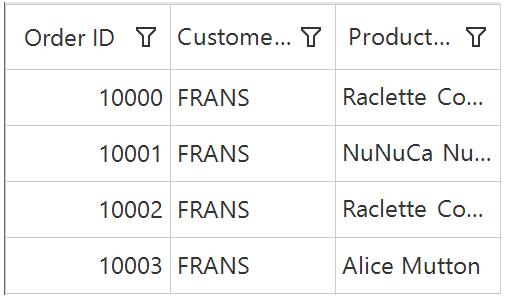
The applications render themselves based on the actual DPI of a screen and provide a much better visual experience. The controls or applications needs manual implementation, such DPI awareness by retrieving the current monitor DPI value, scaling its content, applying different icon sets, and more.
The following DataGrid sample demo screenshot runs under 192 DPI, you can see the better quality of text and icon.
DPI compatibility
To access your applications DPI compatibility, test your application at a variety of resolutions with different high DPI settings.
The following table provides a recommended set of DPI settings and minimum resolutions to consider when testing the DPI awareness level.
|
DPI |
Scaling |
Minimum resolution |
| 96 | 100% | 1024*720 |
| 120 | 125% | 1280*960 |
| 144 | 150% | 1536*1080 |
| 192 | 200% | 2048*1440 |
The application or control created in 96 DPI value must be properly changed based on the current DPI values when trying to use the control or application to other DPI values.
DPI scaling
The DPI scaling mechanism calculates the scaling difference between the system that form has been designed on and the running system. This DPI scaling will only trigger if your application declares to be DPI aware. Otherwise, the system will be rendered in the default DPI (96 DPI) sandbox and bitmap scaling of the OS will be used.
You have probably noticed the following two properties:
- AutoScaleDimensions: The Visual Studio designer will serialize the dimensions of the unit used for comparison either font or DPI. When running the form with different DPI settings, its dimensions will be obtained and compared against the serialized dimensions. The scaling factor is computed based on that, then it is applied.
-
AutoScaleMode: Indicates the method to calculate the scale factor. Depending on it, the scaling mechanism will calculate the scale factor according to the dimensions of the system font or system DPI. If the AutoScaleMode is set to
None, the automatic scaling will be disabled. When the scale factor is calculated, the framework calls the scale method of form which basically recalculates the size and the location of child controls on it. Their scale method is also called as properly scale.
this.AutoScaleDimensions = new System.Drawing.SizeF(5F, 12F);
this.AutoScaleMode = System.Windows.Forms.AutoScaleMode.Font;Me.AutoScaleDimensions = New System.Drawing.SizeF(5F, 12F)
Me.AutoScaleMode = System.Windows.Forms.AutoScaleMode.FontEnable high DPI support
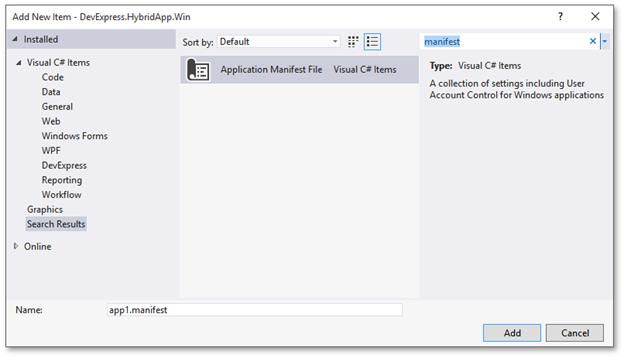
To turn your desktop application into DPI-aware and add app.manifest file, follow the steps:
-
Right click the sample project.
-
Click
Add, selectNew Itemor press theCTRL+SHIFT+Ashortcut. -
Search for the Application Manifest File item and click
Add.
-
When setting the
dpiAwareto true, the control will be drawn using the current DPI value. In this, the font size and image size will be automatically increased. The high DPI controls can be enabled by the following code snippet.<application xmlns="urn:schemas-microsoft-com:asm.v3"> <windowsSettings> <dpiAware xmlns="http://schemas.microsoft.com/SMI/2005/WindowsSettings">true</dpiAware> </windowsSettings> </application> -
Most of the Syncfusion controls support high DPI through manifest file. But, the following Syncfusion controls provides the high DPI support by adding both manifest file and enabling the DpiAware property.
- GridControl
- GridGroupingControl
- GridDataBoundGrid
- GridListControl
//To enable DpiAware in GridControl
   gridControl.DpiAware = true;

   //To enable DpiAware in GridDataBoundGrid control
   gridDataBoundGrid1.DpiAware = true;

   //To enable DpiAware in GridGroupingControl
   this.gridGroupingControl1.TableControl.DpiAware = true;

   //To enable DpiAware in GridListControl
   gridListControl1.Grid.DpiAware = true;
'To enable DpiAware in GridControl
gridControl.DpiAware = True
'To enable DpiAware in GridDataBoundGrid control
gridDataBoundGrid1.DpiAware = True
'To enable DpiAware in GridGroupingControl
Me.gridGroupingControl1.TableControl.DpiAware = True
'To enable DpiAware in GridListControl
gridListControl1.Grid.DpiAware = TrueAutomatically change images based on DPI through ImageListAdv component
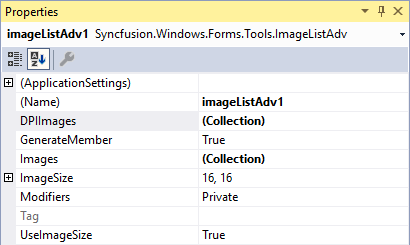
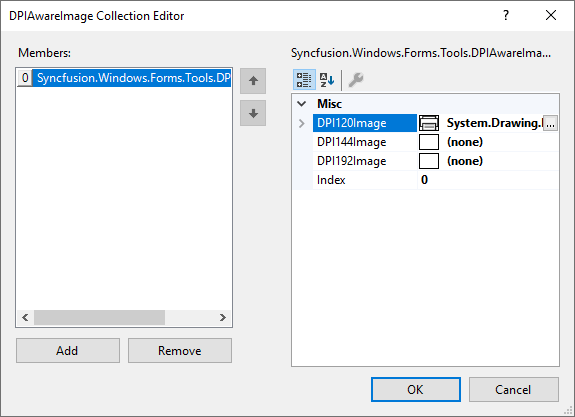
ImageListAdv component provides an option to set images with respect to different DPI scaling during application design. It helps the application to automatically switch the image when running on different machines in different DPI scaling. Images for different DPI scaling can be set using the DPIAwareImage object in each item added to the DPIImages collection of the ImageListAdv component. The DPIAwareImage contains the following properties.
- DPI120Image - This sets the image of the item for 125 scaling and above.
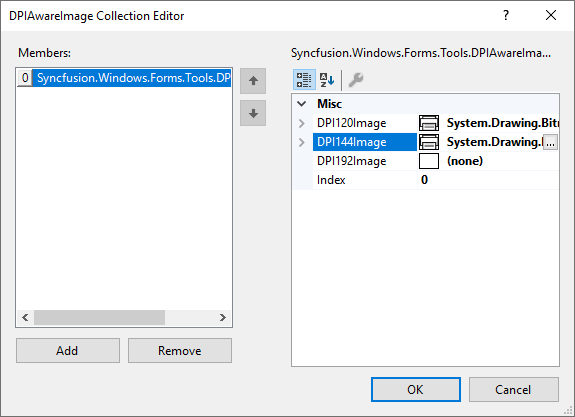
- DPI144Image - This sets the image of the item for 150 scaling and above.
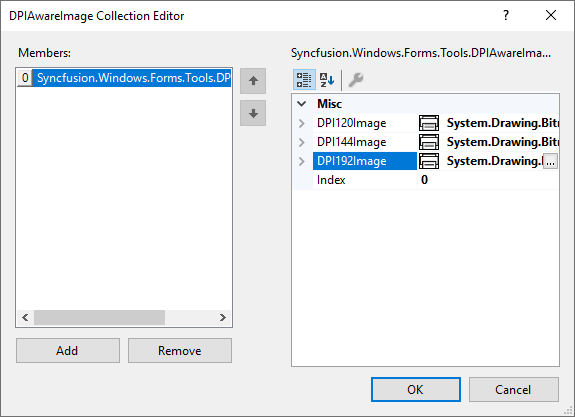
- DPI192Image - This sets the image of the item for 200 scaling and above.
-
Index - Maps the index of the default image present in the
Imagescollection bound the ImageListAdv component.
NOTE
The image present in the Images[1] index can have its relevant DPI scaling images set in the DPIImages[7] index (at any dynamic position) and to map them, the
Indexproperty is set to 1 (which is the actual default image position).
NOTE
If the image for a particular DPI scaling is not set in the
DPIAwareImage, either the lower scaling image or the default image from theImagescollection will be consumed for display.
The steps below illustrate the setting of image for a ButtonAdv using ImageListAdv for different DPI scaling.
-
Drag and drop the ImageListAdv from the toolbox to the designer.
-
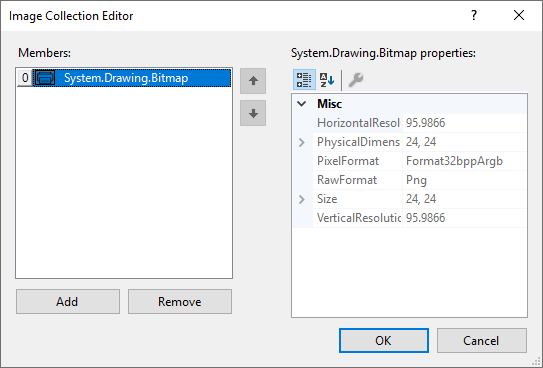
Add the required images to the
Imagescollection of the ImageListAdv. These images will act as default images that will be displayed at all scaling when no DPI images are set.
- To set the images for various DPI scaling, open the
DPIImagescollection in the ImageListAdv and add a newDPIAwareImageitem using the Add button.

- For 125 scaling and above, set the desired image to the
DPI120Imageproperty.
- For 150 scaling and above, set the desired image to the
DPI144Imageproperty.
- For 200 scaling and above, set the desired image to the
DPI192Imageproperty.
- To map this
DPIAwareImageto its default image, set the index of the appropriate image from theImagescollection to theIndexproperty.
-
Now map the desired image from the
Imagescollection to the ButtonAdv control using itsImageproperty.buttonAdv1.Image = imageListAdv1.Images[0];buttonAdv1.Image = imageListAdv1.Images(0) -
Run the application and the image for the ButtonAdv will be displayed as per the image set for different DPI scaling as shown below.
100 DPI Scaling

125 Scaling

150 Scaling

200 Scaling