UI Automation in WPF TreeGrid (SfTreeGrid)
27 Feb 20254 minutes to read
Requirements and configuration
To test SfTreeGrid control with CUITs, build the extension project and place it in the mentioned location. You can get the extension project from the following location.
|
SfTreeGrid |
https://github.com/SyncfusionExamples/coded-ui-extension-project-for-wpf-treegrid |
- Open the extension project and build it.
- Get the following tabulated assembly from the bin folder.
|
SfGrid.WPF |
Syncfusion.VisualStudio.TestTools.UITest.SfGridExtension.dll |
The SfGridExtension assembly must be placed into the following directory based on your Visual Studio version.
For Visual Studio 2015:
C:\Program Files (x86)\Common Files\Microsoft Shared\VSTT\14.0\UITestExtensionPackages
For Visual Studio 2017:
C:\Program Files (x86)\Common Files\Microsoft Shared\VSTT\15.0\UITestExtensionPackages
NOTE
Syncfusion.VisualStudio.TestTools.UITest.SfGridExtension.dll needs to be installed in GAC location. Please refer to the MSDN link for GAC installation.
Steps to work with Coded UI
This section explains how to create a CodedUITest project and test the tree grid application.
-
Create a new WPF application or open an existing WPF application with tree grid and enable the Coded UI test in tree grid. To enable CUITs, set AutomationPeerHelper.EnableCodedUI to true and access the AutomationPeerHelper class from Syncfusion.UI.Xaml.Grid namespace as demonstrated in the following code sample.
using Syncfusion.UI.Xaml.Grid; public MainWindow() { InitializeComponent(); AutomationPeerHelper.EnableCodedUI = true; } - Build the application and launch the .exe file from the bin folder.
-
Create a Coded UI test project as shown in the following screenshot.
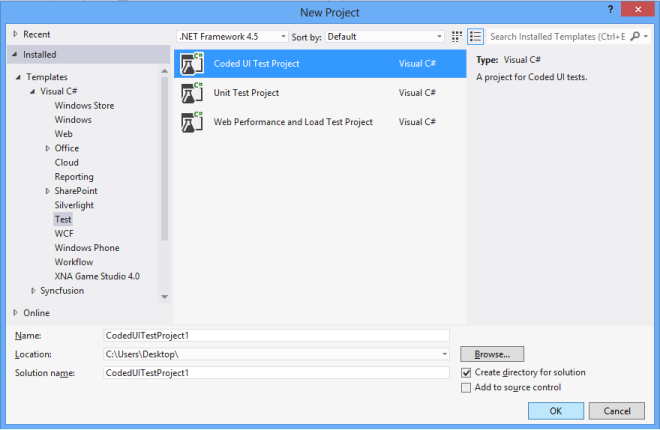
Add New Project
-
After created a new Coded UI project, a CUIT file is added automatically, and the Generate Code dialog box appears. In this, choose Record actions, edit UI map, or add assertions.
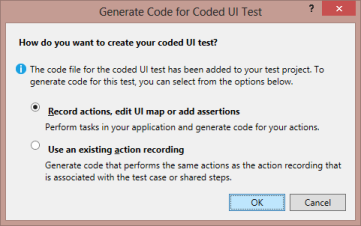
Generate Code for Coded UI Test
-
Now, minimize the Coded UI project Visual Studio, and CodedUITestBuilder appears in the bottom-right corner of your window. You can record the actions by clicking the Start Recording in CodedUITestBuilder.

CodedUITestBuilder
-
Open the CodedUITestBuilder from the existing Coded UI project by right-clicking the CodedUITestMethod in the CUIT file and clicking the Generate Code for Coded UI test as shown in the following screenshot. You can see the same CodedUITestBuilder in the bottom-right corner of the window.
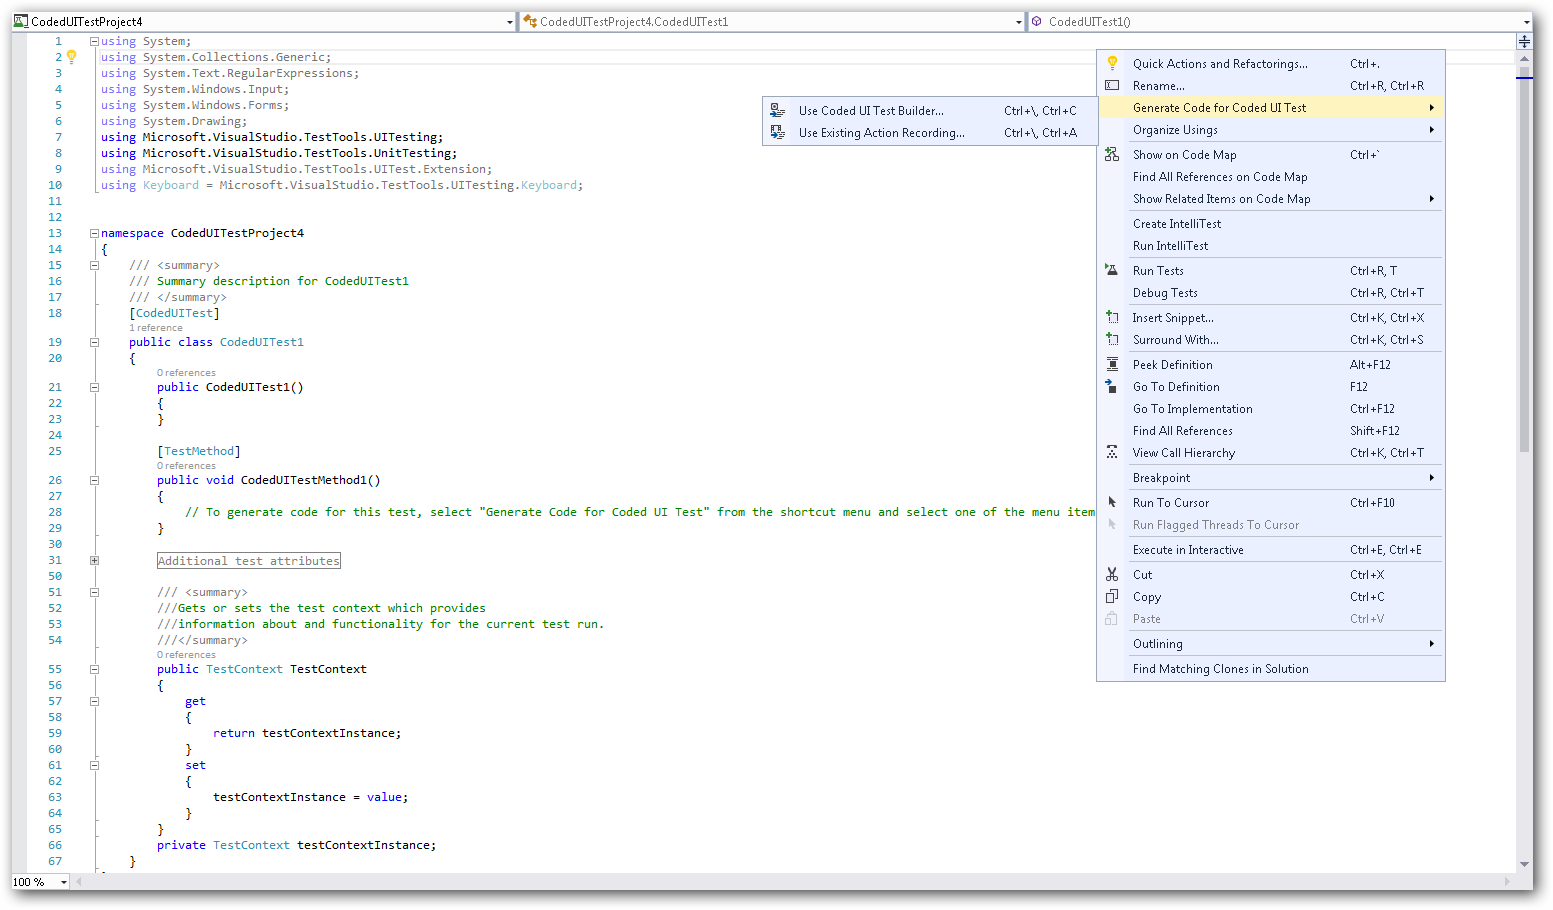
CodedUITestMethod
- Now, drag the Crosshairs to the UI elements of your WPF SfTreeGrid application, and it shows the available properties of the inner UI elements in SfTreeGrid.
-
Record the actions made on UI elements by clicking the Record button on the CodedUITest builder. For example you can record the action of changing the cell value in SfTreeGrid. Click the Pause button to finish the record.
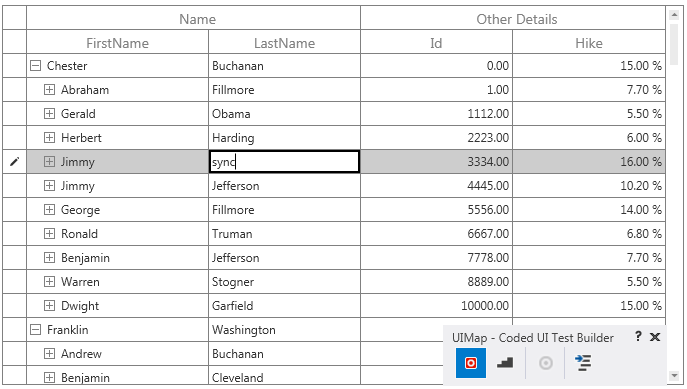
CodedUITest
-
After the record has been completed, click the GenerateCode icon in CodedUITestBuilder for generate a test method, and then close the CodedUITestBuilder. You can see the generated code for cell value changed action as follows.
public void RecordedMethod1() { public void RecordedMethod2() { #region Variable Declarations WpfText uIHardingText = this.UIWpfWindow.UITreeGridRowControlCustom.UITreeGridCellCustom.UIHardingText; WpfEdit uIItemEdit = this.UIWpfWindow.UITreeGridRowControlCustom.UITreeGridCellCustom.UIItemEdit; WpfText uIJeffersonText = this.UIWpfWindow.UITreeGridRowControlCustom1.UITreeGridCellCustom.UIJeffersonText; #endregion // Double-Click 'Harding' label Mouse.DoubleClick(uIHardingText, new Point(75, 5)); // Type 'sync' in text box uIItemEdit.Text = this.RecordedMethod2Params.UIItemEditText; // Click 'Jefferson' label Mouse.Click(uIJeffersonText, new Point(140, 6)); } } -
Create an assertion to check the modified cell value. Drag the crosshair to the modified cell, and the Assertion window appears. The properties for control (Cell) is now listed in the Assertion dialog box. You can add assertion by clicking the Generate Code button in CodedUITestBuilder.
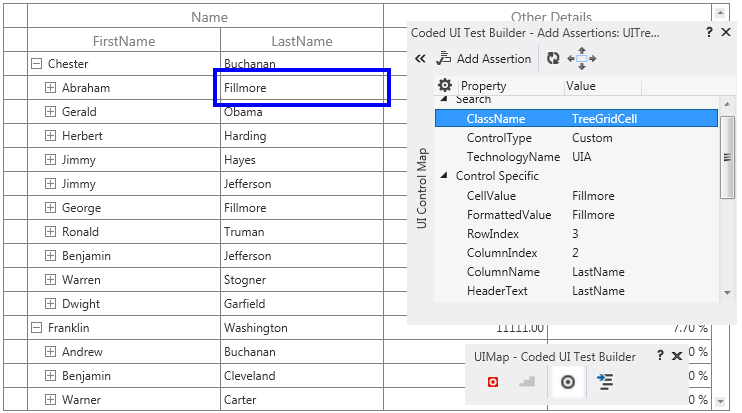
Assertion window
-
After all the tests and assertion have been created, right-click the Test method, and click Run Tests to run the test as follows.
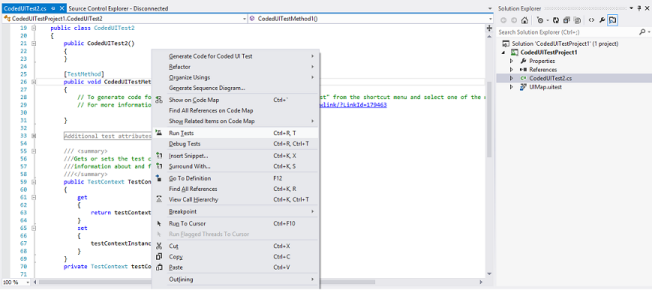
Run Test
Properties
|
UI Elements |
Properties |
| TreeGrid | RowCount ColumnCount SelectionMode SelectionUnit SelectionIndex SelectedItemCount |
| TreeGridCell | CellValue FormattedValue RowIndex ColumnIndex ColumnName |
| TreeGridHeaderCell | MappingName SortDirection SortNumberVisibility |
| TreeGridRowHeaderCell | RowErrorMessage RowIndex State |
| TreeGridStackedHeaderCell | Default Properties |
| TreeGridExpanderCell | Default properties |
|
Automation peer class name |
Control name in code generation |
Property provider class name |
| SfTreeGridAutomationPeer | WpfSfTreeGrid | SfTreeGridPropertyProvider |
| TreeGridCellAutomationPeer | WpfSfTreeGridCell | SfTreeGridCellPropertyProvider |
| TreeGridHeaderCellAutomationPeer | WpfSfTreeGridHeaderCell | SfTreeGridHeaderCellPropertyProvider |
| TreeGridRowHeaderCellAutomationPeer | WpfSfTreeGridRowHeaderCell | SfTreeGridRowHeaderCellPropertyProvider |
| TreeGridStackedHeaderCellAutomationPeer | WpfSfTreeGridStackedHeaderCell | SfTreeGridStackedHeaderCellPropertyProvider |
| TreeGridExpanderCellAutomationPeer | WpfTreeGridExpanderCell | SfTreeGridExpanderCellPropertyProvider |
NOTE
You can refer to our WPF TreeGrid feature tour page for its groundbreaking feature representations. You can also explore our WPF TreeGrid example to know how to render and configure the treegrid.