How can I help you?
Styles and Templates in WPF DataGrid (SfDataGrid)
27 Feb 202524 minutes to read
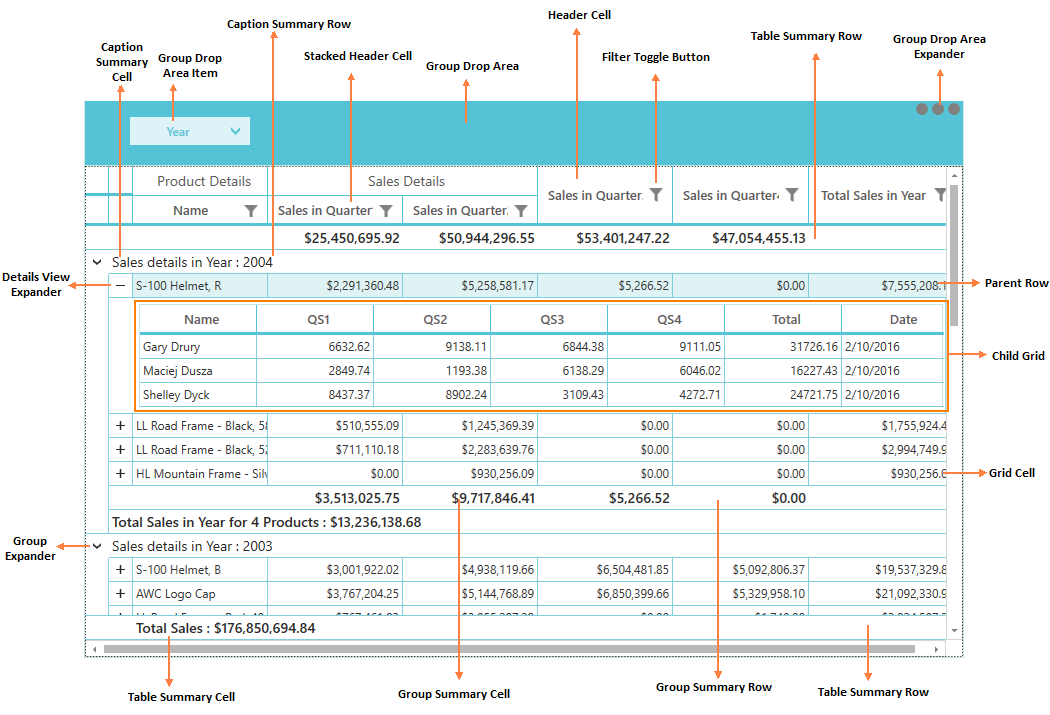
The appearance of WPF DataGrid (SfDataGrid) and its inner elements (example: Cell, Row, Header, Summary etc.) can be customized using various properties exposed and by editing the elements’ Style.
Control Structure of SfDataGrid
Customizing Default Containers
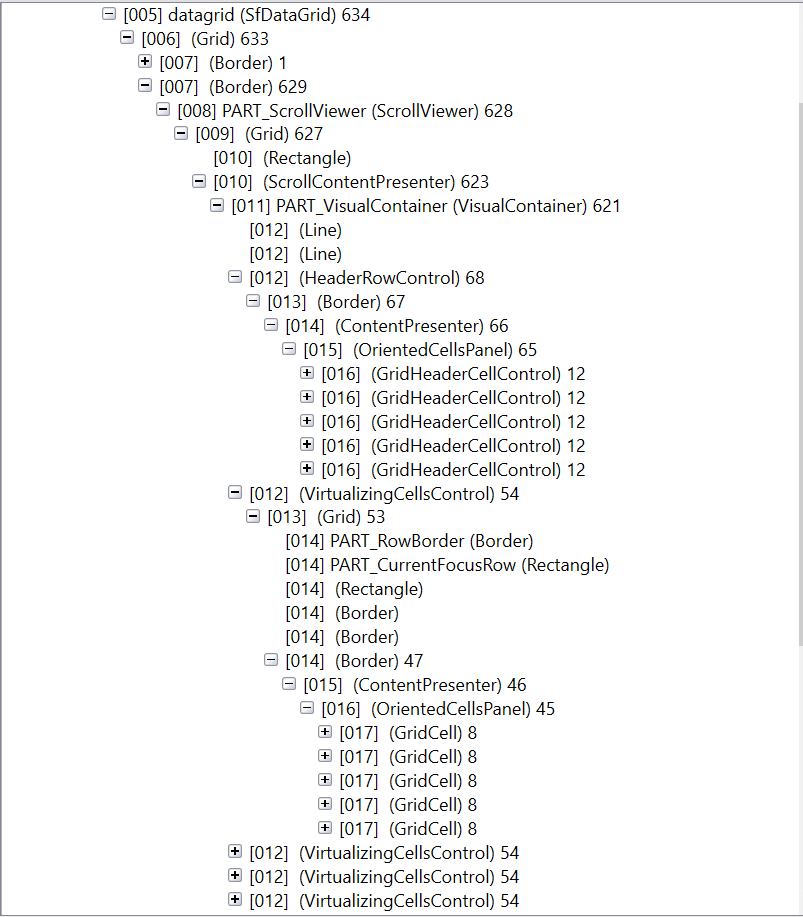
WPF DataGrid (SfDataGrid) arranges the cell and row content using cell and row containers. Below screenshot shows the VisualTree of SfDataGrid where HeaderCell is loaded into the HeaderCellControl and data cells are loaded into the VirtualizingCellsControl container. VirtualizingCellsControl container uses GridCell to load the cell content.
RowGenerator class processes the creation and re-using of containers for SfDataGrid. You create your own containers by overriding RowGenerator class and setting it to SfDataGrid.RowGenerator. Using this method to customize the row and cell containers allows for customizations that aren’t possible through styling and conditional styling.
Row containers
Below table shows the different types of grid rows and its container.
|
RowType |
Container |
| DataRow | |
| UnboundRow | |
| FilterRow | |
| DetailsViewDataRow | |
| TableSummaryRow | |
| HeaderRow | |
| AddNewRow | |
| CaptionSummaryRow | |
| GroupSummaryRow | |
| StackedHeaderRow |
Animating the data row when property changes
You can customize the DataRow operations by overriding the DataRow class. You have to override the GetDataRow method in RowGenerator to load the customized DataRow.
Similarly, you can able to customize:
The below code example shows how to animate the DataRow when the row data is changed.
this.dataGrid.RowGenerator = new CustomRowGenerator(this.dataGrid);
public class CustomDataRow : DataRow
{

    public CustomDataRow()
        : base()
    {
    }

    protected Storyboard sb = null;

    protected override void OnRowDataChanged()
    {
        base.OnRowDataChanged();

        if (this.WholeRowElement != null)
        {
            DoubleAnimation animation = new DoubleAnimation
            {
                From = 0,
                To = 1,
                Duration = new Duration(TimeSpan.FromMilliseconds(2000)),
                AutoReverse = true,
                FillBehavior = FillBehavior.Stop
            };

            Storyboard.SetTarget(animation, this.WholeRowElement);
            Storyboard.SetTargetProperty(animation, new PropertyPath(Path.OpacityProperty));
            sb = new Storyboard();
            sb.Children.Add(animation);
            sb.Begin();
        }
    }
}

public class CustomRowGenerator : RowGenerator
{

    public CustomRowGenerator(SfDataGrid dataGrid)
        : base(dataGrid)
    { }

    protected override GridDataRow GetDataRow<T>(RowType type)
    {

        //Set the customized DataRow.

        if (typeof(T) == typeof(DataRow))
            return new CustomDataRow();
        return base.GetDataRow<T>(type);
    }
}
You can download a working demo for the above customization from here.
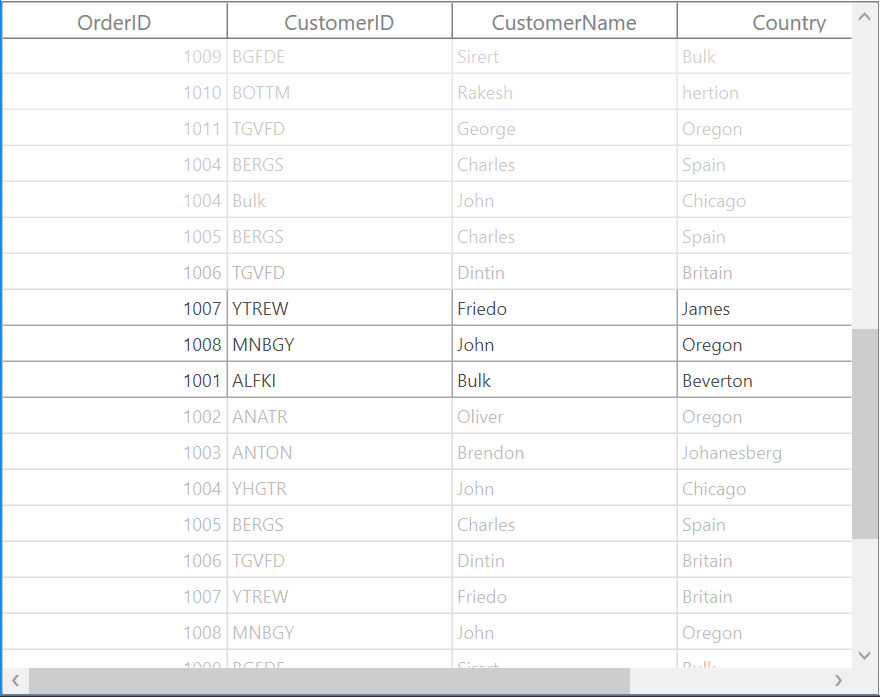
The below code example shows how to change the background color of the VirtualizingCellsControl when the value has been changed for a particular cell. This can be done by hooking the DataContextChanged and PropertyChanged event.
this.dataGrid.RowGenerator = new CustomRowGenerator(this.dataGrid);

public class CustomVirtualizingCellsControl : VirtualizingCellsControl
{

    public CustomVirtualizingCellsControl()
        : base()
    {
        this.DataContextChanged += CustomVirtualizingCellsControl_DataContextChanged;
    }

    private void CustomVirtualizingCellsControl_DataContextChanged(object sender, DependencyPropertyChangedEventArgs e)
    {
        var newValue = e.NewValue as INotifyPropertyChanged;
        newValue.PropertyChanged += NewValue_PropertyChanged;
    }

    private void NewValue_PropertyChanged(object sender, PropertyChangedEventArgs e)
    {

        if (e.PropertyName == "CustomerID")
            this.Background = new SolidColorBrush(Colors.Pink);
    }
}

public class CustomRowGenerator : RowGenerator
{
    public CustomRowGenerator(SfDataGrid dataGrid)
        : base(dataGrid)
    { }

    protected override VirtualizingCellsControl GetVirtualizingCellsControl<T>()
    {

        //Set the customized VirtualizingCellsControl

        if (typeof(T) == typeof(VirtualizingCellsControl))
            return new CustomVirtualizingCellsControl();
        return base.GetVirtualizingCellsControl<T>();
    }
}
You can download a working demo for the above customization from here.
Cell containers
Below table shows the different types of cells and its container.
|
CellType |
Container |
| GridCell | |
| GridUnBoundRowCell | |
| GridFilterRowCell |
Animating the data cell when property changes
You can customize the GridCell behavior by overriding the GridCell class. You have to override the GetGridCell method in RowGenerator to load the customized GridCell.
Similarly, you can able to customize:
The below code example shows how to animate the cell based on the changes occur in another cell using the DataContextChanged and PropertyChanged events.
this.dataGrid.RowGenerator = new CustomRowGenerator(this.dataGrid);

public class CustomGridCell : GridCell
{

    public CustomGridCell() : base()
    {
        this.DataContextChanged += CustomGridCell_DataContextChanged;
    }

    private void CustomGridCell_DataContextChanged(object sender, DependencyPropertyChangedEventArgs e)
    {
        var newData = e.NewValue as INotifyPropertyChanged;
        newData.PropertyChanged += Data_PropertyChanged;
    }
    protected Storyboard sb = null;

    private void Data_PropertyChanged(object sender, PropertyChangedEventArgs e)
    {

        if (e.PropertyName == "CustomerID")
        {
            DoubleAnimation animation = new DoubleAnimation
            {
                From = 0,
                To = 1,
                Duration = new Duration(TimeSpan.FromMilliseconds(2000)),
                AutoReverse = false,
                FillBehavior = FillBehavior.HoldEnd
            };

            Storyboard.SetTarget(animation, this);
            Storyboard.SetTargetProperty(animation, new PropertyPath(Path.OpacityProperty));
            sb = new Storyboard();
            sb.Children.Add(animation);
            sb.Begin();
        }
    }

    protected override void Dispose(bool isDisposing)
    {
        this.DataContextChanged -= CustomGridCell_DataContextChanged;
        base.Dispose(isDisposing);
    }
}

public class CustomRowGenerator : RowGenerator
{

    public CustomRowGenerator(SfDataGrid dataGrid)
        : base(dataGrid)
    {
    }

    protected override GridCell GetGridCell<T>()
    {
        return new CustomGridCell();
    }
}
You can download a working demo for the above customization from here.
Editing Style in Visual Studio Designer
You can edit the SfDataGrid style in Visual Studio Designer by right clicking it in design View and click Edit Template.
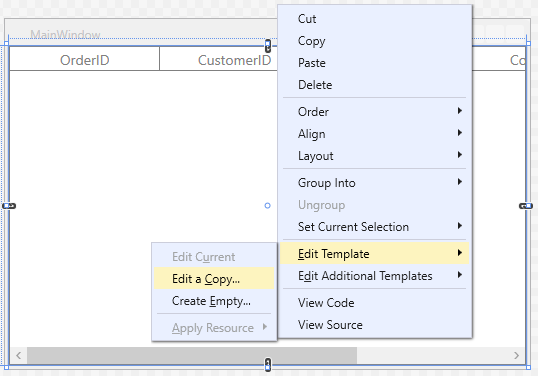
By clicking Edit a Copy, it will generate default template of SfDataGrid in XAML view and you can edit the default style.
Editing DataGrid Elements Style in Visual Studio Designer
You can edit the SfDataGrid elements style in Visual Studio Designer by right clicking it in designer view and click Edit Additional Templates.
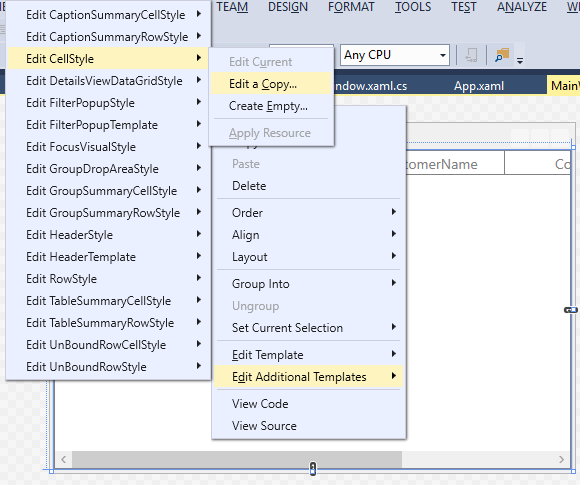
You can edit or create new style for the following SfDataGrid elements through Edit Additional Templates option,
- HeaderStyle
- HeaderTemplate
- CellStyle
- RowStyle
- GroupDropAreaStyle
- CaptionSummaryCellStyle
- CaptionSummaryRowStyle
- GroupSummaryCellStyle
- GroupSummaryRowStyle
- TableSummaryCellStyle
- TableSummaryRowStyle
- UnBoundRowCellStyle
- UnBoundRowStyle
- FilterPopupStyle
- FilterPopupTemplate
- DetailsViewDataGridStyle
NOTE
Visual Studio Editing option is available from Visual Studio 2015 and higher versions only.
Writing Style by TargetType
The appearance of WPF DataGrid (SfDataGrid) and its inner elements can be customized by writing style of TargetType to those control. If the key is not specified, then the style will be applied to all the SfDataGrid in its scope. You can apply specific to SfDataGrid or column or cell using various properties exposed.
Styling Record cell
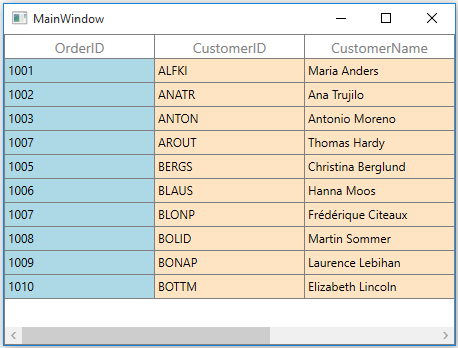
The record cells can be customized by writing style of TargetType GridCell. You can set to particular SfDataGrid by setting SfDataGrid.CellStyle property and the particular column can be styled by setting GridColumn.CellStyle property. Underlying record will be the DataContext for GridCell.
<Window.Resources>
    <Style TargetType="syncfusion:GridCell" x:Key="customCellStyle">
        <Setter Property="Background" Value="Bisque" />
    </Style>
</Window.Resources>

<syncfusion:SfDataGrid x:Name="dataGrid"
                       CellStyle="{StaticResource customCellStyle}"
                       ItemsSource="{Binding Orders}"/>
You can also set the CellStyle to particular column in below way.
<syncfusion:GridTextColumn MappingName="OrderID">
    <syncfusion:GridTextColumn.CellStyle>
        <Style TargetType="syncfusion:GridCell">
            <Setter Property="Background" Value="LightBlue" />
        </Style>
    </syncfusion:GridTextColumn.CellStyle>
</syncfusion:GridTextColumn>
NOTE
GridColumn.CellStyletakes higher priority thanSfDataGrid.CellStyleproperty.
Changing Grid line border as dotted line
You can change the gridline border as dotted line by customizing GridCell.BorderBrush property.
<Window.Resources>
    <Style TargetType="syncfusion:GridCell">
        <Setter Property="BorderBrush">
            <Setter.Value>
                <DrawingBrush Viewport="0,0,7,7" ViewportUnits="Absolute" TileMode="Tile">
                    <DrawingBrush.Drawing>
                        <DrawingGroup>
                            <GeometryDrawing Brush="Black">
                                <GeometryDrawing.Geometry>
                                    <GeometryGroup>
                                        <RectangleGeometry Rect="0,0,50,50" />
                                        <RectangleGeometry Rect="50,50,50,50" />
                                    </GeometryGroup>
                                </GeometryDrawing.Geometry>
                            </GeometryDrawing>
                        </DrawingGroup>
                    </DrawingBrush.Drawing>
                </DrawingBrush>
            </Setter.Value>
        </Setter>
    </Style>
</Window.Resources>

<syncfusion:SfDataGrid x:Name="dataGrid"
                       ItemsSource="{Binding Orders}">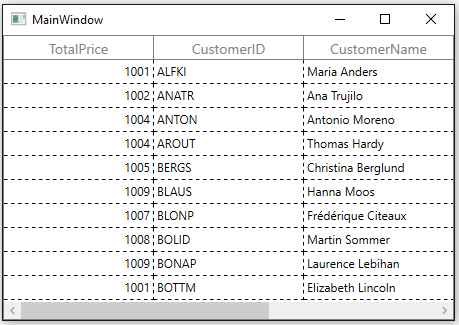
Changing Grid line color
You can also change the gridline color by setting GridCell.BorderBrush property.
<Window.Resources>
    <Style TargetType="syncfusion:GridCell">
        <Setter Property="BorderBrush" Value="Green" />
    </Style>
</Window.Resources>
Styling Record row
The record rows can be customized by writing style of TargetType VirtualizingCellsControl. You can set to particular SfDataGrid by setting SfDataGrid.RowStyle property.
<Window.Resources>
    <Style TargetType="syncfusion:VirtualizingCellsControl" x:Key="customRowStyle">
        <Setter Property="Background" Value="Bisque"/>
    </Style>
</Window.Resources>
<syncfusion:SfDataGrid x:Name="dataGrid"
                       ItemsSource="{Binding Orders}"
                       RowStyle="{StaticResource customRowStyle}"/>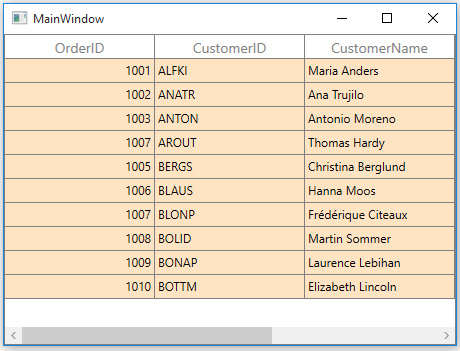
Alternating Row Style
You can style the alternate rows by setting SfDataGrid.AlternatingRowStyle and SfDataGrid.RowStyle property. AlternateRowStyle will be applied based on SfDataGrid.AlternationCount property.
<Window.Resources>
    <Style TargetType="syncfusion:VirtualizingCellsControl" x:Key="alternatingRowStyle">
        <Setter Property="Background" Value="LightBlue"/>
    </Style>

    <Style TargetType="syncfusion:VirtualizingCellsControl" x:Key="RowStyle">
        <Setter Property="Background" Value="Bisque"/>
    </Style>
</Window.Resources>

<syncfusion:SfDataGrid x:Name="dataGrid"
                       AlternatingRowStyle="{StaticResource alternatingRowStyle}"
                       AlternationCount="3"
                       RowStyle="{StaticResource RowStyle}"
                       ItemsSource="{Binding Orders}"/>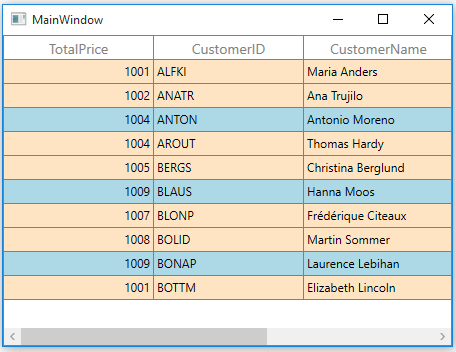
Selection
The foreground and background for the selected row, cell can be customized by setting SfDataGrid.RowSelectionBrush and SfDataGrid.SelectionForegroundBrush property.
<syncfusion:SfDataGrid x:Name="dataGrid"
                       RowSelectionBrush="DarkBlue"
                       SelectionForegroundBrush="Bisque"
                       ItemsSource="{Binding Orders}">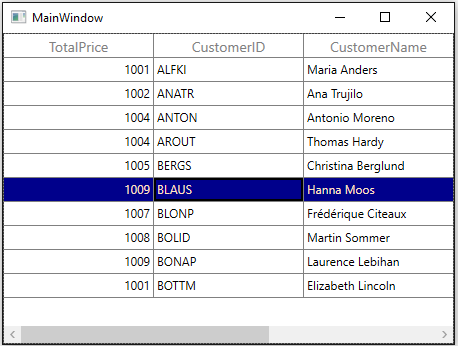
Styling Column Header
Styling Header cell
The header cell can be customized by writing style of TargetType GridHeaderCellControl. You can set to particular SfDataGrid by setting SfDataGrid.HeaderStyle property and the particular column can be styled by setting GridColumn.HeaderStyle property.
NOTE
GridColumn.HeaderStyletakes higher priority thanSfDataGrid.HeaderStyleproperty.
<Window.Resources>
    <Style TargetType="syncfusion:GridHeaderCellControl" x:Key="headerStyle">
        <Setter Property="FontWeight" Value="Bold"/>
        <Setter Property="FontSize" Value="14"/>
        <Setter Property="Foreground" Value="DarkBlue"/>
    </Style>
</Window.Resources>

<syncfusion:SfDataGrid x:Name="dataGrid"
                       HeaderStyle="{StaticResource headerStyle}"
                       ItemsSource="{Binding Orders}"/>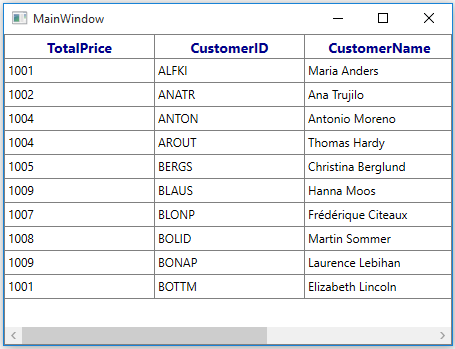
Styling DetailsViewDataGrid header
The header style can be applied to DetailsViewDataGrid alone by setting HeaderStyle property to DetailsViewDataGrid in both XAML and code behind.
<Window.Resources>
    <Style TargetType="syncfusion:GridHeaderCellControl" x:Key="header">
        <Setter Property="Foreground" Value="DarkBlue"/>
    </Style>
</Window.Resources>

<syncfusion:SfDataGrid x:Name="dataGrid"
			ItemsSource="{Binding Orders}">
    <syncfusion:SfDataGrid.DetailsViewDefinition>
        <syncfusion:GridViewDefinition RelationalColumn="Details">
            <syncfusion:GridViewDefinition.DataGrid>
                <syncfusion:SfDataGrid x:Name="FirstDetailsViewGrid"
                                       HeaderStyle="{StaticResource header}">
                </syncfusion:SfDataGrid>
            </syncfusion:GridViewDefinition.DataGrid>
        </syncfusion:GridViewDefinition>
    </syncfusion:SfDataGrid.DetailsViewDefinition>
</syncfusion:SfDataGrid>
If SfDataGrid.AutoGenerateRelations is true, you can set the header style to DetailsViewDataGrid in SfDataGrid.AutoGenerateRelations event.
<syncfusion:SfDataGrid x:Name="dataGrid"
                       AutoGenerateRelations="True"
ItemsSource="{Binding Orders}">this.dataGrid.AutoGeneratingRelations += dataGrid_AutoGeneratingRelations;
void dataGrid_AutoGeneratingRelations
(object sender, Syncfusion.UI.Xaml.Grid.AutoGeneratingRelationsArgs e)
{
e.GridViewDefinition.DataGrid.HeaderStyle = (Style)this.Resources["header"];
}Styling Stacked Headers
The appearance of stacked header can be customized by writing style of TargetType GridStackedHeaderCellControl.
<Window.Resources>
    <Style TargetType="syncfusion:GridStackedHeaderCellControl">
        <Setter Property="FontWeight" Value="ExtraBold"/>
        <Setter Property="FontSize" Value="14"/>
        <Setter Property="Foreground" Value="DarkBlue"/>
    </Style>
</Window.Resources>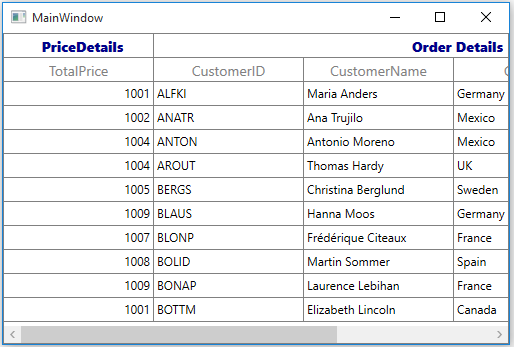
Setting different styles to StackedHeader
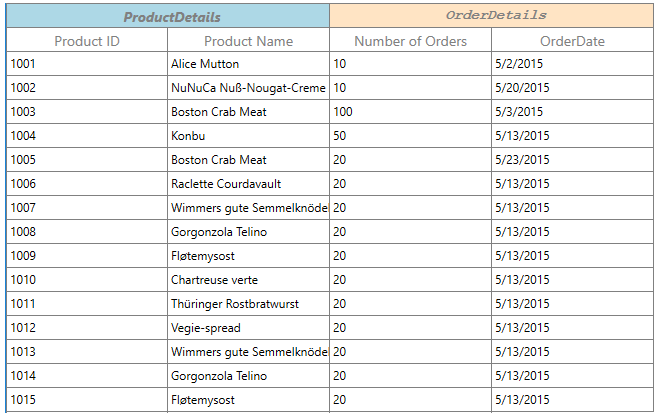
You can apply the different style to stacked header by overriding the default renderer of StackedHeader.
<Application.Resources>
    <Style x:Key="style1" TargetType="syncfusion:GridStackedHeaderCellControl">
        <Setter Property="Background" Value="LightBlue" />
        <Setter Property="FontFamily" Value="Segoe UI" />
        <Setter Property="FontStyle" Value="Italic" />
        <Setter Property="FontWeight" Value="Bold"/>
    </Style>
    <Style x:Key="style2" TargetType="syncfusion:GridStackedHeaderCellControl">
        <Setter Property="Background" Value="Bisque" />
        <Setter Property="FontFamily" Value="Courier New" />
        <Setter Property="FontStyle" Value="Oblique" />
        <Setter Property="FontWeight" Value="Bold"/>
    </Style>
</Application.Resources>
//Default GridStackedCellRenderer is removed.
this.dataGrid.CellRenderers.Remove("StackedHeader");
//Customized GridStackedCellRenderer is added.
this.dataGrid.CellRenderers.Add("StackedHeader", new GridCustomStackedRenderer());
public class GridCustomStackedRenderer : GridStackedHeaderCellRenderer
{
public GridCustomStackedRenderer()
{
}
public override void OnInitializeEditElement(DataColumnBase dataColumn, GridStackedHeaderCellControl uiElement, object dataContext)
{
if (dataColumn.ColumnIndex == 0)
uiElement.Style = App.Current.Resources["style1"] as Style;
else if (dataColumn.ColumnIndex == 2)
uiElement.Style = App.Current.Resources["style2"] as Style;
base.OnInitializeEditElement(dataColumn, uiElement, dataContext);
}
}
Setting Default Style for one column
You can also skip the cell styling for particular column from other setting like SfDataGrid.CellStyle by setting GridColumn.CellStyle to null. Likewise, you can skip all the style properties in particular column (example: HeaderStyle).
<Window.Resources>
    <Style TargetType="syncfusion:GridCell" x:Key="customCellStyle">
        <Setter Property="Background" Value="Bisque" />
    </Style>
</Window.Resources>

<syncfusion:SfDataGrid x:Name="dataGrid"
                       CellStyle="{StaticResource customCellStyle}"
                       ItemsSource="{Binding Orders}">
    <syncfusion:SfDataGrid.Columns>
        <syncfusion:GridTextColumn MappingName="OrderID"
                                   CellStyle="{x:Null}" />
    </syncfusion:SfDataGrid.Columns>
</syncfusion:SfDataGrid>this.dataGrid.Columns["OrderID"].CellStyle = null;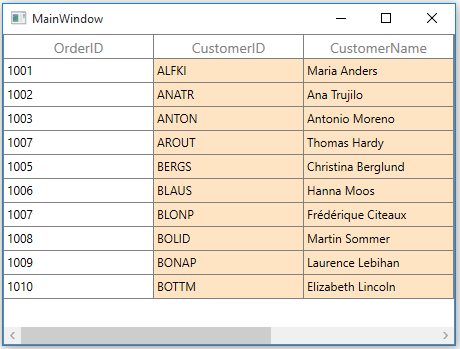
Styling CaptionSummary
Styling CaptionSummary cells
The caption summary cells can be customized by writing style of TargetType GridCaptionSummaryCell. You can set to particular SfDataGrid by setting SfDataGrid.CaptionSummaryCellStyle property.
<Window.Resources>
    <Style TargetType="syncfusion:GridCaptionSummaryCell" x:Key="customCaptionSummaryCell">
       <Setter Property="FontWeight" Value="Bold"/>
       <Setter Property="Foreground" Value="DarkBlue"/>
       <Setter Property="FontStyle" Value="Italic"/>
       <Setter Property="FontSize" Value="14"/>
    </Style>
</Window.Resources>

<syncfusion:SfDataGrid x:Name="dataGrid"
                       ShowGroupDropArea="True"
                       CaptionSummaryCellStyle="{StaticResource customCaptionSummaryCell}"
                       ItemsSource="{Binding Orders}"/>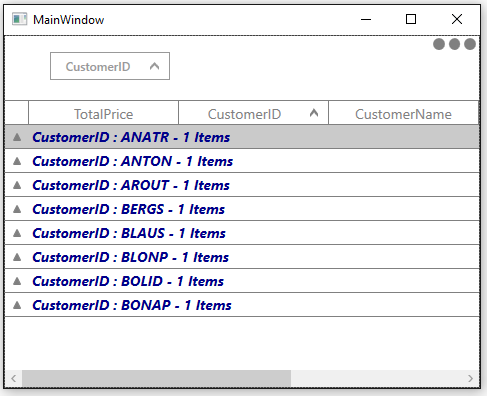
Styling CaptionSummary rows
The caption summary rows can be customized by writing style of TargetType GridCaptionSummaryRowControl. You can set to particular SfDataGrid by setting SfDataGrid.CaptionSummaryRowStyle property.
<Window.Resources>
    <Style TargetType="syncfusion:CaptionSummaryRowControl" x:Key="captionSummaryRowStyle">
        <Setter Property="FontWeight" Value="SemiBold"/>
       <Setter Property="Background" Value="Bisque"/>
       <Setter Property="FontStyle" Value="Oblique"/>
       <Setter Property="FontSize" Value="18"/>
    </Style>
</Window.Resources>

<syncfusion:SfDataGrid x:Name="dataGrid"
                       ShowGroupDropArea="True"
                       CaptionSummaryRowStyle="{StaticResource captionSummaryRowStyle}"
                       ItemsSource="{Binding Orders}"/>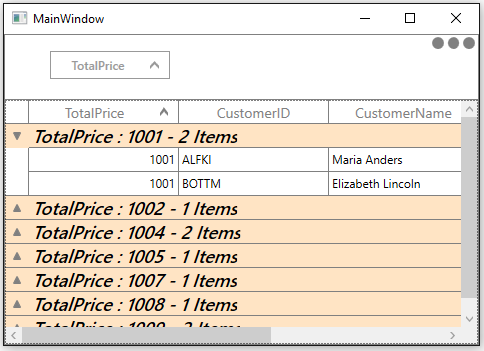
Styling GroupSummary
Styling GroupSummary cells
The group summary cells can be customized by writing style of TargetType GridGroupSummaryCell. You can set to particular SfDataGrid by setting SfDataGrid.GroupSummaryCellStyle property.
<Window.Resources>
    <Style TargetType="syncfusion:GridGroupSummaryCell" x:Key="customGroupSummary">
       <Setter Property="FontWeight" Value="SemiBold"/>
       <Setter Property="Foreground" Value="DarkBlue"/>
       <Setter Property="FontStyle" Value="Oblique"/>
       <Setter Property="FontSize" Value="14"/>
    </Style>
</Window.Resources>

<syncfusion:SfDataGrid x:Name="dataGrid"
                       ShowGroupDropArea="True"
                       GroupSummaryCellStyle="{StaticResource customGroupSummary}"
                       ItemsSource="{Binding Orders}"/>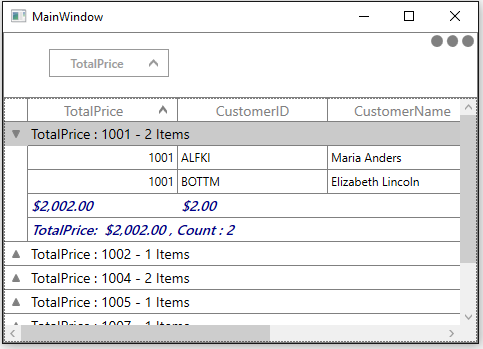
Styling GroupSummary rows
The group summary rows can be customized by writing style of TargetType GridGroupSummaryRowControl. You can set to particular SfDataGrid by setting SfDataGrid.GroupSummaryRowStyle property.
<Window.Resources>
    <Style TargetType="syncfusion:GroupSummaryRowControl" x:Key="customGroupSummaryRowControl">
        <Setter Property="Background" Value="Bisque"/>
    </Style>
</Window.Resources>

<syncfusion:SfDataGrid x:Name="dataGrid"
                       GroupSummaryRowStyle="{StaticResource customGroupSummaryRowControl}"
                       ShowGroupDropArea="True"
                       ItemsSource="{Binding Orders}"/>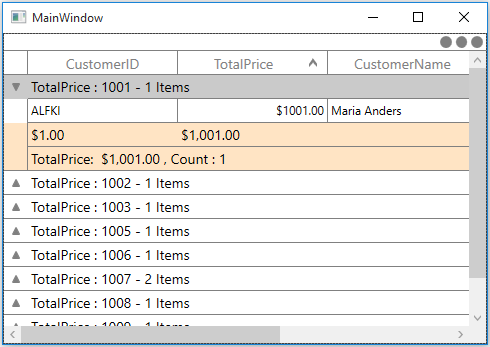
Styling TableSummary
Styling TableSummary cells
The table summary cells can be customized by writing style of TargetType GridTableSummaryCell. You can set to particular SfDataGrid by setting SfDataGrid.TableSummaryCellStyle property.
<Window.Resources>
    <Style x:Key="customTableSummary" TargetType="syncfusion:GridTableSummaryCell">
            <Setter Property="Foreground" Value="DarkBlue" />
            <Setter Property="FontSize" Value="16" />
            <Setter Property="FontWeight" Value="Bold" />
    </Style>
</Window.Resources>

<syncfusion:SfDataGrid x:Name="dataGrid"
                       ItemsSource="{Binding Orders}"
                       TableSummaryCellStyle="{StaticResource customTableSummary}"/>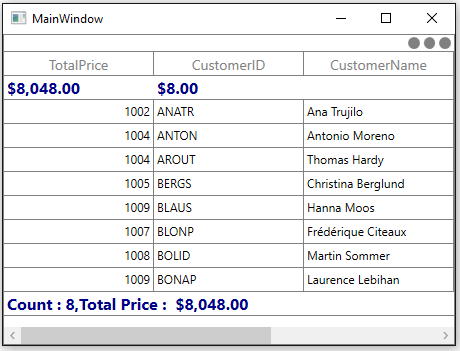
Styling TableSummary rows
The table summary rows can be customized by writing style of TargetType GridTableSummaryRowControl. You can set to particular SfDataGrid by setting SfDataGrid.TableSummaryRowStyle property.
<Window.Resources>
    <Style TargetType="syncfusion:TableSummaryRowControl" x:Key="tableSummaryRowStyle">
        <Setter Property="Background" Value="Bisque"/>
    </Style>
</Window.Resources>

<syncfusion:SfDataGrid x:Name="dataGrid"
                       ItemsSource="{Binding Orders}"
                       TableSummaryRowStyle="{StaticResource tableSummaryRowStyle}"  />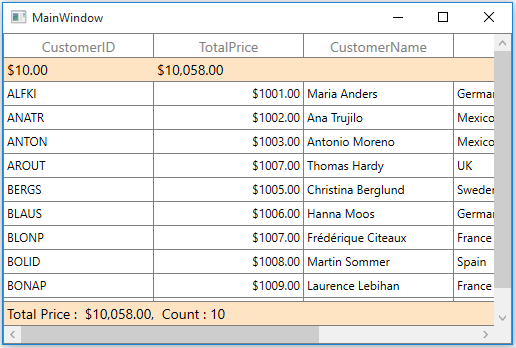
Styling UnboundRows
Styling unbound row cells
The unbound row cells can be customized by writing style of TargetType GridUnBoundRowCell. You can set to particular SfDataGrid by setting SfDataGrid.UnBoundRowCellStyle property.
<Style TargetType="syncfusion:GridUnBoundRowCell" x:Key="style">
    <Setter Property="FontWeight" Value="SemiBold"/>
</Style>

<syncfusion:SfDataGrid x:Name="sfDataGrid"
                       ItemsSource="{Binding YearlySalesDetails}"
                       UnBoundRowCellStyle="{StaticResource style}"/>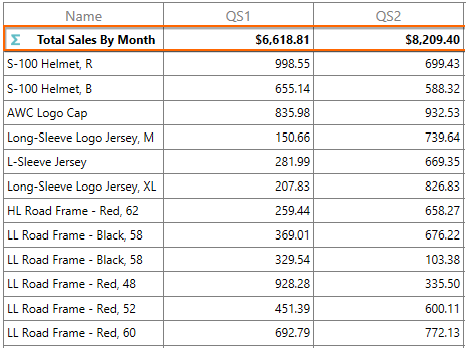
Styling unbound row
The unbound rows can be customized by writing style of TargetType UnBoundRowControl. You can set to particular SfDataGrid by setting SfDataGrid.UnBoundRowStyle property.
<Style TargetType="syncfusion:UnBoundRowControl" x:Key="rowStyle">
    <Setter Property="Foreground" Value="blue"/>
</Style>

<syncfusion:SfDataGrid x:Name="sfDataGrid"
                       ItemsSource="{Binding YearlySalesDetails}"
                       UnBoundRowStyle="{StaticResource rowStyle}"/>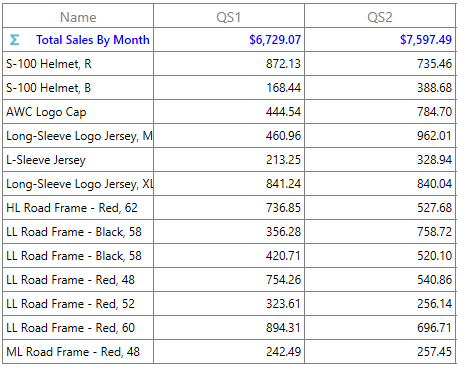
Styling AddNewRow
The appearance of AddNewRow can customized by writing style of TargetType AddNewRowControl.
<Window.Resources>
    <Style  TargetType="Syncfusion:AddNewRowControl">
        <Setter Property="AddNewRowText" Value="Enter value to add new row"/>
        <Setter Property="FontWeight" Value="Bold"/>
    </Style>
</Window.Resources>

<syncfusion:SfDataGrid x:Name="dataGrid"
                       AddNewRowPosition="Top"
                       ItemsSource="{Binding Orders}">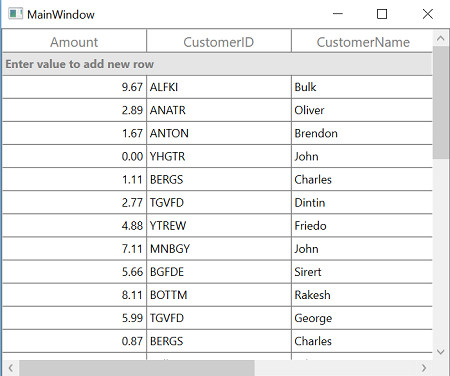
Styling RowHeader
The appearance of header row can be customized by writing style of TargetType HeaderRowControl.
<Window.Resources>
    <Style TargetType="syncfusion:HeaderRowControl">
        <Setter Property="Background" Value="Bisque"/>
        <Setter Property="BorderThickness" Value="1"/>
    </Style>
</Window.Resources>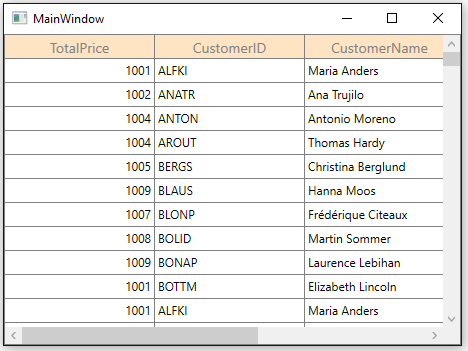
Displaying row index in row header cell
The appearance of row header can be customized by writing style of TargetType RowHeaderCell.
You can also display the row index value in the row header cell by customizing its style.
<Window.Resources>
    <Style TargetType="syncfusion:GridRowHeaderCell">
        <Setter Property="Template">
            <Setter.Value>
                <ControlTemplate TargetType="syncfusion:GridRowHeaderCell">
                    <Border x:Name="PART_RowHeaderCellBorder"
                        Background="Bisque"
                        BorderBrush="{TemplateBinding BorderBrush}"
                        BorderThickness="{TemplateBinding BorderThickness}">
                        <Grid>
                            <!--RowIndex is displayed here -->
                            <TextBlock HorizontalAlignment="Center"
                                    VerticalAlignment="Center"
                                    Text="{Binding RowIndex,
                                    RelativeSource={RelativeSource TemplatedParent}}"
                                    TextAlignment="Center" />
                        </Grid>
                    </Border>
                </ControlTemplate>
            </Setter.Value>
        </Setter>
    </Style>
</Window.Resources>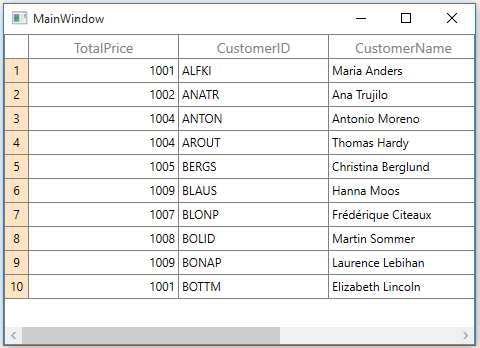
Template Selectors
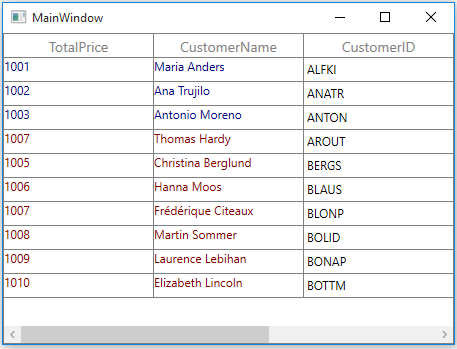
The DataTemplateSelectors can be used to set the custom templates to the cell or rows based on the data. You can set to particular SfDataGrid by setting SfDataGrid.CellTemplateSelector and the template can be set to particular column by setting GridColumn.CellTemplateSelector.
Here, custom template applied to TotalPrice and CustomerID columns.
<Application.Resources>
    <DataTemplate x:Key="CellTemplate1">
        <TextBlock Foreground="DarkBlue" Text="{Binding Path=Value}" />
    </DataTemplate>
    <DataTemplate x:Key="CellTemplate2">
        <TextBlock Foreground="DarkRed" Text="{Binding Path=Value}" />
    </DataTemplate>
</Application.Resources>

<Window.Resources>
        <local:GridCellTemplateSelector x:Key="templateSelector"/>
</Window.Resources>

<syncfusion:SfDataGrid x:Name="dataGrid"
                       ItemsSource="{Binding Orders}"
                       CellTemplateSelector="{StaticResource templateSelector}">
    <syncfusion:SfDataGrid.Columns>
        <syncfusion:GridTemplateColumn MappingName="TotalPrice"
                                       SetCellBoundValue="True" />
        <syncfusion:GridTemplateColumn MappingName="CustomerName" SetCellBoundValue="True"/>
    </syncfusion:SfDataGrid.Columns>
</syncfusion:SfDataGrid>
public class GridCellTemplateSelector : DataTemplateSelector
{
public override DataTemplate SelectTemplate(object item, DependencyObject container)
{
var data = (item as DataContextHelper).Record as OrderInfo;
//custom logic is checked.
if (data.TotalPrice < 1005)
return Application.Current.Resources["CellTemplate1"] as DataTemplate;
else
return Application.Current.Resources["CellTemplate2"] as DataTemplate;
}
}
Changing HeaderTemplates
You can customize the appearance of particular SfDataGrid column header by setting SfDataGrid.HeaderTemplate and the particular column header can be customized by setting GridColumn.HeaderTemplate.
<DataTemplate x:Key="headerTemplate">
    <Grid>
        <Grid.ColumnDefinitions>
            <ColumnDefinition Width="Auto" />
            <ColumnDefinition Width="*" />
        </Grid.ColumnDefinitions>
        <TextBlock Grid.Column="0" VerticalAlignment="Center"
            Foreground="Black" Text="{Binding}" />
        <Image Source="/Assets/S3.png" Grid.Column="1" />
    </Grid>
</DataTemplate>

<syncfusion:SfDataGrid x:Name="dataGrid"
                       ItemsSource="{Binding Orders}"
                       HeaderTemplate="{StaticResource headerTemplate}"/>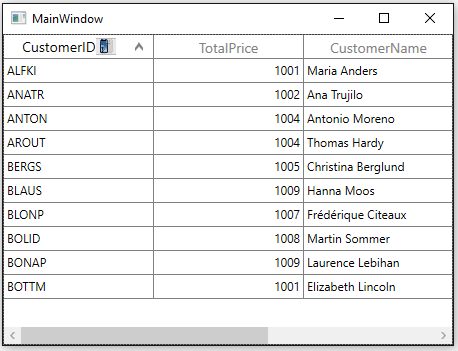
Loading different editor elements in a same column
The different editor elements can be loaded in a same template column conditionally based on data by setting GridTemplateColumn.EditTemplateSelector.
<Application.Resources>
    <DataTemplate x:Key="DatePicker">
        <DatePicker/>
    </DataTemplate>

    <DataTemplate x:Key="textbox">
        <TextBox/>
    </DataTemplate>
</Application.Resources>

<Window.Resources>
    <local:GridCellEditTemplateSelector x:Key="editSelector"/>
</Window.Resources>

<syncfusion:SfDataGrid x:Name="dataGrid"
                       AllowEditing="True"
                       ItemsSource="{Binding Orders}">
    <syncfusion:SfDataGrid.Columns>
        <syncfusion:GridTemplateColumn HeaderText="Employee Name"
                                       MappingName="CustomerName"
                                       EditTemplateSelector="{StaticResource editSelector}" />
    </syncfusion:SfDataGrid.Columns>
</syncfusion:SfDataGrid>
For example, in the below code example TextBox or DatePicker will be loaded based on TotalPrice property of Underlying data.
public class GridCellEditTemplateSelector : DataTemplateSelector
{

    public override DataTemplate SelectTemplate(object item, DependencyObject container)
    {

        if((item as OrderInfo).TotalPrice < 1005)
            return Application.Current.Resources["textbox"] as DataTemplate;

        else
            return Application.Current.Resources["DatePicker"] as DataTemplate;
    }
}
Styling DetailsViewDataGrid
The appearance of DetailsViewDataGrid can be customized by writing style of TargetType DetailsViewDataGrid. You can set to particular SfDataGrid by setting SfDataGrid.DetailsViewDataGridStyle property.
<Window.Resources>
    <Style TargetType="{x:Type syncfusion:DetailsViewDataGrid}" x:Key="detailsViewStyle">
        <Setter Property="Background" Value="Bisque" />
        <Setter Property="BorderBrush" Value="Blue" />
        <Setter Property="FontWeight" Value="Bold"/>
    </Style>
</Window.Resources>

<syncfusion:SfDataGrid x:Name="dataGrid"
                       AutoGenerateRelations="True"
                       DetailsViewDataGridStyle="{StaticResource detailsViewStyle}"
                       ItemsSource="{Binding Orders}"/>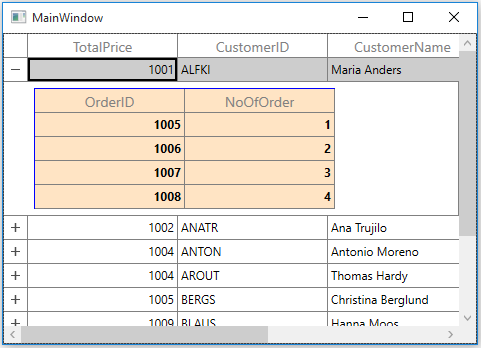
Styling Filter popup
Refer here for filter popup styling
Styling Sort icon
The appearance of sort indicator can be customized by editing the style of GridHeaderCellControl. Once the GridHeaderCellControl style is edited, go to PART_SortButtonPresenter.
Default GridHeaderCellControl style
<syncfusion:SortDirectionToVisibilityConverter x:Key="sortDirectionToVisibilityConverter" />
<syncfusion:SortDirectionToWidthConverter x:Key="sortDirectionToWidthConverter" />
<Style TargetType="syncfusion:GridHeaderCellControl">
<Setter Property="Background" Value="Red" />
<Setter Property="BorderBrush" Value="Gray" />
<Setter Property="BorderThickness" Value="0,0,1,1" />
<Setter Property="HorizontalContentAlignment" Value="Left" />
<Setter Property="Padding" Value="5,3,5,3" />
<Setter Property="Foreground" Value="Gray" />
<Setter Property="FontSize" Value="14" />
<Setter Property="FontWeight" Value="Normal" />
<Setter Property="IsTabStop" Value="False" />
<Setter Property="syncfusion:VisualContainer.WantsMouseInput" Value="True" />
<Setter Property="Template">
<Setter.Value>
<ControlTemplate TargetType="syncfusion:GridHeaderCellControl">
<Grid>
<VisualStateManager.VisualStateGroups>
<VisualStateGroup x:Name="HiddenColumnsResizingStates">
<VisualState x:Name="PreviousColumnHidden">
<Storyboard>
<ThicknessAnimationUsingKeyFrames BeginTime="0"
Duration="1"
Storyboard.TargetName="PART_HeaderCellBorder"
Storyboard.TargetProperty="BorderThickness">
<EasingThicknessKeyFrame KeyTime="0" Value="3, 0, 1, 1" />
</ThicknessAnimationUsingKeyFrames>
</Storyboard>
</VisualState>
<VisualState x:Name="HiddenState">
<Storyboard>
<ThicknessAnimationUsingKeyFrames BeginTime="0"
Duration="1"
Storyboard.TargetName="PART_HeaderCellBorder"
Storyboard.TargetProperty="BorderThickness">
<EasingThicknessKeyFrame KeyTime="0" Value="3, 0, 3, 1" />
</ThicknessAnimationUsingKeyFrames>
</Storyboard>
</VisualState>
<VisualState x:Name="NormalState" />
<VisualState x:Name="LastColumnHidden">
<Storyboard>
<ThicknessAnimationUsingKeyFrames BeginTime="0"
Duration="1"
Storyboard.TargetName="PART_HeaderCellBorder"
Storyboard.TargetProperty="BorderThickness">
<EasingThicknessKeyFrame KeyTime="0" Value="0, 0, 3, 1" />
</ThicknessAnimationUsingKeyFrames>
</Storyboard>
</VisualState>
</VisualStateGroup>
<VisualStateGroup x:Name="CommonStates">
<VisualState x:Name="MouseOver" />
<VisualState x:Name="Normal" />
</VisualStateGroup>
<VisualStateGroup x:Name="BorderStates">
<VisualState x:Name="NormalCell" />
<VisualState x:Name="FrozenColumnCell">
<Storyboard BeginTime="0">
<ThicknessAnimationUsingKeyFrames BeginTime="0"
Duration="1"
Storyboard.TargetName="PART_HeaderCellBorder"
Storyboard.TargetProperty="BorderThickness">
<EasingThicknessKeyFrame KeyTime="0" Value="0,0,1,1" />
</ThicknessAnimationUsingKeyFrames>
</Storyboard>
</VisualState>
<VisualState x:Name="FooterColumnCell">
<Storyboard BeginTime="0">
<ThicknessAnimationUsingKeyFrames BeginTime="0"
Duration="1"
Storyboard.TargetName="PART_FooterCellBorder"
Storyboard.TargetProperty="BorderThickness">
<EasingThicknessKeyFrame KeyTime="0" Value="1,0,1,1" />
</ThicknessAnimationUsingKeyFrames>
</Storyboard>
</VisualState>
<VisualState x:Name="BeforeFooterColumnCell">
<Storyboard BeginTime="0">
<ThicknessAnimationUsingKeyFrames BeginTime="0"
Duration="1"
Storyboard.TargetName="PART_FooterCellBorder"
Storyboard.TargetProperty="BorderThickness">
<EasingThicknessKeyFrame KeyTime="0" Value="0,0,0,1" />
</ThicknessAnimationUsingKeyFrames>
<ThicknessAnimationUsingKeyFrames BeginTime="0"
Duration="1"
Storyboard.TargetName="PART_HeaderCellBorder"
Storyboard.TargetProperty="BorderThickness">
<EasingThicknessKeyFrame KeyTime="0" Value="0,0,0,1" />
</ThicknessAnimationUsingKeyFrames>
</Storyboard>
</VisualState>
</VisualStateGroup>
</VisualStateManager.VisualStateGroups>
<Border x:Name="PART_FooterCellBorder"
Background="{TemplateBinding Background}"
BorderBrush="{TemplateBinding BorderBrush}" />
<Border x:Name="PART_HeaderCellBorder"
Background="{TemplateBinding Background}"
BorderBrush="{TemplateBinding BorderBrush}"
BorderThickness="{TemplateBinding BorderThickness}"
SnapsToDevicePixels="True">
<Grid Margin="{TemplateBinding Padding}" SnapsToDevicePixels="True">
<Grid.ColumnDefinitions>
<ColumnDefinition Width="*" />
<ColumnDefinition Width="Auto" />
<ColumnDefinition Width="Auto" />
</Grid.ColumnDefinitions>
<ContentPresenter HorizontalAlignment="{TemplateBinding HorizontalContentAlignment}"
VerticalAlignment="Center"
Focusable="False" />
<Border x:Name="PART_FilterPopUpPresenter" />
<Grid x:Name="PART_SortButtonPresenter"
Grid.Column="1"
SnapsToDevicePixels="True">
<Grid.ColumnDefinitions>
<ColumnDefinition Width="0" MinWidth="{Binding Path=SortDirection, Mode=OneWay, RelativeSource={RelativeSource TemplatedParent}, Converter={StaticResource sortDirectionToWidthConverter}}" />
<ColumnDefinition Width="*" />
</Grid.ColumnDefinitions>
<Path Width="8.938"
Height="8.138"
HorizontalAlignment="Center"
VerticalAlignment="Center"
Data="F1M753.644,-13.0589L753.736,-12.9639 753.557,-12.7816 732.137,8.63641 732.137,29.7119 756.445,5.40851 764.094,-2.24384 764.275,-2.42352 771.834,5.1286 796.137,29.4372 796.137,8.36163 774.722,-13.0589 764.181,-23.5967 753.644,-13.0589z"
Fill="Gray"
SnapsToDevicePixels="True"
Stretch="Fill"
Visibility="{Binding Path=SortDirection,
RelativeSource={RelativeSource TemplatedParent},
ConverterParameter=Ascending,
Converter={StaticResource sortDirectionToVisibilityConverter}}">
<Path.RenderTransform>
<TransformGroup>
<TransformGroup.Children>
<RotateTransform Angle="0" />
<ScaleTransform ScaleX="1" ScaleY="1" />
</TransformGroup.Children>
</TransformGroup>
</Path.RenderTransform>
</Path>
<Path Width="8.938"
Height="8.138"
HorizontalAlignment="Center"
VerticalAlignment="Center"
Data="F1M181.297,177.841L181.205,177.746 181.385,177.563 202.804,156.146 202.804,135.07 178.497,159.373 170.847,167.026 170.666,167.205 163.107,159.653 138.804,135.345 138.804,156.42 160.219,177.841 170.76,188.379 181.297,177.841z"
Fill="Gray"
SnapsToDevicePixels="True"
Stretch="Fill"
Visibility="{Binding Path=SortDirection,
RelativeSource={RelativeSource TemplatedParent},
ConverterParameter=Decending,
Converter={StaticResource sortDirectionToVisibilityConverter}}">
<Path.RenderTransform>
<TransformGroup>
<TransformGroup.Children>
<RotateTransform Angle="0" />
<ScaleTransform ScaleX="1" ScaleY="1" />
</TransformGroup.Children>
</TransformGroup>
</Path.RenderTransform>
</Path>
<TextBlock Grid.Column="1"
Margin="0,-4,0,0"
VerticalAlignment="Center"
FontSize="10"
Foreground="{TemplateBinding Foreground}"
SnapsToDevicePixels="True"
Text="{TemplateBinding SortNumber}"
Visibility="{TemplateBinding SortNumberVisibility}" />
</Grid>
<syncfusion:FilterToggleButton x:Name="PART_FilterToggleButton"
Grid.Column="2"
HorizontalAlignment="Stretch"
VerticalAlignment="Stretch"
SnapsToDevicePixels="True"
Visibility="{TemplateBinding FilterIconVisiblity}" />
</Grid>
</Border>
</Grid>
</ControlTemplate>
</Setter.Value>
</Setter>
</Style>Totally two paths will be present under the PART_SortButtonPresenter. You can change the appearance of Ascending sort indicator by customizing first path present in this.
Here, height and color of the indicator is customized in the below code example.
Customizing Ascending Sort Indicator
<Path Data="F1M753.644,-13.0589L753.736,-12.9639 753.557,-12.7816 732.137,8.63641 732.137,29.7119 756.445,5.40851 764.094,-2.24384 764.275,-2.42352 771.834,5.1286 796.137,29.4372 796.137,8.36163 774.722,-13.0589 764.181,-23.5967 753.644,-13.0589z"
        Fill="DarkBlue"
        HorizontalAlignment="Center"
        Height="15"
        Stretch="Fill"
        SnapsToDevicePixels="True"
        VerticalAlignment="Center"
        Width="12">
    <Path.RenderTransform>
        <TransformGroup>
            <RotateTransform Angle="0"/>
            <ScaleTransform ScaleY="1" ScaleX="1"/>
        </TransformGroup>
    </Path.RenderTransform>
    <Path.Visibility>
        <Binding ConverterParameter="Ascending" Path="SortDirection" RelativeSource="{RelativeSource TemplatedParent}">
            <Binding.Converter>
                <syncfusion:SortDirectionToVisibilityConverter/>
            </Binding.Converter>
        </Binding>
    </Path.Visibility>
</Path>
And also, you can change the appearance of Descending sort indicator by customizing second path present in PART_SortButtonPresenter. For example, in the below code example height and color of the indicator is changed.
![]()
Customizing Descending Sort Indicator
<Path Data="F1M181.297,177.841L181.205,177.746 181.385,177.563 202.804,156.146 202.804,135.07 178.497,159.373 170.847,167.026 170.666,167.205 163.107,159.653 138.804,135.345 138.804,156.42 160.219,177.841 170.76,188.379 181.297,177.841z"
        Fill="DarkGreen"
        HorizontalAlignment="Center"
        Height="15"
        Stretch="Fill"
        SnapsToDevicePixels="True"
        VerticalAlignment="Center"
        Width="11">
    <Path.RenderTransform>
        <TransformGroup>
            <RotateTransform Angle="0"/>
            <ScaleTransform ScaleY="1" ScaleX="1"/>
        </TransformGroup>
    </Path.RenderTransform>
    <Path.Visibility>
        <Binding ConverterParameter="Decending" Path="SortDirection" RelativeSource="{RelativeSource TemplatedParent}">
            <Binding.Converter>
                <syncfusion:SortDirectionToVisibilityConverter/>
            </Binding.Converter>
        </Binding>
    </Path.Visibility>
</Path>![]()
Styling GroupDropArea
The appearance of GroupDropArea can be customized by writing style of TargetType GroupDropArea. You can disable the water mark displayed in GroupDropArea by setting WaterMarkTextVisibility as Collapsed.
<Window.Resources>
    <Style TargetType="syncfusion:GroupDropArea">
        <Setter Property="BorderBrush" Value="Blue"/>
        <Setter Property="Foreground" Value="DarkBlue"/>
        <Setter Property="FontWeight" Value="Medium"/>
        <Setter Property="WatermarkTextVisibility" Value="Visible"/>
    </Style>
</Window.Resources>

<syncfusion:SfDataGrid x:Name="dataGrid"
                       ShowGroupDropArea="True"
                       ItemsSource="{Binding Orders}"/>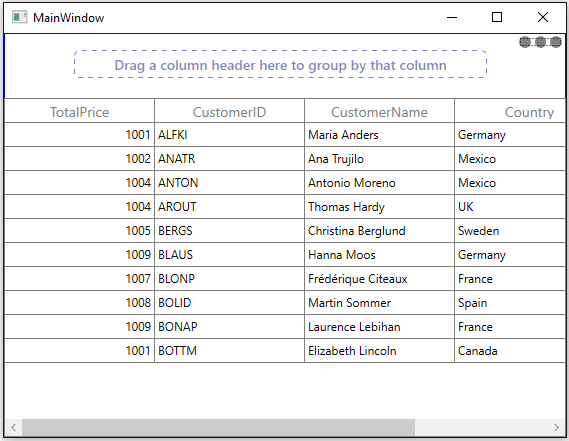
Showing busy indicator before loading records
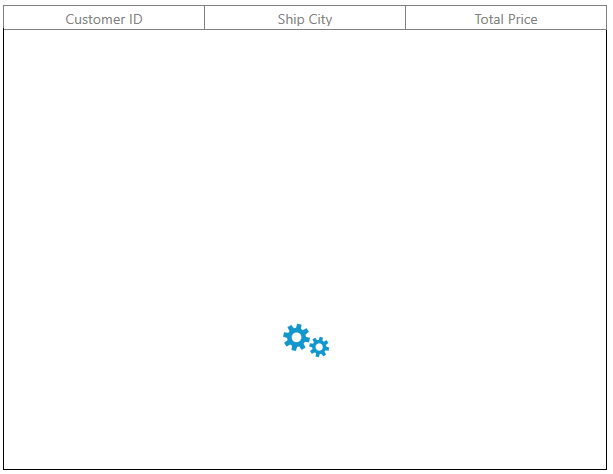
You can show the indication of data loading with the help of BusyIndicator by setting BusyIndicator.IsBusy as True and you can stop it by setting BusyIndicator.IsBusy as false in the ItemsSourceChanged event.
<Syncfusion:SfBusyIndicator Name="sfBusyIndicator"
                            IsBusy="True"
                            Margin="5"
                            VerticalAlignment="Center"
AnimationType="Gear"/>sfDataGrid.Loaded += sfDataGrid_Loaded;
sfDataGrid.ItemsSourceChanged += sfDataGrid_ItemsSourceChanged;
async void sfDataGrid_Loaded(object sender, RoutedEventArgs e)
{
this.sfDataGrid.ItemsSource = await (this.DataContext as ViewModel).GetRecords();
}
void sfDataGrid_ItemsSourceChanged(object sender, GridItemsSourceChangedEventArgs e)
{
sfBusyIndicator.IsBusy = false;
}