Bar Pointer in Flutter Linear Gauge (SfLinearGauge)
18 Nov 201823 minutes to read
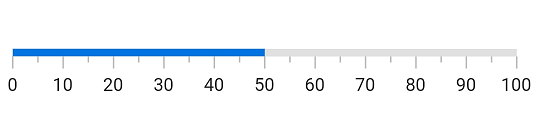
A bar pointer is an accenting line or shaded background that can be placed on a Linear Gauge to mark any current value in the axis track. The bar pointers always start from the minimum value of the axis and end with the specified value. The value property is a required parameter for creating a bar pointer.
Default bar pointer
The following code sample creates a default bar pointer with the value 50.
import 'package:flutter/material.dart';
import 'package:syncfusion_flutter_gauges/gauges.dart';

void main() => runApp(const LinearGaugeDemo());

class LinearGaugeDemo extends StatelessWidget {
  const LinearGaugeDemo({Key? key}) : super(key: key);

  @override
  Widget build(BuildContext context) {
    return MaterialApp(
      home: Scaffold(
        body: Center(
          child: SfLinearGauge(
            barPointers: [
              LinearBarPointer(
                value: 50
              )
            ],
          ),
        ),
      ),
    );
  }
}
Customize bar pointer thickness
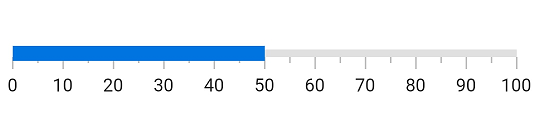
The thickness can be changed by the thickness property of the bar pointer. The following code sample demonstrates the same.
import 'package:flutter/material.dart';
import 'package:syncfusion_flutter_gauges/gauges.dart';

void main() => runApp(const LinearGaugeDemo());

class LinearGaugeDemo extends StatelessWidget {
  const LinearGaugeDemo({Key? key}) : super(key: key);

  @override
  Widget build(BuildContext context) {
    return MaterialApp(
      color: Colors.white,
      home: Scaffold(
        body: Center(
          child: SfLinearGauge(
            barPointers: [
              LinearBarPointer(
                value: 50,
                thickness: 10,
              )
            ],
          ),
        ),
      ),
    );
  }
}
Customize edge style
The edge style can be changed with the edgeStyle property of the bar pointer. The edge style can be any of the startCurve, endCurve, bothCurve, and bothFlat options. The default value is bothFlat.
import 'package:flutter/material.dart';
import 'package:syncfusion_flutter_gauges/gauges.dart';

void main() => runApp(const LinearGaugeDemo());

class LinearGaugeDemo extends StatelessWidget {
  const LinearGaugeDemo({Key? key}) : super(key: key);

  @override
  Widget build(BuildContext context) {
    return MaterialApp(
      color: Colors.white,
      home: Scaffold(
        body: Center(
          child: SfLinearGauge(
            barPointers: [
              LinearBarPointer(
                value: 50,
                // Changed the thickness to make the curve visible
                thickness: 10,
                //Updated the edge style as curve at end position
                edgeStyle: LinearEdgeStyle.endCurve
              )
            ],
          ),
        ),
      ),
    );
  }
}
Customize the position
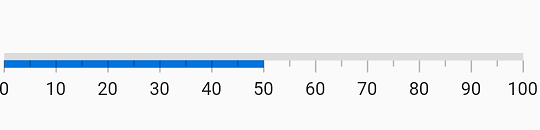
By default, the bar pointer is positioned cross to the axis. This position can be changed by the position property of a bar pointer. It is possible to position the bar pointer inside, cross, or outside the axis. The following code sample demonstrates how to change the bar pointer position to inside the axis.
import 'package:flutter/material.dart';
import 'package:syncfusion_flutter_gauges/gauges.dart';

void main() => runApp(const LinearGaugeDemo());

class LinearGaugeDemo extends StatelessWidget {
  const LinearGaugeDemo({Key? key}) : super(key: key);

  @override
  Widget build(BuildContext context) {
    return MaterialApp(
      home: Scaffold(
        body: Center(
          child: SfLinearGauge(
            barPointers: [
              LinearBarPointer(
                value: 50,
                position: LinearElementPosition.inside
              )
            ],
          ),
        ),
      ),
    );
  }
}
Customize the offset
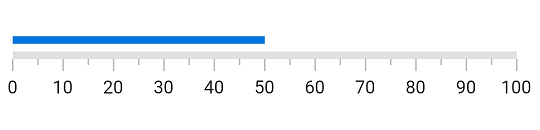
In addition to positioning the bar pointer, it is also possible to change the offset of the bar pointer. The offset is the distance from the axis and it cannot be negative. Cross-positioned elements will not be affected by the offset value. The following code sample demonstrates how to change the offset value of the bar pointer.
import 'package:flutter/material.dart';
import 'package:syncfusion_flutter_gauges/gauges.dart';

void main() => runApp(const LinearGaugeDemo());

class LinearGaugeDemo extends StatelessWidget {
  const LinearGaugeDemo({Key? key}) : super(key: key);

  @override
  Widget build(BuildContext context) {
    return MaterialApp(
      color: Colors.white,
      home: Scaffold(
        body: Center(
          child: SfLinearGauge(
            barPointers: [
              LinearBarPointer(
                value: 50,
                position: LinearElementPosition.outside,
                offset: 5
              )
            ],
          ),
        ),
      ),
    );
  }
}
Change the color of bar pointer
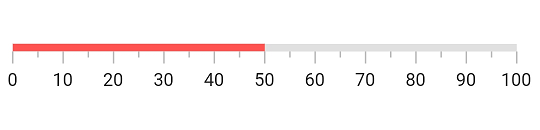
The color of the bar pointer can be changed by the color property. The following code sample demonstrates the same.
import 'package:flutter/material.dart';
import 'package:syncfusion_flutter_gauges/gauges.dart';

void main() => runApp(const LinearGaugeDemo());

class LinearGaugeDemo extends StatelessWidget {
  const LinearGaugeDemo({Key? key}) : super(key: key);

  @override
  Widget build(BuildContext context) {
    return MaterialApp(
      color: Colors.white,
      home: Scaffold(
        body: Center(
          child: SfLinearGauge(
            barPointers: [
              LinearBarPointer(
                value: 50,
                //Change the color
                color: Colors.redAccent
              )
            ],
          ),
        ),
      ),
    );
  }
}
Apply radial gradient
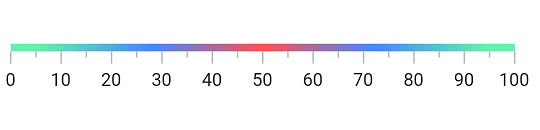
The gradient can be applied by using the shaderCallback property of bar pointer. The following code sample demonstrates how to apply a radial gradient to the bar pointer.
import 'package:flutter/material.dart';
import 'package:syncfusion_flutter_gauges/gauges.dart';

void main() => runApp(const LinearGaugeDemo());

class LinearGaugeDemo extends StatelessWidget {
  const LinearGaugeDemo({Key? key}) : super(key: key);

  @override
  Widget build(BuildContext context) {
    return MaterialApp(
      color: Colors.white,
      home: Scaffold(
        body: Center(
          child: SfLinearGauge(
            barPointers: [
              LinearBarPointer(
                value: 100,
                //Apply radial gradient
                shaderCallback: (bounds) => RadialGradient(
                  radius: 30,
                  colors: [
                    Colors.redAccent,
                    Colors.blueAccent,
                    Colors.greenAccent,
                  ],
                ).createShader(bounds))
            ],
          ),
        ),
      ),
    );
  }
}
Apply linear gradient
The gradient can be applied by using the shaderCallback property of bar pointer. The following code sample demonstrates how to apply a linear gradient to the bar pointer.
import 'package:flutter/material.dart';
import 'package:syncfusion_flutter_gauges/gauges.dart';

void main() => runApp(const LinearGaugeDemo());

class LinearGaugeDemo extends StatelessWidget {
  const LinearGaugeDemo({Key? key}) : super(key: key);

  @override
  Widget build(BuildContext context) {
    return MaterialApp(
      color: Colors.white,
      home: Scaffold(
        body: Center(
          child: SfLinearGauge(
            barPointers: [
              LinearBarPointer(
                value: 100,
                thickness: 10,
                //Apply linear gradient
                shaderCallback: (bounds) => LinearGradient(
                    begin: Alignment.centerLeft,
                    end: Alignment.centerRight,
                    colors: [Colors.redAccent, Colors.blueAccent]
                ).createShader(bounds)
              ),
            ],
          ),
        ),
      ),
    );
  }
}
Apply sweep gradient
The gradient can be applied by using the shaderCallback property of the bar pointer. The following code sample demonstrates how to apply a sweep gradient to the bar pointer.
import 'package:flutter/material.dart';
import 'package:syncfusion_flutter_gauges/gauges.dart';

void main() => runApp(const LinearGaugeDemo());

class LinearGaugeDemo extends StatelessWidget {
  const LinearGaugeDemo({Key? key}) : super(key: key);

  @override
  Widget build(BuildContext context) {
    return MaterialApp(
      color: Colors.white,
      home: Scaffold(
        body: Center(
          child: SfLinearGauge(
            barPointers: [
              LinearBarPointer(
                value: 100,
                thickness: 10,
                //Apply sweep gradient
                shaderCallback: (bounds) => SweepGradient(
                  startAngle: 0.1,
                  endAngle: 0.2,
                  colors: [
                    Colors.blueAccent,
                    Colors.greenAccent,
                    Colors.orangeAccent,
                  ],
                  tileMode: TileMode.mirror,
                  center: Alignment.bottomRight,
                ).createShader(bounds))
            ],
          ),
        ),
      ),
    );
  }
}
Customize border
The border can be customized with borderWidth and borderColor properties of the bar pointer. The following code examples demonstrates the same.
import 'package:flutter/material.dart';
import 'package:syncfusion_flutter_gauges/gauges.dart';

void main() => runApp(const LinearGaugeDemo());

class LinearGaugeDemo extends StatelessWidget {
  const LinearGaugeDemo({Key? key}) : super(key: key);

  @override
  Widget build(BuildContext context) {
    return MaterialApp(
      home: Scaffold(
        body: Center(
          child: SfLinearGauge(
            barPointers: [
              LinearBarPointer(
                value: 80,
                thickness: 10,
                borderWidth: 3,
                borderColor: Colors.cyanAccent,
              ),
            ],
          ),
        ),
      ),
    );
  }
}
Add multiple bar pointers
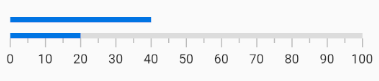
You can add multiple bar pointers in a LinearGauge. The bar pointers by default will overlap each other. When adding multiple bar pointers, specify an offset value to separate them. Use an offset value greater than the bar pointer thickness to avoid overlap. The below code example demonstrates adding two bar pointers with different offsets:
import 'package:flutter/material.dart';
import 'package:syncfusion_flutter_gauges/gauges.dart';

void main() => runApp(const LinearGaugeDemo());

class LinearGaugeDemo extends StatelessWidget {
  const LinearGaugeDemo({Key? key}) : super(key: key);

  @override
  Widget build(BuildContext context) {
    return MaterialApp(
      home: Scaffold(
        body: Center(
          child: SfLinearGauge(
            barPointers: [
              LinearBarPointer(
                value: 20,
                position: LinearElementPosition.outside
              ),
              LinearBarPointer(
                value: 40,
                // Setting offset to move the bar from previous one
                offset: 10,
                position: LinearElementPosition.outside
              ),
            ],
          ),
        ),
      ),
    );
  }
}
Animation completed callback
The onAnimationCompleted callback in the LinearBarPointer will be triggered when the bar pointer animation is completed. The default value of the onAnimationCompleted callback is null.
import 'package:flutter/material.dart';
import 'package:syncfusion_flutter_gauges/gauges.dart';

void main() => runApp(const LinearGaugeDemo());

class LinearGaugeDemo extends StatelessWidget {
  const LinearGaugeDemo({Key? key}) : super(key: key);

  @override
  Widget build(BuildContext context) {
    return MaterialApp(
      home: Scaffold(
        body: Center(
          child: SfLinearGauge(
            barPointers:[
              LinearBarPointer(
                onAnimationCompleted: () {
                  // Bar Pointer animation is completed
                  debugPrint('Bar Pointer animation is completed');
                },
              ),
            ],
          ),
        ),
      ),
    );
  }
}