Data Binding in Windows Forms TreeView
8 Jul 20269 minutes to read
TreeViewAdv binds to any table, collection of tables, custom objects, etc. by using the TreeViewAdv.DataSource property.
The following are the ways to bind various data sources to TreeViewAdv.
- Binding to Self-Referencing Data
- Binding to Data Relations
- Binding to Object-Relational Data
Binding to Self-Referencing Data
In this type, TreeViewAdv binds to self-referencing data where the TreeViewAdv is bound to single table instead of multiple related tables.
Parent-Child relationship for all the records is defined by setting the ParentMember and ChildMember properties to the respective fields in the data source. If the Parent ID of one record has the respective value in the Child ID of any other record from the table, then that record is considered to have a parent. If not, then the record is considered to have no parent and, in such case, it will not be visible in the TreeViewAdv.
If the value in ParentMember field of some records matches with the TreeViewAdv.SelfRelationRootValue, then those records are considered as root nodes of TreeViewAdv.
| Property | Description |
|---|---|
| DataSource | Gets or sets the data source object in TreeViewAdv. |
| DisplayMember | Gets or sets the field that populates the Text property of the TreeNodeAdv in TreeViewAdv. |
| ValueMember | Gets or sets the field that populates the Value property of TreeNodeAdv in TreeViewAdv. |
| ParentMember | Gets or sets a value indicating the parent data field which behaves as a parent node in TreeViewAdv. |
| ChildMember | Gets or sets a value indicating the child data field which behaves as a child node in TreeViewAdv. |
| DataMember | Gets or sets the table name that should be bound to the TreeViewAdv. |
| CheckedMember | Gets or sets a value indicating the field to populate the state of checkbox of TreeNodeAdv in TreeViewAdv. |
| SelfRelationRootValue | Gets or sets the value that defines the root object in a self-relational mode when data source is used to define the underlying tree data. |
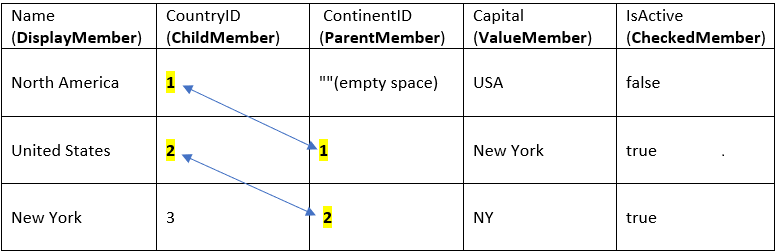
In the above table, North America is declared as root node by setting appropriate (or matching) SelfRelationRootValue. Here the value is set to empty and so North America is added as root node.
United States is declared as child of North America by setting appropriate ContinentID. Here the value is set to 1 and it matches the CountryID of North America. As a result, United States is added as child node of North America.
treeViewAdv1.SelfRelationRootValue = "";
treeViewAdv1.DisplayMember = "Name";
treeViewAdv1.ParentMember = "ContinentID";
treeViewAdv1.ChildMember = "CountryID";
treeViewAdv1.ValueMember = "Capital";
treeViewAdv1.CheckedMember = "IsActive";
treeViewAdv1.DataSource = Table_1;treeViewAdv1.SelfRelationRootValue = ""
treeViewAdv1.DisplayMember = "Name"
treeViewAdv1.ParentMember = "ContinentID"
treeViewAdv1.ChildMember = "CountryID"
treeViewAdv1.ValueMember = "Capital"
treeViewAdv1.CheckedMember = "IsActive"
treeViewAdv1.DataSource = Table_1NOTE
1) Root nodes are parentless (for example, see the “North America” node in the image above). All root nodes must have their parent member values (TreeViewAdv.ParentMember) set to the TreeViewAdv.SelfRelationRootValue property. If the property is not specified, you may notice an empty TreeViewAdv. To avoid this, we recommend that you always set the parent member values to TreeViewAdv.SelfRelationRootValue for root nodes.
2) You must specify the TreeViewAdv.DisplayMember, TreeViewAdv.ParentMember, and TreeViewAdv.ChildMember properties to populate the TreeViewAdv.
Binding to Data Relations
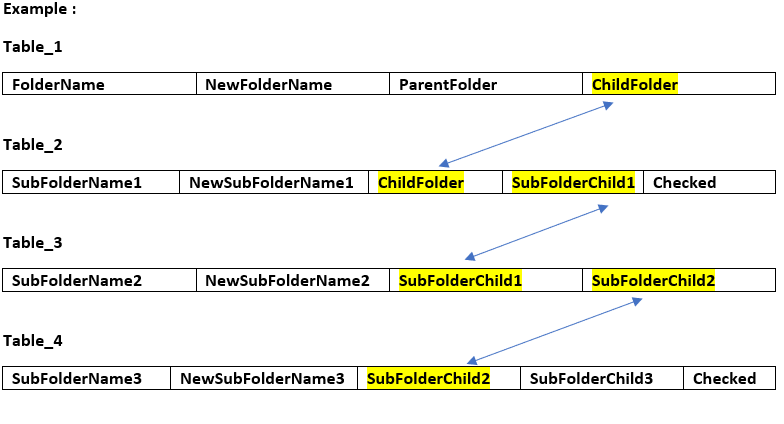
In this type, TreeViewAdv are bound to database where levels are created using DataRelation class. Each DataRelation class object describes the parent data being bound to, the child data being bound to and the data columns used to populate Text and selected Value properties of the nodes.
| S.No | Property Name | Description |
|---|---|---|
| 1 | DataRelations | Contains the collection of DataRelation in TreeViewAdv. |
| S.No | Class Name | Description |
|---|---|---|
| 1 | DataRelation | Represents a parent/child relationship between two DataTable objects. |
Syncfusion.Windows.Forms.Tools.DataRelation childRelation1;
Syncfusion.Windows.Forms.Tools.DataRelation childRelation2;
Syncfusion.Windows.Forms.Tools.DataRelation childRelation3;

childRelation1 = new Syncfusion.Windows.Forms.Tools.DataRelation(Table_2, "Table_2", "SubFolderName1", "ChildFolder", "SubFolderChild1", "SubFolderName1", "Checked");

childRelation2 = new Syncfusion.Windows.Forms.Tools.DataRelation(Table_3, "Table_3", "SubFolderName2", "SubFolderChild1", "SubFolderChild2");

childRelation3 = new Syncfusion.Windows.Forms.Tools.DataRelation(Table_4, "Table_4", "SubFolderName3", "SubFolderChild2", "SubFolderChild3", "SubFolderName3", "Checked");

treeViewAdv1.DataRelations.Clear();

treeViewAdv1.DisplayMember = "FolderName";
treeViewAdv1.ParentMember = "ParentFolder";
treeViewAdv1.ChildMember = "ChildFolder";

treeViewAdv1.DataRelations.Add(childRelation1);
treeViewAdv1.DataRelations.Add(childRelation2);
treeViewAdv1.DataRelations.Add(childRelation3);

treeViewAdv1.DataSource = Table_1;
Dim childRelation1 As Syncfusion.Windows.Forms.Tools.DataRelation
Dim childRelation2 As Syncfusion.Windows.Forms.Tools.DataRelation
Dim childRelation3 As Syncfusion.Windows.Forms.Tools.DataRelation
childRelation1 = New Syncfusion.Windows.Forms.Tools.DataRelation(Table_2, "Table_2", "SubFolderName1", "ChildFolder", "SubFolderChild1", "SubFolderName1", "Checked")
childRelation2 = New Syncfusion.Windows.Forms.Tools.DataRelation(Table_3, "Table_3", "SubFolderName2", "SubFolderChild1", "SubFolderChild2")
childRelation3 = New Syncfusion.Windows.Forms.Tools.DataRelation(Table_4, "Table_4", "SubFolderName3", "SubFolderChild2", "SubFolderChild3", "SubFolderName3", "Checked")
treeViewAdv1.DisplayMember = "FolderName"
treeViewAdv1.ParentMember = "ParentFolder"
treeViewAdv1.ChildMember = "ChildFolder"
treeViewAdv1.DataRelations.Add(childRelation1)
treeViewAdv1.DataRelations.Add(childRelation2)
treeViewAdv1.DataRelations.Add(childRelation3)
treeViewAdv1.DataSource = Table_1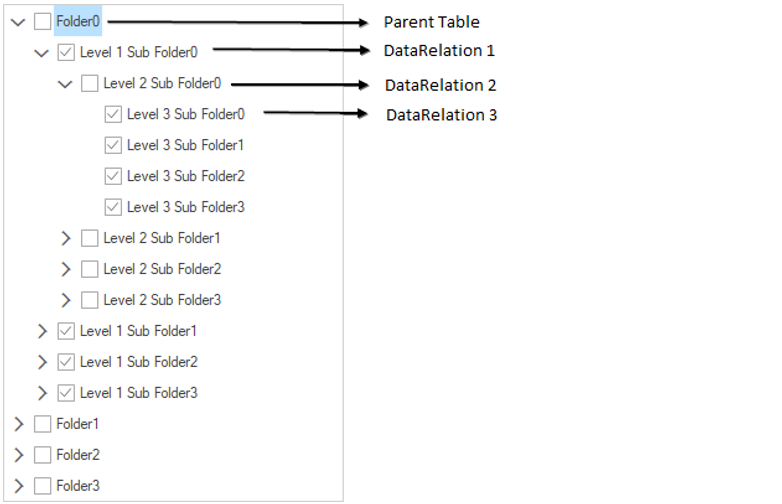
NOTE
1) In this type, you must specify DisplayMember, ParentMember, ChildMember properties mandatorily to populate appropriate TreeViewAdv.
2) Here levels are created using DataRelation, so if you want to dynamically add new level then you need to create new instance of DataRelation and add it to TreeViewAdv.DataRelations property with proper relation first.
Binding to Object-Relational Data
In this type, TreeViewAdv binds to class objects which have collections associated with other dependent class objects establishing proper relation.
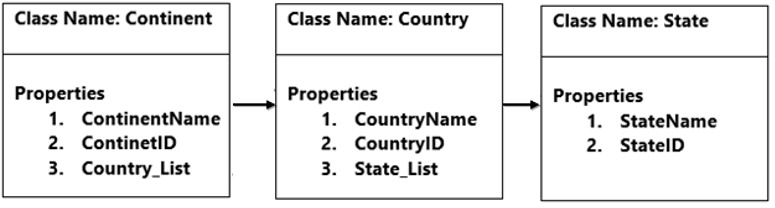
In this illustration, there are three classes named Continent, Country and State. In this case the Continent class has a property named ContinentName, ContinentID and Country_List which is a collection of Country objects. This is the first relation. The second relation is the State_List property in the Country class, it offers a reference to a collection of State.
You must specify the DisplayMember, ChildMember property and here you need not define ParentMember property. TreeViewAdv must display it in hierarchical view.
| S.No | Properties | Description |
|---|---|---|
| 1 | DisplayMember | Defines which property of the class needs to be in node's text. Example: Continent -> ContinentName, Country -> CountryName, State -> StateName. |
| 2 | ChildMember | Defines the class order. Example: Continent -> First level, Country -> Second level, State -> Third level. |
NOTE
ChildMemberandDisplayMemberuse a backslash-separated hierarchy path. In C# the backslash must be escaped (\\), while VB.NET uses a single backslash (\).
treeViewAdv1.DisplayMember = "ContinentName\\CountryName\\StateName";
treeViewAdv1.ChildMember = "Continent\\Country\\State";treeViewAdv1.DisplayMember = "ContinentName\CountryName\StateName"
treeViewAdv1.ChildMember = "Continent\Country\State"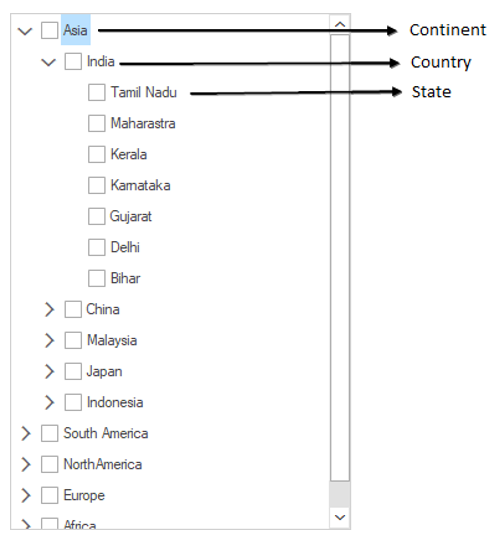
See Also
How to get value specified by ValueMember path for CheckedNodes?
Binding data through designer
The TreeViewAdv control supports to bind data from Microsoft Access database through designer. This section describes about how to bind the data from Microsoft Access database to TreeViewAdv.
Importing Microsoft Access Database
NOTE
Prerequisite: The Microsoft Access Database Engine 2010 (or later) Redistributable must be installed on the development machine so that the .NET Framework Data Provider for OLE DB can list the Microsoft Office Access Database Engine OLE DB Provider.
To load the data from a Microsoft Access database, follow the steps below.
1) On the View menu, select Other Windows > Data Sources.
2) In the Data Sources window, click Add New Data Source, the DataSource configuration wizard will be opened.
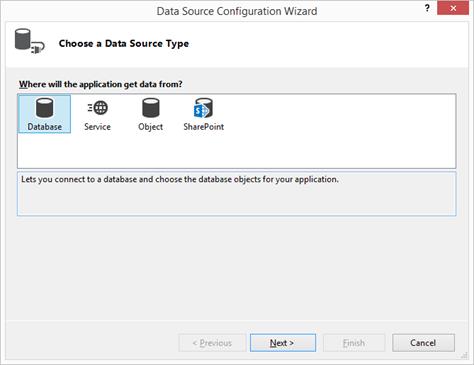
3) Select Database on the Choose a Data Source Type page, and then select Next.
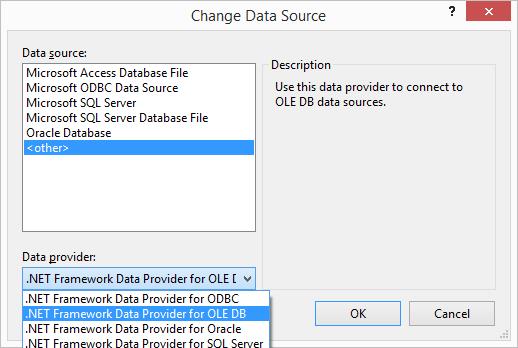
4) On the Choose your Data Connection page, select New Connection to configure a new data connection and Change the Data source to .NET Framework Data Provider for OLE DB.
5) In OLE DB Provider, select Microsoft Office 12.0 Access Database Engine OLE DB Provider. In Server or file name, specify the path and name of the .accdb file to which want to connect, and then select OK.
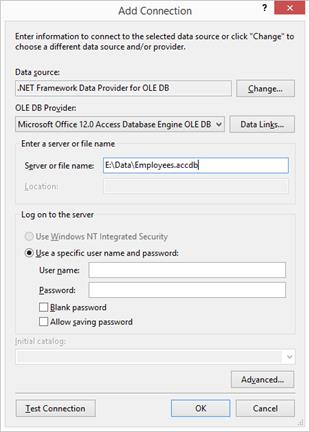
6) Select Next on the Choose your Data Connection page.
7) Select Next on the Save connection string to the Application Configuration file page.
8) Expand the Tables node on the Choose your Database Objects page.
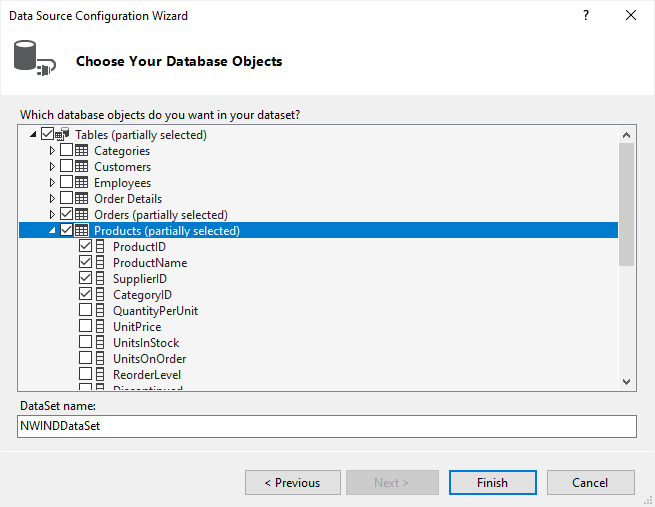
9) Select whatever tables or views in the dataset, and then select Finish.
Loading Data from Microsoft Access Database
To access the Microsoft Access database, follow the below steps.
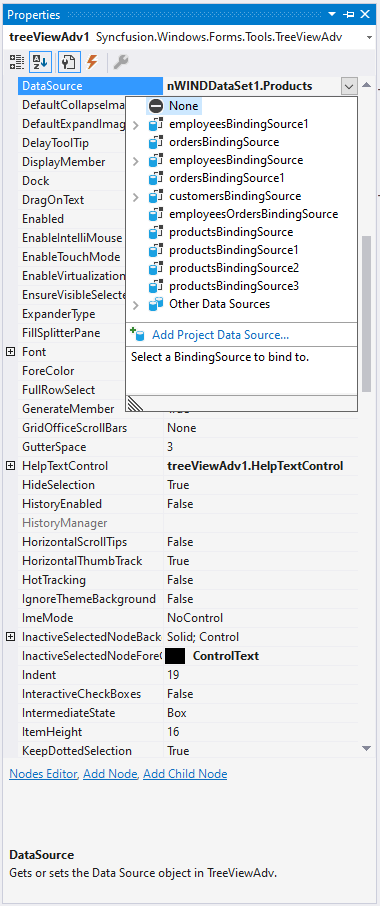
1) The DataSource property can be customized at designer level like below,
2) The value for DisplayMember, ValueMember and ParentMember properties can be selected as like below,
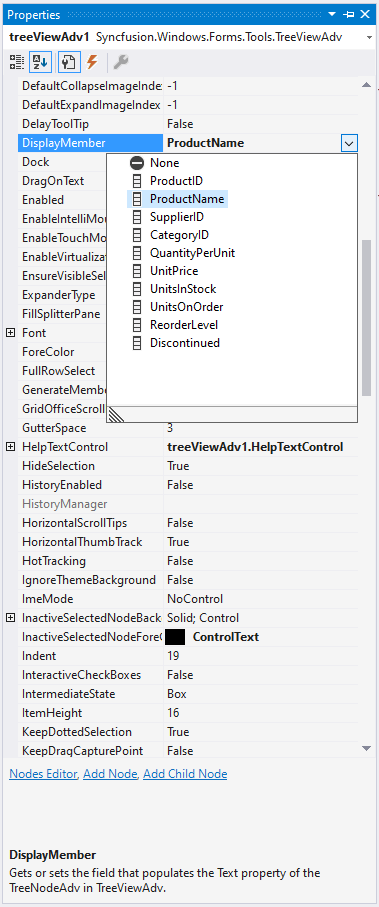
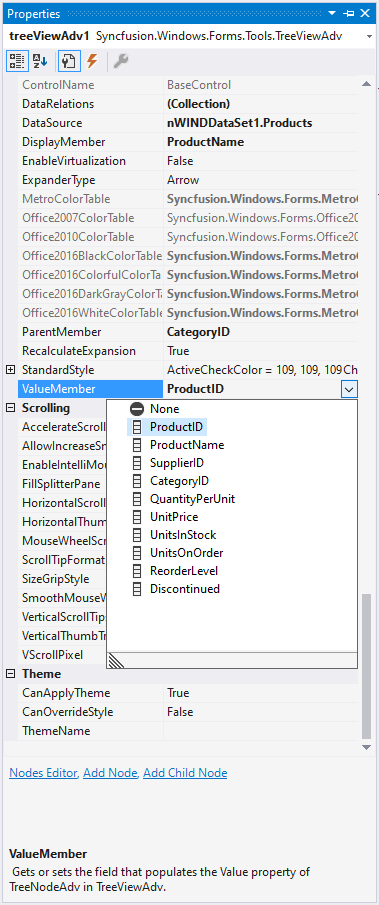

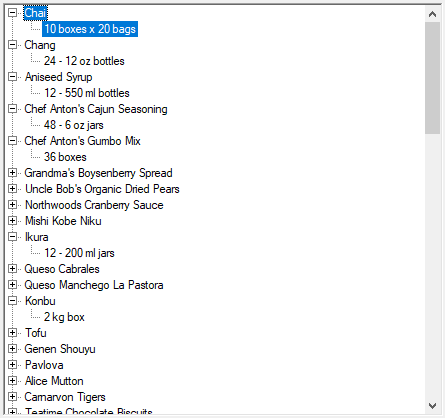
3) Based on the DataSource binding with the TreeViewAdv control, the items can be displayed by using DisplayMember, ValueMember and ParentMember properties.
Creating the DataRelations through designer
To create the DataRelations through designer follow the below steps,
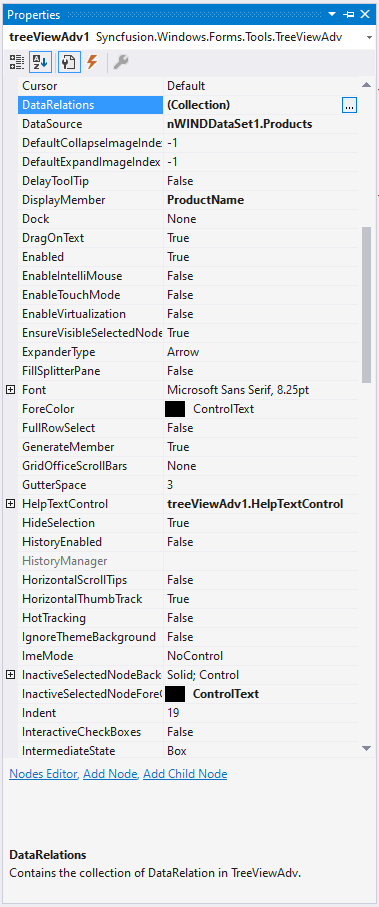
1) The DataRelations property can be customized at designer level like below,
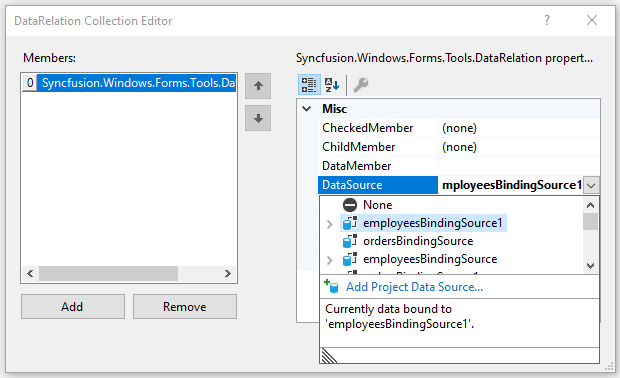
2) Click Add to create new data relation in the DataRelations Collection Editor.
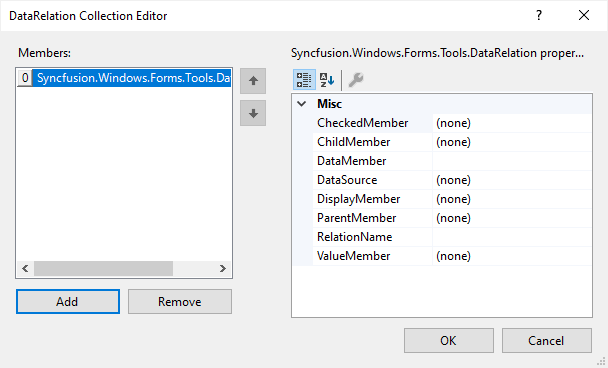
3) Choose the DataSource in the DataRelations Collection Editor like below,
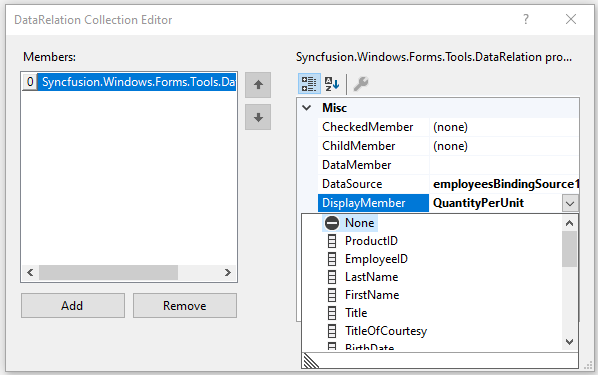
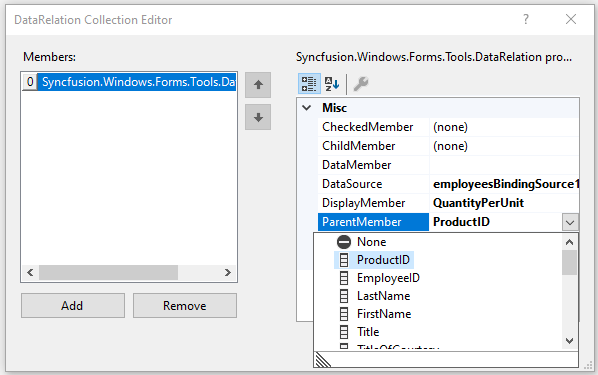
4) The value for DisplayMember and ParentMember properties can be selected as like below,
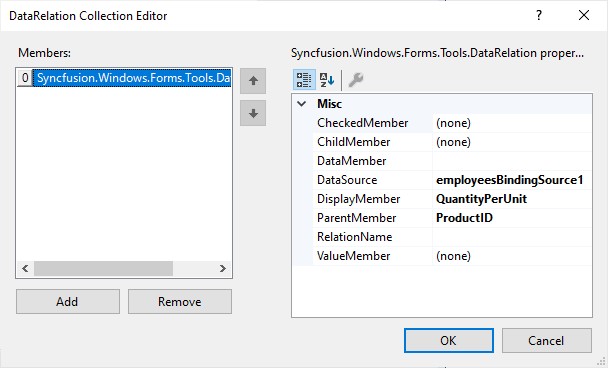
5) Based on the DataRelations binding with the TreeViewAdv control, the items can be displayed by using DisplayMember and ParentMember properties.
