Getting Started with Windows Forms DateTimePicker
18 Nov 20187 minutes to read
This section briefly describes how to create a new Windows Forms project in Visual Studio and add the SfDateTimeEdit control with its basic functionalities.
Assembly deployment
Refer to the Control Dependencies section to get the list of assemblies or details of NuGet package that needs to be added as reference to use the control in any application.
Refer to this documentation to find more details about installing NuGet packages in a Windows Forms application.
Adding the SfDateTimeEdit control via designer
The following steps describe how to create an SfDateTimeEdit control via designer.
-
Create a new Windows Forms application in Visual Studio.
-
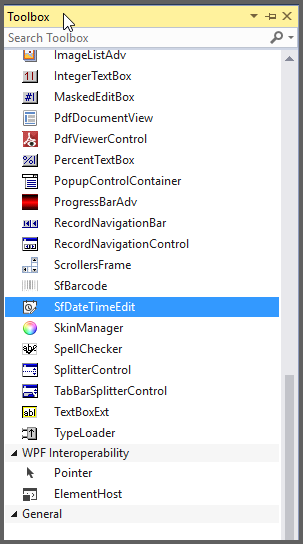
Add the SfDateTimeEdit control to an application by dragging it from the toolbox to design view. The following dependent assemblies will be added automatically:
- Syncfusion.Core.WinForms
- Syncfusion.SfInput.WinForms
- Syncfusion.Shared.Base
Adding SfDateTimeEdit control via code
The following steps describe how to create an SfDateTimeEdit control programmatically:
-
Create a C# or VB application via Visual Studio.
-
Add the following assembly references to the project:
- Syncfusion.Core.WinForms
- Syncfusion.SfInput.WinForms
- Syncfusion.Shared.Base
-
Include the required namespace.
using Syncfusion.WinForms.Input;

   using Syncfusion.WinForms.Input;
Imports Syncfusion.WinForms.Input- Create an instance of the SfDateTimeEdit control, and then add it to the form.
using Syncfusion.WinForms.Input;

   SfDateTimeEdit sfDateTimeEdit = new SfDateTimeEdit();

   this.Controls.Add(sfDateTimeEdit);
Imports Syncfusion.WinForms.Input
Dim sfDateTimeEdit As New SfDateTimeEdit()
Me.Controls.Add(sfDateTimeEdit)Date range
In a real-time appointment scenario, the appointment is open only for a limited number of days. You have to select a date and time within given range using the MinDateTime and MaxDateTime properties, which enable specified date range in the SfDateTimeEdit control.
using Syncfusion.WinForms.Input;

Syncfusion.WinForms.Input.SfDateTimeEdit dateTimeEdit = new Syncfusion.WinForms.Input.SfDateTimeEdit();

this.Controls.Add(dateTimeEdit);

dateTimeEdit.Value = new DateTime(2018, 2, 16);

dateTimeEdit.MinDateTime = new DateTime(2018, 2, 3);

dateTimeEdit.MaxDateTime = new DateTime(2018, 2, 27);
Imports Syncfusion.WinForms.Input
Dim dateTimeEdit As New Syncfusion.WinForms.Input.SfDateTimeEdit()
Me.Controls.Add(dateTimeEdit)
dateTimeEdit.Value = New DateTime(2018, 2, 16)
dateTimeEdit.MinDateTime = New DateTime(2018, 2, 3)
dateTimeEdit.MaxDateTime = New DateTime(2018, 2, 27)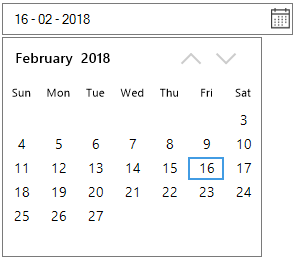
Editing mode
The date-time value in the DateTimeEdit can be edited in two ways as follows.
- Default Editing
- Mask Editing
Editing modes can be changed using the DateTimeEditingMode property of SfDateTimeEdit. The following code example demonstrates how to change the date-time editing mode.
using Syncfusion.WinForms.Input;

dateTimeEdit.DateTimeEditingMode = DateTimeEditingMode.Mask;
Imports Syncfusion.WinForms.Input
dateTimeEdit.DateTimeEditingMode = DateTimeEditingMode.Mask
Allow null value
The SfDateTimeEdit allows you to set Value to null in the mask mode of DateTimeEditing when AllowNull is set to true.
using Syncfusion.WinForms.Input;

dateTimeEdit.DateTimeEditingMode = DateTimeEditingMode.Mask;

dateTimeEdit.AllowNull = true;

dateTimeEdit.Watermark = "Choose a date";
Imports Syncfusion.WinForms.Input
dateTimeEdit.DateTimeEditingMode = DateTimeEditingMode.Mask
dateTimeEdit.AllowNull = true
dateTimeEdit.Watermark = "Choose a date"
Custom format
The custom pattern can be displayed in the SfDateTimeEdit control using the Format property when DateTimePattern is set to custom.
using Syncfusion.WinForms.Input;

dateTimeEdit.Value = new DateTime(2018, 2, 5);

dateTimeEdit.DateTimePattern = DateTimePattern.Custom;

//Setting Custom Pattern

dateTimeEdit.Format = "MM/dd/yy hh:mm:ss";
Imports Syncfusion.WinForms.Input
dateTimeEdit.Value = New DateTime(2018, 2, 5)
dateTimeEdit.DateTimePattern = DateTimePattern.Custom
'Setting Custom Pattern
dateTimeEdit.Format = "MM/dd/yy hh:mm:ss"
Configure up-down
You can edit the value of DateTimeEdit using the up-down button by setting the ShowUpDown property to true. The up-down button appears only when DateTimeEditingMode is set to mask.
using Syncfusion.WinForms.Input;

//Enable the UpDown Button

this.dateTimeEdit.ShowUpDown = true;
Imports Syncfusion.WinForms.Input
'Enable the UpDown Button
Me.dateTimeEdit.ShowUpDown = true
Configure the calculation of week number based on culture
You can get the current week number in Windows Forms DateTimePicker control by changing the CalendarWeekRule property value of date time format in CultureInfo. The default value of CalendarWeekRule property is FirstDay.
using Syncfusion.WinForms.Input;

SfDateTimeEdit sfdateTimeEdit1 = new SfDateTimeEdit();
CultureInfo info = new CultureInfo("en-EN");
info.DateTimeFormat.CalendarWeekRule = CalendarWeekRule.FirstFullWeek;
sfdateTimeEdit1.Culture = info;
Imports Syncfusion.WinForms.Input
Dim sfdateTimeEdit1 As SfDateTimeEdit = New SfDateTimeEdit()
Dim info As CultureInfo = New CultureInfo("en-EN")
info.DateTimeFormat.CalendarWeekRule = CalendarWeekRule.FirstFullWeek
sfdateTimeEdit1.Culture = info