Create Excel Files in .NET MAUI with Excel Library
14 Aug 202624 minutes to read
Syncfusion® Excel library for .NET MAUI platform can be used to create, read, edit Excel files. This also convert Excel files to PDF. Syncfusion® Excel library is compatible with .NET MAUI Windows, iOS, and Android platforms only.
Prerequisites:
To use the .NET MAUI project templates, install the Mobile development with .NET workload for Visual Studio. For more details, refer here.
The supported development environment is Visual Studio 2022 (17.3 or later) on Windows with the .NET MAUI workload installed, and .NET 8 or later.
Create a simple Excel report
The following steps illustrate creating a simple Invoice-formatted Excel document in a .NET MAUI application.
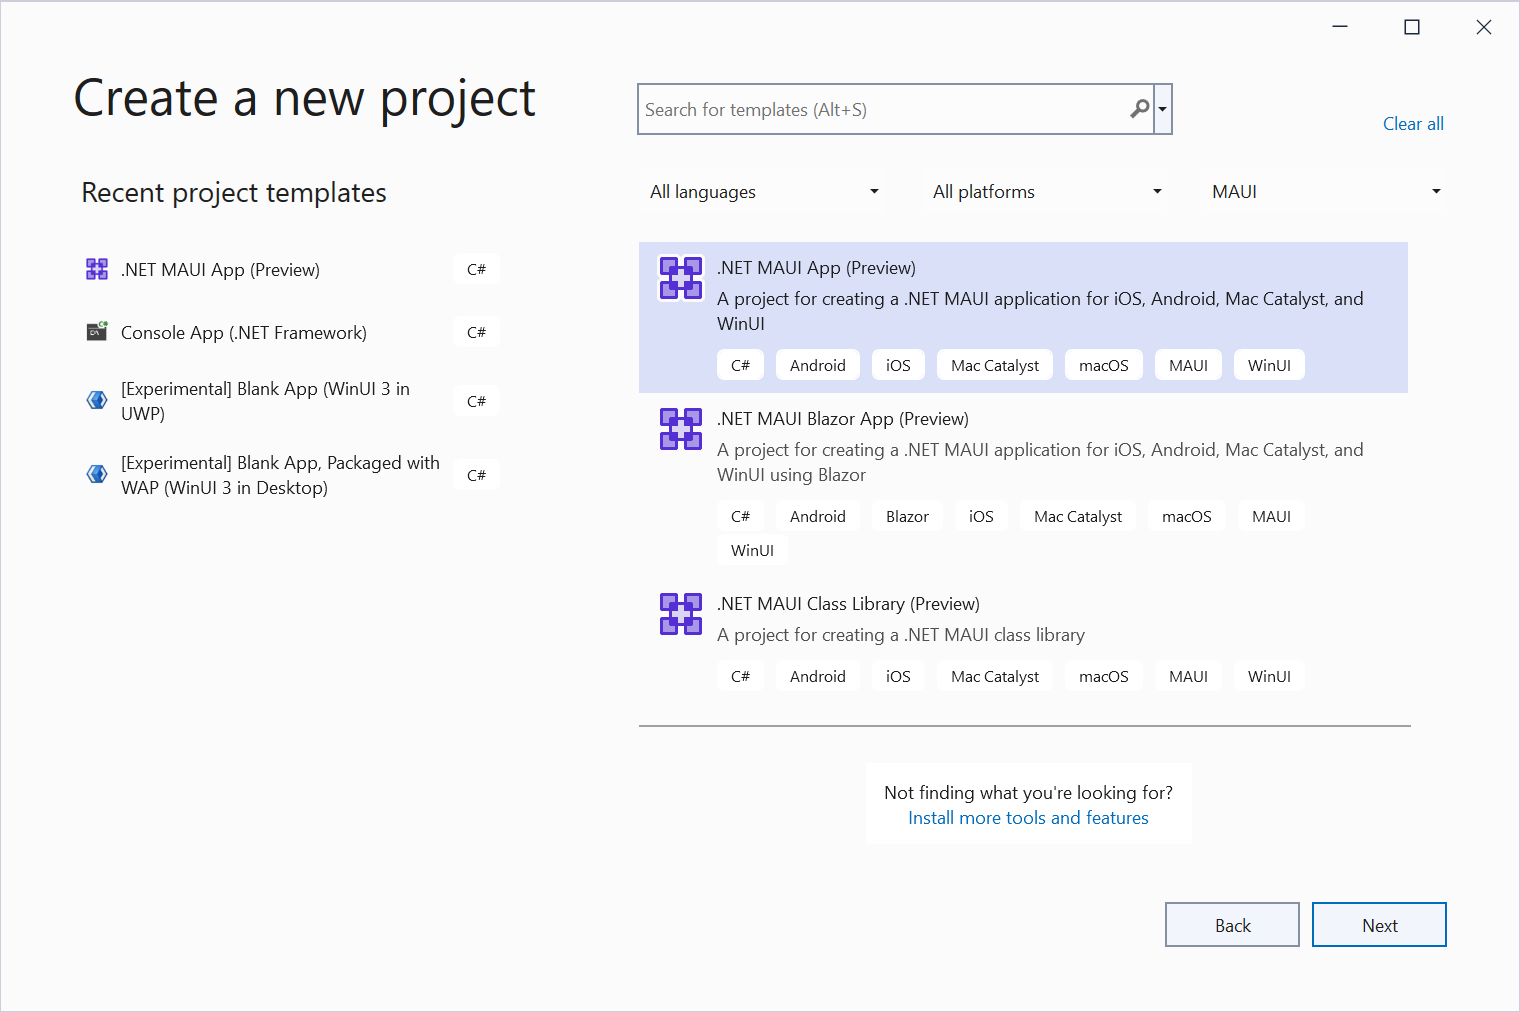
Step 1: Create a new project in Visual Studio 2022, select the .NET MAUI App template, and click the Next button.
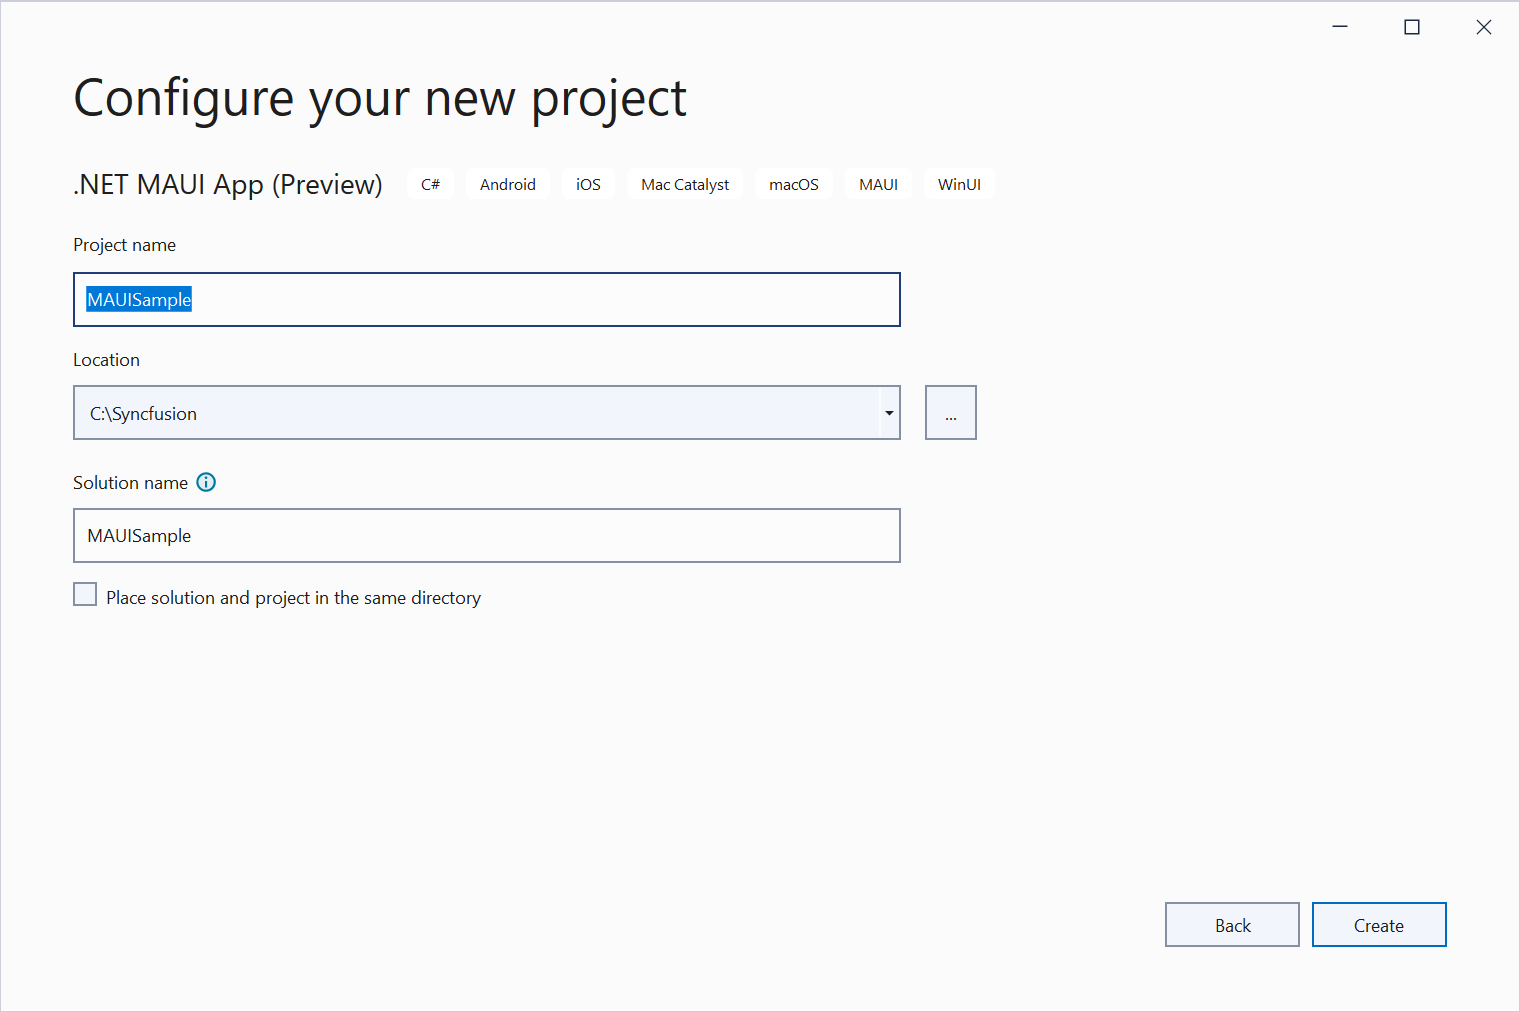
Step 2: Enter the project name and click Create.
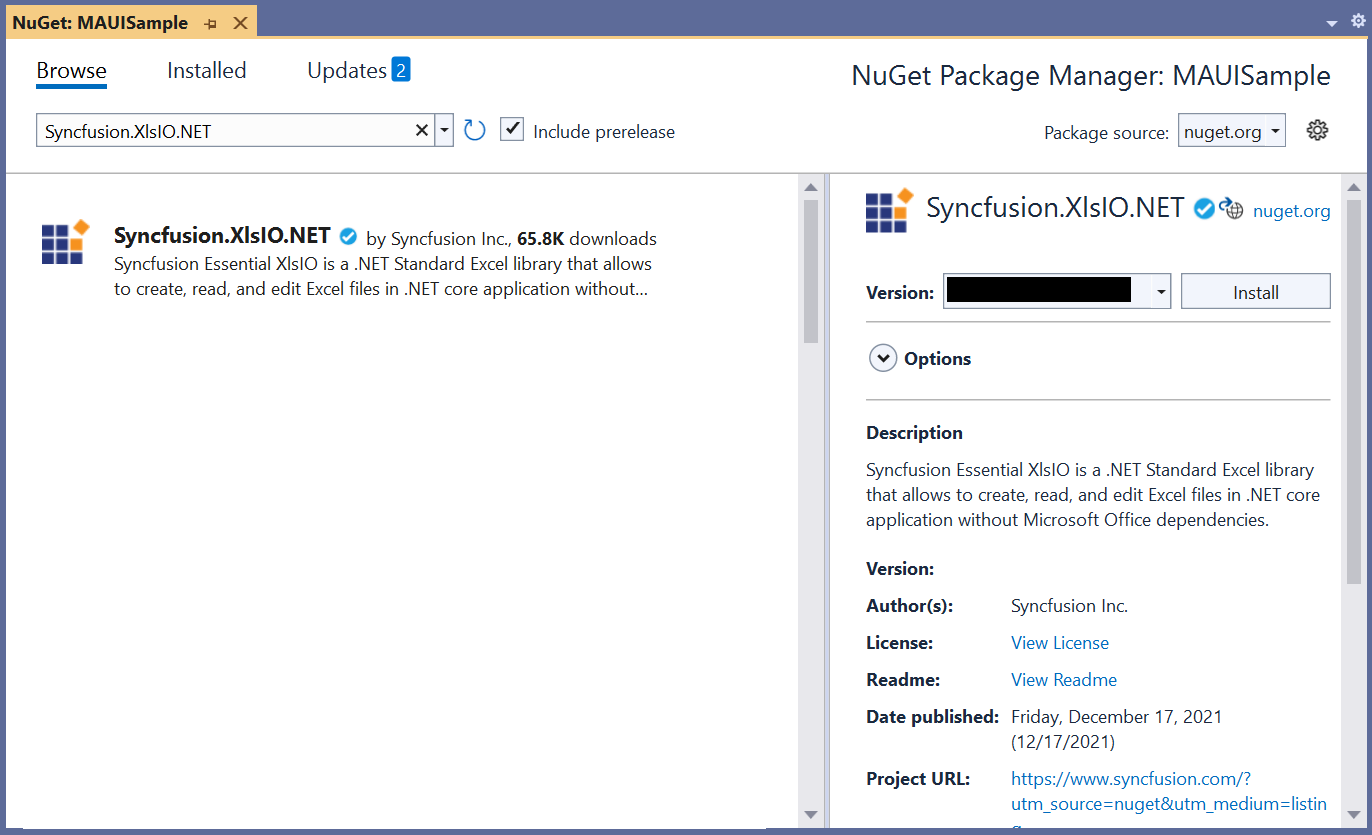
Step 3: Install the Syncfusion.XlsIO.NET NuGet package as a reference to your .NET MAUI application from NuGet.org.
Starting with v16.2.0.x, if you reference Syncfusion® assemblies from trial setup or from the NuGet feed, you also have to add “Syncfusion.Licensing” assembly reference and include a license key in your projects. Please refer to this link to know about registering Syncfusion® license key in your applications to use our components.
Open MainPage.xaml and add a new button. Also add a matching createExcel_Click event handler in MainPage.xaml.cs, as shown below.
<ContentPage xmlns="http://schemas.microsoft.com/dotnet/2021/maui"
          xmlns:x="http://schemas.microsoft.com/winfx/2009/xaml"
          x:Class="MAUISample.MainPage"
          BackgroundColor="{DynamicResource SecondaryColor}">
      <ScrollView>
        <Button
           Text="Create Excel"
           FontAttributes="Bold"
           Grid.Row="3"
           Clicked="createExcel_Click"
           HorizontalOptions="Center"
           VerticalOptions="Center"/>
       </ScrollView>
   </ContentPage>
Step 5: Include the following namespaces in the MainPage.xaml.cs file.
using Syncfusion.XlsIO;
   using System.IO;
   using System.Reflection;
Implement the createExcel_Click event handler in MainPage.xaml.cs and include the following code snippet to create an Excel document.
Before proceeding, add the AdventureCycles-Logo.png image to the project and set its Build Action to Embedded Resource in the file properties so it can be loaded using GetManifestResourceStream.
//Create an instance of ExcelEngine.
   using (ExcelEngine excelEngine = new ExcelEngine())
   {
     IApplication application = excelEngine.Excel;
     application.DefaultVersion = ExcelVersion.Xlsx;

     //Create a workbook with a worksheet
     IWorkbook workbook = application.Workbooks.Create(1);

     //Access first worksheet from the workbook instance.
     IWorksheet worksheet = workbook.Worksheets[0];

     Assembly executingAssembly = typeof(App).GetTypeInfo().Assembly;
     Stream inputStream = executingAssembly.GetManifestResourceStream("MAUISample.AdventureCycles-Logo.png");

     //Add a picture
     IPictureShape shape = worksheet.Pictures.AddPicture(1, 1, inputStream, 20, 20);

     //Disable gridlines in the worksheet
     worksheet.IsGridLinesVisible = false;

     //Enter values to the cells from A3 to A5
     worksheet.Range["A3"].Text = "46036 Michigan Ave";
     worksheet.Range["A4"].Text = "Canton, USA";
     worksheet.Range["A5"].Text = "Phone: +1 231-231-2310";

     //Make the text bold
     worksheet.Range["A3:A5"].CellStyle.Font.Bold = true;

     //Merge cells
     worksheet.Range["D1:E1"].Merge();

     //Enter text to the cell D1 and apply formatting.
     worksheet.Range["D1"].Text = "INVOICE";
     worksheet.Range["D1"].CellStyle.Font.Bold = true;
     worksheet.Range["D1"].CellStyle.Font.RGBColor = Syncfusion.Drawing.Color.FromArgb(0, 42, 118, 189);
     worksheet.Range["D1"].CellStyle.Font.Size = 35;

     //Apply alignment in the cell D1
     worksheet.Range["D1"].CellStyle.HorizontalAlignment = ExcelHAlign.HAlignRight;
     worksheet.Range["D1"].CellStyle.VerticalAlignment = ExcelVAlign.VAlignTop;

     //Enter values to the cells from D5 to E8
     worksheet.Range["D5"].Text = "INVOICE#";
     worksheet.Range["E5"].Text = "DATE";
     worksheet.Range["D6"].Number = 1028;
     worksheet.Range["E6"].Value = "12/31/2018";
     worksheet.Range["D7"].Text = "CUSTOMER ID";
     worksheet.Range["E7"].Text = "TERMS";
     worksheet.Range["D8"].Number = 564;
     worksheet.Range["E8"].Text = "Due Upon Receipt";

     //Apply RGB backcolor to the cells from D5 to E8
     worksheet.Range["D5:E5"].CellStyle.Color = Syncfusion.Drawing.Color.FromArgb(0, 42, 118, 189);
     worksheet.Range["D7:E7"].CellStyle.Color = Syncfusion.Drawing.Color.FromArgb(0, 42, 118, 189);

     //Apply known colors to the text in cells D5 to E8
     worksheet.Range["D5:E5"].CellStyle.Font.Color = ExcelKnownColors.White;
     worksheet.Range["D7:E7"].CellStyle.Font.Color = ExcelKnownColors.White;

     //Make the text as bold from D5 to E8
     worksheet.Range["D5:E8"].CellStyle.Font.Bold = true;

     //Apply alignment to the cells from D5 to E8
     worksheet.Range["D5:E8"].CellStyle.HorizontalAlignment = ExcelHAlign.HAlignCenter;
     worksheet.Range["D5:E5"].CellStyle.VerticalAlignment = ExcelVAlign.VAlignCenter;
     worksheet.Range["D7:E7"].CellStyle.VerticalAlignment = ExcelVAlign.VAlignCenter;
     worksheet.Range["D6:E6"].CellStyle.VerticalAlignment = ExcelVAlign.VAlignTop;

     //Enter value and applying formatting in the cell A7
     worksheet.Range["A7"].Text = "  BILL TO";
     worksheet.Range["A7"].CellStyle.Color = Syncfusion.Drawing.Color.FromArgb(0, 42, 118, 189);
     worksheet.Range["A7"].CellStyle.Font.Bold = true;
     worksheet.Range["A7"].CellStyle.Font.Color = ExcelKnownColors.White;

     //Apply alignment
     worksheet.Range["A7"].CellStyle.HorizontalAlignment = ExcelHAlign.HAlignLeft;
     worksheet.Range["A7"].CellStyle.VerticalAlignment = ExcelVAlign.VAlignCenter;

     //Enter values in the cells A8 to A12
     worksheet.Range["A8"].Text = "Steyn";
     worksheet.Range["A9"].Text = "Great Lakes Food Market";
     worksheet.Range["A10"].Text = "20 Whitehall Rd";
     worksheet.Range["A11"].Text = "North Muskegon,USA";
     worksheet.Range["A12"].Text = "+1 231-654-0000";

     //Create a Hyperlink for e-mail in the cell A13
     IHyperLink hyperlink = worksheet.HyperLinks.Add(worksheet.Range["A13"]);
     hyperlink.Type = ExcelHyperLinkType.Url;
     hyperlink.Address = "[email protected]";
     hyperlink.ScreenTip = "Send Mail";

     //Enter details of products and prices
     worksheet.Range["A15"].Text = "  DESCRIPTION";
     worksheet.Range["C15"].Text = "QTY";
     worksheet.Range["D15"].Text = "UNIT PRICE";
     worksheet.Range["E15"].Text = "AMOUNT";
     worksheet.Range["A16"].Text = "Cabrales Cheese";
     worksheet.Range["A17"].Text = "Chocos";
     worksheet.Range["A18"].Text = "Pasta";
     worksheet.Range["A19"].Text = "Cereals";
     worksheet.Range["A20"].Text = "Ice Cream";
     worksheet.Range["C16"].Number = 3;
     worksheet.Range["C17"].Number = 2;
     worksheet.Range["C18"].Number = 1;
     worksheet.Range["C19"].Number = 4;
     worksheet.Range["C20"].Number = 3;
     worksheet.Range["D16"].Number = 21;
     worksheet.Range["D17"].Number = 54;
     worksheet.Range["D18"].Number = 10;
     worksheet.Range["D19"].Number = 20;
     worksheet.Range["D20"].Number = 30;
     worksheet.Range["D23"].Text = "Total";

     //Apply number format
     worksheet.Range["D16:E22"].NumberFormat = "$0.00";
     worksheet.Range["E23"].NumberFormat = "$0.00";

     //Merge column A and B from row 15 to 22
     worksheet.Range["A15:B15"].Merge();
     worksheet.Range["A16:B16"].Merge();
     worksheet.Range["A17:B17"].Merge();
     worksheet.Range["A18:B18"].Merge();
     worksheet.Range["A19:B19"].Merge();
     worksheet.Range["A20:B20"].Merge();
     worksheet.Range["A21:B21"].Merge();
     worksheet.Range["A22:B22"].Merge();

     //Apply incremental formula for column Amount by multiplying Qty and UnitPrice
     application.EnableIncrementalFormula = true;
     worksheet.Range["E16:E20"].Formula = "=C16*D16";

     //Formula for Sum the total
     worksheet.Range["E23"].Formula = "=SUM(E16:E22)";

     //Apply borders
     worksheet.Range["A16:E22"].CellStyle.Borders[ExcelBordersIndex.EdgeTop].LineStyle = ExcelLineStyle.Thin;
     worksheet.Range["A16:E22"].CellStyle.Borders[ExcelBordersIndex.EdgeBottom].LineStyle = ExcelLineStyle.Thin;
     worksheet.Range["A16:E22"].CellStyle.Borders[ExcelBordersIndex.EdgeTop].Color = ExcelKnownColors.Grey_25_percent;
     worksheet.Range["A16:E22"].CellStyle.Borders[ExcelBordersIndex.EdgeBottom].Color = ExcelKnownColors.Grey_25_percent;
     worksheet.Range["A23:E23"].CellStyle.Borders[ExcelBordersIndex.EdgeTop].LineStyle = ExcelLineStyle.Thin;
     worksheet.Range["A23:E23"].CellStyle.Borders[ExcelBordersIndex.EdgeBottom].LineStyle = ExcelLineStyle.Thin;
     worksheet.Range["A23:E23"].CellStyle.Borders[ExcelBordersIndex.EdgeTop].Color = ExcelKnownColors.Black;
     worksheet.Range["A23:E23"].CellStyle.Borders[ExcelBordersIndex.EdgeBottom].Color = ExcelKnownColors.Black;

     //Apply font setting for cells with product details
     worksheet.Range["A3:E23"].CellStyle.Font.FontName = "Arial";
     worksheet.Range["A3:E23"].CellStyle.Font.Size = 10;
     worksheet.Range["A15:E15"].CellStyle.Font.Color = ExcelKnownColors.White;
     worksheet.Range["A15:E15"].CellStyle.Font.Bold = true;
     worksheet.Range["D23:E23"].CellStyle.Font.Bold = true;

     //Apply cell color
     worksheet.Range["A15:E15"].CellStyle.Color = Syncfusion.Drawing.Color.FromArgb(0, 42, 118, 189);

     //Apply alignment to cells with product details
     worksheet.Range["A15"].CellStyle.HorizontalAlignment = ExcelHAlign.HAlignLeft;
     worksheet.Range["C15:C22"].CellStyle.HorizontalAlignment = ExcelHAlign.HAlignCenter;
     worksheet.Range["D15:E15"].CellStyle.HorizontalAlignment = ExcelHAlign.HAlignCenter;

     //Apply row height and column width to look good
     worksheet.Range["A1"].ColumnWidth = 36;
     worksheet.Range["B1"].ColumnWidth = 11;
     worksheet.Range["C1"].ColumnWidth = 8;
     worksheet.Range["D1:E1"].ColumnWidth = 18;
     worksheet.Range["A1"].RowHeight = 47;
     worksheet.Range["A2"].RowHeight = 15;
     worksheet.Range["A3:A4"].RowHeight = 15;
     worksheet.Range["A5"].RowHeight = 18;
     worksheet.Range["A6"].RowHeight = 29;
     worksheet.Range["A7"].RowHeight = 18;
     worksheet.Range["A8"].RowHeight = 15;
     worksheet.Range["A9:A14"].RowHeight = 15;
     worksheet.Range["A15:A23"].RowHeight = 18;

     MemoryStream ms = new MemoryStream();
     workbook.SaveAs(ms);
     ms.Position = 0;

     //Saves the memory stream as a file.
     SaveService saveService = new SaveService();
     saveService.SaveAndView("Output.xlsx", "application/vnd.openxmlformats-officedocument.spreadsheetml.sheet", ms);
   }
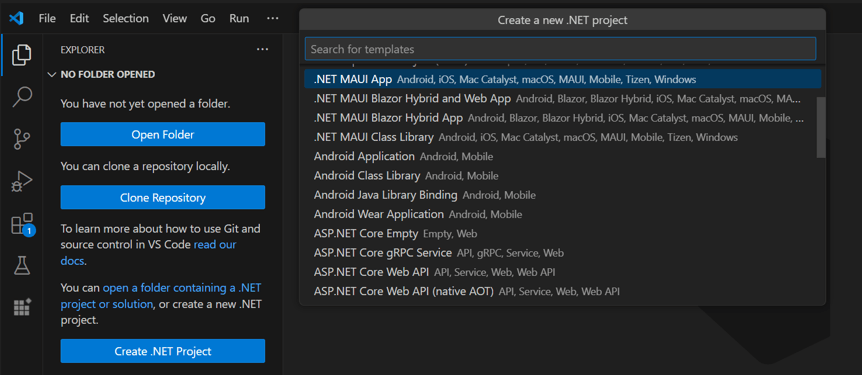
Step 1: Create a new C# .NET MAUI application project using Create .NET Project option.
Step 2: Name the project and create the project.
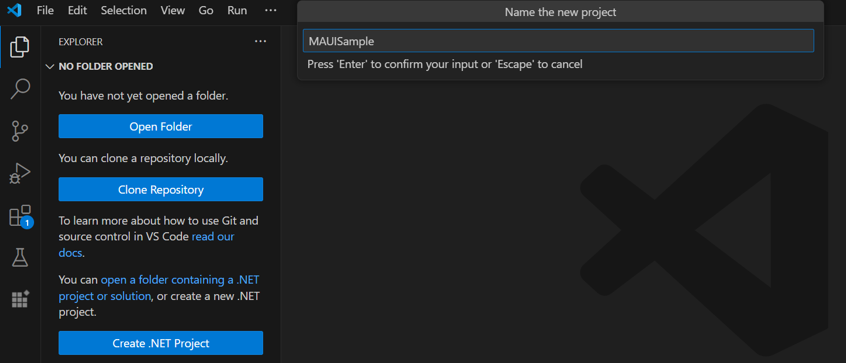
Alternatively, create a .NET MAUI application using the following command in the terminal (Ctrl+`):
dotnet new maui -o MAUISample
cd MAUISample
Step 3: To create and edit Excel documents in the .NET MAUI app, run the following command to install the Syncfusion.XlsIO.NET package.
dotnet add package Syncfusion.XlsIO.NET

Starting with v16.2.0.x, if you reference Syncfusion® assemblies from trial setup or from the NuGet feed, you also have to add “Syncfusion.Licensing” assembly reference and include a license key in your projects. Please refer to this link to know about registering Syncfusion® license key in your applications to use our components.
Open MainPage.xaml and add a new button. Also add a matching createExcel_Click event handler in MainPage.xaml.cs, as shown below.
<ContentPage xmlns="http://schemas.microsoft.com/dotnet/2021/maui"
          xmlns:x="http://schemas.microsoft.com/winfx/2009/xaml"
          x:Class="MAUISample.MainPage"
          BackgroundColor="{DynamicResource SecondaryColor}">
      <ScrollView>
        <Button
           Text="Create Excel"
           FontAttributes="Bold"
           Grid.Row="3"
           Clicked="createExcel_Click"
           HorizontalOptions="Center"
           VerticalOptions="Center"/>
       </ScrollView>
   </ContentPage>
Step 5: Include the following namespaces in the MainPage.xaml.cs file.
using Syncfusion.XlsIO;
   using System.IO;
   using System.Reflection;
Implement the createExcel_Click event handler in MainPage.xaml.cs and include the following code snippet to create an Excel document.
Before proceeding, add the AdventureCycles-Logo.png image to the project and set its Build Action to Embedded Resource in the file properties so it can be loaded using GetManifestResourceStream.
//Create an instance of ExcelEngine.
   using (ExcelEngine excelEngine = new ExcelEngine())
   {
     IApplication application = excelEngine.Excel;
     application.DefaultVersion = ExcelVersion.Xlsx;

     //Create a workbook with a worksheet
     IWorkbook workbook = application.Workbooks.Create(1);

     //Access first worksheet from the workbook instance.
     IWorksheet worksheet = workbook.Worksheets[0];

     Assembly executingAssembly = typeof(App).GetTypeInfo().Assembly;
     Stream inputStream = executingAssembly.GetManifestResourceStream("MAUISample.AdventureCycles-Logo.png");

     //Add a picture
     IPictureShape shape = worksheet.Pictures.AddPicture(1, 1, inputStream, 20, 20);

     //Disable gridlines in the worksheet
     worksheet.IsGridLinesVisible = false;

     //Enter values to the cells from A3 to A5
     worksheet.Range["A3"].Text = "46036 Michigan Ave";
     worksheet.Range["A4"].Text = "Canton, USA";
     worksheet.Range["A5"].Text = "Phone: +1 231-231-2310";

     //Make the text bold
     worksheet.Range["A3:A5"].CellStyle.Font.Bold = true;

     //Merge cells
     worksheet.Range["D1:E1"].Merge();

     //Enter text to the cell D1 and apply formatting.
     worksheet.Range["D1"].Text = "INVOICE";
     worksheet.Range["D1"].CellStyle.Font.Bold = true;
     worksheet.Range["D1"].CellStyle.Font.RGBColor = Syncfusion.Drawing.Color.FromArgb(0, 42, 118, 189);
     worksheet.Range["D1"].CellStyle.Font.Size = 35;

     //Apply alignment in the cell D1
     worksheet.Range["D1"].CellStyle.HorizontalAlignment = ExcelHAlign.HAlignRight;
     worksheet.Range["D1"].CellStyle.VerticalAlignment = ExcelVAlign.VAlignTop;

     //Enter values to the cells from D5 to E8
     worksheet.Range["D5"].Text = "INVOICE#";
     worksheet.Range["E5"].Text = "DATE";
     worksheet.Range["D6"].Number = 1028;
     worksheet.Range["E6"].Value = "12/31/2018";
     worksheet.Range["D7"].Text = "CUSTOMER ID";
     worksheet.Range["E7"].Text = "TERMS";
     worksheet.Range["D8"].Number = 564;
     worksheet.Range["E8"].Text = "Due Upon Receipt";

     //Apply RGB backcolor to the cells from D5 to E8
     worksheet.Range["D5:E5"].CellStyle.Color = Syncfusion.Drawing.Color.FromArgb(0, 42, 118, 189);
     worksheet.Range["D7:E7"].CellStyle.Color = Syncfusion.Drawing.Color.FromArgb(0, 42, 118, 189);

     //Apply known colors to the text in cells D5 to E8
     worksheet.Range["D5:E5"].CellStyle.Font.Color = ExcelKnownColors.White;
     worksheet.Range["D7:E7"].CellStyle.Font.Color = ExcelKnownColors.White;

     //Make the text as bold from D5 to E8
     worksheet.Range["D5:E8"].CellStyle.Font.Bold = true;

     //Apply alignment to the cells from D5 to E8
     worksheet.Range["D5:E8"].CellStyle.HorizontalAlignment = ExcelHAlign.HAlignCenter;
     worksheet.Range["D5:E5"].CellStyle.VerticalAlignment = ExcelVAlign.VAlignCenter;
     worksheet.Range["D7:E7"].CellStyle.VerticalAlignment = ExcelVAlign.VAlignCenter;
     worksheet.Range["D6:E6"].CellStyle.VerticalAlignment = ExcelVAlign.VAlignTop;

     //Enter value and applying formatting in the cell A7
     worksheet.Range["A7"].Text = "  BILL TO";
     worksheet.Range["A7"].CellStyle.Color = Syncfusion.Drawing.Color.FromArgb(0, 42, 118, 189);
     worksheet.Range["A7"].CellStyle.Font.Bold = true;
     worksheet.Range["A7"].CellStyle.Font.Color = ExcelKnownColors.White;

     //Apply alignment
     worksheet.Range["A7"].CellStyle.HorizontalAlignment = ExcelHAlign.HAlignLeft;
     worksheet.Range["A7"].CellStyle.VerticalAlignment = ExcelVAlign.VAlignCenter;

     //Enter values in the cells A8 to A12
     worksheet.Range["A8"].Text = "Steyn";
     worksheet.Range["A9"].Text = "Great Lakes Food Market";
     worksheet.Range["A10"].Text = "20 Whitehall Rd";
     worksheet.Range["A11"].Text = "North Muskegon,USA";
     worksheet.Range["A12"].Text = "+1 231-654-0000";

     //Create a Hyperlink for e-mail in the cell A13
     IHyperLink hyperlink = worksheet.HyperLinks.Add(worksheet.Range["A13"]);
     hyperlink.Type = ExcelHyperLinkType.Url;
     hyperlink.Address = "[email protected]";
     hyperlink.ScreenTip = "Send Mail";

     //Enter details of products and prices
     worksheet.Range["A15"].Text = "  DESCRIPTION";
     worksheet.Range["C15"].Text = "QTY";
     worksheet.Range["D15"].Text = "UNIT PRICE";
     worksheet.Range["E15"].Text = "AMOUNT";
     worksheet.Range["A16"].Text = "Cabrales Cheese";
     worksheet.Range["A17"].Text = "Chocos";
     worksheet.Range["A18"].Text = "Pasta";
     worksheet.Range["A19"].Text = "Cereals";
     worksheet.Range["A20"].Text = "Ice Cream";
     worksheet.Range["C16"].Number = 3;
     worksheet.Range["C17"].Number = 2;
     worksheet.Range["C18"].Number = 1;
     worksheet.Range["C19"].Number = 4;
     worksheet.Range["C20"].Number = 3;
     worksheet.Range["D16"].Number = 21;
     worksheet.Range["D17"].Number = 54;
     worksheet.Range["D18"].Number = 10;
     worksheet.Range["D19"].Number = 20;
     worksheet.Range["D20"].Number = 30;
     worksheet.Range["D23"].Text = "Total";

     //Apply number format
     worksheet.Range["D16:E22"].NumberFormat = "$0.00";
     worksheet.Range["E23"].NumberFormat = "$0.00";

     //Merge column A and B from row 15 to 22
     worksheet.Range["A15:B15"].Merge();
     worksheet.Range["A16:B16"].Merge();
     worksheet.Range["A17:B17"].Merge();
     worksheet.Range["A18:B18"].Merge();
     worksheet.Range["A19:B19"].Merge();
     worksheet.Range["A20:B20"].Merge();
     worksheet.Range["A21:B21"].Merge();
     worksheet.Range["A22:B22"].Merge();

     //Apply incremental formula for column Amount by multiplying Qty and UnitPrice
     application.EnableIncrementalFormula = true;
     worksheet.Range["E16:E20"].Formula = "=C16*D16";

     //Formula for Sum the total
     worksheet.Range["E23"].Formula = "=SUM(E16:E22)";

     //Apply borders
     worksheet.Range["A16:E22"].CellStyle.Borders[ExcelBordersIndex.EdgeTop].LineStyle = ExcelLineStyle.Thin;
     worksheet.Range["A16:E22"].CellStyle.Borders[ExcelBordersIndex.EdgeBottom].LineStyle = ExcelLineStyle.Thin;
     worksheet.Range["A16:E22"].CellStyle.Borders[ExcelBordersIndex.EdgeTop].Color = ExcelKnownColors.Grey_25_percent;
     worksheet.Range["A16:E22"].CellStyle.Borders[ExcelBordersIndex.EdgeBottom].Color = ExcelKnownColors.Grey_25_percent;
     worksheet.Range["A23:E23"].CellStyle.Borders[ExcelBordersIndex.EdgeTop].LineStyle = ExcelLineStyle.Thin;
     worksheet.Range["A23:E23"].CellStyle.Borders[ExcelBordersIndex.EdgeBottom].LineStyle = ExcelLineStyle.Thin;
     worksheet.Range["A23:E23"].CellStyle.Borders[ExcelBordersIndex.EdgeTop].Color = ExcelKnownColors.Black;
     worksheet.Range["A23:E23"].CellStyle.Borders[ExcelBordersIndex.EdgeBottom].Color = ExcelKnownColors.Black;

     //Apply font setting for cells with product details
     worksheet.Range["A3:E23"].CellStyle.Font.FontName = "Arial";
     worksheet.Range["A3:E23"].CellStyle.Font.Size = 10;
     worksheet.Range["A15:E15"].CellStyle.Font.Color = ExcelKnownColors.White;
     worksheet.Range["A15:E15"].CellStyle.Font.Bold = true;
     worksheet.Range["D23:E23"].CellStyle.Font.Bold = true;

     //Apply cell color
     worksheet.Range["A15:E15"].CellStyle.Color = Syncfusion.Drawing.Color.FromArgb(0, 42, 118, 189);

     //Apply alignment to cells with product details
     worksheet.Range["A15"].CellStyle.HorizontalAlignment = ExcelHAlign.HAlignLeft;
     worksheet.Range["C15:C22"].CellStyle.HorizontalAlignment = ExcelHAlign.HAlignCenter;
     worksheet.Range["D15:E15"].CellStyle.HorizontalAlignment = ExcelHAlign.HAlignCenter;

     //Apply row height and column width to look good
     worksheet.Range["A1"].ColumnWidth = 36;
     worksheet.Range["B1"].ColumnWidth = 11;
     worksheet.Range["C1"].ColumnWidth = 8;
     worksheet.Range["D1:E1"].ColumnWidth = 18;
     worksheet.Range["A1"].RowHeight = 47;
     worksheet.Range["A2"].RowHeight = 15;
     worksheet.Range["A3:A4"].RowHeight = 15;
     worksheet.Range["A5"].RowHeight = 18;
     worksheet.Range["A6"].RowHeight = 29;
     worksheet.Range["A7"].RowHeight = 18;
     worksheet.Range["A8"].RowHeight = 15;
     worksheet.Range["A9:A14"].RowHeight = 15;
     worksheet.Range["A15:A23"].RowHeight = 18;

     MemoryStream ms = new MemoryStream();
     workbook.SaveAs(ms);
     ms.Position = 0;

     //Saves the memory stream as a file.
     SaveService saveService = new SaveService();
     saveService.SaveAndView("Output.xlsx", "application/vnd.openxmlformats-officedocument.spreadsheetml.sheet", ms);
   }
Save Service class in portable project
Add a new class file named SaveService to the shared project and add the following code in it. This is the helper class used to save and view the Excel file on Windows, Android, iOS, and Mac Catalyst devices.
namespace MAUISample.Services
{
  public partial class SaveService
  {
    //Method to save document as a file and view the saved document.
    public partial void SaveAndView(string filename, string contentType, MemoryStream stream);
  }
}
Save and View the Excel document in Windows
Add a new class file named SaveWindows under the Platforms -> Windows directory to save and view the Excel document on a Windows machine, and use the following code in it.
using Windows.Storage;
using Windows.Storage.Pickers;
using Windows.Storage.Streams;
using Windows.UI.Popups;

namespace MAUISample.Services
{
  public partial class SaveService
  {
    public async partial void SaveAndView(string filename, string contentType, MemoryStream stream)
    {
      StorageFile stFile;
      string extension = Path.GetExtension(filename);
      //Gets process windows handle to open the dialog in application process.
      IntPtr windowHandle = System.Diagnostics.Process.GetCurrentProcess().MainWindowHandle;
      if (!Windows.Foundation.Metadata.ApiInformation.IsTypePresent("Windows.Phone.UI.Input.HardwareButtons"))
      {
        //Creates file save picker to save a file.
        FileSavePicker savePicker = new();
        savePicker.DefaultFileExtension = ".xlsx";
        savePicker.SuggestedFileName = filename;
        //Saves the file as xlsx file.
        savePicker.FileTypeChoices.Add("XLSX", new List<string>() { ".xlsx" });
        WinRT.Interop.InitializeWithWindow.Initialize(savePicker, windowHandle);
        stFile = await savePicker.PickSaveFileAsync();
      }
      else
      {
        StorageFolder local = ApplicationData.Current.LocalFolder;
        stFile = await local.CreateFileAsync(filename, CreationCollisionOption.ReplaceExisting);
      }
      if (stFile != null)
      {
        using (IRandomAccessStream zipStream = await stFile.OpenAsync(FileAccessMode.ReadWrite))
        {
          //Writes compressed data from memory to file.
          using Stream outstream = zipStream.AsStreamForWrite();
          outstream.SetLength(0);
          //Saves the stream as file.
          byte[] buffer = stream.ToArray();
          outstream.Write(buffer, 0, buffer.Length);
          outstream.Flush();
        }
        //Create message dialog box.
        MessageDialog msgDialog = new("Do you want to view the document?", "File has been created successfully");
        UICommand yesCmd = new("Yes");
        msgDialog.Commands.Add(yesCmd);
        UICommand noCmd = new("No");
        msgDialog.Commands.Add(noCmd);

        WinRT.Interop.InitializeWithWindow.Initialize(msgDialog, windowHandle);

        //Showing a dialog box.
        IUICommand cmd = await msgDialog.ShowAsync();
        if (cmd.Label == yesCmd.Label)
        {
          //Launch the saved file.
          await Windows.System.Launcher.LaunchFileAsync(stFile);
        }
      }
    }
  }
}
Save and View the Excel document in Android
Add a new class file named SaveAndroid under the Platforms -> Android directory to save and view the Excel document on an Android device, and use the following code in it.
using Android.Content;
using Android.OS;
using Java.IO;
using System;
using System.IO;
using System.Threading.Tasks;

namespace MAUISample.Services
{
  public partial class SaveService
  {
    public partial void SaveAndView(string filename, string contentType, MemoryStream stream)
    {
      string exception = string.Empty;
      string? root = null;

      if (Android.OS.Environment.IsExternalStorageEmulated)
      {
        root = Android.App.Application.Context!.GetExternalFilesDir(Android.OS.Environment.DirectoryDownloads)!.AbsolutePath;
      }
      else
        root = System.Environment.GetFolderPath(System.Environment.SpecialFolder.MyDocuments);

      Java.IO.File myDir = new(root + "/Syncfusion");
      myDir.Mkdir();
      Java.IO.File file = new(myDir, filename);

      if (file.Exists())
      {
        file.Delete();
      }

      try
      {
        FileOutputStream outs = new(file);
        outs.Write(stream.ToArray());

        outs.Flush();
        outs.Close();
      }
      catch (Exception e)
      {
        exception = e.ToString();
      }
      if (file.Exists())
      {
        if (Build.VERSION.SdkInt >= Android.OS.BuildVersionCodes.N)
        {
          var fileUri = AndroidX.Core.Content.FileProvider.GetUriForFile(Android.App.Application.Context, Android.App.Application.Context.PackageName + ".provider", file);
          var intent = new Intent(Intent.ActionView);
          intent.SetData(fileUri);
          intent.AddFlags(ActivityFlags.NewTask);
          intent.AddFlags(ActivityFlags.GrantReadUriPermission);
          Android.App.Application.Context.StartActivity(intent);
        }
        else
        {
          var fileUri = Android.Net.Uri.Parse(file.AbsolutePath);
          var intent = new Intent(Intent.ActionView);
          intent.SetDataAndType(fileUri, contentType);
          intent = Intent.CreateChooser(intent, "Open File");
          intent!.AddFlags(ActivityFlags.NewTask);
          Android.App.Application.Context.StartActivity(intent);
        }
      }
    }
  }
}
A new runtime permission model was introduced for Android SDK version 23 and above. Include the following configuration to enable the Android file provider so the generated Excel document can be saved and viewed.
Create a new XML file with the name of provider_path.xml under the Resources-> xml folder of Android project and add the following code in it. Eg: Resources/xml/provider_path.xml
<?xml version="1.0" encoding="UTF-8" ?>
<paths xmlns:android="http://schemas.android.com/apk/res/android">
   <external-path name="external_files" path="."/>
</paths>
Add the following code to the AndroidManifest.xml file located under Properties folder.
<?xml version="1.0" encoding="utf-8"?>
<manifest xmlns:android="http://schemas.android.com/apk/res/android" android:versionCode="1" android:versionName="1.0" package="com.companyname.MAUISample">
   <uses-sdk android:minSdkVersion="19" android:targetSdkVersion="27" />
   <application android:label="MAUISample.Android">
      <provider android:name="androidx.core.content.FileProvider"
         android:authorities="${applicationId}.provider"
         android:exported="false"
         android:grantUriPermissions="true">
         <meta-data android:name="android.support.FILE_PROVIDER_PATHS"
            android:resource="@xml/provider_paths" />
      </provider>
   </application>
</manifest>
Save and View the Excel document in iOS
Add a new class file named SaveIOS under the Platforms -> iOS directory to save and view the Excel document on an iOS device, and use the following code in it.
using QuickLook;
using UIKit;

namespace MAUISample.Services
{
  public partial class SaveService
  {
    public partial void SaveAndView(string filename, string contentType, MemoryStream stream)
    {
      string exception = string.Empty;
      string path = Environment.GetFolderPath(Environment.SpecialFolder.Personal);
      string filePath = Path.Combine(path, filename);
      try
      {
        FileStream fileStream = File.Open(filePath, FileMode.Create);
        stream.Position = 0;
        stream.CopyTo(fileStream);
        fileStream.Flush();
        fileStream.Close();
      }
      catch (Exception e)
      {
        exception = e.ToString();
      }
      if (contentType != "application/html" || exception == string.Empty)
      {
#pragma warning disable CA1416
        UIViewController? currentController = UIApplication.SharedApplication!.KeyWindow!.RootViewController;
#pragma warning restore CA1416
        while (currentController!.PresentedViewController != null)
          currentController = currentController.PresentedViewController;

        QLPreviewController qlPreview = new();
        QLPreviewItem item = new QLPreviewItemBundle(filename, filePath);
        qlPreview.DataSource = new PreviewControllerDS(item);
        currentController.PresentViewController((UIViewController)qlPreview, true, null);
      }
    }
  }
}
Save and View the Excel document in MacCatalyst
Add a new class file named SaveMAC under the Platforms -> MacCatalyst directory to save and view the Excel document on a Mac device, and use the following code in it.
using Foundation;
using QuickLook;
using UIKit;

namespace MAUISample.Services
{
  public partial class SaveService
  {
    public partial void SaveAndView(string filename, string contentType, MemoryStream stream)
    {
      string path = Environment.GetFolderPath(Environment.SpecialFolder.MyDocuments);
      string filePath = Path.Combine(path, filename);
      stream.Position = 0;
      //Saves the document
      using FileStream fileStream = new(filePath, FileMode.Create, FileAccess.ReadWrite);
      stream.CopyTo(fileStream);
      fileStream.Flush();
      fileStream.Dispose();
#pragma warning disable CA1416
      //Launch the file
      UIViewController? currentController = UIApplication.SharedApplication!.KeyWindow!.RootViewController;
#pragma warning restore CA1416
      while (currentController!.PresentedViewController != null)
        currentController = currentController.PresentedViewController;
      UIView? currentView = currentController.View;

      QLPreviewController qlPreview = new();
      QLPreviewItem item = new QLPreviewItemBundle(filename, filePath);
      qlPreview.DataSource = new PreviewControllerDS(item);
      currentController.PresentViewController((UIViewController)qlPreview, true, null);
    }
  }
}

public class QLPreviewItemFileSystem : QLPreviewItem
{
  readonly string _fileName, _filePath;

  public QLPreviewItemFileSystem(string fileName, string filePath)
  {
    _fileName = fileName;
    _filePath = filePath;
  }

  public override string PreviewItemTitle
  {
    get
    {
      return _fileName;
    }
  }
  public override NSUrl PreviewItemUrl
  {
    get
    {
      return NSUrl.FromFilename(_filePath);
    }
  }
}

public class QLPreviewItemBundle : QLPreviewItem
{
  readonly string _fileName, _filePath;
  public QLPreviewItemBundle(string fileName, string filePath)
  {
    _fileName = fileName;
    _filePath = filePath;
  }

  public override string PreviewItemTitle
  {
    get
    {
      return _fileName;
    }
  }
  public override NSUrl PreviewItemUrl
  {
    get
    {
      var documents = NSBundle.MainBundle.BundlePath;
      var lib = Path.Combine(documents, _filePath);
      var url = NSUrl.FromFilename(lib);
      return url;
    }
  }
}

public class PreviewControllerDS : QLPreviewControllerDataSource
{
  private readonly QLPreviewItem _item;

  public PreviewControllerDS(QLPreviewItem item)
  {
    _item = item;
  }

  public override nint PreviewItemCount(QLPreviewController controller)
  {
    return (nint)1;
  }

  public override IQLPreviewItem GetPreviewItem(QLPreviewController controller, nint index)
  {
    return _item;
  }
}
A complete working example of creating an Excel document in the .NET MAUI application in C# is present on this GitHub page.
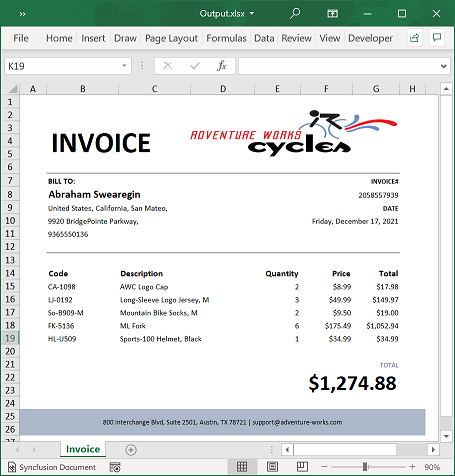
By executing the program in windows, you will get the Excel document as follows.
Read and Edit Excel file
The following code snippet illustrates how to read and edit an Excel file in .NET MAUI.
Add the
Sample.xlsxfile to the project and set its Build Action to Embedded Resource before running this example.
//Create an instance of ExcelEngine.
using (ExcelEngine excelEngine = new ExcelEngine())
{
  IApplication application = excelEngine.Excel;
  application.DefaultVersion = ExcelVersion.Xlsx;

  Assembly executingAssembly = typeof(App).GetTypeInfo().Assembly;
  Stream inputStream = executingAssembly.GetManifestResourceStream("MAUISample.Sample.xlsx");

  //Create a workbook with a worksheet
  IWorkbook workbook = application.Workbooks.Open(inputStream);

  //Access first worksheet from the workbook instance.
  IWorksheet worksheet = workbook.Worksheets[0];

  //Set Text in cell A3.
  worksheet.Range["A3"].Text = "Hello World";

  //Access a cell value from Excel
  var value = worksheet.Range["A1"].Value;

  MemoryStream ms = new MemoryStream();
  workbook.SaveAs(ms);
  ms.Position = 0;

  //Saves the memory stream as a file.
  SaveService saveService = new SaveService();
  saveService.SaveAndView("Output.xlsx", "application/vnd.openxmlformats-officedocument.spreadsheetml.sheet", ms);
}
A complete working example of how to read and edit an Excel file in the .NET MAUI application in C# is present on this GitHub page.
Click here to explore the rich set of Syncfusion® Excel library (XlsIO) features.
An online sample link to create an Excel document in ASP.NET Core.