How can I help you?
Resource View in Xamarin Scheduler (SfSchedule)
8 Jan 202523 minutes to read
Resource view displays the resources as discrete views integrated with the scheduler to display appointments in all types of schedule views. It provides an intuitive user interface, which allows users to select single or multiple resources and display the events associated with the selected resources with efficient and effective utilization. Each resource can be assigned to a unique color to more easily identify the resource associated with an appointment.
You can add resources that can be assigned to appointments using the ScheduleResources property of SfSchedule. You need to set the Name, Id, and Color properties of ScheduleResource to create a resource.
<syncfusion:SfSchedule
          x:Name="schedule"
          ScheduleView="WeekView"
          ShowResourceView="True">
          <syncfusion:SfSchedule.ScheduleResources>
               <syncfusion:ScheduleResource
                    Name="Brooklyn"
                    Id="5601"
                    Color="#FF3399" />
          </syncfusion:SfSchedule.ScheduleResources>
</syncfusion:SfSchedule>
// Creating an instance for schedule resource collection.
ObservableCollection<object> resources = new ObservableCollection<object>();
// Adding schedule resource in schedule resource collection.
resources.Add(new ScheduleResource()
{
Name = "Brooklyn",
Id = 5601,
Color = Color.FromHex("#FF3399")
});
// Adding schedule resource collection to schedule resources of SfSchedule.
schedule.ScheduleResources = resources;You can download the custom resource demo for Xamarin.Forms from here.
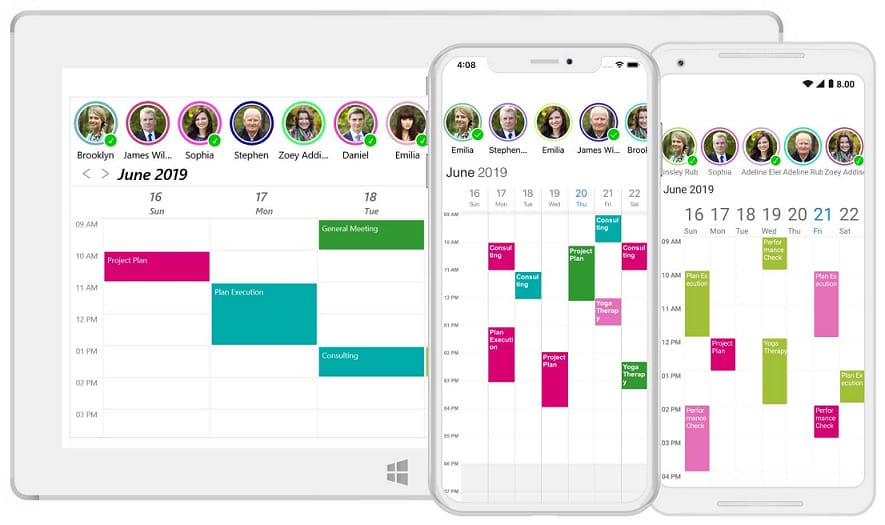
Resource view visibility
You can handle the visibility of resource view using the ShowResourceView bool property of SfSchedule. By default, value of this property is set to false.
<schedule:SfSchedule ScheduleView="WeekView" ShowResourceView="True" />schedule.ScheduleView = ScheduleView.WeekView;
schedule.ShowResourceView = true;Assigning events for resources
You can associate Resources to the appointments by adding Id of resource in the ResourceIds property of ScheduleAppointment. Appointments associated with the selected resources will be displayed in the SfSchedule views.
// Creating an instance for schedule appointment collection
ScheduleAppointmentCollection scheduleAppointmentCollection = new ScheduleAppointmentCollection();
//Adding schedule appointment in schedule appointment collection
scheduleAppointmentCollection.Add(new ScheduleAppointment()
{
     StartTime = new DateTime(2019, 05, 08, 10, 0, 0),
     EndTime = new DateTime(2019, 05, 08, 12, 0, 0),
     Subject = "Meeting",
     Location = "Hutchison road",
     ResourceIds = new ObservableCollection<object> { 5601, 5602 }
});

//Adding schedule appointment collection to DataSource of SfSchedule
schedule.DataSource = scheduleAppointmentCollection;
Assigning custom events to resources
You can associate resources to the custom appointments using the equivalent field of ResourceIds in custom appointment class.
Creating custom events
You can create a custom class Event with mandatory fields From, To, EventName, and Resources.
/// <summary>
/// Represents custom data properties.
/// </summary>
public class Event
{
	public string EventName { get; set; }
	public DateTime From { get; set; }
	public DateTime To { get; set; }
	public Color Color { get; set; }
	public ObservableCollection<object> Resources { get; set; }
}
NOTE
You can inherit this class fromINotifyPropertyChangedfor dynamic changes in custom data.
You can map the properties of Meeting class with our SfSchedule control using ScheduleAppointmentMapping.
<syncfusion:SfSchedule x:Name="schedule" ScheduleView="DayView" DataSource="{Binding Meetings}">
     <syncfusion:SfSchedule.AppointmentMapping>
          <syncfusion:ScheduleAppointmentMapping
               SubjectMapping="EventName"
               ColorMapping="Color"
               StartTimeMapping="From"
               EndTimeMapping="To"
               ResourceIdsMapping="Resources">
          </syncfusion:ScheduleAppointmentMapping>
     </syncfusion:SfSchedule.AppointmentMapping>
</syncfusion:SfSchedule>
// Schedule data mapping for custom appointments.
ScheduleAppointmentMapping dataMapping = new ScheduleAppointmentMapping();
dataMapping.SubjectMapping = "EventName";
dataMapping.StartTimeMapping = "From";
dataMapping.EndTimeMapping = "To";
dataMapping.ColorMapping = "Color";
dataMapping.ResourceIdsMapping = "Resources";
schedule.AppointmentMapping = dataMapping;You can associate resources to the custom events by adding Id of resource in the Resources property of custom appointment class.
// Creating an instance for custom appointment class.
Meeting meeting = new Meeting();
meeting.From = new DateTime(2017, 06, 11, 10, 0, 0);
meeting.To = meeting.From.AddHours(2);
meeting.EventName = "Client Meeting";
meeting.Color = Color.Green;

// Setting resources for an event.
meeting.Resources = new ObservableCollection<object> () {5601, 5604};
NOTE
- You can also associate custom resources to the appointments by using the equivalent field of resource
Idin custom resource class.- All appointments will be displayed when the
ShowResourceViewproperty is set to false.- If an appointment is mapped to a single resource, it will be displayed in resource
Color. If an appointment is mapped to multiple resources, it will be displayed in the default appointmentColor.
Mapping
Schedule supports full data binding to any type of IEnumerable source. Specify the ResourceMapping attribute to map the properties in the underlying data source to the schedule resource.
| Property Name | Description |
|---|---|
| Name | Maps the property name of custom class, which is equivalent to Name in ScheduleResource. |
| Id | Maps the property name of custom class, which is equivalent to Id in ScheduleResource. |
| Image | Maps the property name of custom class, which is equivalent to Image in ScheduleResource. |
| Color | Maps the property name of custom class, which is equivalent to Color in ScheduleResource. |
NOTE
Custom resource class should contain a mandatory field for resourceId.
Creating a custom resource
You can create a custom class Employee with required fields such as Name, Id, Color, and DisplayPicture.
/// <summary>
/// Represents custom data properties.
/// </summary>
public class Employee
{
     public string Name { get; set; }
     public object Id { get; set; }
     public Color Color { get; set; }
     public string DisplayPicture { get; set; }
}
NOTE
You can inherit this class fromINotifyPropertyChangedfor dynamic changes in custom data.
You can map the properties of Employee class with our SfSchedule control using ResourceMapping.
<schedule:SfSchedule ScheduleView="WeekView" ShowResourceView="True">
     <schedule:SfSchedule.ResourceMapping>
          <schedule:ResourceMapping Name="Name"
                                    Id="Id"
                                    Color="Color"
                                    Image="DisplayPicture"/>
     </schedule:SfSchedule.ResourceMapping>
</schedule:SfSchedule>
// Creating an instance for resource mapping.
ResourceMapping resourceMapping = new ResourceMapping();
// Mapping the custom data fields.
resourceMapping.Name = "Name";
resourceMapping.Id = "Id";
resourceMapping.Color = "Color";
resourceMapping.Image = "DisplayPicture";
schedule.ResourceMapping = resourceMapping;You can create a resource by setting Id, Name, Color and DisplayPicture of the Employee class. Create resources of type ObservableCollection<Employee> and assign this resource collection to the ScheduleResources property of SfSchedule.
public ObservableCollection<object> Employees { get; set; }

// Creating an instance for collection of custom resources.
Employees = new ObservableCollection<object>();

// Creating an instance for custom appointment class.
Employee employee = new Employee();

employee.Name = "Kinsley Elena";
employee.Id = 5601;
employee.Color = Color.FromHex("#FFE671B8");
employee.DisplayPicture = "KinsleyElena.png";

// Adding a custom resource in custom resource collection.
Employees.Add(employee);

// Adding a custom resource collection to schedule resources.
schedule.ScheduleResources = Employees;
Resource view mode
The SfSchedule control provides support to view the appointments of either selected resource or entire resource in timeline view using the ResourceViewMode property of SfSchedule.
Selection: Displays the appointments of selected resource.
Absolute: Displays the appointments of entire resource.
<schedule:SfSchedule ScheduleView="TimelineView" ResourceViewMode="Absolute" />schedule.ScheduleView = ScheduleView.TimelineView;
schedule.ResourceViewMode = ResourceViewMode.Absolute;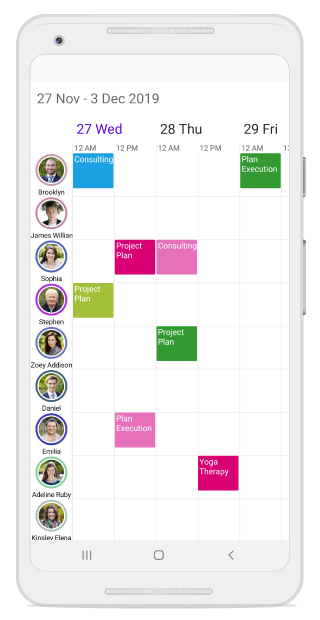
NOTE
Absoluteoption in theResourceViewModeis applicable only for timeline view.- If an appointment is mapped to a single resource and
ResourceViewModeisSelection, it will be displayed in resource color. If an appointment is mapped to multiple resources orResourceViewModeisAbsolute, it will be displayed in the default appointment color.
Selection mode
The SfSchedule control provides support to select single or multiple resources using the SelectionMode property of ResourceViewSettings in SfSchedule.
<schedule:SfSchedule ScheduleView="WeekView" ShowResourceView="True">
     <schedule:SfSchedule.ResourceViewSettings>
          <schedule:ResourceViewSettings SelectionMode="Multiple"/>
     </schedule:SfSchedule.ResourceViewSettings>
</schedule:SfSchedule>schedule.ScheduleView = ScheduleView.WeekView;
schedule.ShowResourceView = true;
ResourceViewSettings resourceViewSettings = new ResourceViewSettings();
resourceViewSettings.SelectionMode = SelectionMode.Multiple;
schedule.ResourceViewSettings = resourceViewSettings;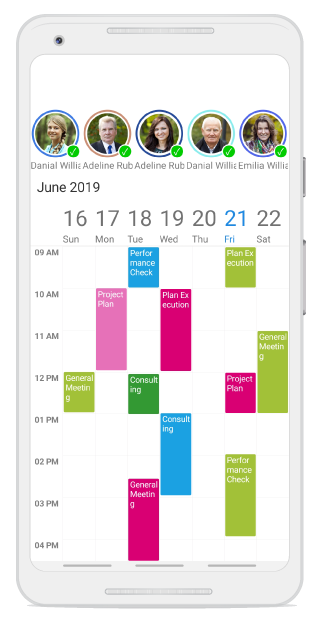
NOTE
In timeline view, SelectionMode is applicable only when theResourceViewModeisSelection.
Programmatic resource selection
You can programmatically select single or multiple resources by adding resources to the SelectedResources property of SfSchedule.
// Creating an instance for collection of selected resources.
ObservableCollection<object> selectedResources = new ObservableCollection<object>();

// Adding selected resource in resource collection from the resources.
selectedResources.Add(resources.FirstOrDefault(resource => (resource as ScheduleResource).Id.ToString() == "5601"));
selectedResources.Add(resources.FirstOrDefault(resource => (resource as ScheduleResource).Id.ToString() == "5604"));
selectedResources.Add(resources.FirstOrDefault(resource => (resource as ScheduleResource).Id.ToString() == "5608"));

// Adding selected resource collection to the selected resources of SfSchedule.
schedule.SelectedResources = selectedResources;
You can clear the selection by removing the resource from SelectedResources or by setting SelectedResources to null.
var selectedResource = selectedResources.FirstOrDefault(resource => (resource as ScheduleResource).Id.ToString() == "5604");

// Removing selected resource in selected resources of SfSchedule.
schedule.SelectedResources.Remove(selectedResource);
Changing resource view height
You can customize the height of the resource view using the ResourceViewHeight property of SfSchedule.
<schedule:SfSchedule ScheduleView="WeekView"
                     ShowResourceView="True"
ResourceViewHeight="200" />schedule.ScheduleView = ScheduleView.WeekView;
schedule.ShowResourceView = true;
schedule.ResourceViewHeight = 200;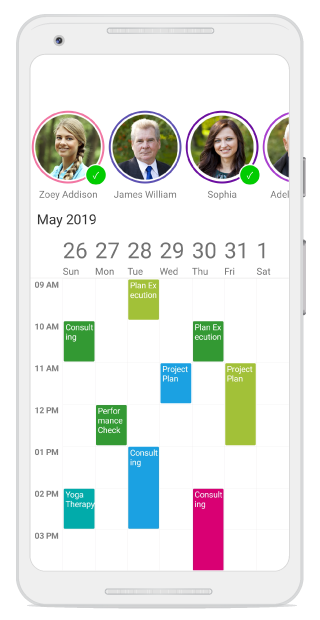
NOTE
TheResourceViewHeightproperty functions as width whenResourceViewModeisAbsolutefor timeline view.
Visible resource count
You can customize the number of visible resources in the current view using the VisibleResourceCount property of ResourceViewSettings in SfSchedule. By default, value of this property is set to -1.
<schedule:SfSchedule ScheduleView="WeekView" ShowResourceView="True">
     <schedule:SfSchedule.ResourceViewSettings>
          <schedule:ResourceViewSettings>
          <schedule:ResourceViewSettings.VisibleResourceCount>
               <OnPlatform x:TypeArguments="x:Int32"
                              iOS="5"
                              Android="4"
                              WinPhone="10" />
          </schedule:ResourceViewSettings.VisibleResourceCount>
          </schedule:ResourceViewSettings>
     </schedule:SfSchedule.ResourceViewSettings>
</schedule:SfSchedule>
ResourceViewSettings resourceViewSettings = new ResourceViewSettings();
resourceViewSettings.VisibleResourceCount = Device.OnPlatform(5, 10, 5);
schedule.ResourceViewSettings = resourceViewSettings;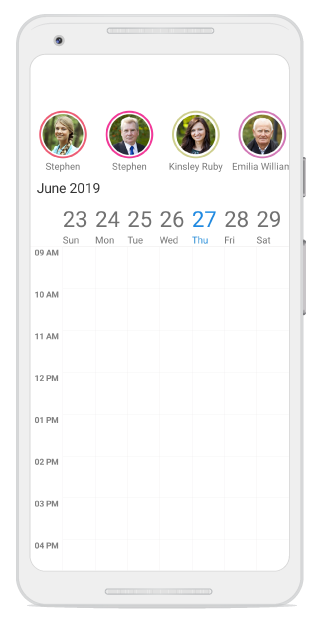
Resource item tapped event
You can handle the single tap action of resource view using the ResourceItemTapped event of SfSchedule. This event occurs when a resource item is tapped. This event contains ResourceItemTappedEventArgs argument, which holds the details of SelectedResource and SelectedResources in it.
schedule.ResourceItemTapped += OnResourceItemTapped;
          …
private void OnResourceItemTapped(object sender, ResourceItemTappedEventArgs e)
{
}
NOTE
In timeline view, theSelectedResourcesbecomes null on tapping an item when theResourceViewModeisAbsolute.
Customization
Changing resource name label text color
You can customize the text color of the resource name using the DisplayLabelTextColor property of ResourceViewSettings in SfSchedule.
<schedule:SfSchedule ScheduleView="WeekView" ShowResourceView="True">
     <schedule:SfSchedule.ResourceViewSettings>
          <schedule:ResourceViewSettings DisplayLabelTextColor="#8490f9" />
     </schedule:SfSchedule.ResourceViewSettings>
</schedule:SfSchedule>
ResourceViewSettings resourceViewSettings = new ResourceViewSettings();
resourceViewSettings.DisplayLabelTextColor = Color.FromHex("#8490f9");
schedule.ResourceViewSettings = resourceViewSettings;Data template
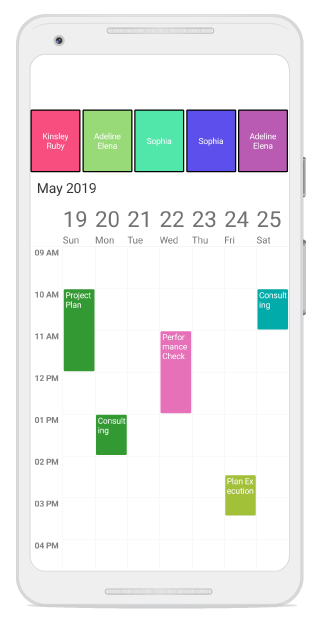
The default appearance of the resource can be customized using the ResourceItemTemplate property of the schedule. You can handle the default touch action such as selection of resource item using the InputTransparent property of the Xamarin.Forms.VisualElement.
<schedule:SfSchedule x:Name="schedule"
     ResourceItemTemplate="{Binding ResourceTemplate}">
     <schedule:SfSchedule.BindingContext>
          <samplelocal:ResourceDataTemplate />
     </schedule:SfSchedule.BindingContext>
</schedule:SfSchedule>
Creating a DataTemplate
<?xml version="1.0" encoding="utf-8" ?>
<Button xmlns="http://xamarin.com/schemas/2014/forms"
        xmlns:x="http://schemas.microsoft.com/winfx/2009/xaml"
        x:Class="ScheduleSample.ResourceTemplate"
        Text="{Binding Name}"
        TextColor="White"
        FontSize="15"
        BackgroundColor="{Binding Color}"
        BorderColor="Black"
        BorderWidth="2">
</Button>public class ResourceDataTemplate : DataTemplate
{
public DataTemplate ResourceTemplate { get; set; }
public ResourceDataTemplate()
{
ResourceTemplate = new DataTemplate(() =>
{
return new ResourceTemplate();
});
}
}
Template selector
DataTemplateSelector can be used to choose a DataTemplate at run time based on the value of data bound to the ScheduleResource property through ResourceItemTemplate. It provides multiple DataTemplates to be enabled for schedule resources to customize the appearance of a particular resource item. You can handle the default touch action such as selection of a resource item using the InputTransparent property of the Xamarin.Forms.VisualElement.
<ContentPage.Resources>
     <ResourceDictionary>
          <local:ResourceTemplateSelector x:Key="resourceDataTemplateSelector"/>
     </ResourceDictionary>
</ContentPage.Resources>
<ContentPage.Content>
     <schedule:SfSchedule x:Name="schedule"
                         ScheduleView="WeekView"
                         ShowResourceView="True"
                         ResourceItemTemplate="{StaticResource resourceDataTemplateSelector}"/>
</ContentPage.Content>
Creating a DataTemplateSelector
public class ResourceTemplateSelector : DataTemplateSelector
{
     public DataTemplate AvailabelResourceTemplate { get; set; }
     public DataTemplate UnavailableResourceTemplate { get; set; }

     public ResourceTemplateSelector()
     {
          AvailabelResourceTemplate = new DataTemplate(typeof(AvailableResourceTemplate));
          UnavailableResourceTemplate = new DataTemplate(typeof(UnavailableResourceTemplate));
     }

     protected override DataTemplate OnSelectTemplate(object item, BindableObject container)
     {
          if ((item as ScheduleResource).Id.ToString() == "5601" ||
               (item as ScheduleResource).Id.ToString() == "5604")
               return UnavailableResourceTemplate;
          else
               return AvailabelResourceTemplate;
     }
}
Used button to display the resources
<?xml version="1.0" encoding="utf-8" ?>
<Button xmlns="http://xamarin.com/schemas/2014/forms"
        xmlns:x="http://schemas.microsoft.com/winfx/2009/xaml"
        x:Class="ScheduleSample.AvailableResourceTemplate"
        Text="{Binding Name}"
        TextColor="White"
        FontSize="15"
        BackgroundColor="{Binding Color}"
        BorderColor="Black"
        BorderWidth="2">
</Button>
    .......

<?xml version="1.0" encoding="utf-8" ?>
<Button xmlns="http://xamarin.com/schemas/2014/forms"
        xmlns:x="http://schemas.microsoft.com/winfx/2009/xaml"
        x:Class="ScheduleSample.UnavailableResource"
        Text="{Binding Name, StringFormat= '\{0\} (unavailable)'}"
        TextColor="White"
        FontSize="15"
        BackgroundColor="{Binding Color}"
        BorderColor="Black"
        BorderWidth="2">
</Button>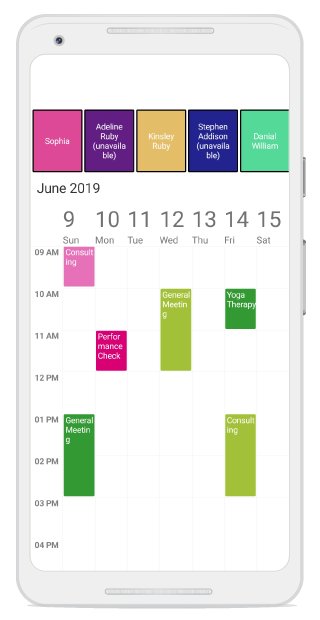
You can download the template selector demo for Xamarin.Forms from here.
NOTE
You can refer to our Xamarin Scheduler feature tour page for its groundbreaking feature representations. You can also explore our Xamarin Scheduler example to understand how to schedule and manage appointments.
See also
How to handle appointments for multiple resources in Schedule?