How can I help you?
Getting Started with the .NET MAUI Scheduler
20 Jun 202524 minutes to read
This section explains how to populate the appointments to the Scheduler as well as the essential aspects for getting started with the Scheduler and also provides a walk-through to configure the .NET MAUI Scheduler control in a real-time scenario. Follow the steps below to add a .NET Scheduler control to your project.
To quickly get started with the .NET MAUI Scheduler, watch this video.
Prerequisites
Before proceeding, ensure the following are set up:
- Install .NET 7 SDK or later is installed.
- Set up a .NET MAUI environment with Visual Studio 2022 (v17.3 or later) or Visual Studio Code. For Visual Studio Code users, ensure that the .NET MAUI workload is installed and configured as described here.
Step 1: Create a New .NET MAUI Project
- Go to File > New > Project and choose the .NET MAUI App template.
- Name the project and choose a location. Then click Next.
- Select the .NET framework version and click Create.
Step 2: Install the Syncfusion® .NET MAUI Scheduler NuGet Package
- In Solution Explorer, right-click the project and choose Manage NuGet Packages.
- Search for Syncfusion.Maui.Scheduler and install the latest version.
- Ensure the necessary dependencies are installed correctly, and the project is restored.
Step 3: Register the handler
The Syncfusion.Maui.Core NuGet is a dependent package for all Syncfusion® controls of .NET MAUI. In the MauiProgram.cs file, register the handler for Syncfusion® core.
using Syncfusion.Maui.Core.Hosting;
namespace GettingStarted
{
    public static class MauiProgram
    {
        public static MauiApp CreateMauiApp()
        {
            var builder = MauiApp.CreateBuilder();

            builder.ConfigureSyncfusionCore();
            builder
            .UseMauiApp<App>()
            .ConfigureFonts(fonts =>
            {
                fonts.AddFont("OpenSans-Regular.ttf", "OpenSansRegular");
                fonts.AddFont("Segoe-mdl2.ttf", "SegoeMDL2");
            });

            return builder.Build();
        }
    }
}
Step 4: Add .NET MAUI Scheduler view
- To initialize the control, import the
Syncfusion.Maui.Schedulernamespace into your code. - Initialize SfScheduler.
<ContentPage
    . . .
    xmlns:scheduler="clr-namespace:Syncfusion.Maui.Scheduler;assembly=Syncfusion.Maui.Scheduler">

    <scheduler:SfScheduler />
</ContentPage>
using Syncfusion.Maui.Scheduler;
. . .
public partial class MainPage : ContentPage
{
public MainPage()
{
InitializeComponent();
SfScheduler scheduler = new SfScheduler();
this.Content = scheduler;
}
}Prerequisites
Before proceeding, ensure the following are set up:
- Install .NET 7 SDK or later is installed.
- Set up a .NET MAUI environment with Visual Studio Code.
- Ensure that the .NET MAUI extension is installed and configured as described here.
Step 1: Create a New .NET MAUI Project
- Open the command palette by pressing
Ctrl+Shift+Pand type .NET:New Project and enter. - Choose the .NET MAUI App template.
- Select the project location, type the project name and press Enter.
- Then choose Create project.
Prerequisites
Before proceeding, ensure the following are set up:
- Ensure you have the latest version of JetBrains Rider.
- Install .NET 8 SDK or later is installed.
- Make sure the MAUI workloads are installed and configured as described here.
Step 1: Create a new .NET MAUI Project
- Go to File > New Solution, Select .NET (C#) and choose the .NET MAUI App template.
- Enter the Project Name, Solution Name, and Location.
- Select the .NET framework version and click Create.
Step 2: Install the Syncfusion® MAUI Scheduler NuGet Package
- In Solution Explorer, right-click the project and choose Manage NuGet Packages.
- Search for Syncfusion.Maui.Scheduler and install the latest version.
- Ensure the necessary dependencies are installed correctly, and the project is restored. If not, Open the Terminal in Rider and manually run:
dotnet restore
Step 3: Register the handler
The Syncfusion.Maui.Core NuGet is a dependent package for all Syncfusion® controls of .NET MAUI. In the MauiProgram.cs file, register the handler for Syncfusion® core.
using Syncfusion.Maui.Core.Hosting;
namespace GettingStarted
{
    public static class MauiProgram
    {
        public static MauiApp CreateMauiApp()
        {
            var builder = MauiApp.CreateBuilder();

            builder.ConfigureSyncfusionCore();
            builder
            .UseMauiApp<App>()
            .ConfigureFonts(fonts =>
            {
                fonts.AddFont("OpenSans-Regular.ttf", "OpenSansRegular");
                fonts.AddFont("Segoe-mdl2.ttf", "SegoeMDL2");
            });

            return builder.Build();
        }
    }
}
Step 4: Add .NET MAUI Scheduler view
- To initialize the control, import the
Syncfusion.Maui.Schedulernamespace into your code. - Initialize SfScheduler.
<ContentPage
    . . .
    xmlns:scheduler="clr-namespace:Syncfusion.Maui.Scheduler;assembly=Syncfusion.Maui.Scheduler">

    <scheduler:SfScheduler />
</ContentPage>
using Syncfusion.Maui.Scheduler;
. . .
public partial class MainPage : ContentPage
{
public MainPage()
{
InitializeComponent();
SfScheduler scheduler = new SfScheduler();
this.Content = scheduler;
}
}Step 2: Install the Syncfusion® .NET MAUI Scheduler NuGet Package
- Press Ctrl + ` (backtick) to open the integrated terminal in Visual Studio Code.
- Ensure you’re in the project root directory where your .csproj file is located.
- Run the command
dotnet add package Syncfusion.Maui.Schedulerto install the Syncfusion® .NET MAUI Scheduler NuGet package. - To ensure all dependencies are installed, run
dotnet restore.
Step 3: Register the handler
The Syncfusion.Maui.Core NuGet is a dependent package for all Syncfusion® controls of .NET MAUI. In the MauiProgram.cs file, register the handler for Syncfusion® core.
using Syncfusion.Maui.Core.Hosting;
namespace GettingStarted
{
    public static class MauiProgram
    {
        public static MauiApp CreateMauiApp()
        {
            var builder = MauiApp.CreateBuilder();

            builder.ConfigureSyncfusionCore();
            builder
            .UseMauiApp<App>()
            .ConfigureFonts(fonts =>
            {
                fonts.AddFont("OpenSans-Regular.ttf", "OpenSansRegular");
                fonts.AddFont("Segoe-mdl2.ttf", "SegoeMDL2");
            });

            return builder.Build();
        }
    }
}
Step 4: Add .NET MAUI Scheduler view
- To initialize the control, import the
Syncfusion.Maui.Schedulernamespace into your code. - Initialize SfScheduler.
<ContentPage
    . . .
    xmlns:scheduler="clr-namespace:Syncfusion.Maui.Scheduler;assembly=Syncfusion.Maui.Scheduler">

    <scheduler:SfScheduler />
</ContentPage>
using Syncfusion.Maui.Scheduler;
. . .
public partial class MainPage : ContentPage
{
public MainPage()
{
InitializeComponent();
SfScheduler scheduler = new SfScheduler();
this.Content = scheduler;
}
}Change different scheduler views
The .NET MAUI Scheduler control provides nine different types of views to display dates and it can be assigned to the control by using the View property. The control is assigned to the Day view by default. The current date will be displayed initially for all the Scheduler views.
<scheduler:SfScheduler x:Name="scheduler" View="Month"/>SfScheduler scheduler = new SfScheduler();
scheduler.View = SchedulerView.Month;
this.Content = scheduler;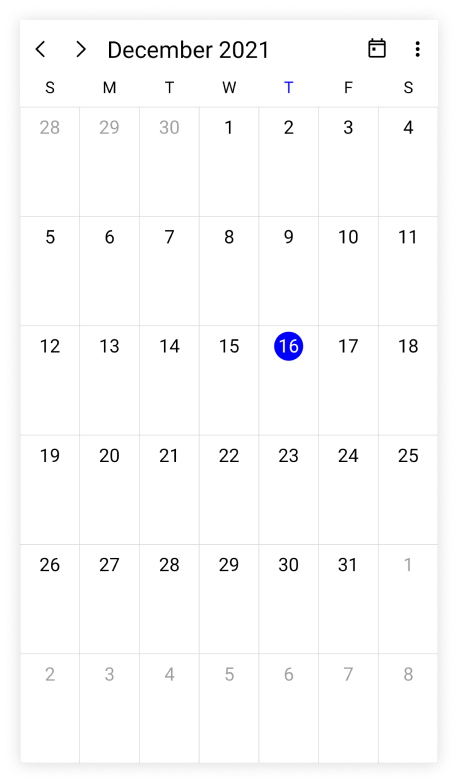
Appointments
The .NET MAUI Scheduler has a built-in capability to handle the appointment arrangement internally based on the SchedulerAppointment collections. Allocate the collection generated to the Appointments property.
Creating the scheduler appointments
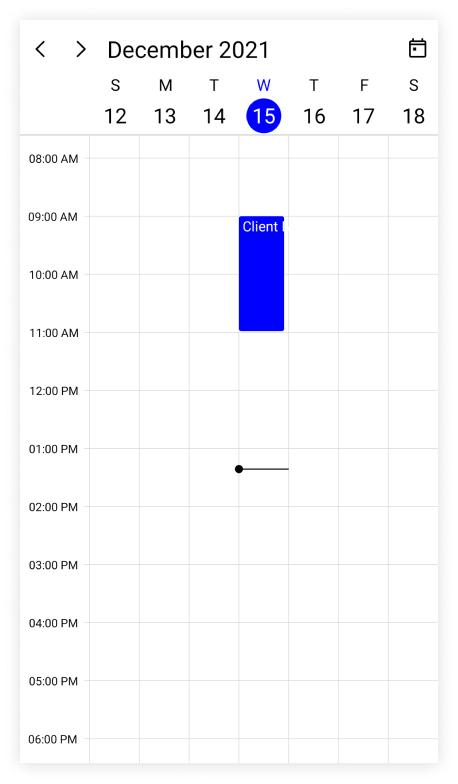
The SchedulerAppointment is a class that includes the specific scheduled appointment. It has some basic properties such as StartTime, EndTime, Subject, and some additional information about the appointment can be added with Notes, Location, and IsAllDay properties.
<scheduler:SfScheduler x:Name="scheduler" />// Creating an instance for the scheduler appointment collection.
var appointment = new ObservableCollection<SchedulerAppointment>();
//Adding scheduler appointment in the schedule appointment collection.
appointment.Add(new SchedulerAppointment()
{
StartTime = DateTime.Today.AddHours(9),
EndTime = DateTime.Today.AddHours(11),
Subject = "Client Meeting",
Location = "Hutchison road",
});
//Adding the scheduler appointment collection to the AppointmentsSource of .NET MAUI Scheduler.
this.scheduler.AppointmentsSource = appointment;
NOTE
Creating the custom Events/Appointments with data mapping
Map the custom appointments data to our scheduler.
NOTE
The CustomAppointment class should contain two DateTime fields and a string field as mandatory.
Here are the steps to render meetings using the .NET MAUI Scheduler control with respective custom data properties created in a class Meeting.
- Creating custom class to map that objects with appointment
- Create view model
- Mapping the data object to SchedulerAppointment
- Bind appointment source for Scheduler
Creating custom class to map that object with appointment
Create a custom class Meeting with mandatory fields From, To, and EventName.
/// <summary>
/// Represents the custom data properties.
/// </summary>
public class Meeting
{
    public DateTime From { get; set; }
    public DateTime To { get; set; }
    public bool IsAllDay { get; set; }
    public string EventName { get; set; }
    public string Notes { get; set; }
    public TimeZoneInfo StartTimeZone { get; set; }
    public TimeZoneInfo EndTimeZone { get; set; }
    public Brush Background { get; set; }
    public Color TextColor { get; set; }
    public object RecurrenceId { get; set; }
    public object Id { get; set; }
    public string RecurrenceRule { get; set; }
    public ObservableCollection<DateTime> RecurrenceExceptions { get; set; }
}
NOTE
Inherit this class from the
INotifyPropertyChangedfor dynamic changes in custom data.
Create view model
By setting From and To of Meeting class, schedule meetings for a specific day. Change the Subject and Background of the appointment using the EventName and Background properties. Define the list of custom appointments in a separate class of ViewModel.
/// <summary>
/// The data binding View Model.
/// </summary>
public class SchedulerViewModel
{
    /// <summary>
    /// The subject collections.
    /// </summary>
    private List<string> subjectCollection;

    /// <summary>
    /// The notes collection.
    /// </summary>
    private List<string> noteCollection;

    /// <summary>
    /// The color collection
    /// </summary>
    private List<Brush> colorCollection;

    /// <summary>
    /// The text color collection
    /// </summary>
    private List<Color> textColorCollection;

    /// <summary>
    /// Initializes a new instance of the <see cref="SchedulerViewModel" /> class.
    /// </summary>
    public SchedulerViewModel()
    {
        this.CreateSubjectCollection();
        this.CreateColorCollection();
        this.CreateTextColorCollection();
        this.CreateNoteCollection();
        this.InitializeAppointments();
    }

    /// <summary>
    /// Gets or sets appointments.
    /// </summary>
    public ObservableCollection<Meeting> Events { get; set; }

    /// <summary>
    /// Method to create the note collection.
    /// </summary>
    private void CreateNoteCollection()
    {
        this.noteCollection = new List<string>();
        this.noteCollection.Add("Consulting firm laws with business advisers");
        this.noteCollection.Add("Execute Project Scope");
        this.noteCollection.Add("Project Scope & Deliverables");
        this.noteCollection.Add("Executive summary");
        this.noteCollection.Add("Try to reduce the risks");
        this.noteCollection.Add("Encourages the integration of mind, body, and spirit");
        this.noteCollection.Add("Execute Project Scope");
        this.noteCollection.Add("Project Scope & Deliverables");
        this.noteCollection.Add("Executive summary");
        this.noteCollection.Add("Try to reduce the risk");
    }

    /// <summary>
    /// Method to initialize the appointments.
    /// </summary>
    private void InitializeAppointments()
    {
        this.Events = new ObservableCollection<Meeting>();
        Random randomTime = new Random();
        List<Point> randomTimeCollection = this.GettingTimeRanges();

        DateTime date;
        DateTime dateFrom = DateTime.Now.AddDays(-50);
        DateTime dateTo = DateTime.Now.AddDays(50);

        for (date = dateFrom; date < dateTo; date = date.AddDays(1))
        {
            int appointmentsPerDay = randomTime.Next(1, 4);
            for (int additionalAppointmentIndex = 0; additionalAppointmentIndex < appointmentsPerDay; additionalAppointmentIndex++)
            {
                var meeting = new Meeting();
                int timeRangeIndex = randomTime.Next(randomTimeCollection.Count);
                int hour = randomTime.Next((int)randomTimeCollection[timeRangeIndex].X, (int)randomTimeCollection[timeRangeIndex].Y);
                meeting.From = new DateTime(date.Year, date.Month, date.Day, hour, 0, 0);
                meeting.To = meeting.From.AddHours(1);
                meeting.EventName = this.subjectCollection[randomTime.Next(9)];
                meeting.Background = this.colorCollection[randomTime.Next(10)];
                meeting.TextColor = this.textColorCollection[randomTime.Next(5)];
                meeting.IsAllDay = false;
                meeting.Notes = this.noteCollection[randomTime.Next(10)];
                meeting.StartTimeZone = TimeZoneInfo.Local;
                meeting.EndTimeZone = TimeZoneInfo.Local;
                this.Events.Add(meeting);
            }
        }
    }

    /// <summary>
    /// Method to create the subject collection.
    /// </summary>
    private void CreateSubjectCollection()
    {
        this.subjectCollection = new List<string>();
        this.subjectCollection.Add("General Meeting");
        this.subjectCollection.Add("Plan Execution");
        this.subjectCollection.Add("Project Plan");
        this.subjectCollection.Add("Consulting");
        this.subjectCollection.Add("Performance Check");
        this.subjectCollection.Add("Support");
        this.subjectCollection.Add("Development Meeting");
        this.subjectCollection.Add("Scrum");
        this.subjectCollection.Add("Project Completion");
        this.subjectCollection.Add("Release updates");
        this.subjectCollection.Add("Performance Check");
    }

    /// <summary>
    /// Method to get timing range.
    /// </summary>
    /// <returns>return time collection</returns>
    private List<Point> GettingTimeRanges()
    {
        List<Point> randomTimeCollection = new List<Point>();
        randomTimeCollection.Add(new Point(9, 11));
        randomTimeCollection.Add(new Point(12, 14));
        randomTimeCollection.Add(new Point(15, 17));

        return randomTimeCollection;
    }

    /// <summary>
    /// Method to create the color collection.
    /// </summary>
    private void CreateColorCollection()
    {
        this.colorCollection = new List<Brush>();

        this.colorCollection.Add(new SolidColorBrush(Color.FromArgb("#FF8B1FA9")));
        this.colorCollection.Add(new SolidColorBrush(Color.FromArgb("#FFD20100")));
        this.colorCollection.Add(new SolidColorBrush(Color.FromArgb("#FFFC571D")));
        this.colorCollection.Add(new SolidColorBrush(Color.FromArgb("#FF36B37B")));
        this.colorCollection.Add(new SolidColorBrush(Color.FromArgb("#FF3D4FB5")));
        this.colorCollection.Add(new SolidColorBrush(Color.FromArgb("#FFE47C73")));
        this.colorCollection.Add(new SolidColorBrush(Color.FromArgb("#FF636363")));
        this.colorCollection.Add(new SolidColorBrush(Color.FromArgb("#FF85461E")));
        this.colorCollection.Add(new SolidColorBrush(Color.FromArgb("#FF0F8644")));
        this.colorCollection.Add(new SolidColorBrush(Color.FromArgb("#FF01A1EF")));
    }

    /// <summary>
    /// Method to  create the text color collection.
    /// </summary>
    private void CreateTextColorCollection()
    {
        this.textColorCollection = new List<Color>();
        textColorCollection.Add(Color.FromRgb(133, 81, 22));
        textColorCollection.Add(Color.FromRgb(140, 285, 219));
        textColorCollection.Add(Color.FromRgb(265, 222, 133));
        textColorCollection.Add(Color.FromRgb(198, 57, 113));
        textColorCollection.Add(Color.FromRgb(245, 62, 133));
        textColorCollection.Add(Color.FromRgb(23, 13, 165));
        textColorCollection.Add(Color.FromRgb(293, 13, 15));
    }

}
Mapping the data object to scheduler appointment
Map those properties of the Meeting class with our .NET MAUI Scheduler control by using the AppointmentMapping property.
<scheduler:SfScheduler x:Name="scheduler"
                       AppointmentsSource="{Binding Events}"
                       View="Week" >
    <scheduler:SfScheduler.AppointmentMapping>
        <scheduler:SchedulerAppointmentMapping
                Subject="EventName"
                StartTime="From"
                EndTime="To"
                Background="Background"
                TextColorMapping="TextColor"
                IsAllDay="IsAllDay"
                StartTimeZone="StartTimeZone"
                EndTimeZone="EndTimeZone"
                Id="Id"
                RecurrenceExceptionDates="RecurrenceExceptions"
                RecurrenceRule="RecurrenceRule"
                RecurrenceId="RecurrenceId"/>
    </scheduler:SfScheduler.AppointmentMapping>
</scheduler:SfScheduler>
using Syncfusion.Maui.Scheduler;
SfScheduler scheduler = new SfScheduler();
scheduler.View = SchedulerView.Week;
SchedulerAppointmentMapping appointmentMapping = new SchedulerAppointmentMapping();
appointmentMapping.Subject = "EventName";
appointmentMapping.StartTime = "From";
appointmentMapping.EndTime = "To";
appointmentMapping.Background = "Background";
appointmentMapping.TextColorMapping = "TextColor";
appointmentMapping.IsAllDay = "IsAllDay";
appointmentMapping.StartTimeZone = "StartTimeZone";
appointmentMapping.EndTimeZone = "EndTimeZone";
appointmentMapping.Id = "Id";
appointmentMapping.RecurrenceExceptionDates = "RecurrenceExceptions";
appointmentMapping.RecurrenceRule = "RecurrenceRule";
appointmentMapping.RecurrenceId = "RecurrenceId";
scheduler.AppointmentMapping = appointmentMapping;
this.Content = scheduler;NOTE
When publishing in AOT mode on iOS and macOS, ensure that
[Preserve(AllMembers = true)]is added to the model class to maintain appointment binding.
Bind appointment source for scheduler
Create meetings of type ObservableCollection<Meeting> and assign those appointments collection to the AppointmentsSource property of SfScheduler.
<schedule:SfScheduler x:Name="scheduler"
                      AppointmentsSource="{Binding Events}">
    <schedule:SfScheduler.BindingContext>
        <local:SchedulerViewModel/>
    </schedule:SfScheduler.BindingContext>
</schedule:SfScheduler>
SfScheduler scheduler = new SfScheduler();
var viewModel = new SchedulerDataBindingViewModel();
scheduler.AppointmentsSource = viewModel.Events;
this.Content = scheduler;NOTE
Change first day of week
The scheduler allows customization on the first day of the week with the FirstDayOfWeek property. The Scheduler will default to Sunday as the first day of the week.
The following code shows the Scheduler with Tuesday as the first day of the week.
<scheduler:SfScheduler x:Name="scheduler" FirstDayOfWeek="Tuesday"/>SfScheduler scheduler = new SfScheduler();
scheduler.FirstDayOfWeek = DayOfWeek.Tuesday;
this.Content = scheduler;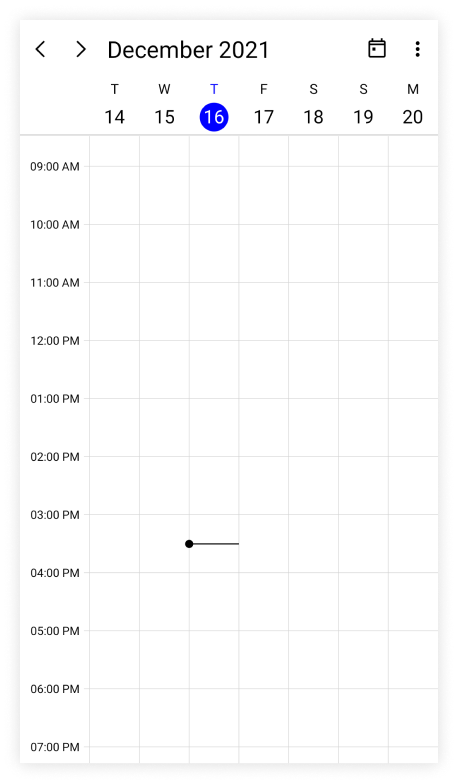
Today highlight brush
The today highlight brush of Scheduler can be customized by using the TodayHighlightBrush property in the SfScheduler, which will highlight the today’s circle and text in Scheduler view header and month cell.
<scheduler:SfScheduler x:Name="scheduler" TodayHighlightBrush="Orange"/>SfScheduler scheduler = new SfScheduler();
scheduler.TodayHighlightBrush = Brush.Orange;
this.Content = scheduler;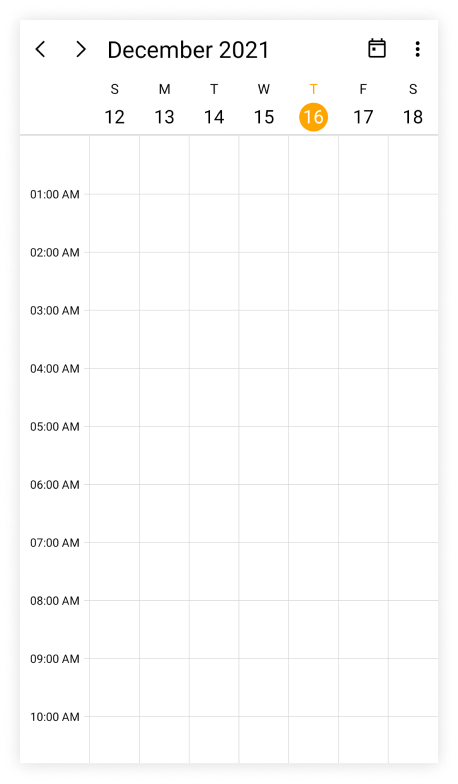
Cell border brush
The vertical and horizontal line color of the Scheduler can be customized by using the CellBorderBrush property in the SfScheduler.
<scheduler:SfScheduler x:Name="scheduler" CellBorderBrush="Orange"/>SfScheduler scheduler = new SfScheduler();
scheduler.CellBorderBrush = Brush.Orange;
this.Content = scheduler;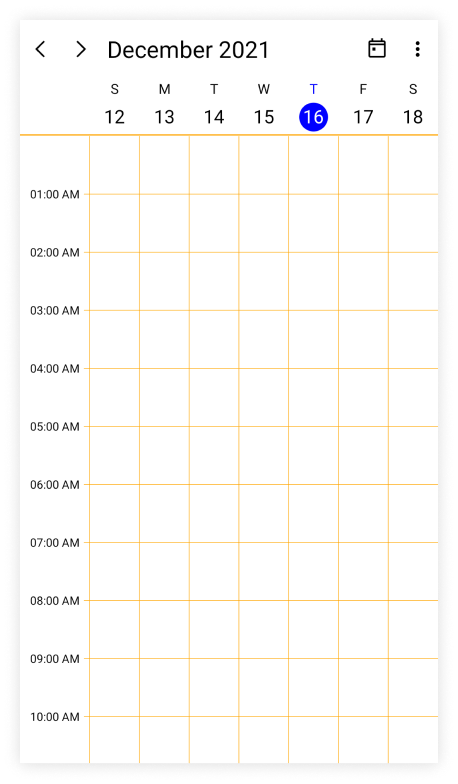
Background color
The Scheduler background color can be customized by using the BackgroundColor property in the SfScheduler.
<scheduler:SfScheduler x:Name="scheduler" BackgroundColor="LightBlue"/>SfScheduler scheduler = new SfScheduler();
scheduler.BackgroundColor = Colors.LightBlue;
this.Content = scheduler;Show navigation arrow
By Using the ShowNavigationArrows property of the SfScheduler, you can navigate to the previous or next views of the Scheduler. By default, the value ShowNavigationArrows is true, which displays the navigation icons and Today button in the header view. It allows to quickly navigate to today and previous or next views.
<scheduler:SfScheduler x:Name="scheduler" ShowNavigationArrows="False"/>SfScheduler scheduler = new SfScheduler();
scheduler.ShowNavigationArrows = false;
this.Content = scheduler;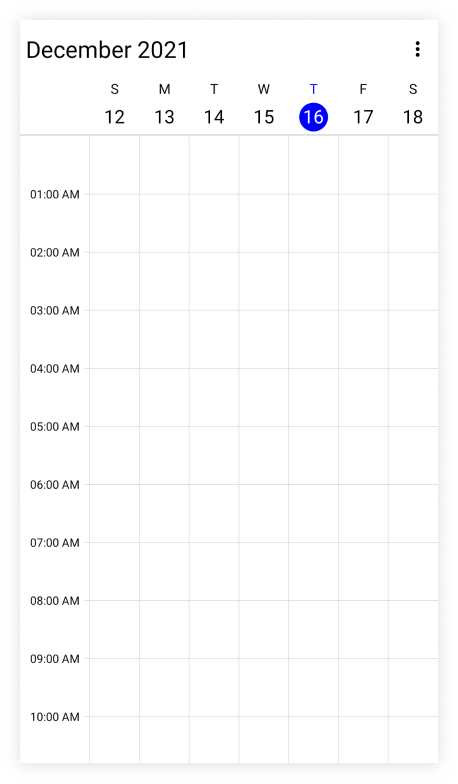
Show week number
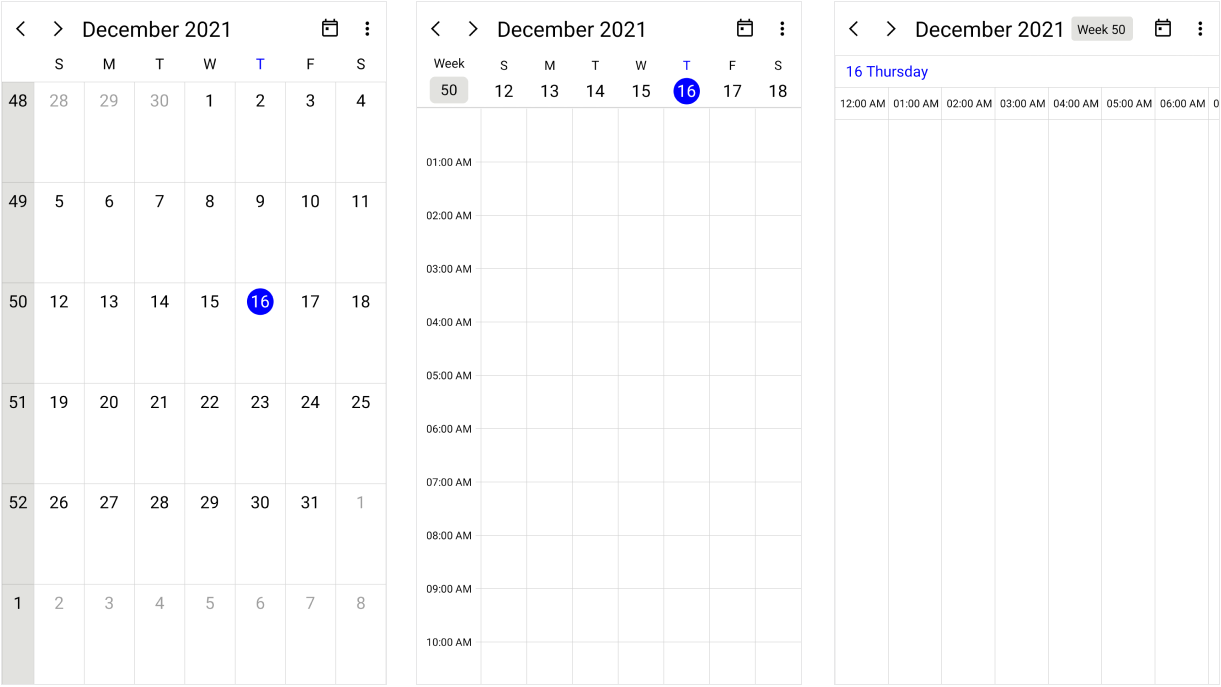
Display the week number of the year in all Scheduler views of the SfScheduler by setting the ShowWeekNumber property as true and by default it is false. The Week numbers will be displayed based on the ISO standard.
<scheduler:SfScheduler x:Name="scheduler" ShowWeekNumber="True"/>SfScheduler scheduler = new SfScheduler();
scheduler.ShowWeekNumber = true;
this.Content = scheduler;NOTE
This property will not be applicable for the
SchedulerViewisTimeline Month.
Customize the week number text style
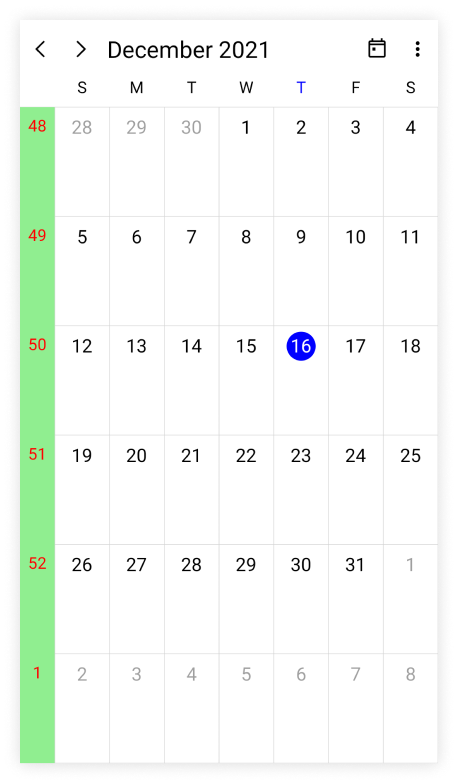
The Week number text style of the Scheduler can be customized by using the WeekNumberStyle property and it allows to customize the TextStyle and the Background color in the Week number of the SfScheduler.
<scheduler:SfScheduler x:Name="scheduler" ShowWeekNumber="True"/>SfScheduler scheduler = new SfScheduler();
scheduler.ShowWeekNumber = true;
var schedulerTextStyle = new SchedulerTextStyle()
{
TextColor = Colors.Red,
FontSize = 14
};
var schedulerWeekNumberStyle = new SchedulerWeekNumberStyle()
{
Background = Brush.LightGreen,
TextStyle = schedulerTextStyle
};
scheduler.WeekNumberStyle = schedulerWeekNumberStyle;
this.Content = scheduler;NOTE
It is not applicable if the
ViewisTimeline Monthand it is applied only when theShowWeekNumberproperty isenabled.
NOTE
You can refer to our .NET MAUI Scheduler feature tour page for its groundbreaking feature representations. You can also explore our .NET MAUI Scheduler Example that shows you how to render the Scheduler in .NET MAUI.