Shape Selection in Flutter Maps (SfMaps)
21 May 202515 minutes to read
You can select a shape to highlight a specific area on a map. You can also use callbacks to perform custom actions during shape selection.
Enable shape selection
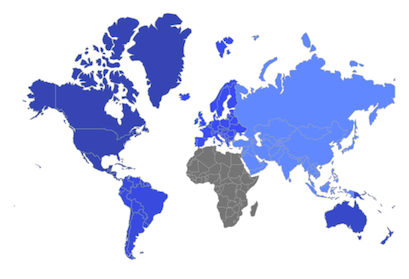
You can enable shape selection on a map using the MapShapeLayer.onSelectionChanged property along with setting the selectedIndex property. The default value of the selectedIndex property is -1.
The onSelectionChanged callback is triggered when a user selects a shape by tapping or clicking, or when a shape is selected programmatically. It provides the index of the selected shape.
NOTE
You must call
setState()in theMapShapeLayer.onSelectionChangedcallback to reflect the changes in the UI.
late List<Model> data;
late MapShapeSource dataSource;
int selectedIndex = 1;

@override
void initState() {
    super.initState();
    data = const <Model>[
        Model('Asia', 'Asia', Color.fromRGBO(60, 120, 255, 0.8)),
        Model('Africa', 'Africa', Color.fromRGBO(51, 102, 255, 0.8)),
        Model('Europe', 'Europe', Color.fromRGBO(0, 57, 230, 0.8)),
        Model('South America', 'SA', Color.fromRGBO(0, 51, 204, 0.8)),
        Model('Australia', 'Australia', Color.fromRGBO(0, 45, 179, 0.8)),
        Model('North America', 'NA', Color.fromRGBO(0, 38, 153, 0.8))
    ];

    dataSource = MapShapeSource.asset(
      "assets/world_map.json",
       shapeDataField: "continent",
       dataCount: data.length,
       primaryValueMapper: (int index) => data[index].continent,
       shapeColorValueMapper: (int index) => data[index].color,
    );
}

@override
Widget build(BuildContext context) {
   return Scaffold(
      body: Center(
        child: Container(
          height: 350,
          child: Padding(
            padding: EdgeInsets.only(left: 15, right: 15),
            child: SfMaps(
              layers: [
                MapShapeLayer(
                   source: dataSource,
                   selectedIndex: selectedIndex,
                   onSelectionChanged: (int index) {
                     setState(() {
                        selectedIndex = index;
                     });
                   },
                ),
              ],
            ),
          ),
        ),
      ),
   );
}

class Model {
  const Model(this.continent, this.code, this.color);

  final String continent;
  final String code;
  final Color color;
}
NOTE
- Refer to the
MapSelectionSettingsclass for customizing the selected shape’s appearance.
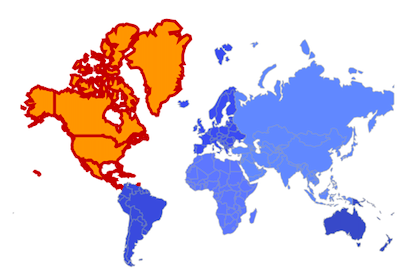
Appearance customization
You can customize the following aspects of the selected shape:
-
Background color - Change the background color of the selected shape using the
MapSelectionSettings.colorproperty. -
Stroke width - Change the stroke width of the selected shape using the
MapSelectionSettings.strokeWidthproperty. -
Stroke color - Change the stroke color of the selected shape using the
MapSelectionSettings.strokeColorproperty.
late List<Model> data;
late MapShapeSource dataSource;
int selectedIndex = 5;

@override
void initState() {
    super.initState();
    data = const <Model>[
        Model('Asia', 'Asia', Color.fromRGBO(60, 120, 255, 0.8)),
        Model('Africa', 'Africa', Color.fromRGBO(51, 102, 255, 0.8)),
        Model('Europe', 'Europe', Color.fromRGBO(0, 57, 230, 0.8)),
        Model('South America', 'SA', Color.fromRGBO(0, 51, 204, 0.8)),
        Model('Australia', 'Australia', Color.fromRGBO(0, 45, 179, 0.8)),
        Model('North America', 'NA', Color.fromRGBO(0, 38, 153, 0.8))
    ];

    dataSource = MapShapeSource.asset(
      "assets/world_map.json",
       shapeDataField: "continent",
       dataCount: data.length,
       primaryValueMapper: (int index) => data[index].continent,
       shapeColorValueMapper: (int index) => data[index].color,
    );
}

@override
Widget build(BuildContext context) {
   return Scaffold(
      body: Center(
        child: Container(
          height: 350,
          child: Padding(
            padding: EdgeInsets.only(left: 15, right: 15),
            child: SfMaps(
              layers: [
                MapShapeLayer(
                   source: dataSource,
                   selectedIndex: selectedIndex,
                   onSelectionChanged: (int index) {
                     setState(() {
                        selectedIndex = index;
                     });
                   },
                   selectionSettings: MapSelectionSettings(
                      color: Colors.orange,
                      strokeColor: Colors.red[900],
                      strokeWidth: 3,
                   ),
                ),
              ],
            ),
          ),
        ),
      ),
   );
}

class Model {
  const Model(this.continent, this.code, this.color);

  final String continent;
  final String code;
  final Color color;
}
Using SfMapsTheme
You can also customize the appearance of the selected shape using SfMapsTheme:
-
Background color - Change the background color of the selected shape using the
SfMapsThemeData.selectionColorproperty. -
Stroke width - Change the stroke width of the selected shape using the
SfMapsThemeData.selectionStrokeWidthproperty. -
Stroke color - Change the stroke color of the selected shape using the
SfMapsThemeData.selectionStrokeColorproperty.
NOTE
You must import the
theme.dartlibrary from theCorepackage to useSfMapsTheme.
late List<Model> data;
late MapShapeSource dataSource;
int selectedIndex = 5;

@override
void initState() {
    super.initState();
    data = const <Model>[
        Model('Asia', 'Asia', Color.fromRGBO(60, 120, 255, 0.8)),
        Model('Africa', 'Africa', Color.fromRGBO(51, 102, 255, 0.8)),
        Model('Europe', 'Europe', Color.fromRGBO(0, 57, 230, 0.8)),
        Model('South America', 'SA', Color.fromRGBO(0, 51, 204, 0.8)),
        Model('Australia', 'Australia', Color.fromRGBO(0, 45, 179, 0.8)),
        Model('North America', 'NA', Color.fromRGBO(0, 38, 153, 0.8))
    ];

    dataSource = MapShapeSource.asset(
      "assets/world_map.json",
       shapeDataField: "continent",
       dataCount: data.length,
       primaryValueMapper: (int index) => data[index].continent,
       shapeColorValueMapper: (int index) => data[index].color,
    );
}

@override
Widget build(BuildContext context) {
    return Scaffold(
      body: Center(
        child: Container(
          height: 350,
          child: Padding(
            padding: EdgeInsets.only(left: 15, right: 15),
            child: SfMapsTheme(
              data: SfMapsThemeData(
                selectionColor: Colors.orange,
                selectionStrokeWidth: 3,
                selectionStrokeColor: Colors.red[900],
              ),
              child: SfMaps(
                layers: [
                  MapShapeLayer(
                     source: dataSource,
                     selectedIndex: selectedIndex,
                     onSelectionChanged: (int index) {
                        setState(() {
                           selectedIndex = index;
                        });
                     },
                  ),
                ],
              ),
            )
          ),
        ),
      ),
   );
}

class Model {
  const Model(this.continent, this.code, this.color);

  final String continent;
  final String code;
  final Color color;
}
NOTE
You can refer to our Flutter Maps feature tour page for its groundbreaking feature representations. You can also explore our Flutter Maps Selection example that shows how to configure a Maps in Flutter.