Bubbles in Flutter Maps (SfMaps)
21 May 202517 minutes to read
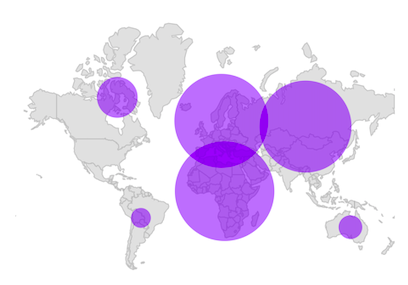
Bubbles can be rendered in different colors and sizes based on the data values of their assigned shape. You can add information to shapes such as population density, number of users, and more.
Enable bubbles
You can enable bubbles using the MapShapeSource.bubbleSizeMapper. This property is used to specify the value based on which the bubble’s size has to be rendered.
late List<Model> data;
late MapShapeSource dataSource;

@override
void initState() {
   super.initState();
   data = <Model>[
      Model('Asia', 51),
      Model('Africa', 58),
      Model('Europe', 48),
      Model('North America', 41),
      Model('South America', 14),
      Model('Australia', 23),
   ];

   dataSource = MapShapeSource.asset(
      "assets/world_map.json",
      shapeDataField: "continent",
      dataCount: data.length,
      primaryValueMapper: (int index) => data[index].continent,
      bubbleSizeMapper: (int index) => data[index].count,
   );
}

@override
Widget build(BuildContext context) {
  return Scaffold(
    body: Padding(
      padding: EdgeInsets.only(left: 15, right: 15),
      child: SfMaps(
        layers: [
          MapShapeLayer(
            source: dataSource,
          ),
        ],
      ),
    ),
  );
}

class Model {
  const Model(this.continent, this.count);

  final String continent;
  final double count;
}
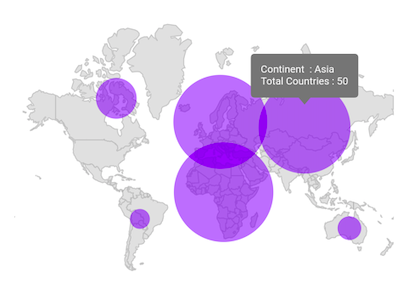
Tooltip for the bubbles
You can enable tooltip for the bubbles using the MapShapeLayer.bubbleTooltipBuilder property. It can be used to indicate clearly the information about the currently interacted bubble.
late List<Model> data;
late MapShapeSource dataSource;

@override
void initState() {
  super.initState();

  data = <Model>[
    Model('Asia', 50, '44,579,000 sq. km.'),
    Model('Africa', 54, '30,370,000 sq. km.'),
    Model('Europe', 51, '10,180,000 sq. km.'),
    Model('North America', 23, '24,709,000 sq. km.'),
    Model('South America', 12, '17,840,000 sq. km.'),
    Model('Australia', 14, '8,600,000 sq. km.'),
  ];

  dataSource = MapShapeSource.asset(
    "assets/world_map.json",
     shapeDataField: "continent",
     dataCount: data.length,
     primaryValueMapper: (int index) => data[index].continent,
     bubbleSizeMapper: (int index) => data[index].countriesCount,
  );
}

@override
Widget build(BuildContext context) {
  final ThemeData themeData = Theme.of(context);
  return Scaffold(
    body: Padding(
      padding: EdgeInsets.only(left: 15, right: 15),
      child: SfMaps(
        layers: [
          MapShapeLayer(
            source: dataSource,
            bubbleTooltipBuilder: (BuildContext context, int index) {
               return Padding(
                  padding: EdgeInsets.all(10),
                  child: Text('Continent : ' +
                     data[index].continent +
                     '\nTotal Countries : ' +
                     data[index].countriesCount.toStringAsFixed(0),
                     style: themeData.textTheme.caption!
                        .copyWith(color: themeData.colorScheme.surface)),
               );
            },
          ),
        ],
      ),
    ),
  );
}

class Model {
  const Model(this.continent, this.countriesCount, this.area);

  final String continent;
  final double countriesCount;
  final String area;
}
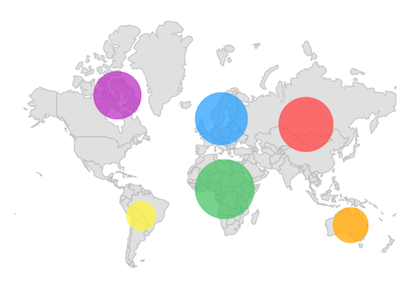
Color
You can customize the bubble color based on the value returned from the MapShapeSource.bubbleColorValueMapper property. You can either return a value or a color from the bubbleColorValueMapper.
If bubbleColorValueMapper returns a color, then the color will be applied to the bubble straightaway.
If bubbleColorValueMapper returns a value other than the color, then you must set the MapShapeSource.bubbleColorMappers property. The value returned from the bubbleColorValueMapper will be used for the comparison in the MapColorMapper.value or MapColorMapper.from and MapColorMapper.to. Then, the MapColorMapper.color will be applied to the respective bubble.
late List<Model> data;
late MapShapeSource dataSource;

@override
void initState() {
  super.initState();

  data = <Model>[
    Model('Asia', 51, Colors.red[400]!),
    Model('Africa', 58, Colors.green[400]!),
    Model('Europe', 48, Colors.blue[400]!),
    Model('North America', 41, Colors.purple[400]!),
    Model('South America', 14, Colors.yellow[400]!),
    Model('Australia', 23, Colors.orange[400]!),
  ];

  dataSource = MapShapeSource.asset(
     "assets/world_map.json",
     shapeDataField: "continent",
     dataCount: data.length,
     primaryValueMapper: (int index) => data[index].continent,
     bubbleSizeMapper: (int index) => data[index].count,
     bubbleColorValueMapper: (int index) => data[index].bubbleColor,
  );
}

@override
Widget build(BuildContext context) {
   return Scaffold(
     body: Padding(
       padding: EdgeInsets.only(left: 15, right: 15),
       child: SfMaps(
         layers: [
           MapShapeLayer(
             source: dataSource,
             bubbleSettings: MapBubbleSettings(
               maxRadius: 30,
               minRadius: 15,
             ),
           ),
         ],
       ),
     ),
   );
}

class Model {
   Model(this.continent, this.count, this.bubbleColor);

  final String continent;
  final double count;
  final Color bubbleColor;
}
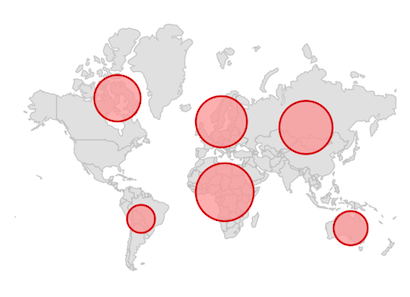
Appearance customization
You can customize the following appearance properties of the bubbles:
-
MinRadius - Change the minimum radius of the bubbles using the
MapBubbleSettings.minRadiusproperty. The default value of theminRadiusproperty is10.0. -
MaxRadius - Change the maximum radius of the bubbles using the
MapBubbleSettings.maxRadiusproperty. The default value of themaxRadiusproperty is50.0. -
Background color - Change the background color of the bubbles using the
MapBubbleSettings.colorproperty. -
Stroke color - Change the stroke color of the bubbles using the
MapBubbleSettings.strokeColorproperty. -
Stroke width - Change the stroke width of the bubbles using the
MapBubbleSettings.strokeWidthproperty.
late List<Model> data;
late MapShapeSource dataSource;

@override
void initState() {
    super.initState();
    data = <Model>[
      Model('Asia', 51),
      Model('Africa', 58),
      Model('Europe', 48),
      Model('North America', 41),
      Model('South America', 14),
      Model('Australia', 23),
    ];

    dataSource = MapShapeSource.asset(
       "assets/world_map.json",
       shapeDataField: "continent",
       dataCount: data.length,
       primaryValueMapper: (int index) => data[index].continent,
       bubbleSizeMapper: (int index) => data[index].count,
    );
}

@override
Widget build(BuildContext context) {
    return Scaffold(
      body: Padding(
        padding: EdgeInsets.only(left: 15, right: 15),
        child: SfMaps(
          layers: [
            MapShapeLayer(
              source: dataSource,
              bubbleSettings: MapBubbleSettings(
                maxRadius: 30,
                minRadius: 15,
                color: Colors.red[200],
                strokeWidth: 2,
                strokeColor: Colors.red[800],
              ),
            )
          ],
        ),
      ),
   );
}

class Model {
  Model(this.continent, this.count);

  final String continent;
  final double count;
}
Using SfMapsTheme
You can also customize the below appearance of the bubbles using SfMapsTheme.
-
Background color - Change the background color of the bubbles using the
SfMapsThemeData.bubbleColorproperty. -
Stroke color - Change the stroke color of the bubbles using the
SfMapsThemeData.bubbleStrokeColorproperty. -
Stroke width - Change the stroke width of the bubbles using the
SfMapsThemeData.bubbleStrokeWidthproperty. -
Hover color - Change the hover color of the bubbles in the web platform using the
SfMapsThemeData.bubbleHoverColorproperty. -
Hover stroke color - Change the hover stroke color of the bubbles in the web platform using the
SfMapsThemeData.bubbleHoverStrokeColorproperty. -
Hover stroke width - Change the hover stroke width of the bubbles in the web platform using the
SfMapsThemeData.bubbleHoverStrokeWidthproperty.
NOTE
You must import the
theme.dartlibrary from theCorepackage to useSfMapsTheme.
late List<Model> data;
late MapShapeSource dataSource;

@override
void initState() {
    super.initState();
    data = <Model>[
      Model('Asia', 51),
      Model('Africa', 58),
      Model('Europe', 48),
      Model('North America', 41),
      Model('South America', 14),
      Model('Australia', 23),
   ];

   dataSource = MapShapeSource.asset(
     "assets/world_map.json",
      shapeDataField: "continent",
      dataCount: data.length,
      primaryValueMapper: (int index) => data[index].continent,
      bubbleSizeMapper: (int index) => data[index].count,
   );
}

@override
Widget build(BuildContext context) {
    return Scaffold(
      body: Padding(
        padding: EdgeInsets.only(left: 15, right: 15),
        child: SfMapsTheme(
          data: SfMapsThemeData(
            bubbleColor: Colors.red[200],
            bubbleStrokeColor: Colors.red[800],
            bubbleStrokeWidth: 2,
            bubbleHoverColor: Colors.red[800],
            bubbleHoverStrokeColor: Colors.black,
            bubbleHoverStrokeWidth: 2,
          ),
          child: SfMaps(
            layers: [
              MapShapeLayer(
                source: dataSource,
                bubbleSettings: MapBubbleSettings(
                  maxRadius: 30,
                  minRadius: 15,
                ),
              )
            ],
          ),
        )
      ),
   );
}

class Model {
  Model(this.continent, this.count);

  final String continent;
  final double count;
}
NOTE
You can refer to our Flutter Maps feature tour page for its groundbreaking feature representations. You can also explore our Flutter Maps Bubble example that shows how to configure a Maps in Flutter.