How can I help you?
Markers in WPF Maps (SfMap)
5 Feb 202524 minutes to read
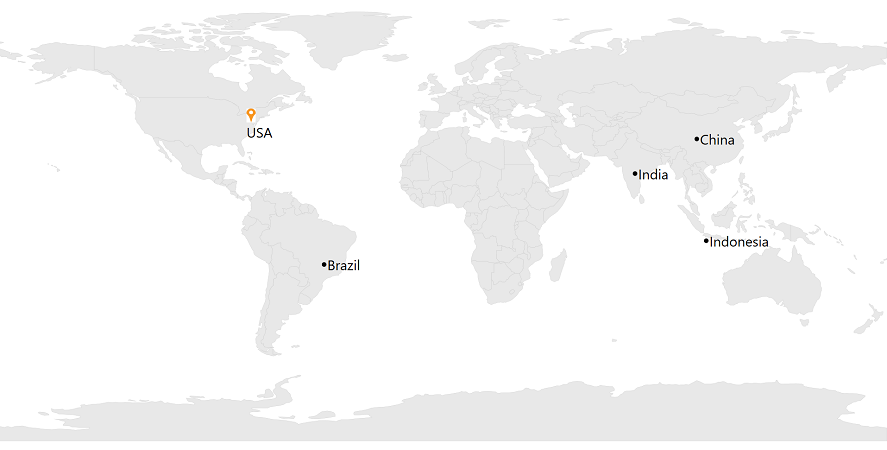
Markers are used to show some messages on maps.
Adding the marker
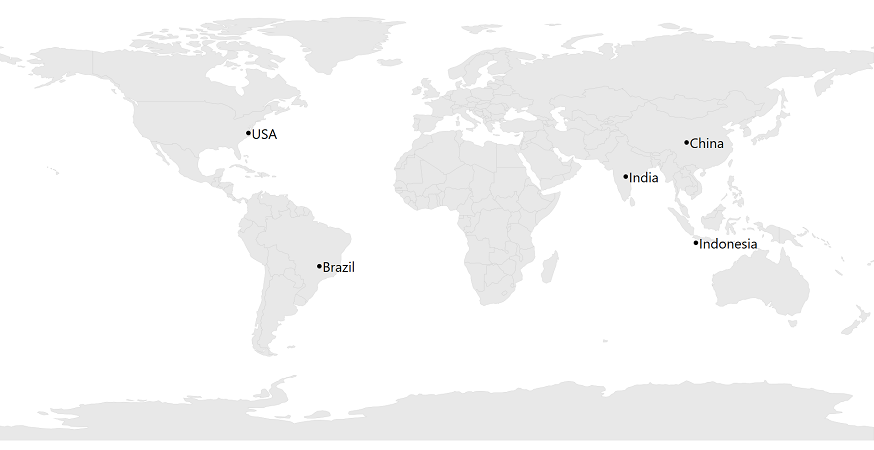
Any number of markers can be added to the shape file layer or the imagery layer using the Markers property. Each marker contains the following properties:
NOTE
You must create a model that contains properties such as Latitude and Longitude to add a marker in maps. If you want to add text with default marker, add Label property with your model.
Label: Displays some messages on maps.
Latitude: Specifies y-axis position of the marker.
Longitude: Specifies x-axis position of the marker.
<syncfusion:SfMap>
            <syncfusion:SfMap.Layers>
                <syncfusion:ShapeFileLayer Uri="Maps.ShapeFiles.world1.shp"  Markers="{Binding Models}" >
                </syncfusion:ShapeFileLayer>
            </syncfusion:SfMap.Layers>
        </syncfusion:SfMap>
public partial class MainWindow : Window
{
public MainWindow()
{
InitializeComponent();
ViewModel view = new ViewModel();
this.DataContext =view;
SfMap maps = new SfMap();
ShapeFileLayer shape = new ShapeFileLayer();
shape.Uri = "Maps.ShapeFiles.world1.shp";
shape.Markers = view.Models;
maps.Layers.Add(shape);
this.Content = maps;
}
}
public class ViewModel
{
public ObservableCollection<Model> Models { get; set; }
public ViewModel()
{
this.Models = new ObservableCollection<Model>();
this.Models.Add(new Model() { Label = "USA", Latitude = "38.8833N", Longitude = "77.0167W" });
this.Models.Add(new Model() { Label = "Brazil ", Latitude = "15.7833S", Longitude = "47.8667W" });
this.Models.Add(new Model() { Label = "India ", Latitude = "21.0000N", Longitude = "78.0000E" });
this.Models.Add(new Model() { Label = "China ", Latitude = "35.0000N", Longitude = "103.0000E" });
this.Models.Add(new Model() { Label = "Indonesia ", Latitude = "6.1750S", Longitude = "106.8283E" });
}
}
public class Model
{
public string Label { get; set; }
public string Longitude { get; set; }
public string Latitude { get; set; }
}
Add a custom marker
The marker appearance customization can be achieved by using the MarkerTemplate and MarkerTemplateSelector properties of ImageryLayer and ShapeFileLayer in the SfMap.
Customize marker appearance using DataTemplate
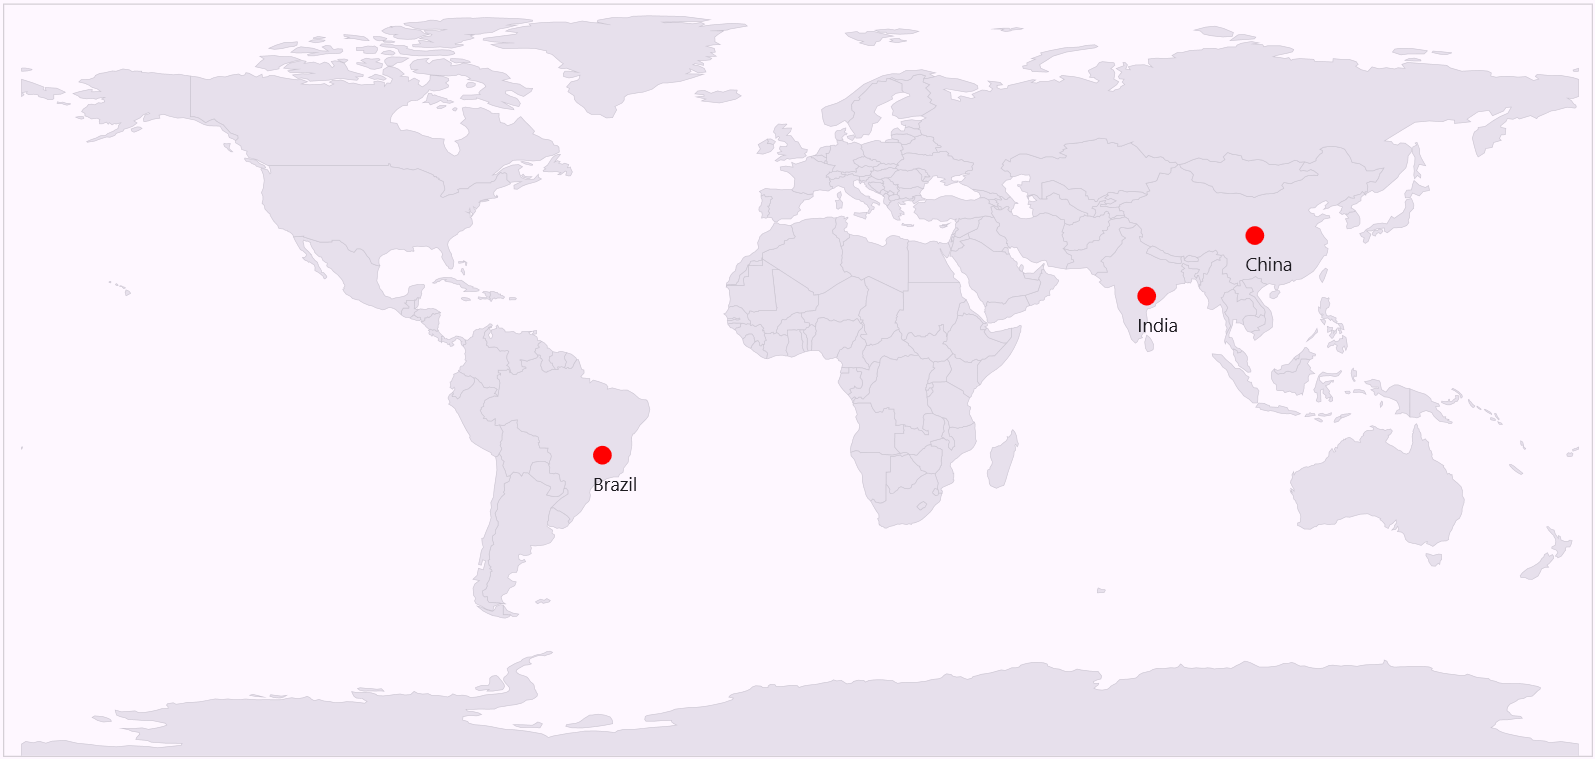
You can customize the marker appearance by using the MarkerTemplate property of ImageryLayer and ShapeFileLayer in the SfMap.
<Grid>
    <Grid.Resources>
        <DataTemplate x:Key="markerTemplate">
            <Grid>
                <Canvas>
                    <Ellipse Width="15" Height="15" Fill="Red"/>
                    <TextBlock HorizontalAlignment="Center" Margin="0,20,0,0" FontSize="15" FontFamily="Segoe UI" Text="{Binding Label}"/>
                </Canvas>
            </Grid>
        </DataTemplate>
    </Grid.Resources>

    <Grid.DataContext>
        <local:MapsViewModel />
    </Grid.DataContext>

    <syncfusion:SfMap x:Name="maps">
        <syncfusion:SfMap.Layers>
            <syncfusion:ShapeFileLayer Uri="Maps.ShapeFiles.world1.shp"
                                       Markers="{Binding Markers}"
                                       MarkerTemplate="{StaticResource markerTemplate}">
            </syncfusion:ShapeFileLayer>
        </syncfusion:SfMap.Layers>
    </syncfusion:SfMap>
</Grid>
ShapeFileLayer shape = new ShapeFileLayer();
shape.Uri = "Maps.ShapeFiles.world1.shp";
shape.MarkerTemplate= this.Resources["markerTemplate"] as DataTemplate;
shape.Markers = view.Models;
this.maps.Layers.Add(shape);public class MarkerDetails
{
public string Label { get; set; }
public string Longitude { get; set; }
public string Latitude { get; set; }
}public class MapsViewModel
{
public ObservableCollection<MarkerDetails> Markers { get; set; }
public MapsViewModel()
{
this.Markers = new ObservableCollection<MarkerDetails>();
this.Markers.Add(new MarkerDetails() { Label = "India", Latitude = "21.0000N", Longitude = "78.0000E" });
this.Markers.Add(new MarkerDetails() { Label = "China", Latitude = "35.0000N", Longitude = "103.0000E" });
this.Markers.Add(new MarkerDetails() { Label = "Brazil", Latitude = "15.7833S", Longitude = "47.8667W" });
}
}
Customize marker appearance using DataTemplateSelector
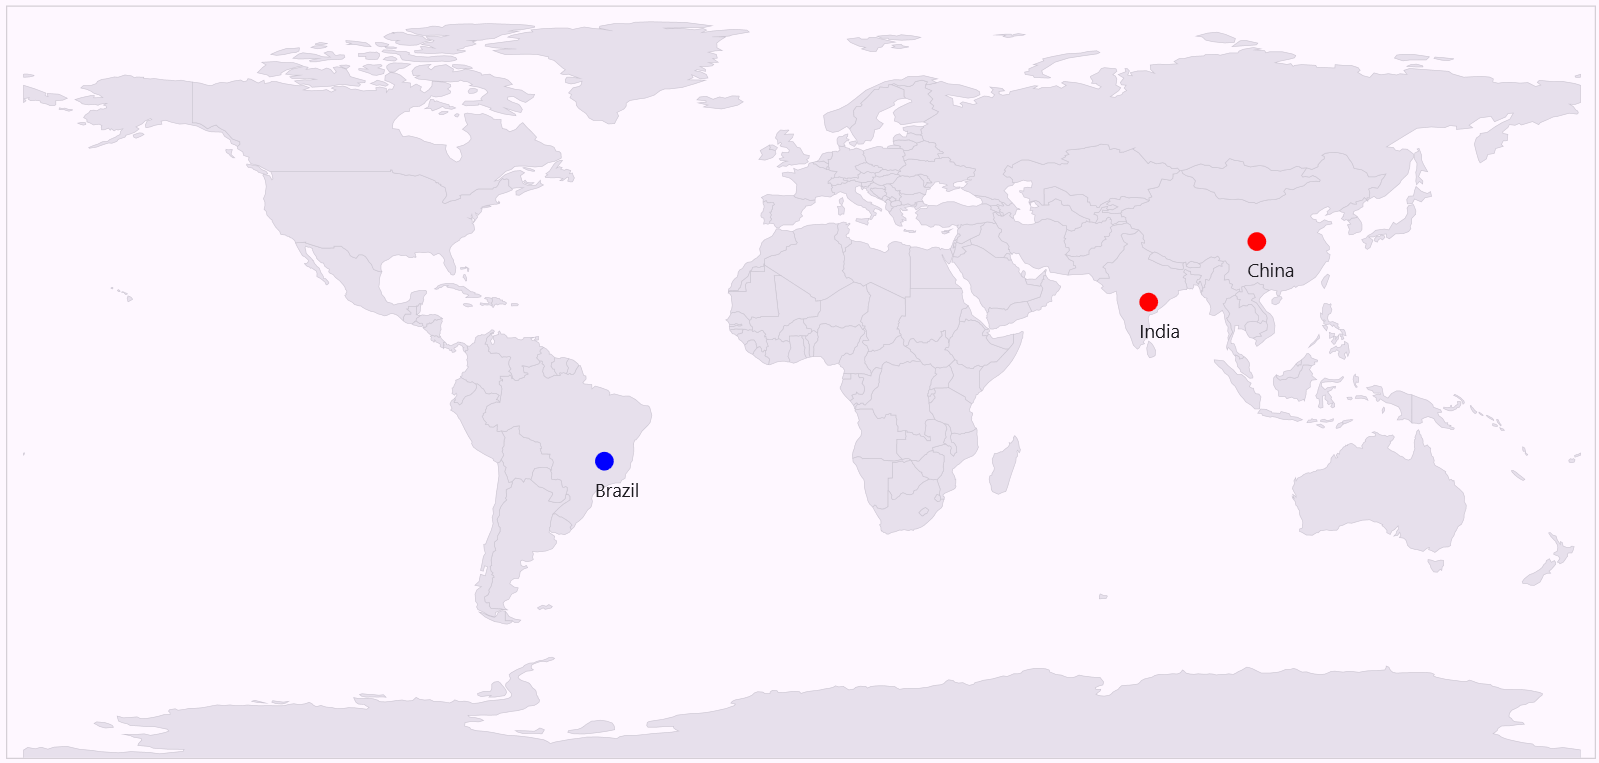
You can customize the marker appearance by using the MarkerTemplateSelector property of ImageryLayer and ShapeFileLayer in the SfMap. The DataTemplateSelector can choose a DataTemplate at runtime based on the value of a data-bound to marker appearance by using the MarkerTemplateSelector. It allows you to choose a different data template for each marker, as well as to customize the appearance of a particular marker based on certain conditions.
<Grid>
    <Grid.Resources>
        <DataTemplate x:Key="AsiaRegionMarkerTemplate">
            <Grid>
                <Canvas>
                    <Ellipse Width="15" Height="15" Fill="Red"/>
                    <TextBlock HorizontalAlignment="Center" Margin="0,20,0,0" FontSize="15" FontFamily="Segoe UI" Text="{Binding Label}"/>
                </Canvas>
            </Grid>
        </DataTemplate>
        <DataTemplate x:Key="SouthAmericaRegionMarkerTemplate">
            <Grid>
                <Canvas>
                    <Ellipse Width="15" Height="15" Fill="Blue"/>
                    <TextBlock HorizontalAlignment="Center" Margin="0,20,0,0" FontSize="15" FontFamily="Segoe UI" Text="{Binding Label}"/>
                </Canvas>
            </Grid>
        </DataTemplate>
        <local:MarkerTemplateSelector x:Key="markerTemplateSelector"
                                      AsiaMarkerTemplate="{StaticResource AsiaRegionMarkerTemplate}"
                                      SouthAmericaMarkerTemplate="{StaticResource SouthAmericaRegionMarkerTemplate}"/>
    </Grid.Resources>

    <Grid.DataContext>
        <local:MapsViewModel />
    </Grid.DataContext>

    <syncfusion:SfMap>
        <syncfusion:SfMap.Layers>
            <syncfusion:ImageryLayer LayerType="OSM"
                                     MarkerTemplateSelector="{StaticResource markerTemplateSelector}"
                                     Markers="{Binding Markers}"/>
            <syncfusion:ShapeFileLayer Uri="Maps.ShapeFiles.world1.shp"
                                       MarkerTemplateSelector="{StaticResource markerTemplateSelector}"
                                       Markers="{Binding Markers}"/>
            </syncfusion:SfMap.Layers>
    </syncfusion:SfMap>
</Grid>
public class MarkerTemplateSelector : DataTemplateSelector
{
public DataTemplate AsiaMarkerTemplate { get; set; }
public DataTemplate SouthAmericaMarkerTemplate { get; set; }
public override DataTemplate SelectTemplate(object item, DependencyObject container)
{
if (item is CustomDataSymbol customDataSymbol && customDataSymbol.Data != null)
{
var value = customDataSymbol.Data as MarkerDetails;
if (value.Label == "India" || value.Label == "China")
{
return this.AsiaMarkerTemplate;
}
return this.SouthAmericaMarkerTemplate;
}
return base.SelectTemplate(item, container);
}
}public class MarkerDetails
{
public string Label { get; set; }
public string Longitude { get; set; }
public string Latitude { get; set; }
}public class MapsViewModel
{
public ObservableCollection<MarkerDetails> Markers { get; set; }
public MapsViewModel()
{
this.Markers = new ObservableCollection<MarkerDetails>();
this.Markers.Add(new MarkerDetails() { Label = "India", Latitude = "21.0000N", Longitude = "78.0000E" });
this.Markers.Add(new MarkerDetails() { Label = "China", Latitude = "35.0000N", Longitude = "103.0000E" });
this.Markers.Add(new MarkerDetails() { Label = "Brazil", Latitude = "15.7833S", Longitude = "47.8667W" });
}
}
NOTE
- The
DataContextfor both theMarkerTemplateandMarkerTemplateSelectorproperties of theImageryLayerandShapeFileLayerin the SfMap is set toCustomDataSymbol.
Customizing marker icons
The size and color of marker icons can be customized using the MarkerIconSize and MarkerIconFill properties.
Icon types
The shape of a marker icons can be customized using the MarkerIconType property. The maps control supports the following types of marker icons:
- Circle
- Diamond
- Image
- Rectangle
- Square
<syncfusion:SfMap>
            <syncfusion:SfMap.Layers>
                <syncfusion:ShapeFileLayer Uri="Maps.ShapeFiles.world1.shp" MarkerIconType="Diamond" MarkerIconSize="30,20"  MarkerIconFill="Green"  Markers="{Binding Models}" >
               </syncfusion:ShapeFileLayer>
            </syncfusion:SfMap.Layers>
        </syncfusion:SfMap>
SfMap maps = new SfMap();
ShapeFileLayer shape = new ShapeFileLayer();
shape.Uri = "Maps.ShapeFiles.world1.shp";
shape.Markers = view.Models;
shape.MarkerIconType = MarkerIcon.Diamond;
shape.MarkerIconFill = new SolidColorBrush(Colors.Green);
shape.MarkerIconSize = new Size(30, 20);
maps.Layers.Add(shape);
this.Content = maps;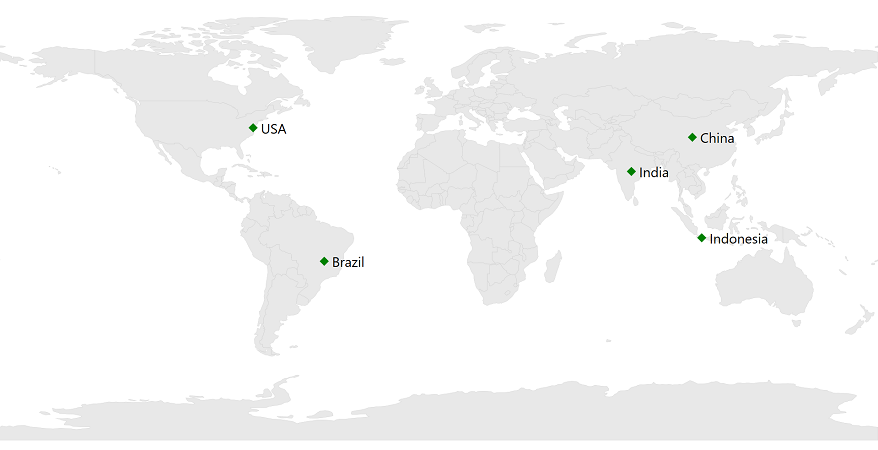
Setting an image marker icon
You can set the image as marker icon by setting the icon type as an Image and set MarkerIconSource to get the image from local path.
<syncfusion:SfMap>
            <syncfusion:SfMap.Layers>
                <syncfusion:ShapeFileLayer Uri="Maps.ShapeFiles.world1.shp" MarkerIconType="Image" MarkerIconSource="pin.png" MarkerIconSize="30,30" Markers="{Binding Models}"  >
               </syncfusion:ShapeFileLayer>
            </syncfusion:SfMap.Layers>
        </syncfusion:SfMap>
SfMap maps = new SfMap();
ShapeFileLayer shape = new ShapeFileLayer();
shape.Uri = "Maps.ShapeFiles.world1.shp";
shape.MarkerIconSize = new Size(30, 30);
shape.Markers = view.Models;
shape.MarkerIconType = MarkerIcon.Image;
BitmapImage bimage = new BitmapImage();
bimage.BeginInit();
bimage.UriSource = new Uri("..\\..\\pin.png", UriKind.Relative);
bimage.EndInit();
shape.MarkerIconSource = bimage;
maps.Layers.Add(shape);
this.Content = maps;![]()
Customizing labels
You can customize the marker labels using the MarkerLabelFontSize, MarkerLabelForeground, MarkerLabelFontStyle, and MarkerLabelFontWeight and MarkerLabelFontFamily properties.
<syncfusion:SfMap>
            <syncfusion:SfMap.Layers>
                <syncfusion:ShapeFileLayer Uri="Maps.ShapeFiles.world1.shp" MarkerLabelFontSize="30" MarkerLabelForeground="Red" MarkerLabelFontStyle="Italic" MarkerLabelFontWeight="Bold" MarkerLabelFontFamily="Segoe UI" Markers="{Binding Models}" >
               </syncfusion:ShapeFileLayer>
            </syncfusion:SfMap.Layers>
        </syncfusion:SfMap>
SfMap maps = new SfMap();
ShapeFileLayer shape = new ShapeFileLayer();
shape.Uri = "Maps.ShapeFiles.world1.shp";
shape.Markers = view.Models;
shape.MarkerLabelFontSize = 30;
shape.MarkerLabelForeground = new SolidColorBrush(Colors.Red);
shape.MarkerLabelFontStyle = FontStyles.Italic;
shape.MarkerLabelFontWeight = FontWeights.Bold;
shape.MarkerLabelFontFamily = new FontFamily("Segoe UI");
maps.Layers.Add(shape);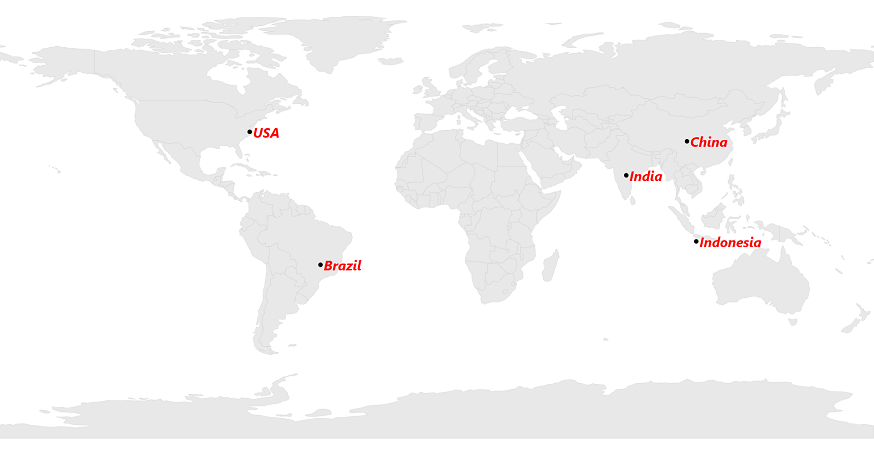
Marker Alignment
You can align the maps marker horizontally and vertically using the MarkerHorizontalAlignment and MarkerVerticalAlignment properties.
Setting a horizontal alignment
The MarkerHorizontalAlignment property is used to position the marker icon horizontally. The marker icon can be positioned using the following ways:
-
Near: Specifies the near position of the marker icon for the given latitude and longitude values. -
Center: Specifies the center position of the marker icon for the given latitude and longitude values. -
Far: Specifies the far position of the marker icon for the given latitude and longitude values.
<ResourceDictionary>
            <DataTemplate x:Key="markerTemplate">
                <Grid>
                    <StackPanel Margin="-12,-20,0,0" Height="60"  Width="100" Orientation="Horizontal" Background="Transparent">
                        <Image Source="pin.png" Height="60"  />
                    </StackPanel>
                </Grid>
            </DataTemplate>
        </ResourceDictionary>
         <Grid>
            <syncfusion:SfMap>
                <syncfusion:SfMap.Layers>
                    <syncfusion:ShapeFileLayer   MarkerTemplate="{StaticResource markerTemplate}"  Uri="Maps.ShapeFiles.usa_state.shp"  MarkerHorizontalAlignment="Near" Markers="{Binding Models}"  >
                        <syncfusion:ShapeFileLayer.ShapeSettings>
                            <syncfusion:ShapeSetting ShapeFill="LightGray" ShapeStroke="Black" ShapeStrokeThickness="1">
						     </syncfusion:ShapeSetting>
                        </syncfusion:ShapeFileLayer.ShapeSettings>
                    </syncfusion:ShapeFileLayer>
                </syncfusion:SfMap.Layers>
            </syncfusion:SfMap>
        </Grid>
SfMap maps = new SfMap();
ShapeFileLayer shape = new ShapeFileLayer();
shape.Uri = "Maps.ShapeFiles.usa_state.shp";
shape.MarkerTemplate = Resources["markerTemplate"] as DataTemplate;
shape.Markers = view.Models;
shape.MarkerHorizontalAlignment = MarkerAlignment.Near;
ShapeSetting shapeSetting = new ShapeSetting();
shapeSetting.ShapeStrokeThickness = 1;
shapeSetting.ShapeStroke = new SolidColorBrush(Colors.Black);
shapeSetting.ShapeFill = new SolidColorBrush(Colors.LightGray);
shape.ShapeSettings = shapeSetting;
maps.Layers.Add(shape);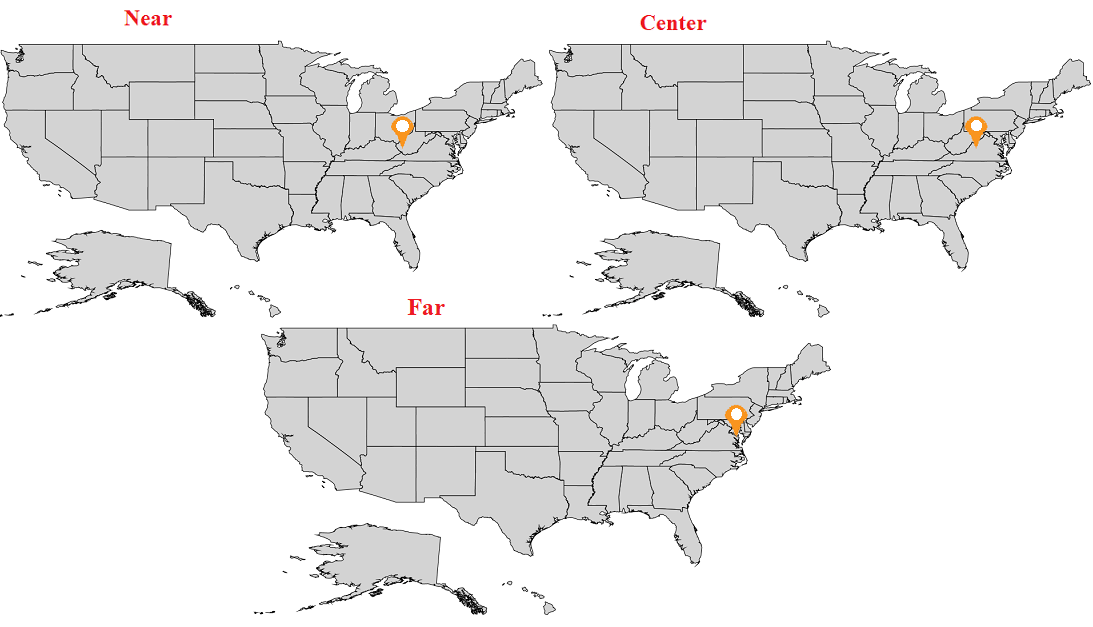
Setting a vertical alignment
The MarkerVerticalAlignment property is used to position the marker icon vertically. The marker icon can be positioned using the following ways:
-
Near: Specifies the near position of the marker icon for the given latitude and longitude values. -
Center: Specifies the center position of the marker icon for the given latitude and longitude values. -
Far: Specifies the far position of the marker icon for the given latitude and longitude values.
<ResourceDictionary>
            <DataTemplate x:Key="markerTemplate">
                <Grid>
                    <StackPanel Margin="-12,-20,0,0" Height="60"  Width="100" Orientation="Horizontal" Background="Transparent">
                        <Image Source="pin.png" Height="60"  />
                    </StackPanel>
                </Grid>
            </DataTemplate>
        </ResourceDictionary>
         <Grid>
            <syncfusion:SfMap>
                <syncfusion:SfMap.Layers>
                    <syncfusion:ShapeFileLayer   MarkerTemplate="{StaticResource markerTemplate}"  Uri="Maps.ShapeFiles.usa_state.shp"  MarkerVerticalAlignment="Near" Markers="{Binding Models}"  >
                        <syncfusion:ShapeFileLayer.ShapeSettings>
                            <syncfusion:ShapeSetting ShapeFill="LightGray" ShapeStroke="Black" ShapeStrokeThickness="1">
                            </syncfusion:ShapeSetting>
                        </syncfusion:ShapeFileLayer.ShapeSettings>
                    </syncfusion:ShapeFileLayer>
                </syncfusion:SfMap.Layers>
            </syncfusion:SfMap>
        </Grid>
SfMap maps = new SfMap();
ShapeFileLayer shape = new ShapeFileLayer();
shape.Uri = "Maps.ShapeFiles.usa_state.shp";
shape.MarkerTemplate = Resources["markerTemplate"] as DataTemplate;
shape.Markers = view.Models;
shape.MarkerVerticalAlignment = MarkerAlignment.Near;
ShapeSetting shapeSetting = new ShapeSetting();
shapeSetting.ShapeStrokeThickness = 1;
shapeSetting.ShapeStroke = new SolidColorBrush(Colors.Black);
shapeSetting.ShapeFill = new SolidColorBrush(Colors.LightGray);
shape.ShapeSettings = shapeSetting;
maps.Layers.Add(shape);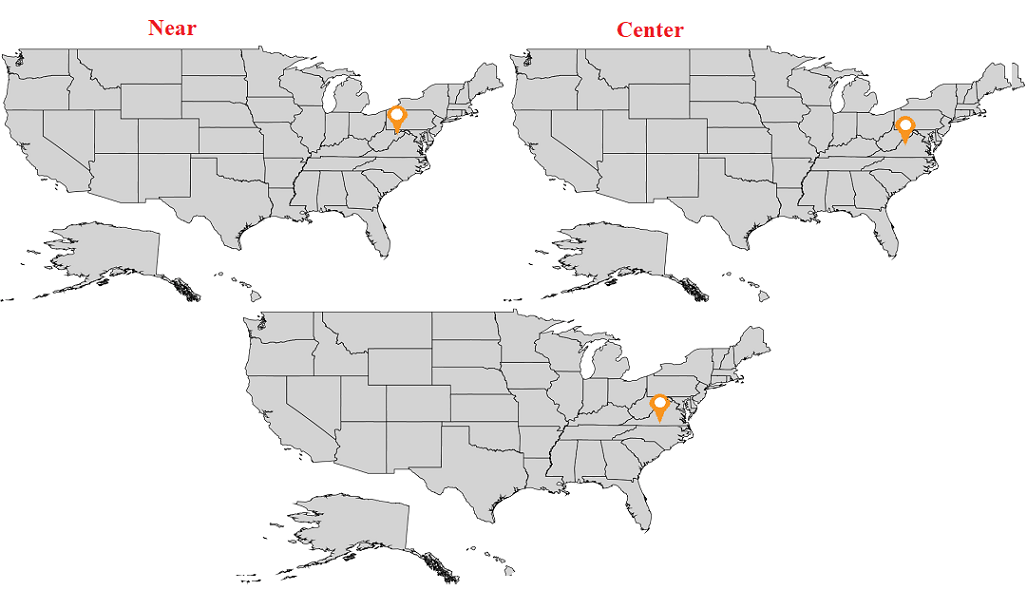
NOTE
The default marker icon position for VerticalAlignment and HorizontalAlignment is Center.
Selection Mode
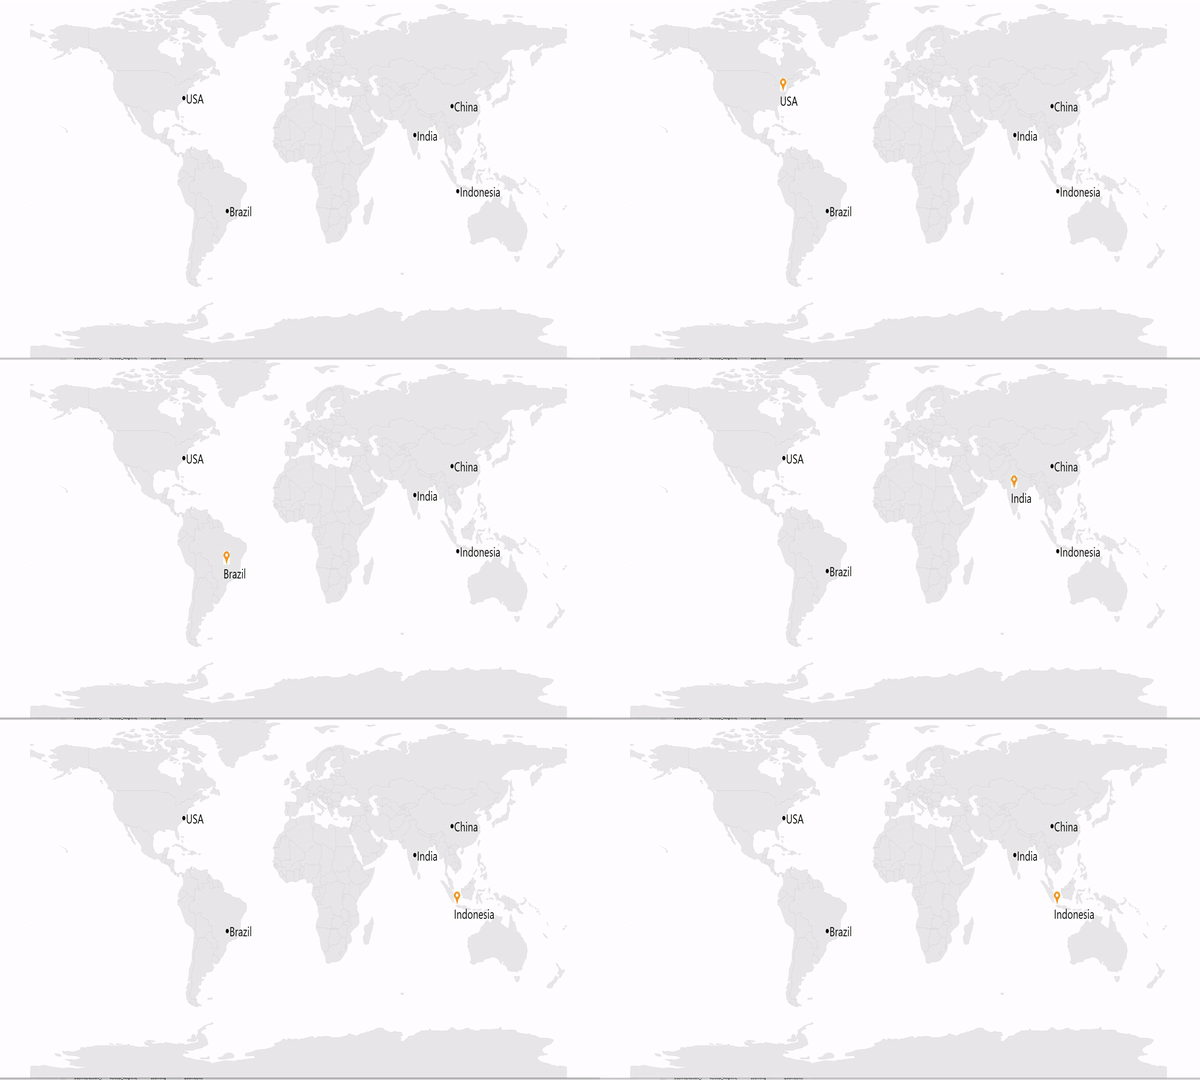
If you add any view for marker using the MarkerTemplate property from MarkerSelected event, then the corresponding view will be applied to the selected marker. Custom view will be added continuously for all the selected marker, but do not have option to reset the old one. Now, you can achieve this using the MarkerSelectionMode property. If set selection mode as Single, then it will be removed the old view of marker and load the initially rendered marker. If set selection mode as Multiple, then the marker template does not reset.
<Window.Resources>
        <ResourceDictionary>
            <DataTemplate x:Key="markerTemplate">
                <Grid>
                    <StackPanel Margin="-12,-30,0,0" Height="50" Orientation="Horizontal">
                        <Image Source="pin.png" Height="30" />
                        <TextBlock HorizontalAlignment="Center" VerticalAlignment="Center" Margin="10" FontSize="30" FontFamily="Segoe UI" Text="{Binding Label}"/>
                    </StackPanel>
                </Grid>
            </DataTemplate>
        </ResourceDictionary>
    </Window.Resources>
    <Grid>
        <syncfusion:SfMap>
            <syncfusion:SfMap.Layers>
                <syncfusion:ShapeFileLayer Uri="Maps.ShapeFiles.world1.shp" MarkerSelected="ShapeFileLayer_MarkerSelected" MarkerSelectionMode="Single"  Markers="{Binding Models}"  >
               </syncfusion:ShapeFileLayer>
            </syncfusion:SfMap.Layers>
        </syncfusion:SfMap>
   </Grid>
SfMap maps = new SfMap();
ShapeFileLayer shape = new ShapeFileLayer();
shape.Uri = "Maps.ShapeFiles.world1.shp";
shape.Markers = view.Models;
shape.MarkerSelected += ShapeFileLayer_MarkerSelected;
maps.Layers.Add(shape);
this.Content = maps;
private void ShapeFileLayer_MarkerSelected(object sender, MarkerSelectedEventArgs e)
{
e.MarkerTemplate = Resources["markerTemplate"] as DataTemplate;
}
Events
The MarkerSelected event is fired when a marker is selected. The MarkerTemplate, SelectedMarker, and IsSelected will be passed to MarkerSelectedEventArgs.
If you set any view for the MarkerTemplate property of MarkerSelectedEventArgs, the corresponding view will be applied to the selected marker.
SelectedMarker: Contains selected marker data.
IsSelected: Used to determine whether a marker is selected or unselected.
CanBringToTop : Used to bring the selected marker to the top position.
<Window.Resources>
        <ResourceDictionary>
            <DataTemplate x:Key="markerTemplate">
                <Grid>
                    <StackPanel Margin="-12,-30,0,0" Height="50" Orientation="Horizontal">
                        <Image Source="pin.png" Height="30" />
                        <TextBlock HorizontalAlignment="Center" VerticalAlignment="Center" Margin="10" FontSize="30" FontFamily="Segoe UI" Text="{Binding Label}"/>
                    </StackPanel>
                </Grid>
            </DataTemplate>
        </ResourceDictionary>
    </Window.Resources>
    <Grid>
        <syncfusion:SfMap>
            <syncfusion:SfMap.Layers>
                <syncfusion:ShapeFileLayer Uri="Maps.ShapeFiles.world1.shp" MarkerSelected="ShapeFileLayer_MarkerSelected" Markers="{Binding Models}"  >
               </syncfusion:ShapeFileLayer>
            </syncfusion:SfMap.Layers>
        </syncfusion:SfMap>
   </Grid>
SfMap maps = new SfMap();
ShapeFileLayer shape = new ShapeFileLayer();
shape.Uri = "Maps.ShapeFiles.world1.shp";
shape.Markers = view.Models;
shape.MarkerSelected += ShapeFileLayer_MarkerSelected;
maps.Layers.Add(shape);
this.Content = maps;
private void ShapeFileLayer_MarkerSelected(object sender, MarkerSelectedEventArgs e)
{
e.MarkerTemplate = Resources["markerTemplate"] as DataTemplate;
object selectedMarker = e.SelectedMarker;
bool MarkerSelected = e.IsSelected;
}
NOTE
You can refer to our WPF Map feature tour page for its groundbreaking feature representations. You can also explore our WPF Map example to know how to render and configure the map.