Getting Started with WPF Kanban (SfKanban)
16 Jul 202620 minutes to read
The following section provides assistance to create a simple Kanban application and configure it.
Creating an Application
- Create a WPF desktop app for C# and .NET 6 or later.
Adding the SfKanban Reference
You can add the SfKanban reference to your project in one of the following ways.
Adding the Reference via NuGet
- Right-click the project in Solution Explorer and choose Manage NuGet Packages.
- Search for Syncfusion.SfKanban.WPF and install it.
NOTE
This is the recommended approach for modern WPF projects.
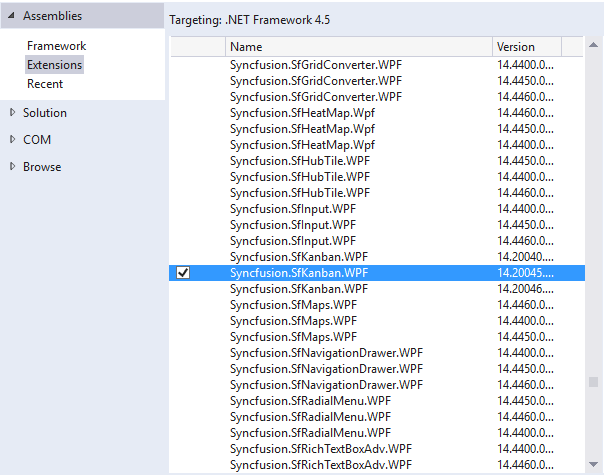
Adding the Assembly Reference
- Open the Add Reference window from your project.
- Choose Assemblies -> Extensions -> Syncfusion.SfKanban.WPF.
NOTE
This window differs for the Visual Basic project.
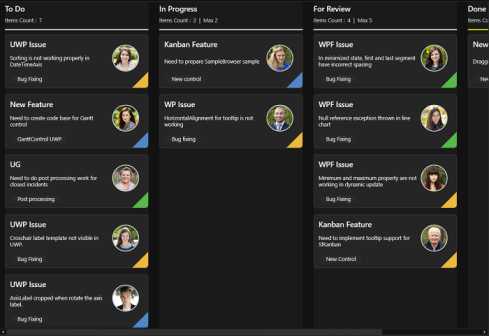
Create a Simple Kanban Board
In this section, we’ll demonstrate how to build a new WPF application that integrates the SfKanban control.
Adding SfKanban via Code
- Add the required assembly references to the project as discussed in the Adding the SfKanban Reference section.
- Add the
Syncfusion.UI.Xaml.Kanbannamespace to the application as shown below.
xmlns:syncfusion="clr-namespace:Syncfusion.UI.Xaml.Kanban;assembly=Syncfusion.SfKanban.WPF"using Syncfusion.UI.Xaml.Kanban;- Create an instance of the SfKanban control.
<syncfusion:SfKanban>
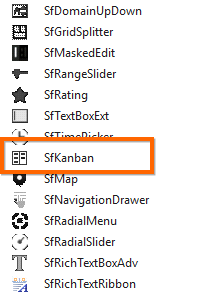
</syncfusion:SfKanban>SfKanban kanban = new SfKanban();Adding SfKanban from the Toolbox
Drag and drop the Kanban control from the toolbox to your application.
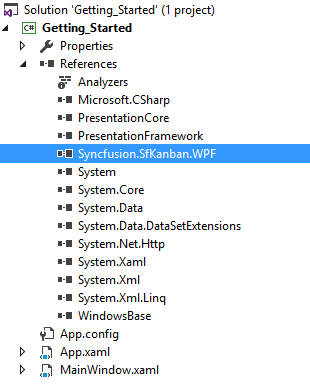
Now the Syncfusion.SfKanban.WPF reference is added to the application references and the xmlns namespace code is generated in MainWindow.xaml as below.

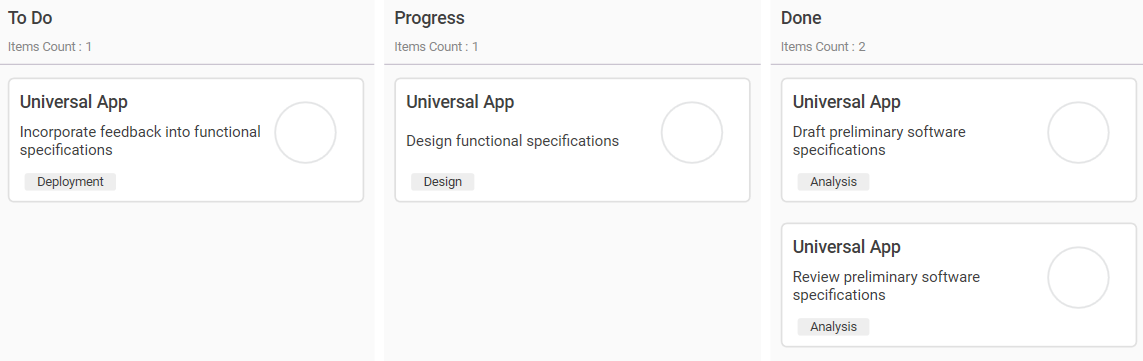
Populating the WPF Kanban Items Source
This section explains how to populate the WPF Kanban control’s ItemsSource by creating and binding both default and custom task data models.
Creating the Default Model Tasks
-
Define the ViewModel: Create a ViewModel class to set values for the properties listed in the
KanbanModelclass as shown in the following example code. EachKanbanModelinstance represents a card in the Kanban control. -
Bind the Item Source for Kanban: To populate the Kanban card items, use the
ItemsSourceproperty ofSfKanban. -
Define Columns in the Kanban Board: The columns are generated automatically based on the different values of the
Categoryin theKanbanModelclass from theItemsSource. Alternatively, you can manually define the columns by setting theAutoGenerateColumnsproperty tofalseand addingKanbanColumninstances to theColumnsproperty ofSfKanban. You can define the column categories using theCategoriesproperty ofKanbanColumn, and the cards will be added to their respective columns.
The following sample code demonstrates this process in action. Ensure the xmlns:local mapping (xmlns:local="clr-namespace:GettingStarted") and xmlns:syncfusion mapping are declared on the root element where the SfKanban is defined.
<Window x:Class="GettingStarted.MainWindow"
        xmlns="http://schemas.microsoft.com/winfx/2006/xaml/presentation"
        xmlns:x="http://schemas.microsoft.com/winfx/2006/xaml"
        xmlns:d="http://schemas.microsoft.com/expression/blend/2008"
        xmlns:mc="http://schemas.openxmlformats.org/markup-compatibility/2006"
        xmlns:local="clr-namespace:GettingStarted"
        xmlns:syncfusion="clr-namespace:Syncfusion.UI.Xaml.Kanban;assembly=Syncfusion.SfKanban.WPF"
        mc:Ignorable="d"
        Title="SfKanban Getting Started" Height="450" Width="800">
    <Grid x:Name="grid">
        <syncfusion:SfKanban x:Name="kanban"
                             ItemsSource="{Binding Tasks}"
                             AutoGenerateColumns="False">
            <syncfusion:KanbanColumn Categories="Open"
                                     Title="To Do" />
            <syncfusion:KanbanColumn Categories="In Progress"
                                     Title="In Progress" />
            <syncfusion:KanbanColumn Categories="Review,Done"
                                     Title="Done" />
        </syncfusion:SfKanban>
        <Grid.DataContext>
            <local:ViewModel />
        </Grid.DataContext>
    </Grid>
</Window>
SfKanban kanban = new SfKanban()
{
AutoGenerateColumns = false,
ItemsSource = new ViewModel().Tasks
};
kanban.Columns.Add(new KanbanColumn()
{
Categories = "Open",
Title = "To Do"
});
kanban.Columns.Add(new KanbanColumn()
{
Categories = "In Progress",
Title = "In Progress"
});
kanban.Columns.Add(new KanbanColumn()
{
Categories = "Review,Done",
Title = "Done"
});
this.grid.Children.Add(kanban);
using System.Collections.ObjectModel;
using Syncfusion.UI.Xaml.Kanban;

namespace GettingStarted
{
    public class ViewModel
    {
        public ObservableCollection<KanbanModel> Tasks { get; set; }

        public ViewModel()
        {
            Tasks = new ObservableCollection<KanbanModel>();
            Tasks.Add(new KanbanModel()
            {
                Title = "Universal App",
                ID = "27654",
                Description = "Incorporate feedback into functional specifications",
                Category = "Open",
                ColorKey = "Low",
                Tags = new string[] { "Deployment" },
            });

            Tasks.Add(new KanbanModel()
            {
                Title = "Universal App",
                ID = "29477",
                Description = "Design functional specifications",
                Category = "In Progress",
                ColorKey = "Normal",
                Tags = new string[] { "Design" },
            });

            Tasks.Add(new KanbanModel()
            {
                Title = "Universal App",
                ID = "25678",
                Description = "Review preliminary software specifications",
                Category = "Done",
                ColorKey = "Low",
                Tags = new string[] { "Analysis" },
            });

            Tasks.Add(new KanbanModel()
            {
                Title = "Universal App",
                ID = "6593",
                Description = "Draft preliminary software specifications",
                Category = "Review",
                ColorKey = "High",
                Tags = new string[] { "Analysis" },
            });
        }
    }
}
NOTE
View the sample in
GitHub.
Creating the Custom Model Tasks with Data Mapping
You can also map a custom data model to the Kanban control. The following steps demonstrate how to render tasks using the WPF Kanban control with respective custom data properties.
-
Create a data model for Kanban: Create a simple data model in a new class file as shown in the following example code.
-
Create a ViewModel: Create a ViewModel class to set values for the properties listed in the model class as shown in the following example code.
-
Bind the Item Source for Kanban: To populate the Kanban card items, use the
ItemsSourceproperty ofSfKanbancontrol. -
Map Column Property: The
ColumnMappingPathspecifies the name of the property within the data object that is used to generate columns in the Kanban control whenAutoGenerateColumnsis set totrue. -
Define Columns in the Kanban Board: The
Columnsin the Kanban board are mapped based on the values of a specified property (e.g., “Status”) from your custom data model. You can manually define columns by settingAutoGenerateColumnstofalseand adding instances ofKanbanColumnto theColumnscollection of theSfKanbancontrol.
Let’s look at the practical code example:
<Window x:Class="GettingStarted.MainWindow"
        xmlns="http://schemas.microsoft.com/winfx/2006/xaml/presentation"
        xmlns:x="http://schemas.microsoft.com/winfx/2006/xaml"
        xmlns:d="http://schemas.microsoft.com/expression/blend/2008"
        xmlns:mc="http://schemas.openxmlformats.org/markup-compatibility/2006"
        xmlns:local="clr-namespace:GettingStarted"
        xmlns:syncfusion="clr-namespace:Syncfusion.UI.Xaml.Kanban;assembly=Syncfusion.SfKanban.WPF"
        mc:Ignorable="d"
        Title="SfKanban Custom Model" Height="450" Width="800">
    <Grid>
        <syncfusion:SfKanban x:Name="kanban"
                             ColumnMappingPath="Status"
                             ItemsSource="{Binding Tasks}">
            <syncfusion:SfKanban.CardTemplate>
                <DataTemplate>
                    <Border BorderBrush="Black"
                            BorderThickness="1"
                            CornerRadius="3"
                            Background="#F3CFCE">
                        <StackPanel Margin="10">
                            <TextBlock Text="{Binding Title}"
                                       TextAlignment="Center"
                                       FontWeight="Bold"
                                       FontSize="14" />
                            <TextBlock Text="{Binding Description}"
                                       TextAlignment="Center"
                                       FontSize="12"
                                       TextWrapping="Wrap"
                                       Margin="5" />
                        </StackPanel>
                    </Border>
                </DataTemplate>
            </syncfusion:SfKanban.CardTemplate>
        </syncfusion:SfKanban>
        <Grid.DataContext>
            <local:ViewModel />
        </Grid.DataContext>
    </Grid>
</Window>this.kanban.ItemsSource = new ViewModel().Tasks;
this.kanban.ColumnMappingPath = "Status";
namespace GettingStarted
{
    public class TaskDetails
    {
        public string Title { get; set; }
        public string Description { get; set; }
        public object Status { get; set; }
    }
}
using System.Collections.ObjectModel;
namespace GettingStarted
{
public class ViewModel
{
public ObservableCollection<TaskDetails> Tasks { get; set; }
public ViewModel()
{
Tasks = new ObservableCollection<TaskDetails>();
Tasks.Add(new TaskDetails()
{
Title = "Universal App",
Description = "Incorporate feedback into functional specifications",
Status = "Open",
});
Tasks.Add(new TaskDetails()
{
Title = "Universal App",
Description = "Design functional specifications",
Status = "In Progress",
});
Tasks.Add(new TaskDetails()
{
Title = "Universal App",
Description = "Review preliminary software specifications",
Status = "Done",
});
Tasks.Add(new TaskDetails()
{
Title = "Universal App",
Description = "Draft preliminary software specifications",
Status = "Review",
});
}
}
}
You can also set the AutoGenerateColumns property to true, in which case you don’t need to define the columns as mentioned in the above example. This will create columns depending on the ColumnMappingPath property for all the distinct values in the ItemsSource.
NOTE
- When the columns are auto-generated, you can handle the
ColumnsGeneratedevent to customize the columns.- When using a custom data model, the default card UI is not applicable. You must define a custom
DataTemplateusing theCardTemplateproperty to render the card content appropriately.
Theme
The Kanban control supports various built-in themes. Refer to the below links to apply themes for the Kanban control: