Getting Started with WPF Menu (MenuAdv)
18 Jun 202512 minutes to read
This section provides a quick overview for working with the Menu (MenuAdv).
Structure of the MenuAdv Control
Assembly deployment
Refer to the control dependencies section to get the list of assemblies or NuGet package that needs to be added as a reference to use the MenuAdv control in any application.
You can find more details about installing the NuGet package in a WPF application in the following link:
How to install nuget packages
Important
Starting with v16.2.0.x, if you refer to Syncfusion assemblies from trial setup or from the NuGet feed, include a license key in your projects. Refer to this link to learn about registering Syncfusion license key in your WPF application to use our components.
Creating Application with MenuAdv control
In this walk through, user will create a WPF application that contains MenuAdv control.
- Creating project
- Adding control via designer
- Adding control manually in XAML
- Adding control manually in C#
- Creating Data Model for sample application
- Binding to Data
Creating project
Below section provides detailed information to create new project using MenuAdv.
Adding control via designer
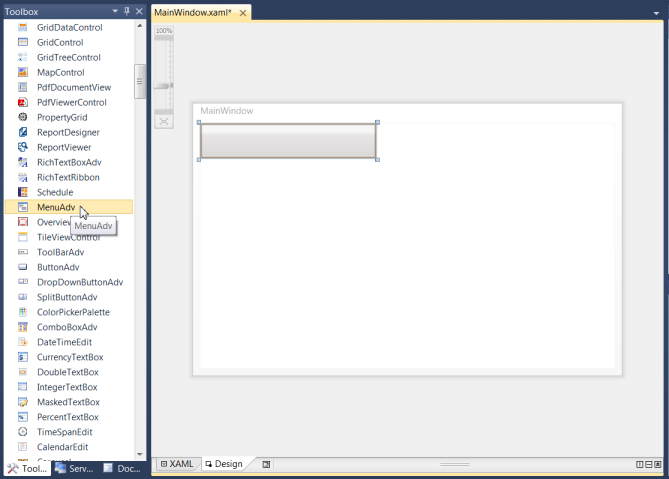
The MenuAdv control can be added to the application in VisualStudio or ExpressionBlend by dragging it from Toolbox and dropping it in designer. The required assembly will be added automatically.
Through Visual Studio
The following are the steps to create the MenuAdv control using Visual Studio.
-
Drag MenuAdv from the Visual Studio Toolbox and drop it in the designer.
-
Select the MenuAdv and go to properties.
-
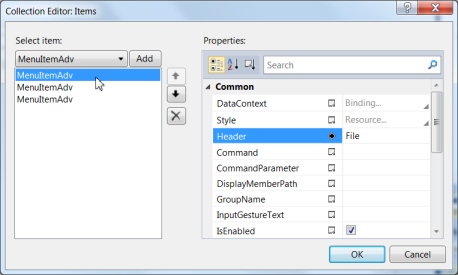
Click the three dotted button given in Items property. Collection Editor window will open.
-
Using the Collection Editor, add the GroupBarItems and configure their properties.
Through Expression Blend
The MenuAdv control can also be created and configured using Expression Blend by following steps.
-
Create a WPF project in the Expression Blend and refer the following assembly.
- Syncfusion.Shared.Wpf
-
Search for MenuAdv in the Toolbox.
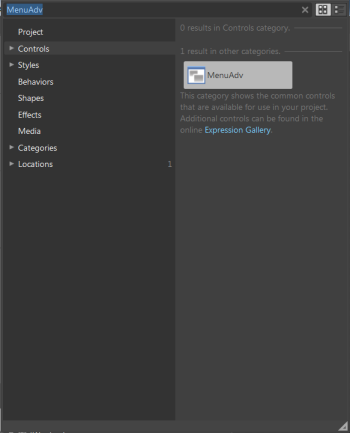
-
Drag the MenuAdv to designer to generate an empty menu bar.
-
To add the MenuItemAdv to the MenuAdv control, select the MenuAdv and go to Properties area.
-
Click Items (Collection) under Common Properties.
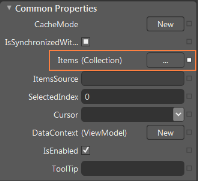
-
Once the Collection Editor opens, click Add another item. The Select Object window will open.
-
Select MenuItemAdv by typing MenuItemAdv in the search box, and then click OK.

-
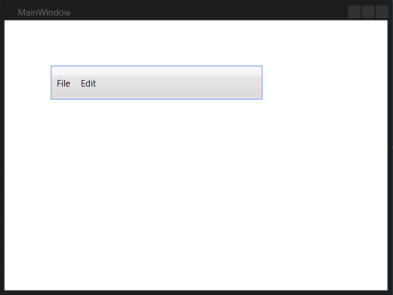
Configure the properties (such as header or icon) of the MenuItemAdv using the properties in the Collection Editor. This will generate the following control.
NOTE
You can customize the appearance of the MenuItemAdv using the template-editing feature available in the Expression Blend.
Adding control manually in XAML
In order to add MenuAdv control manually in XAML, do the below steps,
-
Add the below required assembly references to the project,
- Syncfusion.Shared.WPF
-
Import Syncfusion WPF schema http://schemas.syncfusion.com/wpf in XAML page.
-
Declare MenuAdv in XAML page.
- XAML
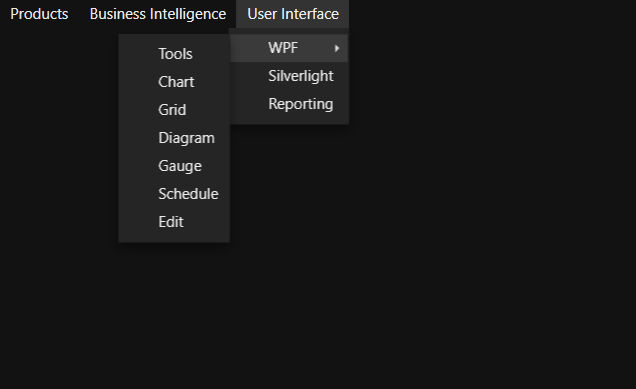
<syncfusion:MenuAdv  Height="25" VerticalAlignment="Top">
    <syncfusion:MenuItemAdv Header="Products" />
    <syncfusion:MenuItemAdv Header="Business Intelligence" />
    <syncfusion:MenuItemAdv Header="User Interface" >
        <syncfusion:MenuItemAdv Header="WPF  ">
            <syncfusion:MenuItemAdv Header="Tools"/>
            <syncfusion:MenuItemAdv Header="Chart"/>
            <syncfusion:MenuItemAdv Header="Grid"/>
            <syncfusion:MenuItemAdv Header="Diagram"/>
            <syncfusion:MenuItemAdv Header="Gauge"/>
            <syncfusion:MenuItemAdv Header="Schedule"/>
            <syncfusion:MenuItemAdv Header="Edit"/>
        </syncfusion:MenuItemAdv>
        <syncfusion:MenuItemAdv Header="Silverlight "/>
        <syncfusion:MenuItemAdv Header="Reporting" />
    </syncfusion:MenuItemAdv>
</syncfusion:MenuAdv>
Adding control manually in C#
In order to add MenuAdv control manually in C#, do the below steps,
-
Add the below required assembly references to the project,
- Syncfusion.Shared.WPF
-
Import MenuAdv namespace Syncfusion.Windows.Shared.
- C#
-
Create MenuAdv control instance and add it to the page.
- C#
using Syncfusion.Windows.Shared;MenuAdv mAdv = new MenuAdv();
MenuItemAdv product = new MenuItemAdv() { Header = "Products" };
MenuItemAdv bi = new MenuItemAdv() { Header = "Business Intelligence" };
MenuItemAdv ui = new MenuItemAdv() { Header = "User Interface" };
MenuItemAdv wpf = new MenuItemAdv() { Header = "WPF" };
MenuItemAdv tools = new MenuItemAdv() { Header = "Tools" };
MenuItemAdv chart = new MenuItemAdv() { Header = "Chart" };
MenuItemAdv grid = new MenuItemAdv() { Header = "Grid" };
MenuItemAdv diagram = new MenuItemAdv() { Header = "Diagram" };
MenuItemAdv gauge = new MenuItemAdv() { Header = "Gauge" };
MenuItemAdv schedule = new MenuItemAdv() { Header = "Schedule" };
MenuItemAdv edit = new MenuItemAdv() { Header = "Edit" };
MenuItemAdv sl = new MenuItemAdv() { Header = "Silverlight" };
MenuItemAdv reporting = new MenuItemAdv() { Header = "Reporting" };
wpf.Items.Add(tools);
wpf.Items.Add(chart);
wpf.Items.Add(grid);
wpf.Items.Add(diagram);
wpf.Items.Add(gauge);
wpf.Items.Add(schedule);
wpf.Items.Add(edit);
ui.Items.Add(wpf);
ui.Items.Add(sl);
product.Items.Add(bi);
product.Items.Add(ui);
product.Items.Add(reporting);
mAdv.Items.Add(product);
this.Content = mAdv;Set icon for Menu item
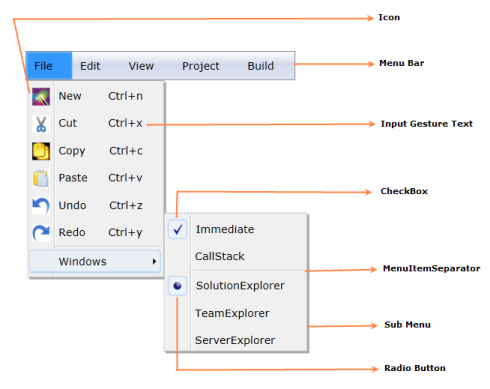
You can display image on left of the MenuItemAdv control by setting the image source as value for Icon property.
<Grid>
    <syncfusion:MenuAdv Height="25" VerticalAlignment="Top">
        <syncfusion:MenuItemAdv Header="File" >
            <syncfusion:MenuItemAdv Header="New">
                <syncfusion:MenuItemAdv.Icon>
                    <Image Source="NewIcon.png" Width="15" Height="15" />
                </syncfusion:MenuItemAdv.Icon>
            </syncfusion:MenuItemAdv>
            <syncfusion:MenuItemAdv Header="Open">
                <syncfusion:MenuItemAdv.Icon>
                    <Image Source="OpenIcon.png" Width="15" Height="15" />
                </syncfusion:MenuItemAdv.Icon>
            </syncfusion:MenuItemAdv>
            <syncfusion:MenuItemAdv Header="Save">
                <syncfusion:MenuItemAdv.Icon>
                    <Image Source="SaveIcon.png" Width="15" Height="15" />
                </syncfusion:MenuItemAdv.Icon>
            </syncfusion:MenuItemAdv>
            <syncfusion:MenuItemAdv Header="Close">
                <syncfusion:MenuItemAdv.Icon>
                    <Image Source="CloseIcon.png" Width="15" Height="15"/>
                </syncfusion:MenuItemAdv.Icon>
            </syncfusion:MenuItemAdv>
        </syncfusion:MenuItemAdv>
        <syncfusion:MenuItemAdv Header="Edit" />
        <syncfusion:MenuItemAdv Header="View" />
        <syncfusion:MenuItemAdv Header="Project" />
    </syncfusion:MenuAdv>
</Grid>
string path;
path = Path.GetFullPath(@"../../" +"NewIcon.png");
MenuAdv menuAdv = new MenuAdv()
{
VerticalAlignment = VerticalAlignment.Top,
Height = 25
};
Image image1 = new Image() { Height=15, Width = 15 };
Image image2= new Image() { Height = 15, Width = 15 };
Image image3 = new Image() { Height = 15, Width = 15 };
Image image4 = new Image() { Height = 15, Width = 15 };
MenuItemAdv File = new MenuItemAdv() { Header = "File"};
MenuItemAdv New = new MenuItemAdv() { Header = "New" };
MenuItemAdv Open = new MenuItemAdv() { Header = "Open" };
MenuItemAdv Save = new MenuItemAdv() { Header = "Save" };
MenuItemAdv Close = new MenuItemAdv() { Header = "Close" };
MenuItemAdv Edit = new MenuItemAdv() { Header = "Edit" };
MenuItemAdv View = new MenuItemAdv() { Header = "View" };
MenuItemAdv Project = new MenuItemAdv() { Header = "Project" };
image1.Source = new BitmapImage(new Uri(path));
New.Icon = image1;
path = Path.GetFullPath(@"../../" + "OpenIcon.png");
image2.Source = new BitmapImage(new Uri(path));
Open.Icon = image2;
path = Path.GetFullPath(@"../../" + "SaveIcon.png");
image3.Source = new BitmapImage(new Uri(path));
Save.Icon = image3;
path = Path.GetFullPath(@"../../" + "CloseIcon.png");
image4.Source = new BitmapImage(new Uri(path));
Close.Icon = image4;
File.Items.Add(New);
File.Items.Add(Open);
File.Items.Add(Save);
File.Items.Add(Close);
menuAdv.Items.Add(File);
menuAdv.Items.Add(Edit);
menuAdv.Items.Add(View);
menuAdv.Items.Add(Project);![]()
Theme
MenuAdv supports various built-in themes. Refer to the below links to apply themes for the MenuAdv,