Data Binding in WPF Menu (MenuAdv)
5 Aug 20258 minutes to read
The topics under this section explain the data binding support for the MenuAdv control.
Data Binding to Objects
The MenuAdv control also supports binding to objects. The following example shows this.
- Create a class that act as a model for MenuAdv.
public class Model
{
    public Model()
    {
        SubItems = new ObservableCollection<Model>();
    }
    public string Header { get; set; }
    public ObservableCollection<Model> SubItems { get; set; }
}- Create a ViewModel class and initialize the items.
public class ViewModel
{
    public ViewModel()
    {
        MenuItems = new ObservableCollection<Model>();
        PopulateData();
    }

    public ObservableCollection<Model> MenuItems { get; set; }

    private void PopulateData()
    {
        Model product = new Model() { Header = "Products" };
        PopulateSubSubItems(product);
        MenuItems.Add(product);
    }

    private void PopulateSubSubItems(Model product)
    {
        Model bi = new Model() { Header = "Business Intelligence" };
        Model ui = new Model() { Header = "User Interface" };
        Model wpf = new Model() { Header = "WPF" };
        Model tools = new Model() { Header = "Tools" };
        Model chart = new Model() { Header = "Chart" };
        Model grid = new Model() { Header = "Grid" };
        Model diagram = new Model() { Header = "Diagram" };
        Model gauge = new Model() { Header = "Gauge" };
        Model schedule = new Model() { Header = "Schedule" };
        Model edit = new Model() { Header = "Edit" };

        wpf.SubItems.Add(tools);
        wpf.SubItems.Add(chart);
        wpf.SubItems.Add(grid);
        wpf.SubItems.Add(diagram);
        wpf.SubItems.Add(gauge);
        wpf.SubItems.Add(schedule);
        wpf.SubItems.Add(edit);

        Model sl = new Model() { Header = "Silverlight" };

        ui.SubItems.Add(wpf);
        ui.SubItems.Add(sl);

        Model reporting = new Model() { Header = "Reporting" };

        product.SubItems.Add(bi);
        product.SubItems.Add(ui);
        product.SubItems.Add(reporting);
    }
}- Create a ViewModel instance and use it as DataContext for the root window.
<Window.DataContext>
   <local:ViewModel/>
</Window.DataContext>- Now configure the ItemsSource and ItemTemplate of MenuAdv.
<syncfusion:MenuAdv ItemsSource="{Binding MenuItems}">
<syncfusion:MenuAdv.ItemTemplate>
<HierarchicalDataTemplate ItemsSource="{Binding SubItems}">
<TextBlock Text="{Binding Header}" />
</HierarchicalDataTemplate>
</syncfusion:MenuAdv.ItemTemplate>
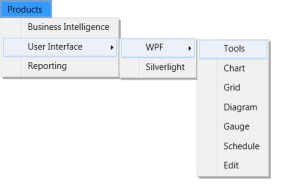
</syncfusion:MenuAdv>Implementing the above code will generate the following control.

Data Binding with XML
An XML file can also be used as ItemsSource for the MenuAdv control. The following example illustrates this.
- Create an XML file with the following details as follows and name it as Data.xml.
<Categories>
   <Root Name="Products">
      <SubItem Name="User Interface">
         <SubItem Name="ASP .NET"/>
         <SubItem Name="ASP .NET MVC"/>
         <SubItem Name="WPF">
            <SubItem Name="Tools"/>
            <SubItem Name="Chart"/>
            <SubItem Name="Grid"/>
            <SubItem Name="Diagram"/>
            <SubItem Name="Gauge"/>
            <SubItem Name="Schedule"/>
            <SubItem Name="Edit"/>
         </SubItem>
         <SubItem Name="Silverlight"/>
         <SubItem Name="Mobile MVC"/>
         <SubItem Name="Windows Phone"/>
         <SubItem Name="Windows Forms"/>
      </SubItem>
      <SubItem Name="Business Intelligence">
         <SubItem Name="WPF"/>
         <SubItem Name="ASP.NET"/>
         <SubItem Name="ASP.NET MVC"/>
         <SubItem Name="Silverlight"/>
      </SubItem>
      <SubItem Name="Reporting">
         <SubItem Name="WPF"/>
         <SubItem Name="Windows Forms"/>
      </SubItem>
   </Root>
</Categories>- Add XmlDataProvider for the above XML document.
<XmlDataProvider Source="Data.xml"
x:Key="xmlSource" XPath="Categories"/>- Set ItemsSource property for the MenuAdv.
<syncfusion:MenuAdv ItemsSource="{Binding Source={StaticResource xmlSource}, XPath=Root}">
   <syncfusion:MenuAdv.ItemTemplate>
      <HierarchicalDataTemplate ItemsSource="{Binding XPath=SubItem}">
         <TextBlock Text="{Binding XPath=@Name}" />
      </HierarchicalDataTemplate>
   </syncfusion:MenuAdv.ItemTemplate>
</syncfusion:MenuAdv>
This will create the following MenuAdv control.