Getting Started with WPF DateTimePicker (DateTimeEdit)
18 Oct 202218 minutes to read
This section provides a quick overview of working with the WPF DateTimeEdit.
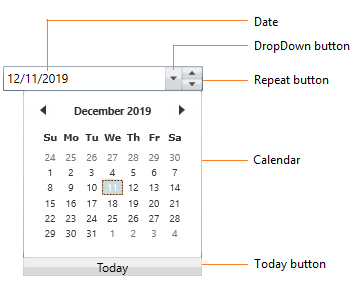
Visual Structure
Assembly deployment
Refer to the Control Dependencies section to get the list of assemblies or NuGet package that needs to be added as a reference to use the DateTimeEdit control in any application.
You can find more details about installing the NuGet package in a WPF application in the following link: How to install nuget packages
Creating an application with the DateTimeEdit control
In this walkthrough, you will create a WPF application that contains the DateTimEdit control.
Creating a project
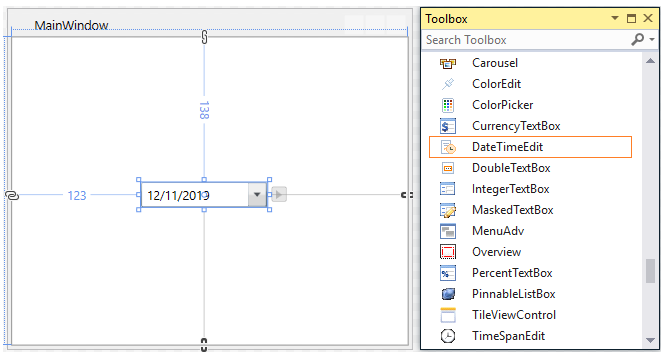
Create a new WPF project to show the DateTimeEdit control in Visual Studio.
Adding control via designer
The DateTimeEdit control can be added to the application by dragging it from Toolbox and dropping it in the designer. The required assemblies will be added automatically.
NOTE
You can customize the properties of DateTimeEdit control using the SmartTag.
Adding control manually in XAML
To add the control manually in XAML page, follow the given steps:
-
Add the following required assembly references to the project,
- Syncfusion.Shared.WPF
-
Import Syncfusion WPF schema http://schemas.syncfusion.com/wpf in XAML page.
-
Declare the
DateTimeEditcontrol in XAML page.<Window x:Class="DateTimeEdit_sample.MainWindow" xmlns="http://schemas.microsoft.com/winfx/2006/xaml/presentation" xmlns:x="http://schemas.microsoft.com/winfx/2006/xaml" xmlns:d="http://schemas.microsoft.com/expression/blend/2008" xmlns:mc="http://schemas.openxmlformats.org/markup-compatibility/2006" xmlns:local="clr-namespace:DateTimeEdit_sample" xmlns:syncfusion="http://schemas.syncfusion.com/wpf" mc:Ignorable="d" Title="MainWindow" Height="450" Width="800"> <Grid Name="grid"> <syncfusion:DateTimeEdit x:Name="dateTimeEdit" Height="25" Width="120" VerticalAlignment="Center"/> </Grid> </Window>
Adding control manually in C#
To add the control manually in C#, follow the given steps:
-
Add the following required assembly references to the project,
- Syncfusion.Shared.WPF
-
Import the
DateTimeEditnamespace Syncfusion.Windows.Shared. -
Create the
DateTimeEditcontrol instance and add it to the page.// Creating an instance of the DateTimeEdit DateTimeEdit dateTimeEdit = new DateTimeEdit(); // Setting height and width to DateTimeEdit dateTimeEdit.Height = 25; dateTimeEdit.Width = 120; // Adding control into the main window this.Content = dateTimeEdit;
Setting date time value
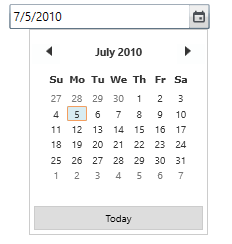
You can set the date using the DateTime property of the DateTimeEdit control.
<!--Setting date -->
<syncfusion:DateTimeEdit DateTime="07/05/2010"
                         Name="dateTimeEdit"
                         Height="25"
                         Width="120" />
//Setting date
dateTimeEdit.DateTime = new DateTime(2010, 07, 05);
NOTE
Binding date time value
You can bind the selected date time value by using the DateTime property.
The following code snippets illustrate the value binding from one DateTimeEdit to another.
//ViewModel.cs
class ViewModel : NotificationObject {
    private DateTime selectedDate = DateTime.Now;

    public DateTime SelectedDate {
        get {
            return selectedDate;
        }
        set {
            selectedDate = value;
            this.RaisePropertyChanged(nameof(SelectedDate));
        }
    }
}<Window.DataContext>
<local:ViewModel/>
</Window.DataContext>
<StackPanel HorizontalAlignment="Center"
VerticalAlignment="Center">
<syncfusion:DateTimeEdit Name="dateTimeEdit1"
Height="25"
Width="200"
DateTime="{Binding SelectedDate, Mode=TwoWay}"/>
<syncfusion:DateTimeEdit Name="dateTimeEdit2"
Height="25"
Width="200"
DateTime="{Binding SelectedDate, Mode=TwoWay}"
Margin="10"/>
</StackPanel>
NOTE
Value Changed Notification
The DateTime property value changed in the DateTimeEdit can be examined using the DateTimeChanged event. The DateTimeChanged event contains the old and newly selected date time values in the OldValue and NewValue properties.
<syncfusion:DateTimeEdit DateTimeChanged="dateTimeEdit_DateTimeChanged"
                          Name="dateTimeEdit"/>
DateTimeEdit dateTimeEdit = new DateTimeEdit();
dateTimeEdit.DateTimeChanged += dateTimeEdit_DateTimeChanged;You can handle the event as follows,
private void dateTimeEdit_DateTimeChanged(DependencyObject d, DependencyPropertyChangedEventArgs e) {
    //Get old and new values
    var oldValue = e.OldValue;
    var newValue = e.NewValue;
}
Applying built-in pattern
You can change the date-time pattern using the Pattern property to the following formats in the DateTimeEdit control.
- LongDate
- LongTime
- ShortDate
- ShortTime
- FullDateTime
- MonthDay
- CustomPattern
- ShortableDateTime
- UniversalShortableDateTime
- RFC1123
- YearMonth
<!--Setting ShortDate Pattern-->
<syncfusion:DateTimeEdit x:Name="dateTimeEdit"
                         DateTime="07/15/2010"
                         Pattern="ShortDate"/>
//Setting predefined ShortDate pattern
dateTimeEdit.Pattern = DateTimePattern.ShortDate;
NOTE
Applying custom pattern
You can display the date and time in any format in the DateTimeEdit control by using the CustomPattern property. The CustomPattern property support can be enabled by setting the Pattern property to CustomPattern.
<syncfusion:DateTimeEdit CustomPattern="MM**dd**yy hh:mm:ss"
                         Pattern="CustomPattern"
                         DateTime="07/15/2010"
                         Name="dateTimeEdit"/>
DateTimeEdit dateTimeEdit = new DateTimeEdit();
dateTimeEdit.CustomPattern = "MM**dd**yy hh:mm:ss";
dateTimeEdit.Pattern = DateTimePattern.CustomPattern;
dateTimeEdit.DateTime = new DateTime(2019, 07, 15);
NOTE
Editing date time
The DateTimeEdit control supports both free form editing (like normal textbox editing) and mask based editing. You can edit the date-time in the DateTimeEdit control by setting the CanEdit property to true. For every user input, the value will be validated after the Enter key is pressed, or focus is lost when the CanEdit property is enabled.
<syncfusion:DateTimeEdit CanEdit="True"
                         DateTime="07/15/2010"
                         Name="dateTimeEdit"/>
DateTimeEdit dateTimeEdit = new DateTimeEdit();
dateTimeEdit.CanEdit = true;
NOTE
Restrict date range
You can restrict the users from selecting a date and time in a particular range by using the MinimumDateTime and MaximumDateTime properties in the DateTimeEdit control.
<!--Setting date range -->
<syncfusion:DateTimeEdit MinDateTime="06/1/2020"
                         MaxDateTime="06/10/2020"
                         Name="dateTimeEdit"/>
DateTimeEdit dateTimeEdit = new DateTimeEdit();
dateTimeEdit.MinDateTime = new DateTime(2020, 06, 01);
dateTimeEdit.MaxDateTime = new DateTime(2020, 06, 10);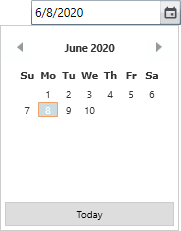
NOTE
Show watermark when value is null
If you want to display the watermark text instead of null value, use the NoneDateText property to setting the watermark text. You can enable it only by setting the IsEmptyDateEnabled property to true, ShowMaskOnNullValue property to false and NullValue property as null. The default value of NoneDateText property is string.Empty.
<syncfusion:DateTimeEdit NoneDateText="Select the date"
                         ShowMaskOnNullValue="True"
                         NullValue="{x:Null}"
                         IsEmptyDateEnabled="True"
                         Name="dateTimeEdit"/>
DateTimeEdit dateTimeEdit = new DateTimeEdit();
dateTimeEdit.NoneDateText= "Select the date";
dateTimeEdit.ShowMaskOnNullValue= true;
dateTimeEdit.IsEmptyDateEnabled= true;
dateTimeEdit.NullValue = null;
NOTE
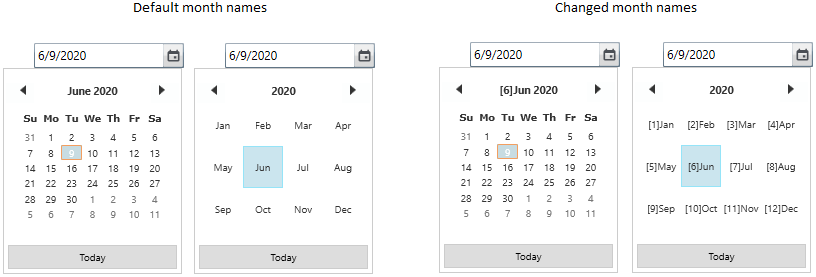
Change month names
You can change the popup calendar month names in the DateTimeEdit control by adding the respective new names to the AbbreviatedMonthNames property. The default value of the AbbreviatedMonthNames property is null.
<syncfusion:DateTimeEdit Name="dateTimeEdit" >
    <syncfusion:DateTimeEdit.AbbreviatedMonthNames>
        <x:Array Type="sys:String"
                 xmlns:sys="clr-namespace:System;assembly=mscorlib">
            <sys:String>[1]Jan</sys:String>
            <sys:String>[2]Feb</sys:String>
            <sys:String>[3]Mar</sys:String>
            <sys:String>[4]Apr</sys:String>
            <sys:String>[5]May</sys:String>
            <sys:String>[6]Jun</sys:String>
            <sys:String>[7]Jul</sys:String>
            <sys:String>[8]Aug</sys:String>
            <sys:String>[9]Sep</sys:String>
            <sys:String>[10]Oct</sys:String>
            <sys:String>[11]Nov</sys:String>
            <sys:String>[12]Dec</sys:String>
        </x:Array>
    </syncfusion:DateTimeEdit.AbbreviatedMonthNames>
</syncfusion:DateTimeEdit>
DateTimeEdit dateTimeEdit = new DateTimeEdit();
dateTimeEdit.AbbreviatedMonthNames = new string[]
{
"[1]Jan",
"[2]Feb",
"[3]Mar",
"[4]Apr",
"[5]May",
"[6]Jun",
"[7]Jul",
"[8]Aug",
"[9]Sep",
"[10]Oct",
"[11]Nov",
"[12]Dec"
};
NOTE
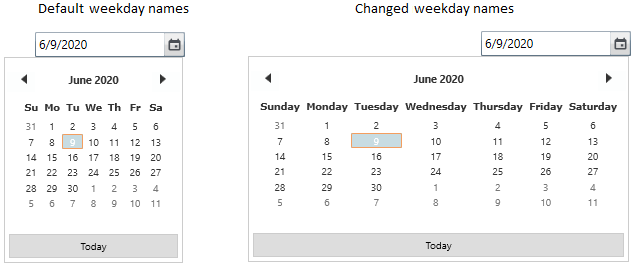
Change week day names
You can change the popup calendar week day names in DateTimeEdit control by adding the respective new names to the ShortestDayNames property. The default value of the ShortestDayNames property is null.
<syncfusion:DateTimeEdit Name="dateTimeEdit" >
    <syncfusion:DateTimeEdit.ShortestDayNames>
        <x:Array Type="sys:String"
                 xmlns:sys="clr-namespace:System;assembly=mscorlib">
            <sys:String>Sunday</sys:String>
            <sys:String>Monday</sys:String>
            <sys:String>Tuesday</sys:String>
            <sys:String>Wednesday</sys:String>
            <sys:String>Thursday</sys:String>
            <sys:String>Friday</sys:String>
            <sys:String>Saturday</sys:String>
        </x:Array>
    </syncfusion:DateTimeEdit.ShortestDayNames>
</syncfusion:DateTimeEdit>
DateTimeEdit dateTimeEdit = new DateTimeEdit();
dateTimeEdit.ShortestDayNames= new string[]
{
"Sunday",
"Monday",
"Tuesday",
"Wednesday",
"Thursday",
"Friday",
"Saturday"
};
NOTE
Block particular dates
You can restrict the user to select the date within some range by blocking the particular date in the DateTimeEdit. If you try to set the blackout dates as the selected datetime through editing or when pressing down arrow, it will reset the previous valid date from StartDate of blackout dates in DateTimeEdit. If you try to set the blackout dates as the selected datetime by pressing down arrow, it will reset the next valid date from EndDate of blackout dates in DateTimeEdit.
NOTE
If you try to set the
DateTimevalue which contained in blackout dates collection or try to add the selectedDateTimevalue in blackout dates collection, its throws theSpecified argument was out of the range of valid values.
<syncfusion:DateTimeEdit Loaded="DateTimeEdit_Loaded"
                         Name="dateTimeEdit"/>
DateTimeEdit dateTimeEdit = new DateTimeEdit();
dateTimeEdit.Loaded += DateTimeEdit_Loaded;//Setting the blockout days
private void DateTimeEdit_Loaded(object sender, RoutedEventArgs e)
{
//Setting start and end range for blocking dates
DateTime StartDate = new DateTime(DateTime.Now.Year, DateTime.Now.Month, 1);
DateTime EndDate = new DateTime(DateTime.Now.Year, DateTime.Now.Month, DateTime.Now.Day - 2);
CalendarDateRange blackOutDays = new CalendarDateRange()
{
Start = StartDate,
End = EndDate
};
Calendar calendar = new Calendar();
calendar.BlackoutDates.Add(blackOutDays);
dateTimeEdit.DateTimeCalender = calendar;
}
NOTE
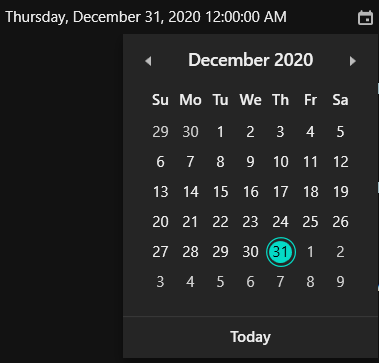
Theme
The WPF DateTimePicker (DateTimeEdit) supports various built-in themes. Refer to the below links to apply themes for the DateTimeEdit,
NOTE