Getting Started with WinUI Radial Gauge
9 Jul 202615 minutes to read
This section explains the steps required to add the WinUI Radial Gauge control and its elements such as axis, range, pointer, and annotation. This section covers only the basic features needed to get started with the Syncfusion radial gauge control.
Creating an application with WinUI Radial Gauge
-
Create a WinUI 3 desktop app for C# and .NET 5.
-
Add a reference to the Syncfusion.Gauge.WinUI NuGet package.
-
Import the control namespace
Syncfusion.UI.Xaml.Gaugesin XAML or C# code. -
Initialize the SfRadialGauge control.
<gauge:SfRadialGauge />SfRadialGauge sfRadialGauge = new SfRadialGauge(); this.Content = sfRadialGauge;
Add an axis to the radial gauge
Axes contain a list of axis elements, where you can add any number of radial axes inside the gauge. You can specify the minimum and maximum values of the axis using the Minimum and Maximum properties as demonstrated in the following code snippet.
<gauge:SfRadialGauge>
    <gauge:SfRadialGauge.Axes>
        <gauge:RadialAxis Minimum="0"
                          Maximum="150" />
    </gauge:SfRadialGauge.Axes>
</gauge:SfRadialGauge>
SfRadialGauge sfRadialGauge = new SfRadialGauge();
RadialAxis radialAxis = new RadialAxis();
radialAxis.Minimum = 0;
radialAxis.Maximum = 150;
sfRadialGauge.Axes.Add(radialAxis);
this.Content = sfRadialGauge;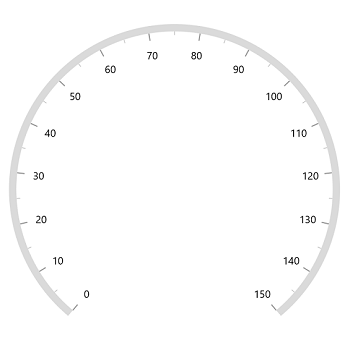
Add a range to the radial gauge
Ranges contain a list of range elements, where you can add any number of ranges inside the axis. You can specify the start value, end value, and background color for a range using the StartValue, EndValue, and Background properties as demonstrated in the following code.
<gauge:SfRadialGauge>
    <gauge:SfRadialGauge.Axes>
        <gauge:RadialAxis Maximum="150"
                          Interval="10">
            <gauge:RadialAxis.Ranges>
                <gauge:GaugeRange StartValue="0"
                                  EndValue="50"
                                  Background="Red" />
                <gauge:GaugeRange StartValue="50"
                                  EndValue="100"
                                  Background="Orange" />
                <gauge:GaugeRange StartValue="100"
                                  EndValue="150"
                                  Background="Green" />
            </gauge:RadialAxis.Ranges>
        </gauge:RadialAxis>
    </gauge:SfRadialGauge.Axes>
</gauge:SfRadialGauge>
SfRadialGauge sfRadialGauge = new SfRadialGauge();
RadialAxis radialAxis = new RadialAxis();
radialAxis.Maximum = 150;
sfRadialGauge.Axes.Add(radialAxis);
GaugeRange gaugeRange1 = new GaugeRange();
gaugeRange1.StartValue = 0;
gaugeRange1.EndValue = 50;
gaugeRange1.Background = new SolidColorBrush(Colors.Red);
radialAxis.Ranges.Add(gaugeRange1);
GaugeRange gaugeRange2 = new GaugeRange();
gaugeRange2.StartValue = 50;
gaugeRange2.EndValue = 100;
gaugeRange2.Background = new SolidColorBrush(Colors.Orange);
radialAxis.Ranges.Add(gaugeRange2);
GaugeRange gaugeRange3 = new GaugeRange();
gaugeRange3.StartValue = 100;
gaugeRange3.EndValue = 150;
gaugeRange3.Background = new SolidColorBrush(Colors.Green);
radialAxis.Ranges.Add(gaugeRange3);
this.Content = sfRadialGauge;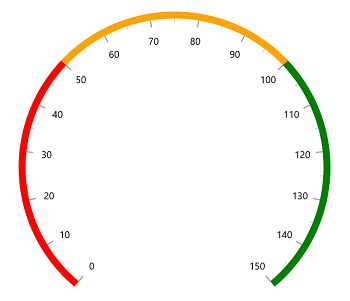
Add a pointer to the radial gauge
Pointers contain a list of pointer elements, where you can add any number of gauge pointers such as NeedlePointer, RangePointer, ShapePointer, and ContentPointer inside the axis to indicate the value.
<gauge:SfRadialGauge>
    <gauge:SfRadialGauge.Axes>
        <gauge:RadialAxis Maximum="150"
                          Interval="10">
            <gauge:RadialAxis.Pointers>
                <gauge:NeedlePointer Value="90" />
            </gauge:RadialAxis.Pointers>
        </gauge:RadialAxis>
    </gauge:SfRadialGauge.Axes>
</gauge:SfRadialGauge>
SfRadialGauge sfRadialGauge = new SfRadialGauge();
RadialAxis radialAxis = new RadialAxis();
radialAxis.Maximum = 150;
sfRadialGauge.Axes.Add(radialAxis);
NeedlePointer needlePointer = new NeedlePointer();
needlePointer.Value = 90;
radialAxis.Pointers.Add(needlePointer);
this.Content = sfRadialGauge;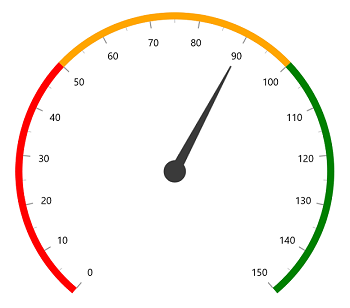
Add an annotation to the radial gauge
You can add any number of controls such as text or image as an annotation inside the axis. The position of the annotation can be customized using the DirectionUnit, DirectionValue, and PositionFactor properties as demonstrated in the following code.
<gauge:SfRadialGauge>
    <gauge:SfRadialGauge.Axes>
        <gauge:RadialAxis Maximum="150"
                          Interval="10">
            <gauge:RadialAxis.Annotations>
                <gauge:GaugeAnnotation x:Name="annotation"
                                       DirectionUnit="Angle"
                                       DirectionValue="90"
                                       PositionFactor="0.5">
                    <gauge:GaugeAnnotation.Content>
                        <TextBlock Text="90"
                                   FontSize="25"
                                   FontWeight="Bold" />
                    </gauge:GaugeAnnotation.Content>
                </gauge:GaugeAnnotation>
            </gauge:RadialAxis.Annotations>
        </gauge:RadialAxis>
    </gauge:SfRadialGauge.Axes>
</gauge:SfRadialGauge>
SfRadialGauge sfRadialGauge = new SfRadialGauge();
RadialAxis radialAxis = new RadialAxis();
radialAxis.Maximum = 150;
sfRadialGauge.Axes.Add(radialAxis);
GaugeAnnotation gaugeAnnotation = new GaugeAnnotation();
gaugeAnnotation.DirectionUnit = AnnotationDirection.Angle;
gaugeAnnotation.DirectionValue = 90;
gaugeAnnotation.PositionFactor = 0.5;
gaugeAnnotation.Content = new TextBlock { Text = "90", FontWeight = FontWeights.Bold, FontSize = 25 };
radialAxis.Annotations.Add(gaugeAnnotation);
this.Content = sfRadialGauge;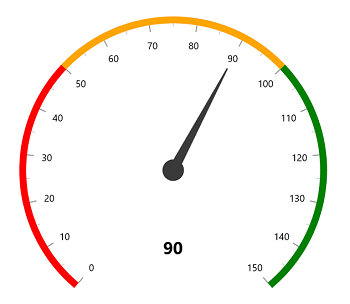
The following code example gives you the complete code of the above configuration.
<gauge:SfRadialGauge>
    <gauge:SfRadialGauge.Axes>
        <gauge:RadialAxis Maximum="150"
                            Interval="10">
            <gauge:RadialAxis.Ranges>
                <gauge:GaugeRange StartValue="0"
                                    EndValue="50"
                                    Background="Red" />
                <gauge:GaugeRange StartValue="50"
                                    EndValue="100"
                                    Background="Orange" />
                <gauge:GaugeRange StartValue="100"
                                    EndValue="150"
                                    Background="Green" />
            </gauge:RadialAxis.Ranges>

            <gauge:RadialAxis.Pointers>
                <gauge:NeedlePointer Value="90" />
            </gauge:RadialAxis.Pointers>

            <gauge:RadialAxis.Annotations>
                <gauge:GaugeAnnotation x:Name="annotation"
                                        DirectionUnit="Angle"
                                        DirectionValue="90"
                                        PositionFactor="0.5">
                    <gauge:GaugeAnnotation.Content>
                        <TextBlock Text="90"
                                    FontSize="25"
                                    FontWeight="Bold" />
                    </gauge:GaugeAnnotation.Content>
                </gauge:GaugeAnnotation>
            </gauge:RadialAxis.Annotations>
        </gauge:RadialAxis>
    </gauge:SfRadialGauge.Axes>
</gauge:SfRadialGauge>
SfRadialGauge sfRadialGauge = new SfRadialGauge();
RadialAxis radialAxis = new RadialAxis();
radialAxis.Maximum = 150;
sfRadialGauge.Axes.Add(radialAxis);
GaugeRange gaugeRange1 = new GaugeRange();
gaugeRange1.StartValue = 0;
gaugeRange1.EndValue = 50;
gaugeRange1.Background = new SolidColorBrush(Colors.Red);
radialAxis.Ranges.Add(gaugeRange1);
GaugeRange gaugeRange2 = new GaugeRange();
gaugeRange2.StartValue = 50;
gaugeRange2.EndValue = 100;
gaugeRange2.Background = new SolidColorBrush(Colors.Orange);
radialAxis.Ranges.Add(gaugeRange2);
GaugeRange gaugeRange3 = new GaugeRange();
gaugeRange3.StartValue = 100;
gaugeRange3.EndValue = 150;
gaugeRange3.Background = new SolidColorBrush(Colors.Green);
radialAxis.Ranges.Add(gaugeRange3);
NeedlePointer needlePointer = new NeedlePointer();
needlePointer.Value = 90;
radialAxis.Pointers.Add(needlePointer);
GaugeAnnotation gaugeAnnotation = new GaugeAnnotation();
gaugeAnnotation.DirectionUnit = AnnotationDirection.Angle;
gaugeAnnotation.DirectionValue = 90;
gaugeAnnotation.PositionFactor = 0.5;
gaugeAnnotation.Content = new TextBlock { Text = "90", FontWeight = FontWeights.Bold, FontSize = 25 };
radialAxis.Annotations.Add(gaugeAnnotation);
this.Content = sfRadialGauge;NOTE
Download demo application from GitHub