Getting Started with Windows Forms StatusStrip
18 Nov 20189 minutes to read
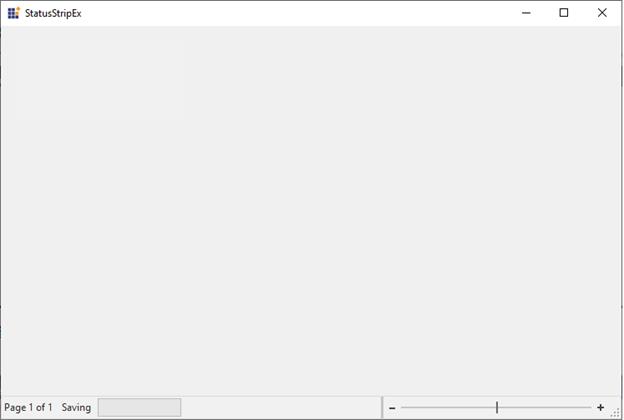
The StatusStrip control can be added to the bottom of a Ribbon control and can host controls such as TrackBarEx, ProgressBar, and StatusStripButton.
Assembly Deployment
Refer to the Control Dependencies section for the list of assemblies and NuGet packages required to use the StatusStripEx control.
Refer to NuGet Packages to learn how to install NuGet packages in a Windows Forms application.
To install the required NuGet package using the NuGet Package Manager Console, run the following command:
Install-Package Syncfusion.Tools.WindowsAdding StatusStrip via Designer
-
Create a new Windows Forms application in Visual Studio.
-
Drag the
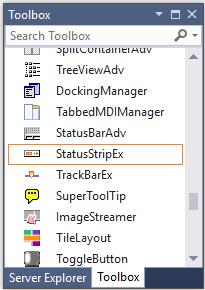
StatusStripExcontrol from the Toolbox and drop it onto the Windows Form designer. The following dependent assemblies are added automatically:- Syncfusion.Grid.Base
- Syncfusion.Grid.Windows
- Syncfusion.Shared.Base
- Syncfusion.Shared.Windows
- Syncfusion.Tools.Base
- Syncfusion.Tools.Windows
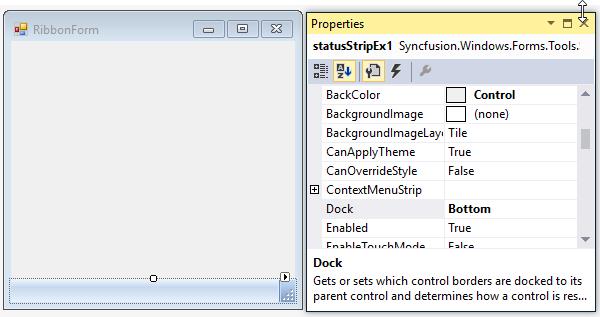
The StatusStrip control can be docked to the bottom of the RibbonControlAdv.
Set the Dock property to Bottom to dock the control at the bottom.
Adding Items to StatusStrip
Use the Items property to open the Items Collection Editor. The editor allows you to add and customize StatusControl items and modify their appearance using the available properties.
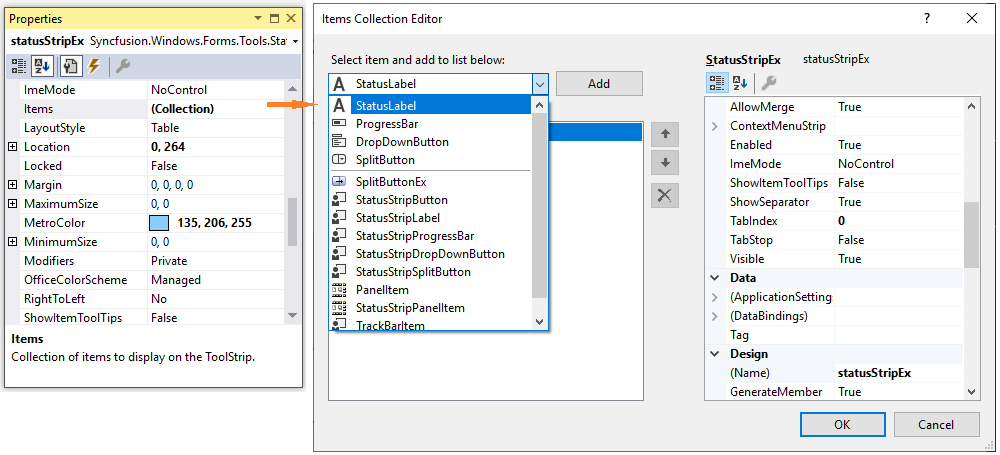
Note: You can also add
ToolStripStatusitems through the Tasks window. For more information, refer to Smart Tag Options.
Adding StatusStripEx via Code
The following steps describe how to create a StatusStripEx control programmatically:
-
Create a C# or VB.NET Windows Forms application in Visual Studio.
-
Add the following assembly references to the project:
- Syncfusion.Grid.Base
- Syncfusion.Grid.Windows
- Syncfusion.Shared.Base
- Syncfusion.Shared.Windows
- Syncfusion.Tools.Base
- Syncfusion.Tools.Windows
-
Include the required namespace.
using Syncfusion.Windows.Forms.Tools;Imports Syncfusion.Windows.Forms.Tools- Create an instance of the
StatusStripExcontrol and add it to the form. The following code example also adds aToolStripStatusLabelto theStatusStripExcontrol.
//Declaring the StatusStripEx and ToolStripStatusLabel
private Syncfusion.Windows.Forms.Tools.StatusStripEx statusStripEx1;
private System.Windows.Forms.ToolStripStatusLabel toolStripStatusLabel1;

//Initializing the StatusStripEx and ToolStripStatusLabel
this.statusStripEx1 = new Syncfusion.Windows.Forms.Tools.StatusStripEx();
this.toolStripStatusLabel1 = new System.Windows.Forms.ToolStripStatusLabel();

//Adding ToolStripStatusLabel to StatusStripEx
this.statusStripEx1.Items.AddRange(new System.Windows.Forms.ToolStripItem[] {
this.toolStripStatusLabel1});
this.Controls.Add(this.statusStripEx1);

//Docking the StatusStripEx to Bottom
this.statusStripEx1.Dock = Syncfusion.Windows.Forms.Tools.DockStyleEx.Bottom;
Imports Syncfusion.Windows.Forms.Tools
'Declaring the StatusStripEx and ToolStripStatusLabel
Private statusStripEx1 As Syncfusion.Windows.Forms.Tools.StatusStripEx
Private toolStripStatusLabel1 As System.Windows.Forms.ToolStripStatusLabel
'Initializing the StatusStripEx and ToolStripStatusLabel
Me.statusStripEx1 = New Syncfusion.Windows.Forms.Tools.StatusStripEx()
Me.toolStripStatusLabel1 = New System.Windows.Forms.ToolStripStatusLabel()
'Adding ToolStripStatusLabel to StatusStripEx
Me.statusStripEx1.Items.AddRange(New System.Windows.Forms.ToolStripItem() {Me.toolStripStatusLabel1})
Me.Controls.Add(Me.statusStripEx1)
'Docking the StatusStripEx to Bottom
Me.statusStripEx1.Dock = Syncfusion.Windows.Forms.Tools.DockStyleEx.BottomStatusStrip Items
The StatusStrip control supports two categories of items:
- StatusControl items
- Notification items
StatusControl Items
StatusControl items are displayed on the right side of the StatusStrip control. The following StatusControl items are available:
- StatusLabel
- ProgressBar
- DropDownButton
- SplitButton
Notification Items
Notification items are displayed on the left side of the StatusStrip control. The following Notification items are available:
- StatusStripLabel
- StatusStripProgressBar
- StatusStripDropDownButton
- StatusStripSplitButton
Note: StatusControl items and Notification items represent the same item types. The only difference is their placement within the
StatusStripExcontrol. For example,StatusStripLabelis added to the left side of the control, whereasStatusLabelis added to the right side.
Smart Tag Options
Clicking the Smart Tag of the StatusStrip control displays the Tasks window. This window provides options for adding ToolStripStatus items and configuring the control.
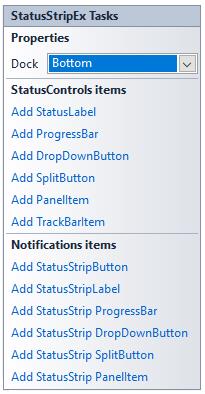
The following option is available:
-
Dock - Provides docking options for the
StatusStripExcontrol.
StatusControl Items
| Option | Description |
|---|---|
| Add StatusLabel | Adds a StatusLabel item. |
| Add ProgressBar | Adds a ProgressBar item. |
| Add DropDownButton | Adds a DropDownButton item. |
| Add SplitButton | Adds a SplitButton item. |
| Add PanelItem | Adds a PanelItem. |
| Add TrackBarItem | Adds a TrackBarItem. |
Notification Items
| Option | Description |
|---|---|
| Add StatusStripButton | Adds a StatusStripButton item. |
| Add StatusStripLabel | Adds a StatusStripLabel item. |
| Add StatusStripProgressBar | Adds a StatusStripProgressBar item. |
| Add StatusStripDropDownButton | Adds a StatusStripDropDownButton item. |
| Add StatusStripSplitButton | Adds a StatusStripSplitButton item. |
| Add StatusStripPanelItem | Adds a StatusStripPanelItem. |
Sizing Grip Settings
The StatusStrip control displays a sizing grip in its lower-right corner. Use the SizingGrip property to show or hide the sizing grip. The following properties can be used to customize its appearance:
| Property | Description |
|---|---|
GripStyle |
Specifies the style of the sizing grip. |
GripMargin |
Specifies the margin around the sizing grip. |
this.statusStripEx1.SizingGrip = true;
this.statusStripEx1.GripStyle = ToolStripGripStyle.Visible;
this.statusStripEx1.GripMargin = new Padding(5);Me.statusStripEx1.SizingGrip = True
Me.statusStripEx1.GripStyle = ToolStripGripStyle.Visible
Me.statusStripEx1.GripMargin = New Padding(5)Color Schemes for StatusStrip
The StatusStrip control supports the following Office 2007 color schemes:
SilverBlueBlack
Use the OfficeColorScheme property to change the color scheme.
this.statusStripEx1.OfficeColorScheme = Syncfusion.Windows.Forms.Tools.ToolStripEx.ColorScheme.Silver;Me.statusStripEx1.OfficeColorScheme = Syncfusion.Windows.Forms.Tools.ToolStripEx.ColorScheme.Silver


Visual Styles
The StatusStrip control supports Office 2016 visual styles such as Office2016Colorful, Office2016White, Office2016Black, and Office2016DarkGray.
The following code example demonstrates how to apply the Office2016Colorful style to the StatusStrip control.
this.statusStripEx1.VisualStyle = Syncfusion.Windows.Forms.Tools.StatusStripExStyle.Office2016Colorful;Me.statusStripEx1.VisualStyle = Syncfusion.Windows.Forms.Tools.StatusStripExStyle.Office2016Colorful;
Custom Colors
You can apply custom colors to the StatusStrip control by setting the OfficeColorScheme property to Managed and specifying the custom colors by using the ApplyManagedColors method.
this.statusStripEx1.OfficeColorScheme = Syncfusion.Windows.Forms.Tools.ToolStripEx.ColorScheme.Managed;
Office2007Colors.ApplyManagedColors(this, Color.DarkGreen);Me.statusStripEx1.OfficeColorScheme = Syncfusion.Windows.Forms.Tools.ToolStripEx.ColorScheme.Managed
Office2007Colors.ApplyManagedColors(Me, Color.DarkGreen)
Custom Context Menu
You can customize the context menu displayed in the StatusStrip control to resemble the style used in Word 2007. To do this, set the StatusString property of notification items such as StatusStripButton, StatusStripLabel, and related controls.
this.statusStripLabel1.Text = "Pages";
this.statusStripLabel1.StatusString = "1/1";Me.statusStripLabel1.Text = "Pages"
Me.statusStripLabel1.StatusString = "1/1"