How can I help you?
Getting started
This section explains you the steps required to populate the Spreadsheet with data, format, and export it as excel file. This section covers only the minimal features that you need to know to get started with the Spreadsheet.
Adding Script Reference
Create an HTML page and add the scripts references in the order mentioned in the following code example.
<!DOCTYPE html>
<html>
    <head>
        <!-- Essential Studio for JavaScript  theme reference -->
        <link rel="stylesheet" href="http://cdn.syncfusion.com/33.1.44/js/web/flat-azure/ej.web.all.min.css" />
        <!--  jquery script  -->
        <script src="https://code.jquery.com/jquery-1.10.2.min.js"></script>
        <script src="http://cdn.syncfusion.com/js/assets/external/jquery.globalize.min.js"></script>
        <script src="http://ajax.aspnetcdn.com/ajax/jquery.validate/1.14.0/jquery.validate.min.js"></script>
        <!--  jsrender script  -->
        <script src="http://cdn.syncfusion.com/js/assets/external/jsrender.min.js"></script>
        <!-- Essential JS UI widget -->
        <script src="http://cdn.syncfusion.com/33.1.44/js/web/ej.web.all.min.js"></script>
        <!--Add custom scripts here -->
    </head>
    <body>
    </body>
</html>
In the above code, ej.web.all.min.js script reference has been added for demonstration purpose. It is not recommended to use this for deployment purpose, as its file size is larger since it contains all the widgets. Instead, you can use CSG utility to generate a custom script file with the required widgets for deployment purpose.
NOTE
For details about Spreadsheet internal and external dependencies refer following
link
Initialize Spreadsheet
Add a div container to render the Spreadsheet.
<!DOCTYPE html>
<html>
    <body>
        <div id="Spreadsheet"></div>
    </body>
</html>
Initialize the Spreadsheet by using the ejSpreadsheet method. The Spreadsheet is rendered based on default width and height. You can also customize the Spreadsheet dimension by setting the width and height property in scrollSettings.
You can also use showRibbonand showPager property to show/hide ribbon and pager in the spreadsheet.
The methodshowWaitingPopUp and hideWaitingPopUp is used to show/hide the waiting popup in the spreadsheet.
<!DOCTYPE html>
<html>
    <body>
        <script type="text/javascript">
            $(function () {
                $("#Spreadsheet").ejSpreadsheet();
            });
        </script>
    </body>
</html>
Now, the Spreadsheet is rendered with default row and column count.
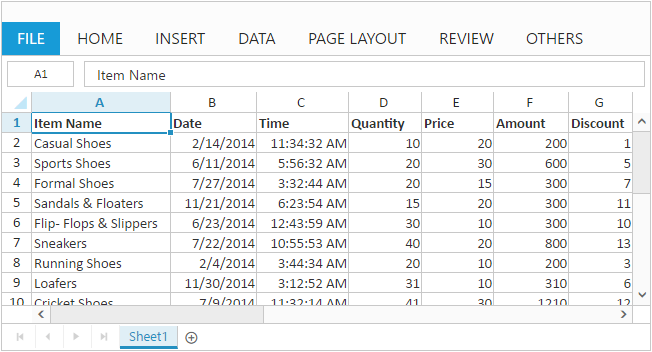
Populate Spreadsheet with data
Now, this section explains how to populate JSON data to the Spreadsheet. You can set dataSource property in sheet settings to populate JSON data in Spreadsheet.
$("#Spreadsheet").ejSpreadsheet({
    // ...
    sheets: [{
        // the datasource "window.defaultData" is referred from 'http://js.syncfusion.com/demos/web/scripts/xljsondata.js'
        dataSource: window.defaultData
    }]
    // ...
});
NOTE
For more details about
data bindingrefer followinglink
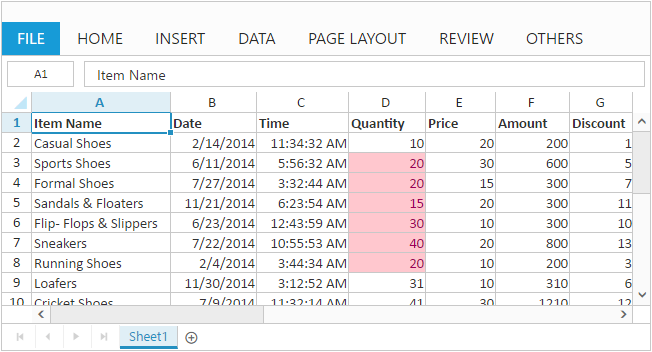
Apply Conditional Formatting
Conditional formatting helps you to apply formats to a cell or range with certain color based on the cells values. You can use allowConditionalFormats property to enable/disable Conditional formats.
To apply conditional formats for a range use setCFRule method. The following code example illustrates this,
$("#Spreadsheet").ejSpreadsheet({
    // ...
    loadComplete: "loadComplete"
    // ...
});

function loadComplete() {
    this.XLCFormat.setCFRule({ action: "greaterthan", inputs: ["10"], color: "redft", range: "D2:D8" });
}
NOTE
For more details about
Conditional Formattingrefer followinglink
Export Spreadsheet as Excel File
The Spreadsheet can save its data, style, format into an excel file. To enable save option in Spreadsheet set allowExporting option in exportSettings as true. Since Spreadsheet uses server side helper to save documents set excelUrl in exportSettings option. The following code example illustrates this,
$("#Spreadsheet").ejSpreadsheet({
    // ...
    exportSettings: {
        excelUrl: "http://js.syncfusion.com/demos/ejservices/api/Spreadsheet/ExcelExport"
    }
    // ...
});
Use shortcut Ctrl + S to save Spreadsheet as excel file.
NOTE