How can I help you?
Cell Range in JavaScript Spreadsheet
A Cell Range is a collection of cells in a sheet. It represents single cell or selection of cells. When cells have been selected, they are surrounded by border.
You have following features in Cell Range,
- Comment
- Cell Navigation
- Data Validation
- Drag and Drop
- Auto Fill
- Hyperlink
- Merge Cell
Comment
Comment is used to give additional information for an individual cell about the data it contains. When a cell has a comment, a red indicator appears in the corner of the cell. When mouse hover on the cell, the comment will appear. You can use allowComments property to enable/disable comments.
To insert a Comment
You can insert a comment by using one of the following ways,
- Using “New” button under Comments group of REVIEW Tab in ribbon.
- Using context menu to select “Insert Comment” option in “Comment”.
- Using
setCommentmethod.
To remove a Comment
You can remove a comment by using one of the following ways,
- Using “Delete” button under Comments group of REVIEW Tab in ribbon.
- Using context menu to select “Delete Comment” option in “Comment”.
- Using
deleteCommentmethod.
The following code example describes the above behavior.
<div id="Spreadsheet"></div>$(function () {
$("#Spreadsheet").ejSpreadsheet({
// the datasource "window.defaultData" is referred from 'http://js.syncfusion.com/demos/web/scripts/xljsondata.min.js'
sheets: [{
rangeSettings: [{ dataSource: window.defaultData }],
}],
loadComplete: "loadComplete"
});
});
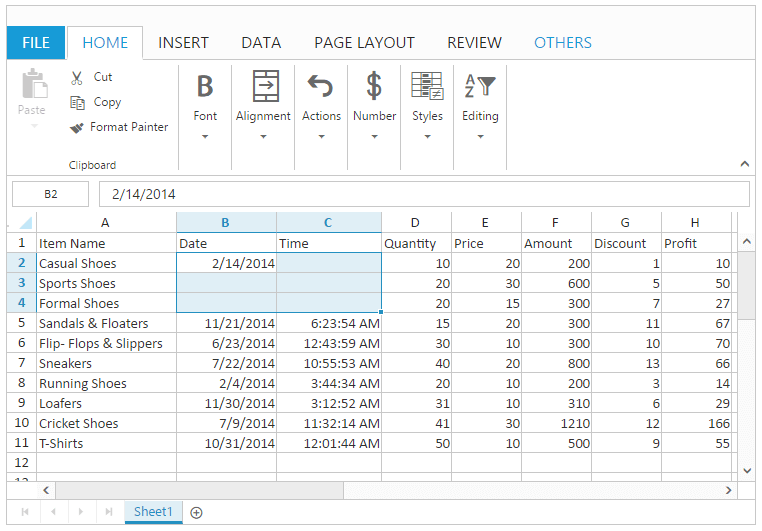
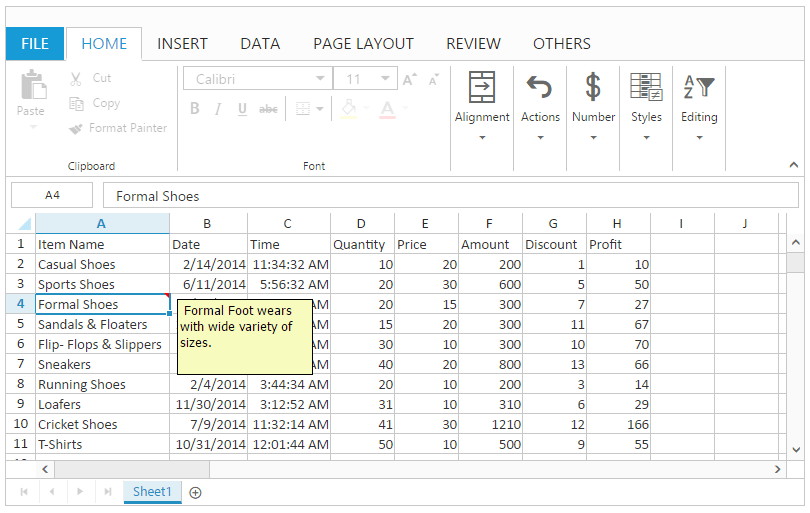
function loadComplete(args) {
if(!this.isImport) {
this.XLComment.setComment("A2", " Casual Foot wears with wide variety of colors.", false);
this.XLComment.setComment("A4", " Formal Foot wears with wide variety of sizes.", true); // If true comment is in Editing mode.
//To Remove a Comment
this.XLComment.deleteComment ("A2");
}
}The following output is displayed as a result of the above code example.
You have following Comment options in Spreadsheet.
1) Edit Comment
2) Find Next Comment
3) Find Previous Comment
4) Get Comment
5) Show All Comments
6) Show Hide Comment
7) User Name
Edit Comment
To edit the comment in the Spreadsheet. Use editComment method to edit comment via code.
Find Next Comment
To find the next comment in the Spreadsheet. Use findNextComment method to find next comment via code.
Find previous Comment
To find the previous comment in the Spreadsheet. Use findPrevComment method to find previous comment via code.
Get Comment
To get the comment in the Spreadsheet. Use getComment method to get the comment via code.
Show All Comments
To show all the comments in the Spreadsheet. Use showAllComments method to show all comments via code.
Show Hide Comment
To show or hide the specific comment in the Spreadsheet. Use showHideComment method to show or hide the specified comment via code.
User Name
To define the username for the Spreadsheet which is displayed in comment. Use userName member to define user name for a comment via code.
Cell Navigation
Cell navigation is used to navigate through the cells using keyboard. You can use allowKeyboardNavigation property to enable/disable cell navigation. The following list of keys used for cell navigation are,
| Keys |
Description |
|---|---|
| Ctrl + Home |
Go to first cell in the first row. |
| Ctrl + End |
Go to last cell in the last row. |
| Up Arrow |
Go to previous cell in the same column |
| Down Arrow |
Go to next cell in the same column |
| Right Arrow |
Go to next cell in the same row |
| Left Arrow |
Go to previous cell in the same row |
| Page Down |
Go to next block |
| Page Up |
Go to previous block |
| Home |
Go to first cell of the same row |
| End |
Go to last cell of the same row |
| Enter |
Save the current cell changes and navigate to the next row. |
| Tab |
Go to next cell |
| Shift + Tab |
Go to previous cell |
| Shift + Up Arrow |
Go to previous row or previous row cell with selection |
| Shift+ Down Arrow |
Go to next row or next row cell with selection |
| Shift + Right Arrow |
Go to next cell within the same row with selection |
| Shift + Left Arrow |
Go to previous cell within the same row with selection |
| Ctrl + Up Arrow |
Go to next cell from the first empty cell in upwards. |
| Ctrl + Down Arrow |
Go to previous cell from the first empty cell in downwards. |
| Ctrl + Left Arrow |
Go to next cell from the first empty cell in leftwards. |
| Ctrl+ Right Arrow |
Go to previous cell from the first empty cell in rightwards. |
NOTE
In the above table, “Ctrl + Home” and “Ctrl + End” is based on the used range.
Data Validation
Data Validation is used to restrict the user to enter the invalid data. You can use allowDataValidation property to enable/disable data validation.
NOTE
The below validation script files are needed for validation.
- jquery.validate.min.js
- jquery.validate.unobtrusive.min.js
To apply validation.
You can apply data validation by using one of the following ways,
- Using “Data Validation” option in Data Validation button under Data Tools group of DATA Tab in ribbon, Data Validation dialog will be opened in that you can perform Validation.
- Using
applyDVRulesmethod.
The following code example describes the above behavior.
<div id="Spreadsheet"></div>$(function () {
$("#Spreadsheet").ejSpreadsheet({
// the datasource "window.defaultData" is referred from 'http://js.syncfusion.com/demos/web/scripts/xljsondata.min.js'
sheets: [{
rangeSettings: [{ dataSource: window.defaultData }],
}],
loadComplete: "loadComplete"
});
});
function loadComplete(args) {
if(!this.isImport) {
this.XLValidate.applyDVRules("G2:G12", ["Greater", 6], "number", true, true);
//the last two boolean values used to ignore blank value and error alert.
}
}To clear validation
You can clear data validation rule by one of the following ways,
- Using “Clear Validation” option in Data Validation button under Data Tools group of DATA Tab in ribbon.
- Using
clearDVmethod.
The following code example describes the above behavior.
<div id="Spreadsheet"></div>$(function () {
$("#Spreadsheet").ejSpreadsheet({
// the datasource "window.defaultData" is referred from 'http://js.syncfusion.com/demos/web/scripts/xljsondata.min.js'
sheets: [{
rangeSettings: [{ dataSource: window.defaultData }],
}],
loadComplete: "loadComplete"
});
});
function loadComplete(args) {
if(!this.isImport) {
this.XLValidate.applyDVRules("G2:G12", ["Greater", 6], "number", true, true);
//the last two boolean values used to ignore blank value and error alert.
this.XLValidate.clearDV("G2:G12");
}
}To format invalid data
You can highlight the invalid data by using following ways,
- Using “Format Invalid Data” option in Data Validation button under Data Tools group of DATA Tab in ribbon.
- Using
highlightInvalidDatamethod.
The following code example describes the above behavior.
<div id="Spreadsheet"></div>$(function () {
$("#Spreadsheet").ejSpreadsheet({
// the datasource "window.defaultData" is referred from 'http://js.syncfusion.com/demos/web/scripts/xljsondata.min.js'
sheets: [{
rangeSettings: [{ dataSource: window.defaultData }],
}],
loadComplete: "loadComplete"
});
});
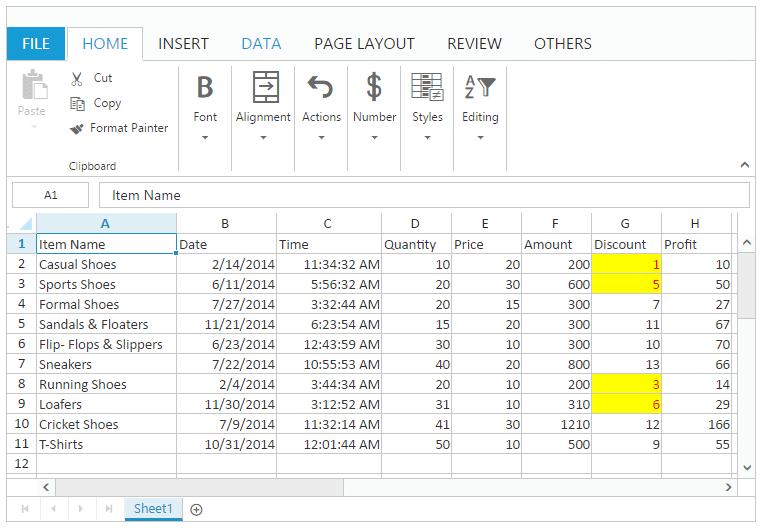
function loadComplete(args) {
if(!this.isImport) {
this.XLValidate.applyDVRules("G2:G12", ["Greater", 6], "number", true, true);
//the last two boolean values used to ignore blank value and error alert.
this.XLValidate.highlightInvalidData ("G2:G12");
}
}The following output is displayed as a result of the above code example.
To clear formatted invalid data
You can clear the highlighted invalid data by using following ways,
- Using “Clear Formats” option in Data Validation button under Data Tools group of DATA Tab in ribbon.
- Using
clearHighlightedValDatamethod.
Drag and Drop
Drag and drop is used to pick a selected cells and drop it into a new place on the worksheet. You can use allowDragAndDrop property to enable/disable drag and drop.
You can do this by one of the following ways,
- Using mouse drag and drop.
- Using
moveRangeToMethod.
The following code example describes the above behavior.
<div id="Spreadsheet"></div>$(function () {
$("#Spreadsheet").ejSpreadsheet({
// the datasource "window.defaultData" is referred from 'http://js.syncfusion.com/demos/web/scripts/xljsondata.min.js'
sheets: [{
rangeSettings: [{ dataSource: window.defaultData }],
}],
loadComplete: "loadComplete"
});
});
function loadComplete(args) {
if(!this.isImport)
this.XLDragDrop.moveRangeTo([1, 6, 4, 7], [1, 9, 4, 10]);
}The following output is displayed as a result of the above code example.

Auto Fill
Auto Fill is used to fill the cells with data based on adjacent cells. It also follows a pattern from adjacent cells if available. There is no need to enter the repeated data manually. You can use allowAutoFill property to enable/disable the auto fill support. You can also use showFillOptions property to enable/disable the fill option and fillType property to change the default auto fill option which is available in autoFillSettings.
You can do this by one of the following ways,
- Using “AutoFillOptions” menu which is open, while drag and drop the cell using fill handle element.
- Using
autoFillmethod.
The following methods are available in spreadsheet to customize the auto fill options in the spreadsheet.
- Using
hideAutoFillElementmethod to fide the auto fill element in the spreadsheet. - Using
hideAutoFillOptionsmethod to fide the auto fill options in the spreadsheet. - Using
positionAutoFillElementmethod to set position of auto fill element in the spreadsheet.
In Auto Fill we have following options,
- Copy Cells
- Fill Series
- Fill Formatting Only
- Fill Without Formatting
- Flash Fill
NOTE
The default auto fill option is “fillSeries” which can be referred from
fillTypeproperty.
Copy Cells
To copy the selected cell content to the adjacent cells. You can do this by one of the following ways,
- Using fill handle to select the adjacent cell range and “Copy Cells” option in “AutoFillOptions” menu to fill the adjacent cells.
- Using “copyCells” as fill type in
autoFillmethod to fill the adjacent cells.
Fill Series
To fill the series of numbers, characters, or dates based on selected cell content to the adjacent cells with their formats.
You can do this by one of the following ways,
- Using fill handle to select the adjacent cell range and “Fill Series” option in “AutoFillOptions” menu to fill the adjacent cells.
- Using “fillSeries” as fill type in
autoFillmethod to fill the adjacent cells.
Fill Formatting Only
To fill the cell style and number formatting based on the selected cell content to the adjacent cells without their content.
You can do this by one of the following ways,
- Using fill handle to select the adjacent cell range and “Fill Formatting Only” option in “AutoFillOptions” menu to fill the adjacent cells.
- Using “fillFormattingOnly” as fill type in
autoFillmethod to fill the adjacent cells.
Fill Without Formatting
To fill series of numbers, characters, or dates based on the selected cells to the adjacent cells without their formats.
You can do this by one of the following ways,
- Using fill handle to select the adjacent cell range and “Fill Without Formatting” option in “AutoFillOptions” menu to fill the adjacent cells.
- Using “fillWithoutFormatting” as fill type in
autoFillmethod to fill the adjacent cells.
Flash Fill
To fill the column when it senses a pattern from adjacent column data based on what you type.
You can do this by one of the following ways,
- Using fill handle to select the adjacent cell range and “Flash Fill” option in “AutoFillOptions” menu to fill the adjacent cells.
- Using “flashFill” as fill type in
autoFillmethod to fill the adjacent cells.
The following code example describes the above behavior.
<div id="Spreadsheet"></div>$(function () {
$("#Spreadsheet").ejSpreadsheet({
// the datasource "window.defaultData" is referred from 'http://js.syncfusion.com/demos/web/scripts/xljsondata.min.js'
sheets: [{
rangeSettings: [{ dataSource: window.defaultData },
{ dataSource: [{i : 1, j: 1, k : 1, l : 1}, {i : 2, j: 2, k : 2, l : 2}, {i : 3, j: 3, k : 3, l : 3}, {i : 4, j: 4, k : 4, l : 4}], startCell: "I2"}
],
}],
loadComplete: "loadComplete"
});
});
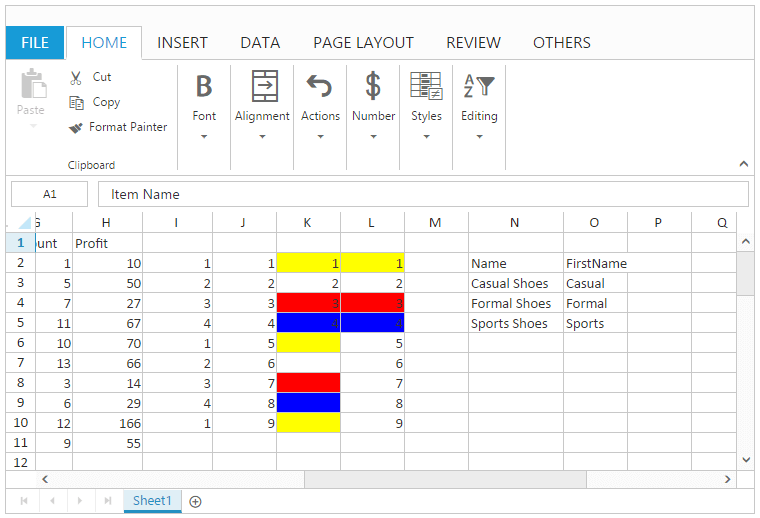
function loadComplete(args) {
if(!this.isImport) {
this.XLEdit.updateValue("N2", "Name");
this.XLEdit.updateValue("N3", "Casual Shoes");
this.XLEdit.updateValue("N4", "Formal Shoes");
this.XLEdit.updateValue("N5", "Sports Shoes");
this.XLEdit.updateValue("O2", "FirstName");
this.XLEdit.updateValue("O3", "Casual");
this.XLFormat.format({ "style": { "background-color": "yellow" } }, "K2:L2");
this.XLFormat.format({ "style": { "background-color": "red" } }, "K4:L4");
this.XLFormat.format({ "style": { "background-color": "blue" } }, "K5:L5");
this.XLDragFill.autoFill({sheetIdx: 1, dataRange:[1, 8, 4, 8], fillRange: "I6:I10", fillType: "copycells", direction:"down"}); //copy Cells
this.XLDragFill.autoFill({sheetIdx: 1, dataRange:[1, 9, 4, 9], fillRange: "J6:J10", fillType: "fillseries", direction:"down"}); //fill series
this.XLDragFill.autoFill({sheetIdx: 1, dataRange:[1, 10, 4, 10], fillRange: "K6:K10", fillType: "fillformattingonly", direction:"down"}); //fill formatting only
this.XLDragFill.autoFill({sheetIdx: 1, dataRange:[1, 11, 4, 11], fillRange: "L6:L10", fillType: "fillwithoutformatting", direction:"down"}); //fill without formatting
this.XLDragFill.autoFill({sheetIdx: 1, dataRange:[2, 14, 2, 14], fillRange: "O4:O6", fillType: "flashfill", direction:"down"}); //flash fill
}
}The following output is displayed as a result of the above code example.
NOTE
- To get the active cell object in Spreadsheet, use
getActiveCellmethod.- To get the cell element based on specified row and column index in the Spreadsheet, use
getCellmethod.- To get the sheet details based on the given sheet index in Spreadsheet, use
getSheetmethod.
Hyperlink
Hyperlink is used to navigate to web links or cell reference within the sheet or to other sheets in Spreadsheet. You can use allowHyperlink property to enable/disable Hyperlink.
To insert a Hyperlink
You can insert a hyperlink by one of the following ways,
- Using “Hyperlink” button under Links group of INSERT Tab in ribbon.
- Using context menu to select “Insert Hyperlink” option in “Hyperlink”.
- Using
setHyperlinkmethod.
To remove a Hyperlink
You can remove a hyperlink by one of the following ways,
- Using context menu to select “Remove Hyperlink” option in Hyperlink.
- Using
removeHyperlinkmethod.
The following code example describes the above behavior.
<div id="Spreadsheet"></div>$(function () {
$("#Spreadsheet").ejSpreadsheet({
// the datasource "window.defaultData" is referred from 'http://js.syncfusion.com/demos/web/scripts/xljsondata.min.js'
sheets: [{
rangeSettings: [{ dataSource: window.defaultData }],
}],
loadComplete: "loadComplete"
});
});
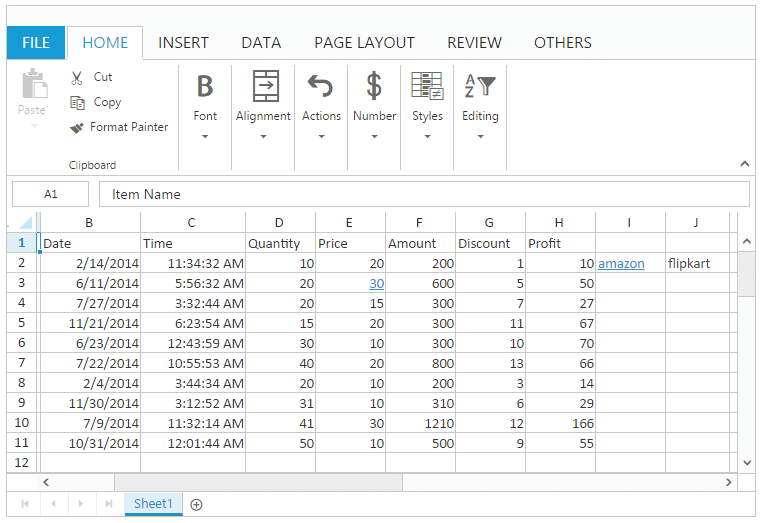
function loadComplete(args) {
if(!this.isImport) {
this.XLEdit.updateValue("I2", "amazon");
this.XLEdit.updateValue("J2", "flipkart");
this.setHyperlink("E3:E3", { "cellAddr": "A1:D2" }, 2);
this.setHyperlink("I2:I2", { "webAddr": "http://www.amazon.com" }, 1);
this.setHyperlink("J2:J2", { "webAddr": "http://www.flipkart.com" }, 1);
//To Remove a Hyperlink
this.removeHyperlink("J2:J2");
}
}The following output is displayed as a result of the above code example.
Merge Cell
Merge cell is a single cell created by combining two or more individual cells together. You can use allowMerging property to enable/disable merge cells. The cell reference for a merged cell is the cell in the upper left corner of the original selected range or group of cells.
You have following options in Merge Cell,
- Merge Cells
- Merge & Center
- Merge Across
Merge Cells
You can combine two or more cells located in the same row or column into a single cell. When cells with multiple values are merged, upper-left most cell’s data will be the data of merged cell.
You can do this by one of the following ways,
- Using “Merge Cells” option in Merge & Center button under Alignment group of HOME Tab in ribbon.
- Using
mergeCellsmethod. - Using
mergeCellsoption insheetsproperty.
Merge & Center
You can combine two or more cells located in the same row or column into a single cell with center text align. When cells with multiple values are merged, upper-left most cell’s data will be the data of the merged cell. You can do this by one of the following ways,
- Using Merge & Center button under Alignment group of HOME Tab in ribbon.
- Using “Merge & Center” option in Merge & Center button under Alignment group of HOME Tab in ribbon.
- Using
mergeCellsmethod withmergeCenterproperty astrueto enable the center alignment.
Merge Across
You can combine two or more cells located in the same row into a single cell. When cells with multiple values are merged, left most cell’s data will be the data of the merged cell.
You can do this by one of the following ways,
- Using “Merge Across” option in Merge & Center button under Alignment group of HOME Tab in ribbon.
- Using
mergeAcrossCellsmethod.
The following code example describes the behavior of merge Cells, merge & center and merge Across.
<div id="Spreadsheet"></div>$(function () {
$("#Spreadsheet").ejSpreadsheet({
// the datasource "window.defaultData" is referred from 'http://js.syncfusion.com/demos/web/scripts/xljsondata.min.js'
sheets: [{
rangeSettings: [{ dataSource: window.defaultData }],
}],
loadComplete: "loadComplete"
});
});
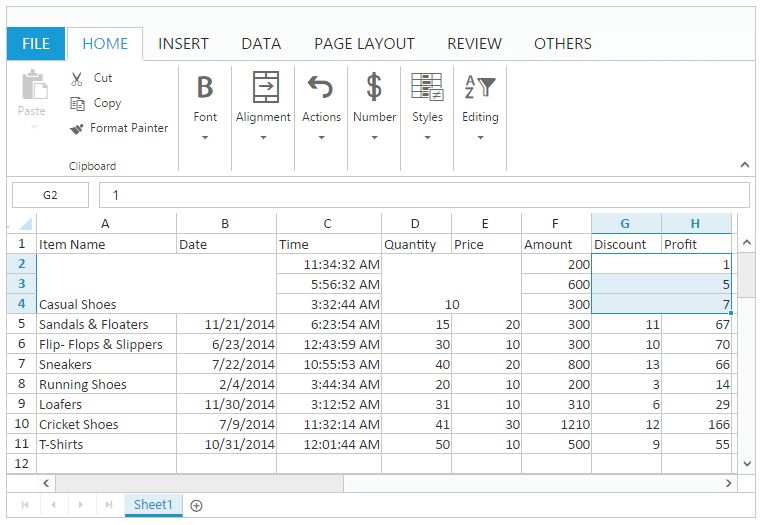
function loadComplete(args) {
if(!this.isImport) {
this.mergeCells("A2:B4", true);
this.mergeCenter = true;
this.mergeCells("D2:E4", true); // true is to prevent the alert message.
this.mergeAcrossCells("G2:H4", true); // true is to prevent the alert message.
}
}The following output is displayed as a result of the above code example.
Unmerge Cells
You can split the merged cell into multiple cells. You can do this by one of the following ways,
- Using “Unmerge cells” option in Merge & Center button under Alignment group of HOME Tab in ribbon.
- Using
unMergeCellsmethod.
The following code example describes the above behavior.
<div id="Spreadsheet"></div>$(function () {
$("#Spreadsheet").ejSpreadsheet({
// the datasource "window.defaultData" is referred from 'http://js.syncfusion.com/demos/web/scripts/xljsondata.min.js'
sheets: [{
rangeSettings: [{ dataSource: window.defaultData }],
}],
loadComplete: "loadComplete"
});
});
function loadComplete(args) {
if(!this.isImport) {
this.mergeCells("B2:C4", true); // true is to prevent the alert message.
this.unmergeCells("B2:C4");
}
}The following output is displayed as a result of the above code example.