- Overview
- System Requirements:
- Configuring Syncfusion Dashboard Viewer Component in ASP.NET Core 2.x Application:
- Adding Scripts and Style References
- Configuring Route
- Configuring Startup Class
- Binding Dashboard Service
- Configuring and Installing Syncfusion NuGet Packages in Visual Studio
- NuGet Installation
Contact Support
ASP.NET Core 2.x Application
Overview
Dashboard Viewer can be embedded within your ASP.NET Core 2.x Web application through Syncfusion Dashboard Platform SDK.
System Requirements:
To work with ASP.NET Core 2.x, you need to make sure that you have installed the following software on your machine
Configuring Syncfusion Dashboard Viewer Component in ASP.NET Core 2.x Application:
The following steps helps you to create an ASP.NET Core 2.x web application to embed your Dashboard Viewer component.
- Open Visual Studio 2017 or higher to create ASP.NET 2.x Core web application.
fromFile | New | Projectand save it with a meaningful name as shown below (Select the .NET Core option, which is available by default in the listed Templates on the left side pane in the new project

Now select the web application(Model-View-Controller) and select the ASP.NET Core Version as in the below image

Refer here for more details for getting started with ASP.NET Core.
- After project creation, open your project file(csproj) to add our Syncfusion assembly packages (highlighted below).To open your project
file right click on the project file in Visual Studio and click the option Edit application.csproj
<PackageReference Include="Syncfusion.EJ.DashboardViewer.AspNet.Core" Version="3.2.0.69" />Adding Scripts and Style References
Create a new folder say, dashboard under wwwroot folder.
NOTE
Default project template consists of the
wwwrootfolder.
Copy the required scripts, themes and fonts into wwwroot\dashboard folder in your new ASP.NET Core 2.x Web application for rendering the ejDashboardViewer.
These can be availed from the Dashboard Platform SDK build installed location mentioned below:
%localappdata%\Syncfusion\Dashboard Platform SDK\Getting Started Samples\Common\Html

Now open _ViewImports.cshtml file from the Views folder and add the following namespace for components references and Tag Helper support.
@using Syncfusion.Dashboard.JavaScript

   @using Syncfusion.Dashboard.JavaScript.Models

   @addTagHelper"*, Syncfusion.EJ.DashboardViewer.AspNet.Core"
Refer the necessary scripts and CSS files in your _Layout.cshtml page from wwwroot -> dashboard folder.
<!DOCTYPE html>
<html>
<head>
    <meta charset="utf-8" />
    <meta name="viewport" content="width=device-width, initial-scale=1.0" />
    <title>AspNetCore - DashboardViewer</title>
	    <link rel="stylesheet" href="~/dashboard/themes/default-theme/bootstrap.min.css" />
        <link rel="stylesheet" href="~/dashboard/themes/default-theme/ej.dashboardViewer.all.min.css" />
        <script src="~/dashboard/scripts/jquery-1.10.2.min.js"></script>
		<script src="~/dashboard/scripts/jquery.easing.1.3.min.js"></script>
        <script src="~/dashboard/scripts/ej.dashboardViewer.all.min.js"></script>
</head>
</html>
Add ScriptManager to the bottom of the _Layout.cshtml page. The ScriptManager is used to place our control initialization script in the page.
<body style="height:100%;width:100%;padding:0;">
    <div class="container body-content" style="height:100%;width:100%;">
        @RenderBody()
        <ej-script-manager></ej-script-manager>
    </div>
    @RenderSection("scripts", required: false)
</body>- Now open your view page to render our Syncfusion Dashboard Viewer component in Tag Helper syntax.
@{
    ViewData["Title"] = "DashboardViewer ASP.NET CORE 2.x Support";
    }
   <style>

    body,  html,#dashboard {
            overflow: hidden !important;
            height:100%;
            width:100%;
        }

   </style>
   <ej-dashboardviewer id="dashboard" service-url="https://dashboardsdk.syncfusion.com/DashboardService/DashboardService.svc" dashboard-path="https://dashboardsdk.syncfusion.com//Dashboards//WorldWideCarSalesDashboard.sydx" ></ej-dashboardviewer>
NOTE
Provided online Dashboard Service URL and Dashboard Path are for demo purpose.
Make sure the given dashboard path should be accessible with the given Dashboard Service URL.
Configuring Route
In the Startup.cs file inside the method configure use the below code to configure the route
public void Configure(IApplicationBuilder app, IHostingEnvironment env, ILoggerFactory loggerFactory)
        {
            loggerFactory.AddConsole(Configuration.GetSection("Logging"));
            loggerFactory.AddDebug();

            if (env.IsDevelopment())
            {
                app.UseDeveloperExceptionPage();
                app.UseBrowserLink();
            }
            else
            {
                app.UseExceptionHandler("/Home/Error");
            }

            app.UseStaticFiles();

            app.UseMvc(routes =>
            {
                routes.MapRoute(
                    name: "default",
                    template: "{controller=Home}/{action=Index}/{id?}");
            });
        }
Configuring Startup Class
ASP.NET Core app uses startup class so in the program.cs file make the below code changes
public static void Main(string[] args)
        {
            var host = new WebHostBuilder()
                .UseKestrel()
                .UseContentRoot(Directory.GetCurrentDirectory())
                .UseIISIntegration()
                .UseStartup<Startup>()
                .Build();

            host.Run();
        }
Binding Dashboard Service
To initiate the dashboard service instance you can follow anyone of the below methods
IMPORTANT
Hosting dashboard service at IIS is recommended for the production environment for object management and other memory management features.
-
Finally compile your project. After successful compilation, press
F5key to deploy your project.
Configuring and Installing Syncfusion NuGet Packages in Visual Studio
NuGet Configuration
The steps to install the Syncfusion Dashboard ASP.NET Core NuGet Packages in Visual Studio are as follows,
-
In Visual Studio, navigate to
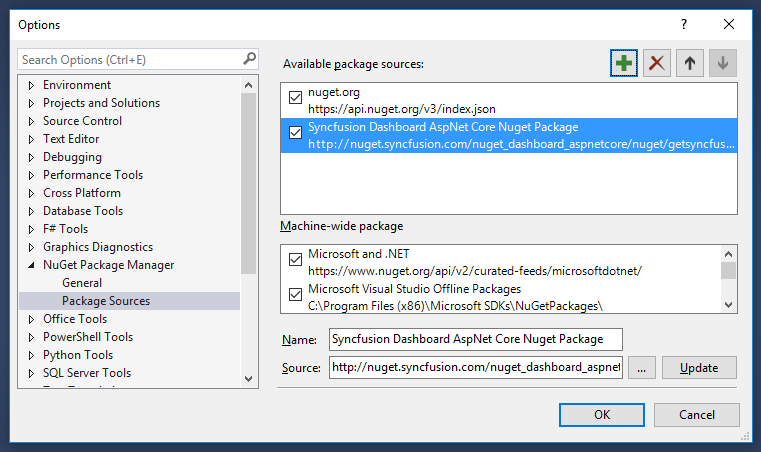
Tools | NuGet Package Manager | Package Manager Settings, the options dialog will appear on the screen as shows below,
-
Select
NuGet Package Manager | Package Sourcesand clickAddbutton to add thePackage NameandPackage Sourceof Syncfusion Dashboard NuGet Packages.
Name: Name of the package that listed in Available package sources
Source: Syncfusion Dashboard ASP.NET Core NuGet Package feed [URL]
(http://nuget.syncfusion.com/nuget_dashboard_aspnetcore/nuget/getsyncfusionpackages/dashboard/aspnetcore/)

NuGet Installation
Syncfusion ASP.NET Core NuGet can install once configured the package source. The NuGet installation steps as below,
-
Once configured the Package source with Syncfusion NuGet Packages, right click on project and choose
Manage NuGet Packages | Browse.
-
The NuGet Packages are listed which are available in package source location. Install the required packages to your application by clicking
Installbutton. -
Now you can find the installed NuGet package under the
Installedtab list as shown below.
