- Overview
- Getting started
- Creating an Aurelia Application with Dashboard Viewer Wrapper
- Binding Dashboard Service
- Initializing Dashboard Viewer
- Running the application
Contact Support
Aurelia
Overview
Syncfusion Dashboard Platform SDK includes Aurelia wrapper for DashboardViewer. The properties of DashboardViewer are defined as attributes for Aurelia component, so you can easily set value to its properties, simply by prefixing property name with e- in component markup.
Getting started
This section guides you to create a web application using Aurelia Framework with DashboardViewer widget wrapper.
Creating an Aurelia Application with Dashboard Viewer Wrapper
-
Create a folder
testapp. -
Copy the contents of
aurelia appfolder into your newly createdtestappfolder from Dashboard Platform SDK build installed location mentioned below.
%localappdata%\Syncfusion\Dashboard\Samples\JavaScript\aurelia app
- Clear the contents of
src/dashboardviewerfolder (srcfolder is present inside thetestappfolder).
Binding Dashboard Service
To initiate the dashboard service instance you can follow anyone of the below methods
IMPORTANT
Hosting dashboard service at IIS is recommended for the production environment for object management and other memory management features.
Initializing Dashboard Viewer
- Create
dashboardviewer.htmlview file insidesrc/dashboardviewerfolder and render ejDashboardViewer Aurelia component using the below code example.
<template>
    <require from="./dashboardviewer.css"></require>
        <div id="dashboardsample">
            <section>
                <div class="row">
                    <div>
                         <ej-dashboard-viewer  id=dashboard e-service-url.bind="url" e-dashboard-path.bind="dashboardPath" e-size.bind="size">
                         </ej-dashboard-viewer>
                    </div>
                </div>
            </section>
        </div>
</template>- Create
dashboardviewer.jsfile insidesrc/dashboardviewerfolder and populate the properties with respective values as in the below code example.
export class BasicUse {
    constructor() {
      this.url = ' https://dashboardsdk.syncfusion.com/DashboardService/DashboardService.svc';
      this.dashboardPath = 'https://dashboardsdk.syncfusion.com//Dashboards//WorldWideCarSalesDashboard.sydx';
      this.size = {width: '100%', height: '100%'};
    }
}
NOTE
Provided online Dashboard Service URL and Dashboard Path are for demo purpose.
Make sure the given dashboard path should be accessible with the given Dashboard Service URL.
- Create
dashboardviewer.cssfile insidesrc/dashboardviewerfolder and add the below code example.
body, html, #dashboard, ej-dashboard-viewer {
            overflow: hidden !important;
	    width: 100%! important;
	    height: 100%!important;
}- Create
index.jsfile insidesrc/dashboardviewerfolder and add the below code example.
import {useView, inject} from 'aurelia-framework';
import {Registry} from 'shared/registry';
@useView('shared/showcase.html')
@inject(Registry)
export class Index {
    constructor(registry) {
        this.registry = registry;
    }
    configureRouter(config, router) {
        this.router = router;
        return this.registry.load(config, 'dashboardviewer');
    }
}- Create
registry.jsonfile insidesrc/dashboardviewerfolder for route configurations and add the below code example.
{
  "title": "DashboardViewer",
  "documentation":"https://help.syncfusion.com/dashboard-platform/dashboard-sdk/ejdashboardviewer",
  "samples": {
     "default":{
       "files": ["html", "js","css"],
       "default": "true"
      }
   }
}
Running the application
Open Command Prompt window and navigate to “testapp” folder and type the below commands to install the required packages and run the Aurelia application.
> npm install
> npm install jspm -global
> jspm install
> “copy.bat”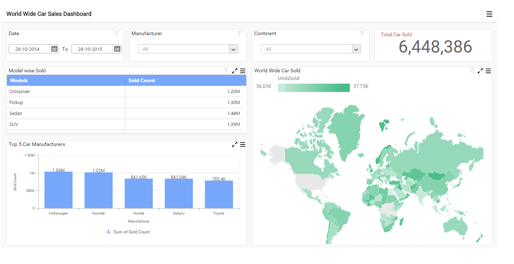
> gulp watch- Browse to http://localhost:9000 to see the application. The dashboard gets rendered as like in the below screenshot.