How can I help you?
Getting Started with ASP.NET Core TreeView
This section briefly explains how to create a tree view in the ASP.NET Core platform.
Create your first tree view in ASP.NET Core
Create an ASP.NET Core project and add the Syncfusion assembly packages, CSS, and scripts with the help of the given ASP.NET Core-Getting Started documentation. After the project creation, create a tree view in the following ways.
Tree view using helper element
Create a tree using the Items API of tree view control. Here, it is not necessary to use a data source for rendering tree view.
In the view page, add the tree view helper as shown in the following. It will render the tree view with specified items.
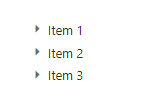
<ej-tree-view id="tree">
            <e-tree-view-items>
                <e-tree-view-item text="Item 1">
                    <e-tree-view-child-items>
                        <e-tree-view-child-item text="Item 1.1">
                            <e-tree-view-child-items>
                                <e-tree-view-child-item text="Item 1.1.1">
                                </e-tree-view-child-item>
                            </e-tree-view-child-items>
                        </e-tree-view-child-item>
                    </e-tree-view-child-items>
                </e-tree-view-item>
                <e-tree-view-item text="Item 2">
                    <e-tree-view-child-items>
                        <e-tree-view-child-item text="Item 2.1"></e-tree-view-child-item>
                        <e-tree-view-child-item text="Item 2.2"></e-tree-view-child-item>
                    </e-tree-view-child-items>
                </e-tree-view-item>
                <e-tree-view-item text="Item 3">
                    <e-tree-view-child-items>
                        <e-tree-view-child-item text="Item 3.1"></e-tree-view-child-item>
                    </e-tree-view-child-items>
                </e-tree-view-item>
            </e-tree-view-items>
        </ej-tree-view>
By running the previous code, you will get output like the following image:
Render tree view using razor syntax
Create a tree using the Items API of tree view control. Here, it is not necessary to use a data source for rendering tree view.
In the view page, add the tree view as shown in the following. It will render the tree view with specified items.
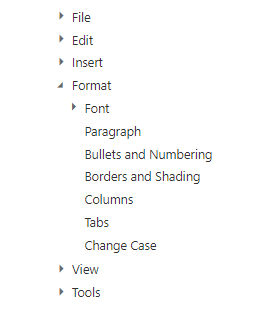
@{Html.EJ().TreeView("tree").Items(items =>
        {
            items.Add().Text("File").Children(child =>
            {
                child.Add().Text("New");
                child.Add().Text("Open");
                child.Add().Text("Save");
                child.Add().Text("Save As");
                child.Add().Text("Print Preview");
                child.Add().Text("Print");
                child.Add().Text("Close");
            });
            items.Add().Text("Edit").Children(child =>
            {
                child.Add().Text("Undo");
                child.Add().Text("Redo");
                child.Add().Text("Cut");
                child.Add().Text("Copy");
                child.Add().Text("Paste");
            });
            items.Add().Text("Insert").Children(child =>
            {
                child.Add().Text("Page Numbers");
                child.Add().Text("Table");
                child.Add().Text("Picture");
                child.Add().Text("Comment");
                child.Add().Text("Links");
                child.Add().Text("Symbols");
                child.Add().Text("Diagram");
                child.Add().Text("TextBox");
                child.Add().Text("Data Time");
            });
            items.Add().Text("Format").Expanded(true).Children(child =>
            {
                child.Add().Text("Font").Children(child1 =>
                {
                    child1.Add().Text("Arial");
                    child1.Add().Text("Arial Black");
                    child1.Add().Text("Arial Narrow");
                    child1.Add().Text("Courier");
                    child1.Add().Text("Georgia");
                    child1.Add().Text("Times New Roman");
                    child1.Add().Text("Verdana");
                    child1.Add().Text("Helvetica");
                    child1.Add().Text("Impact");
                });
                child.Add().Text("Paragraph");
                child.Add().Text("Bullets and Numbering");
                child.Add().Text("Borders and Shading");
                child.Add().Text("Columns");
                child.Add().Text("Tabs");
                child.Add().Text("Change Case");
            });
            items.Add().Text("View").Children(child =>
            {
                child.Add().Text("Normal");
                child.Add().Text("Web Layout");
                child.Add().Text("Print Layout");
                child.Add().Text("Task Pane");
            });
            items.Add().Text("Tools").Children(child =>
            {
                child.Add().Text("Spelling and Grammar");
                child.Add().Text("Research");
                child.Add().Text("Language");
                child.Add().Text("Word Count");
                child.Add().Text("Track Changes");
                child.Add().Text("Merge Documents");
            });
        }).Render();}
By running the previous code, you will get output like the following image:
Tree view using data binding
Another way of creating tree view is by binding with the data source. You can bind a local data source to create a tree view.
The beforeLoad event will be triggered before loading nodes into TreeView.
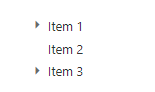
Render the tree view with a local data source.
In the model page, specify the tree view node properties as shown in the following:
public class LoadData
    {
        public int Id { get; set; }
        public int Parent { get; set; }
        public string Text { get; set; }
    }
In the controller page, create a data list that contains the details about the tree nodes.
public partial class TreeViewController : Controller
    {
        List<LoadData> load = new List<LoadData>();
        public ActionResult TreeViewFeatures()
        {
            load.Add(new LoadData { Id = 1, Parent = 0, Text = "Item 1" });
            load.Add(new LoadData { Id = 2, Parent = 0, Text = "Item 2" });
            load.Add(new LoadData { Id = 3, Parent = 0, Text = "Item 3" });
            load.Add(new LoadData { Id = 4, Parent = 1, Text = "Item 1.1" });
            load.Add(new LoadData { Id = 5, Parent = 1, Text = "Item 1.2" });
            load.Add(new LoadData { Id = 6, Parent = 3, Text = "Item 3.1" });
            ViewBag.datasource = load;
            return View();
        }
    }
Data from controller part can be directly assigned to the DataSource property and you can map data fields with respect to the mapper field in order to form the tree view.
<ej-tree-view id="tree1">
        <e-tree-view-fields datasource="@ViewBag.datasource" id="Id" parent-id="Parent" text="Text">
		</e-tree-view-fields>
    </ej-tree-view>
By running the previous code, you will get results like the following image:
Create instance for tree view
Create an instance for an existing tree view in the following ways. Once a reference has been established, you can use the API’s of tree view to control its behavior.
<script type="text/javascript">
        //Specify this after your TreeView creation
        //create instance for TreeView
        var treeObj = $("#treeView").ejTreeView('instance');
        //or
        var treeObj1 = $("#treeView").data("ejTreeView");
    </script>
NOTE
To configure the API settings after tree view creation, please refer to the API configuration, Invoking Methods.
Tree view events
ASP.NET Core tree view supports all the events available in EJ tree view. Refer to the following code example to specify an event using the tag helper of tree view.
<ej-tree-view id="tree1" node-expand="onNodeExpanded" node-collapse="onNodeCollapsed" node-select="onNodeSelected">
        <e-tree-view-fields datasource="@ViewBag.datasource" id="Id" parent-id="Parent" text="Text">
		</e-tree-view-fields>
    </ej-tree-view>

    <script type="text/javascript">
        function onNodeCollapsed(args) {
            //Handle the node collapse event
        }

        function onNodeExpanded(args) {
            //Handle the node expand event
        }

        function onNodeSelected(args) {
            //Handle the node select event
        }
    </script>