Day View in UWP Scheduler
DayView is used to display a single day, current day will be visible by default. Appointments on a specific day will be arranged in respective timeslots based on its duration.
ViewHeader Appearance
You can customize the default appearance of view header in DayView by using DayViewHeaderStyle and DayViewHeaderHeight properties of SfSchedule.
<Schedule:SfSchedule x:Name="schedule" ScheduleType="Day">
            <Schedule:SfSchedule.DayViewHeaderStyle>
                <Schedule:ScheduleDayViewHeaderStyle
                    DayViewHeaderBackground="Red"
                    DayViewHeaderFontFamily="Arial"
                    DayViewHeaderHeight="50"
                    DayViewHeaderTextColor="White"
                    DayViewHeaderTextSize="15" />
            </Schedule:SfSchedule.DayViewHeaderStyle>
        </Schedule:SfSchedule>
SfSchedule schedule = new SfSchedule();
schedule.ScheduleType = ScheduleType.Day;
ScheduleDayViewHeaderStyle dayViewHeaderStyle = new ScheduleDayViewHeaderStyle();
dayViewHeaderStyle.DayViewHeaderTextColor = new SolidColorBrush(Colors.White);
dayViewHeaderStyle.DayViewHeaderFontFamily = new FontFamily("Arial");
dayViewHeaderStyle.DayViewHeaderHeight = 50;
dayViewHeaderStyle.DayViewHeaderTextSize = 15;
dayViewHeaderStyle.DayViewHeaderBackground = new SolidColorBrush(Colors.Red);
schedule.DayViewHeaderStyle = dayViewHeaderStyle;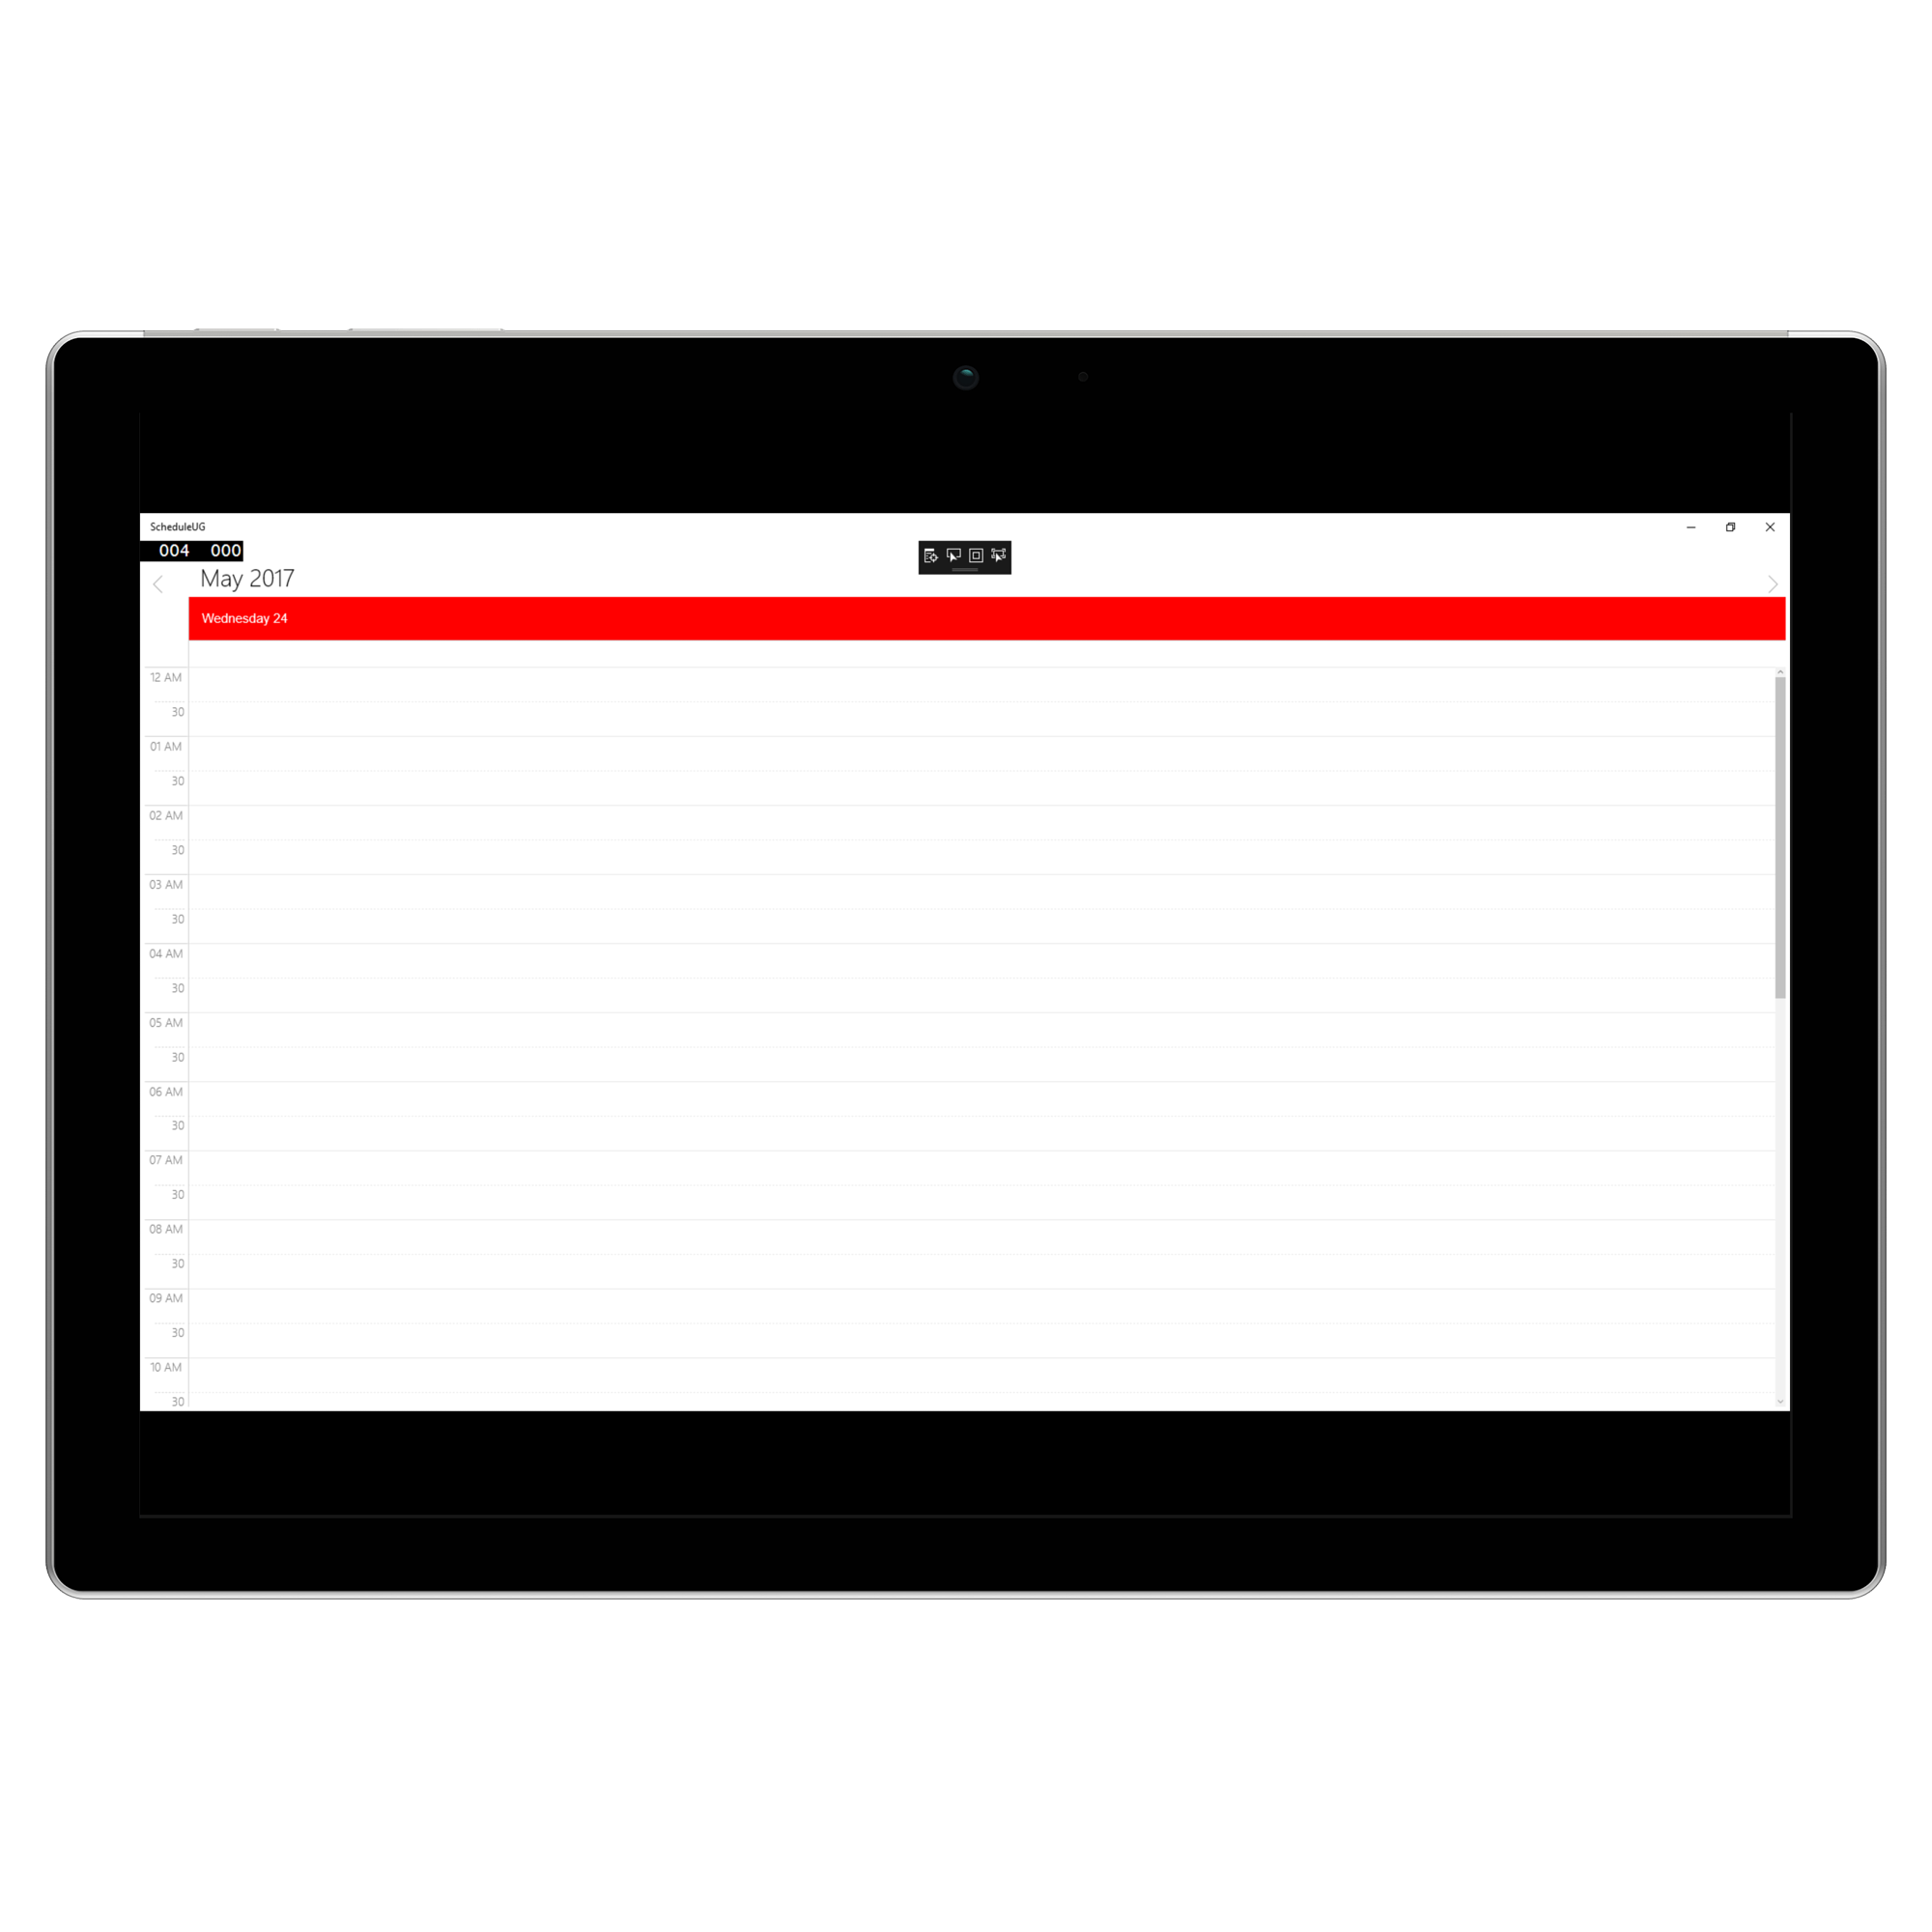
Change Time Interval
You can customize the interval of timeslots in DayView.
TimeInterval customization
You can customize the interval of timeslots in DayView by setting TimeInterval property of SfSchedule.
schedule.ScheduleType = ScheduleType.Day;
            schedule.TimeInterval = TimeInterval.ThirtyMin;
<Schedule:SfSchedule x:Name="schedule" TimeInterval="ThirtyMin" />
CustomTimeInterval
You can customize the interval of timeslots in DayView by setting CustomTimeInterval property of SfSchedule.
schedule.ScheduleType = ScheduleType.Day;
            schedule.TimeInterval = TimeInterval.Custom;
            schedule.CustomTimeInterval = 120;
<Schedule:SfSchedule
x:Name="schedule"
CustomTimeInterval="120"
TimeInterval="Custom" />
Change Working hours
Working hours in DayView of Schedule control will be differentiated with non-working hours by separate color. By default, working hours will be between 09 to 18. You can customize the working hours by setting WorkStartHour and WorkEndHour properties of SfSchedule.
schedule.IsHighLightWorkingHours = true;
            schedule.ScheduleType = ScheduleType.Day;
            schedule.WorkStartHour = 10;
            schedule.WorkEndHour = 18;
            schedule.NonWorkingHourBrush = new SolidColorBrush(Colors.LightGray);
<Schedule:SfSchedule
x:Name="schedule"
IsHighLightWorkingHours="True"
NonWorkingHourBrush="LightGray"
ScheduleType="Day"
WorkEndHour="18"
WorkStartHour="10" />
Note:
WorkStartHourandWorkEndHourshould be in integer value to represent hours.
Timeslot Appearance
You can customize the appearance of the Timeslot by its color using MajorTickStroke, MinorTickStroke, DayViewVerticalLineStroke, MajorTickStrokeDashArray, MinorTickStrokeDashArray, IsHighLightWorkingHours, WorkStartHour , WorkEndHour and NonWorkingHourBrush properties of SfSchedule.
schedule.ScheduleType = ScheduleType.Day;
            schedule.MajorTickStroke = new SolidColorBrush(Colors.Red);
            schedule.MinorTickStroke = new SolidColorBrush(Colors.Green);
            schedule.DayViewVerticalLineStroke = new SolidColorBrush(Colors.Blue);
            schedule.MajorTickStrokeDashArray = new DoubleCollection() { 5, 10 };
            schedule.MinorTickStrokeDashArray = new DoubleCollection() { 10, 10 };
            schedule.IsHighLightWorkingHours = true;
            schedule.WorkStartHour = 9;
            schedule.WorkEndHour = 18;
            schedule.NonWorkingHourBrush = new SolidColorBrush(Colors.LightBlue);
<Schedule:SfSchedule
x:Name="schedule"
DayViewVerticalLineStroke="Blue"
IsHighLightWorkingHours="True"
MajorTickStroke="Red"
MajorTickStrokeDashArray="5,10"
MinorTickStroke="Green"
MinorTickStrokeDashArray="5,5"
NonWorkingHourBrush="LightBlue"
WorkEndHour="18"
WorkStartHour="9" />
Non-Accessible timeslots
You can restrict or allocate certain timeslot as non-accessible blocks by using NonAccessibleBlocks of SfSchedule, so that you can allocate those timeslots for predefined events/activities like Lunch hour.
schedule.ScheduleType = ScheduleType.Day;
            schedule.NonAccessibleBlocks.Add(new NonAccessibleBlock()
            {
                Background = new SolidColorBrush(Colors.LightPink),
                StartHour = 6.00,
                EndHour = 8.00,
                Label = "Non Accessible Block"
            });
<Schedule:SfSchedule x:Name="schedule" ScheduleType="Day">
<Schedule:SfSchedule.NonAccessibleBlocks>
<Schedule:NonAccessibleBlock
Background="LightPink"
EndHour="8.00"
Label="Non Accessible Block"
StartHour="6.00" />
</Schedule:SfSchedule.NonAccessibleBlocks>
</Schedule:SfSchedule>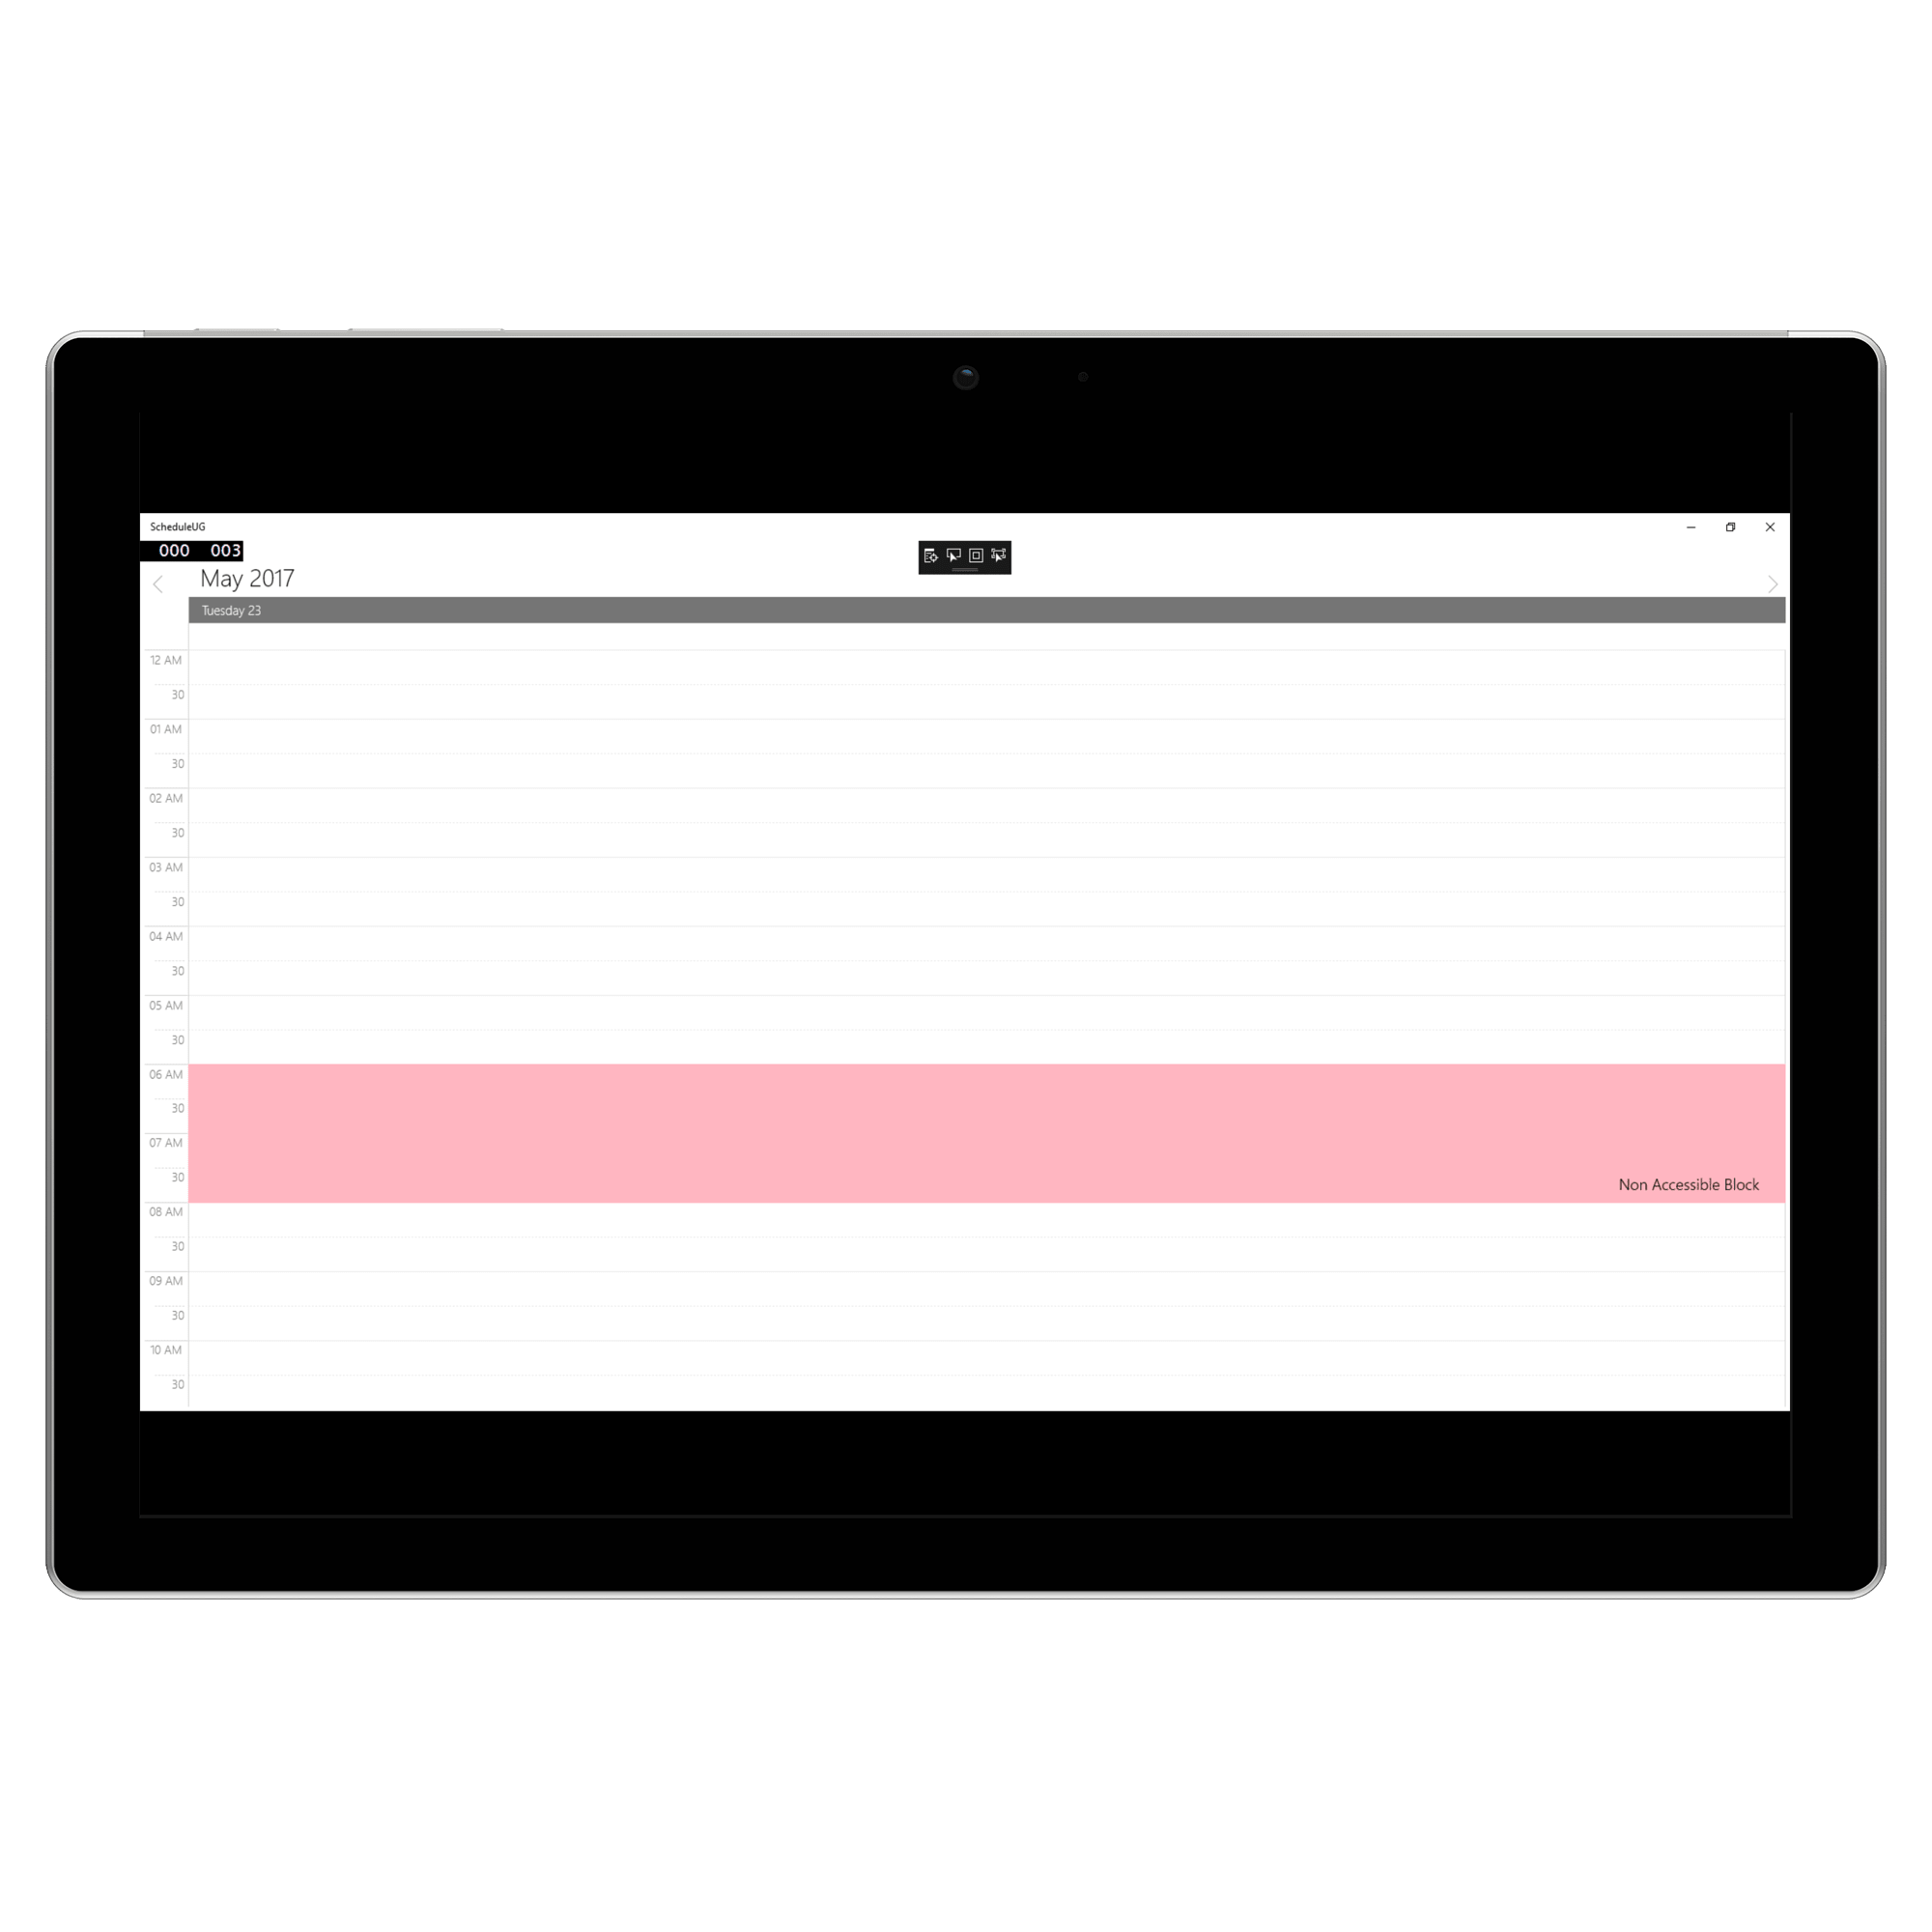
Note:
Selection and related events will not be working in this blocks.
Change first day of week:
Scheduler supports to change the first day of week by using the FirstDayOfWeek property and it is not applicable for DayView as it displays only one day.
Time Label Formatting
You can customize the format for the labels which are mentioning the time, by setting MajorTickTimeFormat and MinorTickTimeFormat properties of ` SfSchedule`.
schedule.ScheduleType = ScheduleType.Day;
            schedule.MajorTickTimeFormat = "hh:mm tt";
            schedule.MinorTickTimeFormat = "mm";
<Schedule:SfSchedule
x:Name="schedule"
MajorTickTimeFormat="hh:mm tt"
MinorTickTimeFormat="mm"
ScheduleType="Day" />
Time Label Appearance
You can customize the color for the labels which are mentioning the time, by setting MajorTickLabelStroke and MinorTickLabelStroke properties of ` SfSchedule`.
schedule.ScheduleType = ScheduleType.Day;
            schedule.MajorTickLabelStroke = new SolidColorBrush(Colors.Blue);
            schedule.MinorTickLabelStroke = new SolidColorBrush(Colors.Blue);
<Schedule:SfSchedule
x:Name="schedule"
MajorTickLabelStroke="Blue"
MinorTickLabelStroke="Blue"
ScheduleType="Day" />
Selection
You can customize the default appearance of selection UI in the timeslots.
Selection customization using style
You can customize the timeslot selection by using ScheduleSelectionStyle property of SfSchedule.
schedule.ScheduleType = ScheduleType.Day;
            ScheduleSelectionStyle selectionStyle = new ScheduleSelectionStyle();
            selectionStyle.Background = new SolidColorBrush(Colors.Blue);
            selectionStyle.BorderBrush = new SolidColorBrush(Colors.Black);
            selectionStyle.BorderThickness = new Thickness(5);
            selectionStyle.BorderCornerRadius = new CornerRadius(5);
            schedule.ScheduleSelectionStyle = selectionStyle;
<Schedule:SfSchedule x:Name="schedule" ScheduleType="Day">
<Schedule:SfSchedule.ScheduleSelectionStyle>
<Schedule:ScheduleSelectionStyle
Background="Blue"
BorderBrush="Black"
BorderCornerRadius="5"
BorderThickness="5" />
</Schedule:SfSchedule.ScheduleSelectionStyle>
</Schedule:SfSchedule>
Selection customization using custom View
You can replace the default selection UI with your custom view by setting SelectionView property of SfSchedule.
schedule.ScheduleType = ScheduleType.Day;
            Button selectionView = new Button();
            selectionView.Content = "+NewEvent";
            selectionView.Background = new SolidColorBrush(Colors.BlueViolet);
            schedule.SelectionView = selectionView;
<Schedule:SfSchedule x:Name="schedule" ScheduleType="Day">
<Schedule:SfSchedule.SelectionView>
<Button Background="BlueViolet" Content="+NewEvent" />
</Schedule:SfSchedule.SelectionView>
</Schedule:SfSchedule>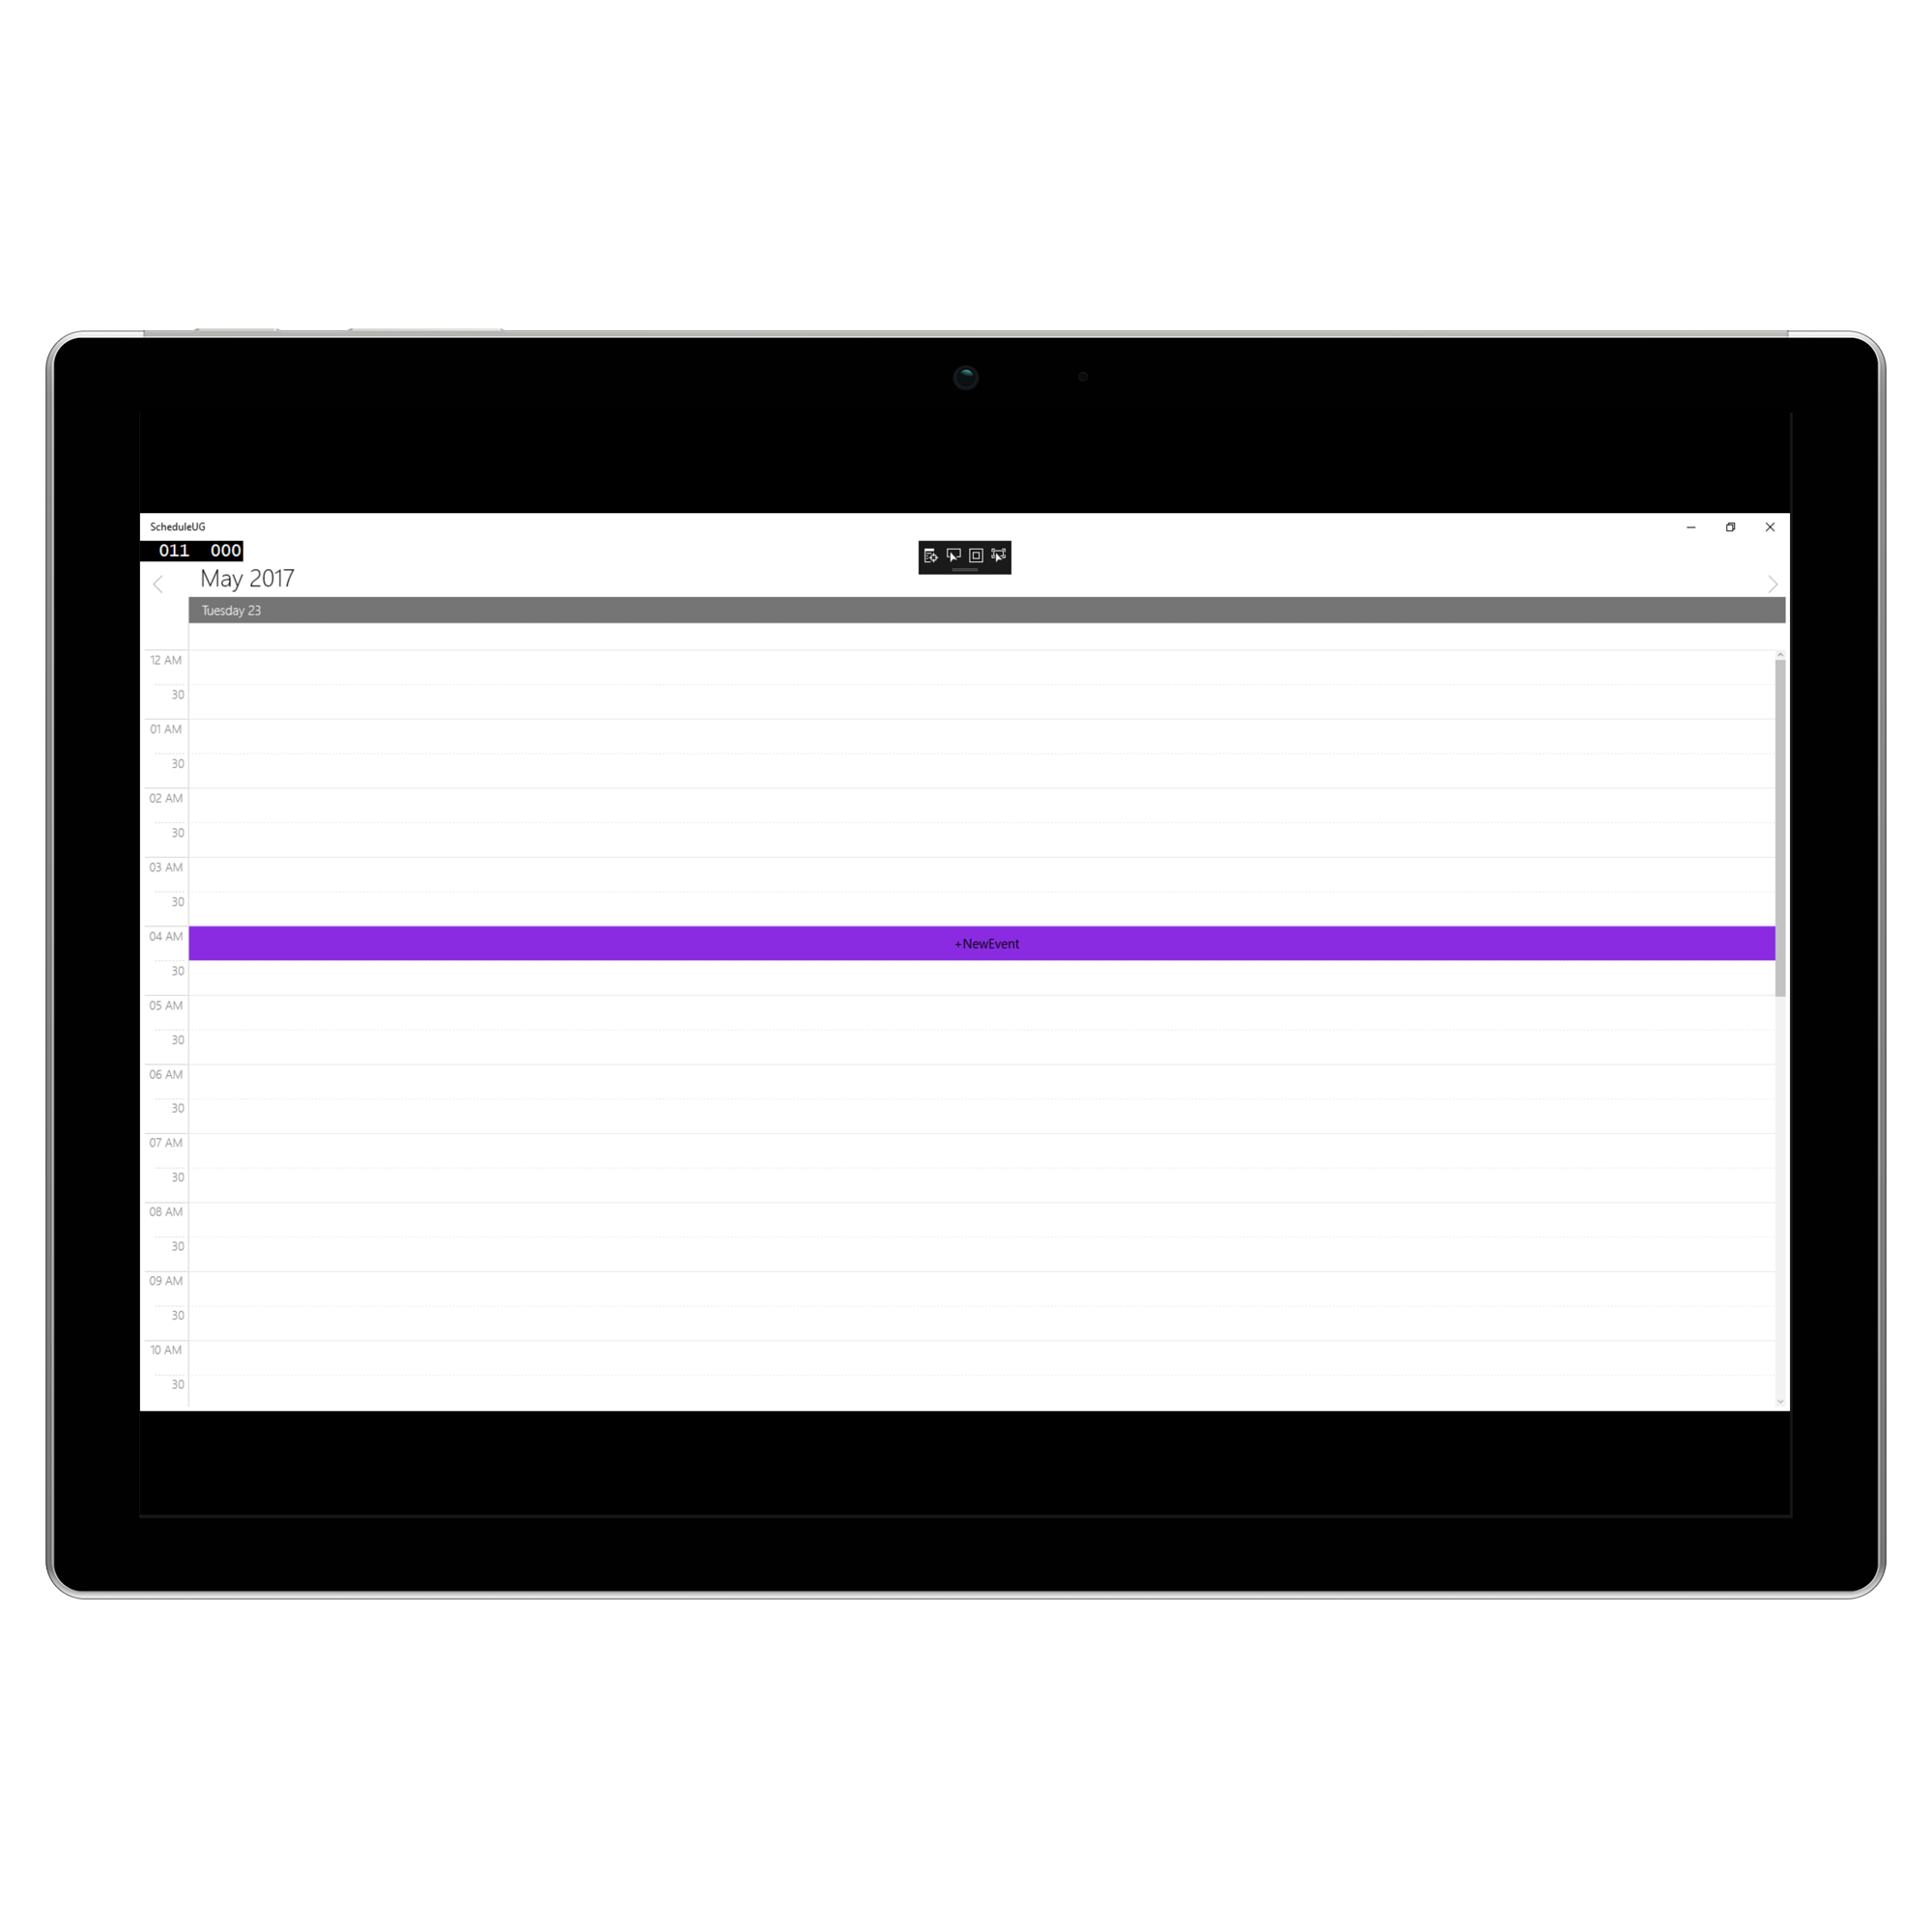
Note:
Selection customization is applicable for time slots alone.
Configuration Resources
The Schedule control allows you to define resources that can be assigned to appointments. Resources let you associate additional information with your appointments. The schedule can group appointments based on the resources associated with them.
Adding resource
Resource can be added to the schedule control by setting Resource and ScheduleResourceTypeCollection of SfSchedule. After that add the ResourceType for ScheduleResourceTypeCollection and assign Resource to ResourceType.
//setting resource for schedule
            schedule.Resource = "Doctor";
            //Creating Appointment style
            ResourceType resourceType = new ResourceType { TypeName = "Doctor" };
            resourceType.ResourceCollection.Add(new Resource { DisplayName = "Dr.Jacob", ResourceName = "Dr.Jacob", });
            resourceType.ResourceCollection.Add(new Resource { DisplayName = "Dr.Darsy", ResourceName = "Dr.Darsy" });
            schedule.DayHeaderOrder = DayHeaderOrder.OrderByDate;
            //setting resource type
            schedule.ScheduleResourceTypeCollection = new ObservableCollection<ResourceType> { resourceType };
<syncfusion:SfSchedule Name="schedule" Resource="Doctors">
<syncfusion:SfSchedule.ScheduleResourceTypeCollection>
<syncfusion:ResourceType TypeName="Doctors">
<syncfusion:Resource
DisplayName="Dr.Jacob John, M.D "
ResourceName="Dr.Jacob" />
<syncfusion:Resource
DisplayName="Dr.Darsy Mascio, M.D"
ResourceName="Dr.Darsy" />
</syncfusion:ResourceType>
</syncfusion:SfSchedule.ScheduleResourceTypeCollection>
</syncfusion:SfSchedule>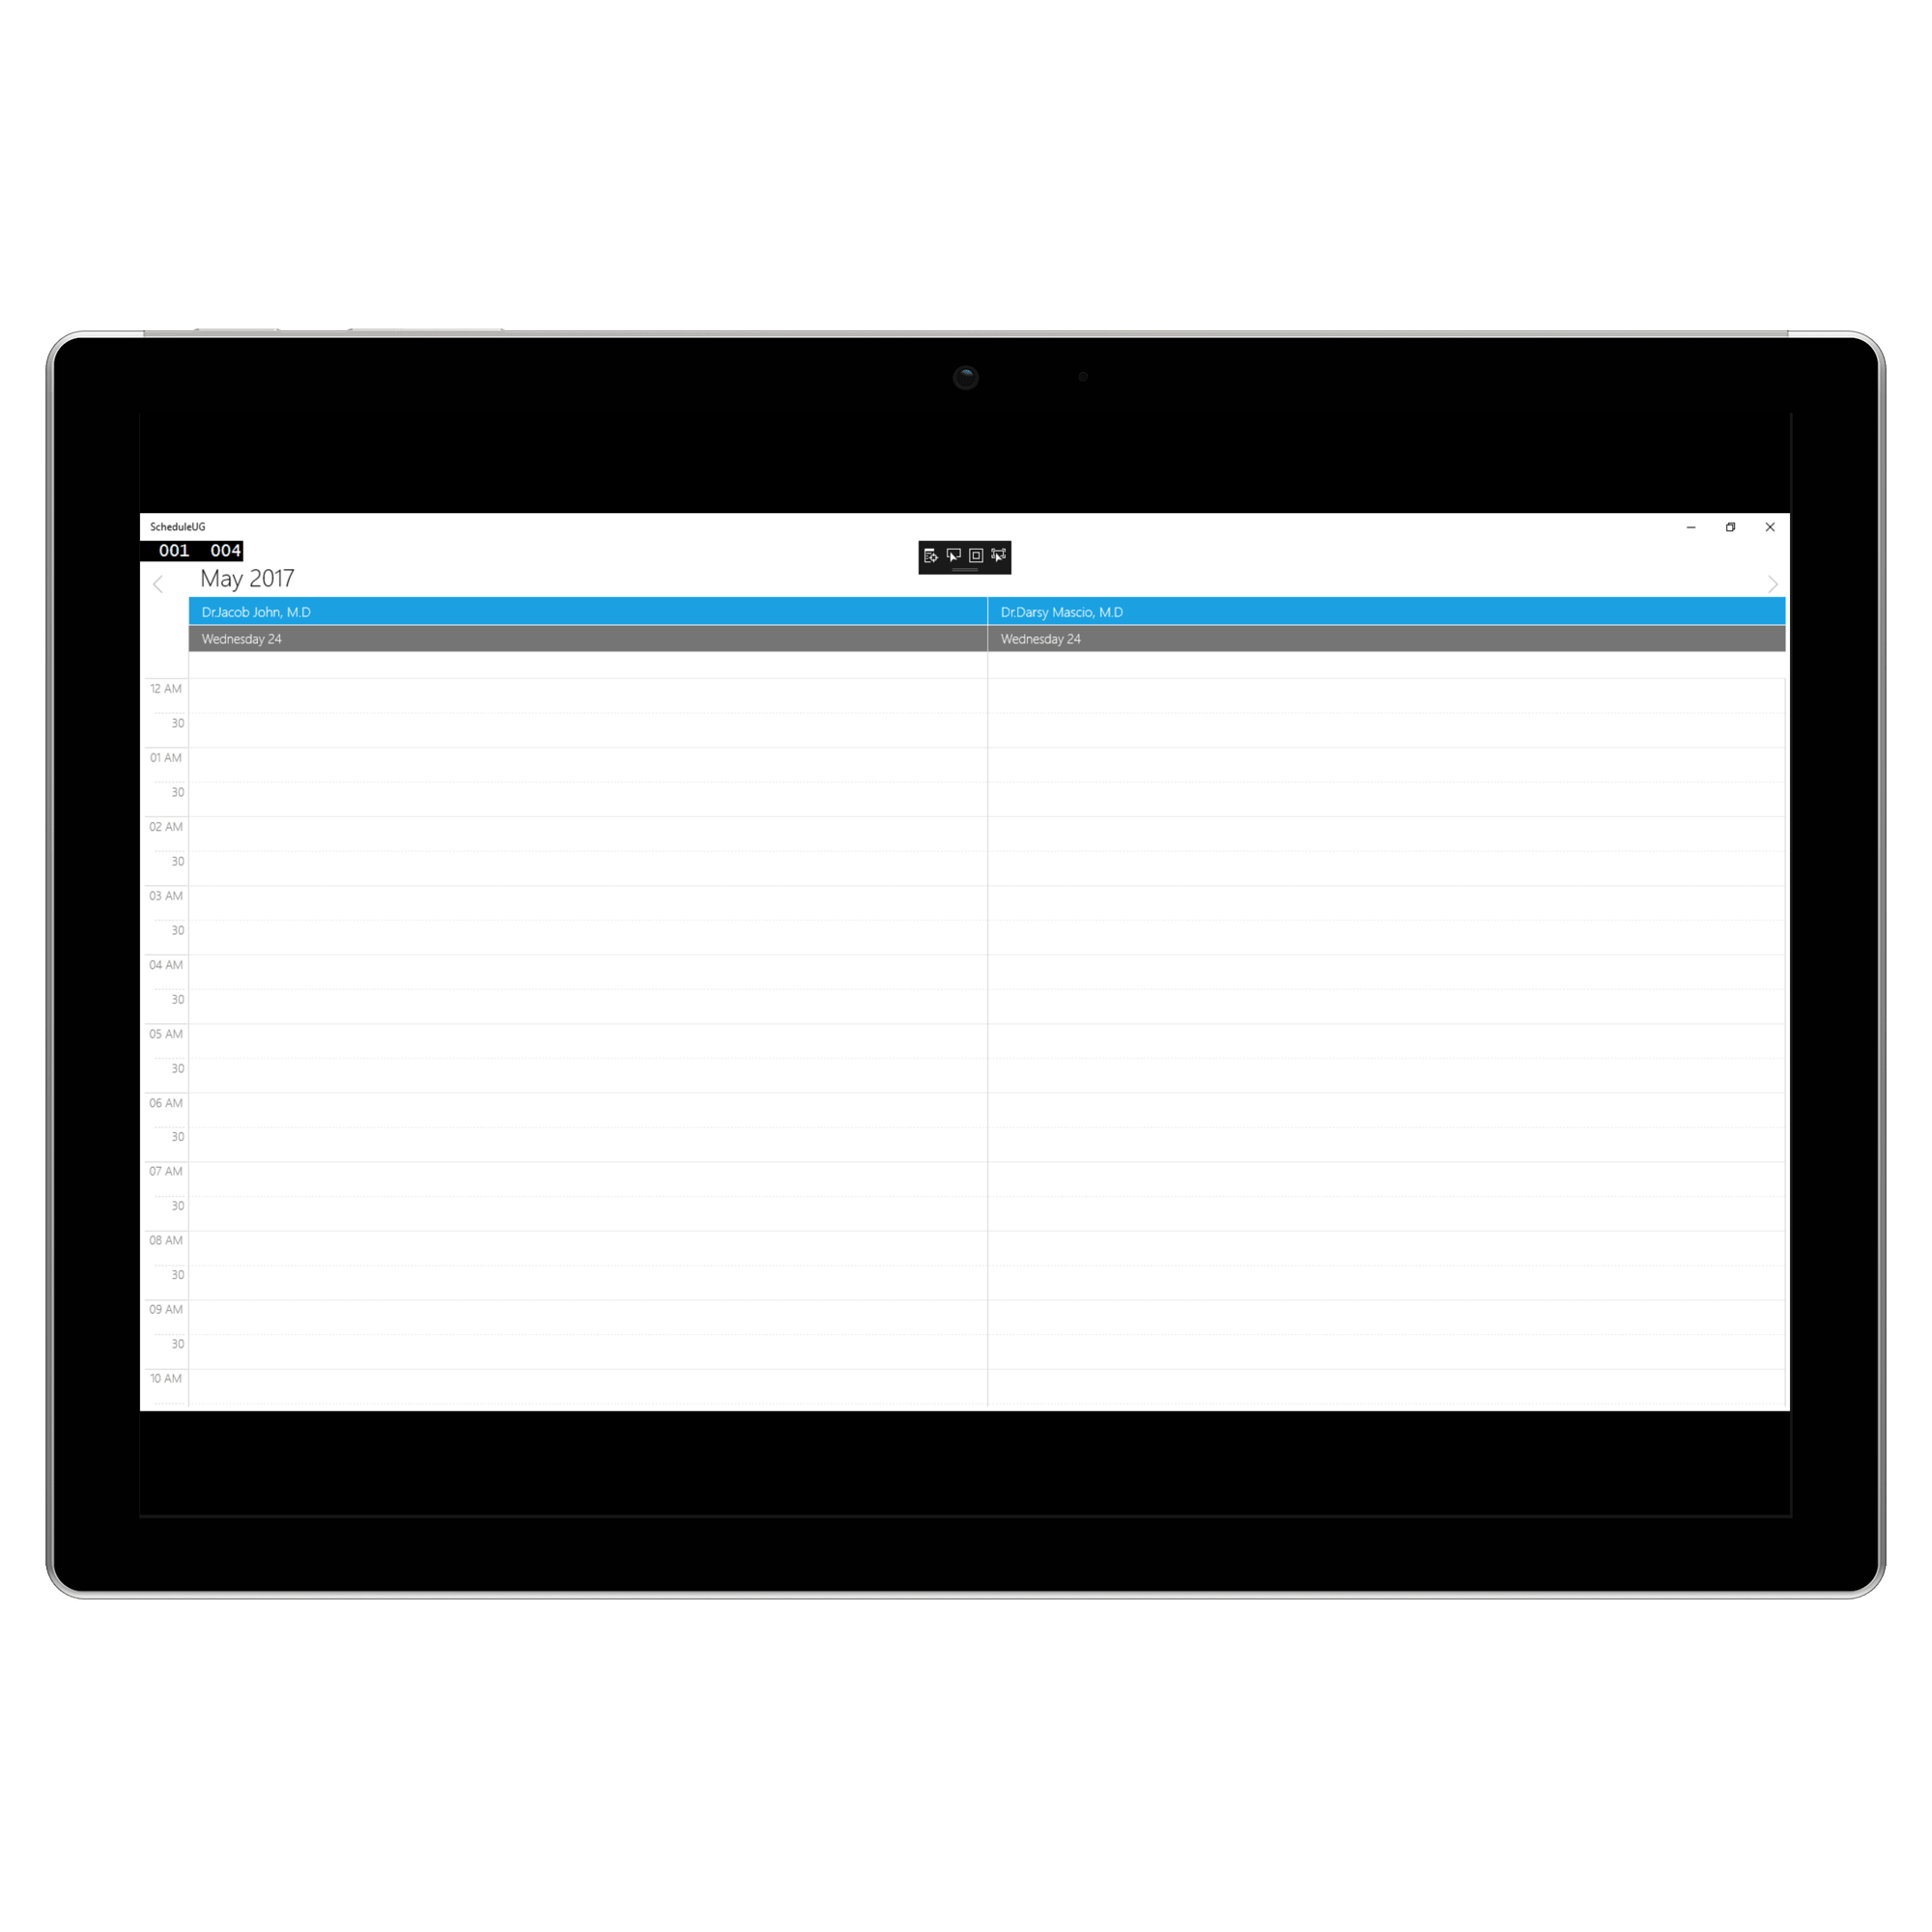
Sub Resource
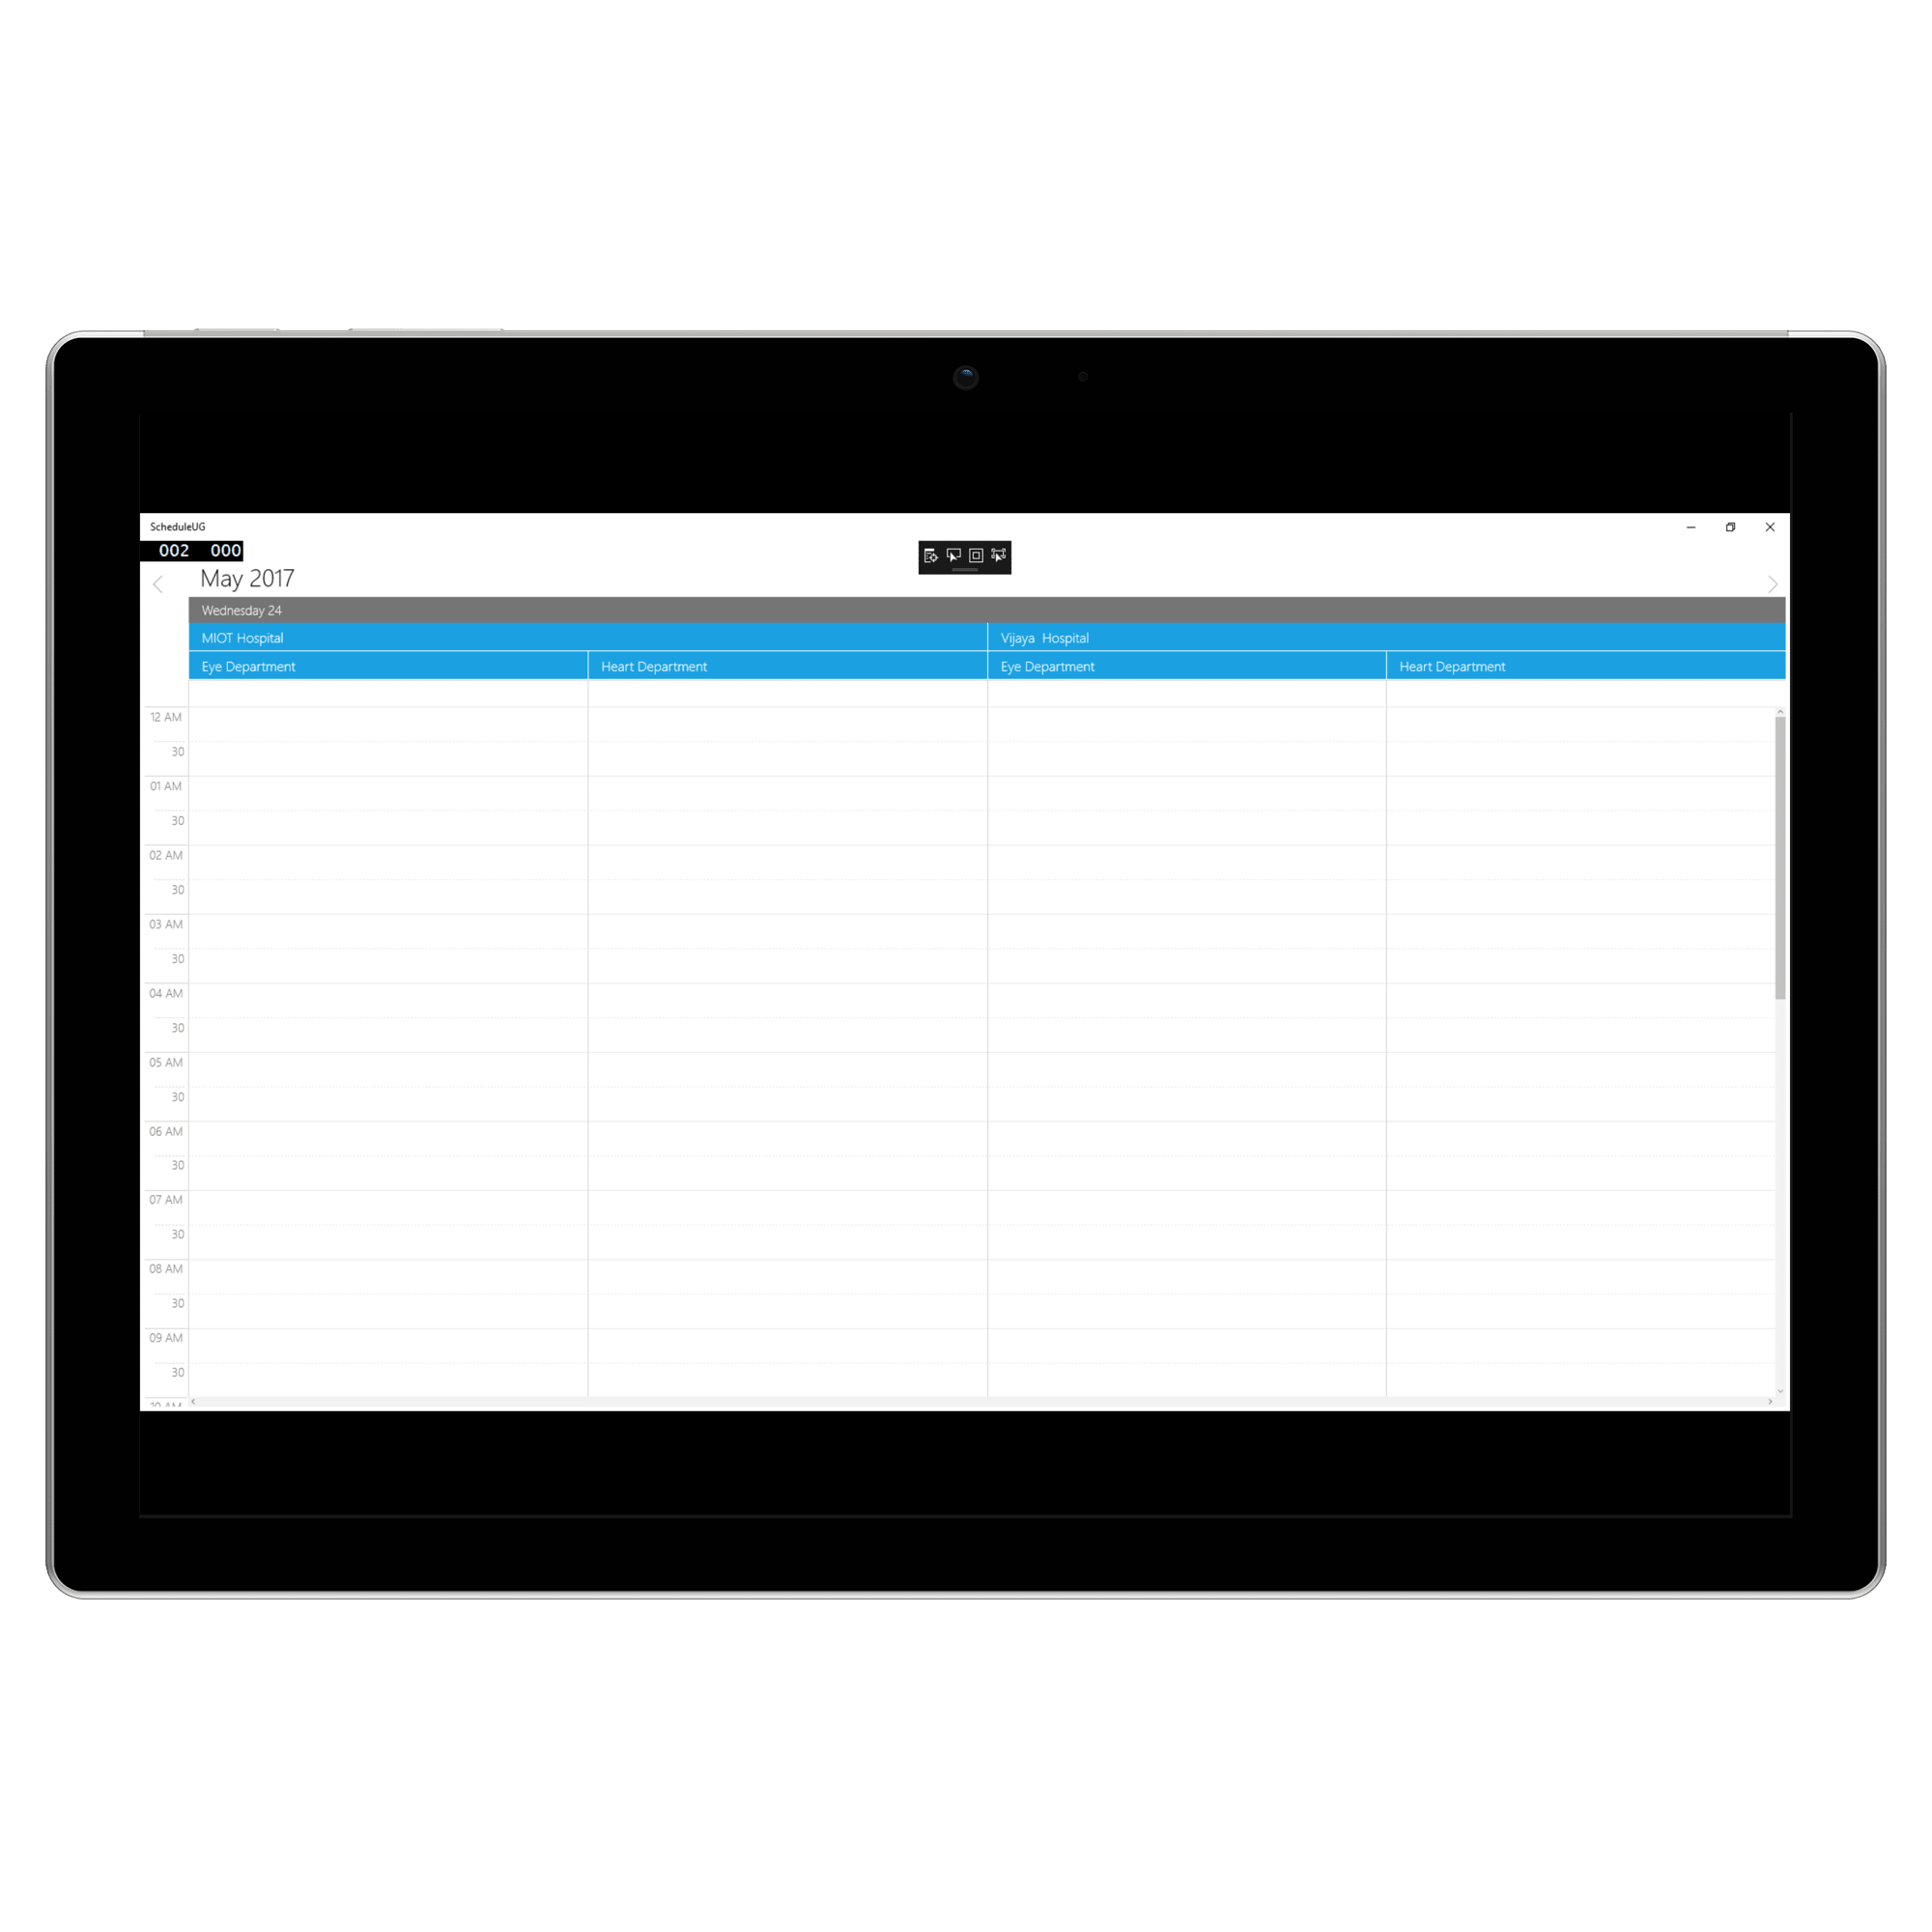
SubResourceType enables users to view appointments based on their subcategory only in day, week views and can group appointments under various subcategories.
SfSchedule schedule = new SfSchedule();
            schedule.ScheduleType = ScheduleType.Day;
            ResourceType resourceType = new ResourceType
            {
                TypeName = "Hospital"
            };
            ResourceType subResourceType = new ResourceType
            {
                TypeName = "Department"
            };
            resourceType.ResourceCollection.Add(new Resource
            {
                DisplayName = "MIOT Hospital",
                ResourceName = "MIOTHospital",
            });
            resourceType.ResourceCollection.Add(new Resource
            {
                DisplayName = "Vijaya  Hospital",
                ResourceName = "VijayaHospital"
            });
            subResourceType.ResourceCollection.Add(new Resource
            {
                DisplayName = "Eye Department",
                ResourceName = "Eye"
            });
            subResourceType.ResourceCollection.Add(new Resource
            {
                DisplayName = "Heart Department",
                ResourceName = "Heart"
            });
            schedule.ScheduleResourceTypeCollection = new ObservableCollection<ResourceType> { resourceType };
            schedule.ScheduleResourceTypeCollection = new ObservableCollection<ResourceType> { subResourceType };
            schedule.Resource = "Hospital";
            schedule.Resource = "Department";
<syncfusion:SfSchedule
x:Name="schedule"
Resource="Hospital"
ScheduleType="Day">
<syncfusion:SfSchedule.ScheduleResourceTypeCollection>
<syncfusion:ResourceType TypeName="Hospital">
<syncfusion:ResourceType.ResourceCollection>
<syncfusion:Resource DisplayName="MIOT Hospital" ResourceName="MIOTHospital" />
<syncfusion:Resource DisplayName="Vijaya Hospital" ResourceName="VijayaHospital" />
</syncfusion:ResourceType.ResourceCollection>
<syncfusion:ResourceType.SubResourceType>
<syncfusion:ResourceType TypeName="Department">
<syncfusion:ResourceType.ResourceCollection>
<syncfusion:Resource DisplayName="Eye Department" ResourceName="Eye" />
<syncfusion:Resource DisplayName="Heart Department" ResourceName="Heart" />
</syncfusion:ResourceType.ResourceCollection>
</syncfusion:ResourceType>
</syncfusion:ResourceType.SubResourceType>
</syncfusion:ResourceType>
</syncfusion:SfSchedule.ScheduleResourceTypeCollection>
</syncfusion:SfSchedule>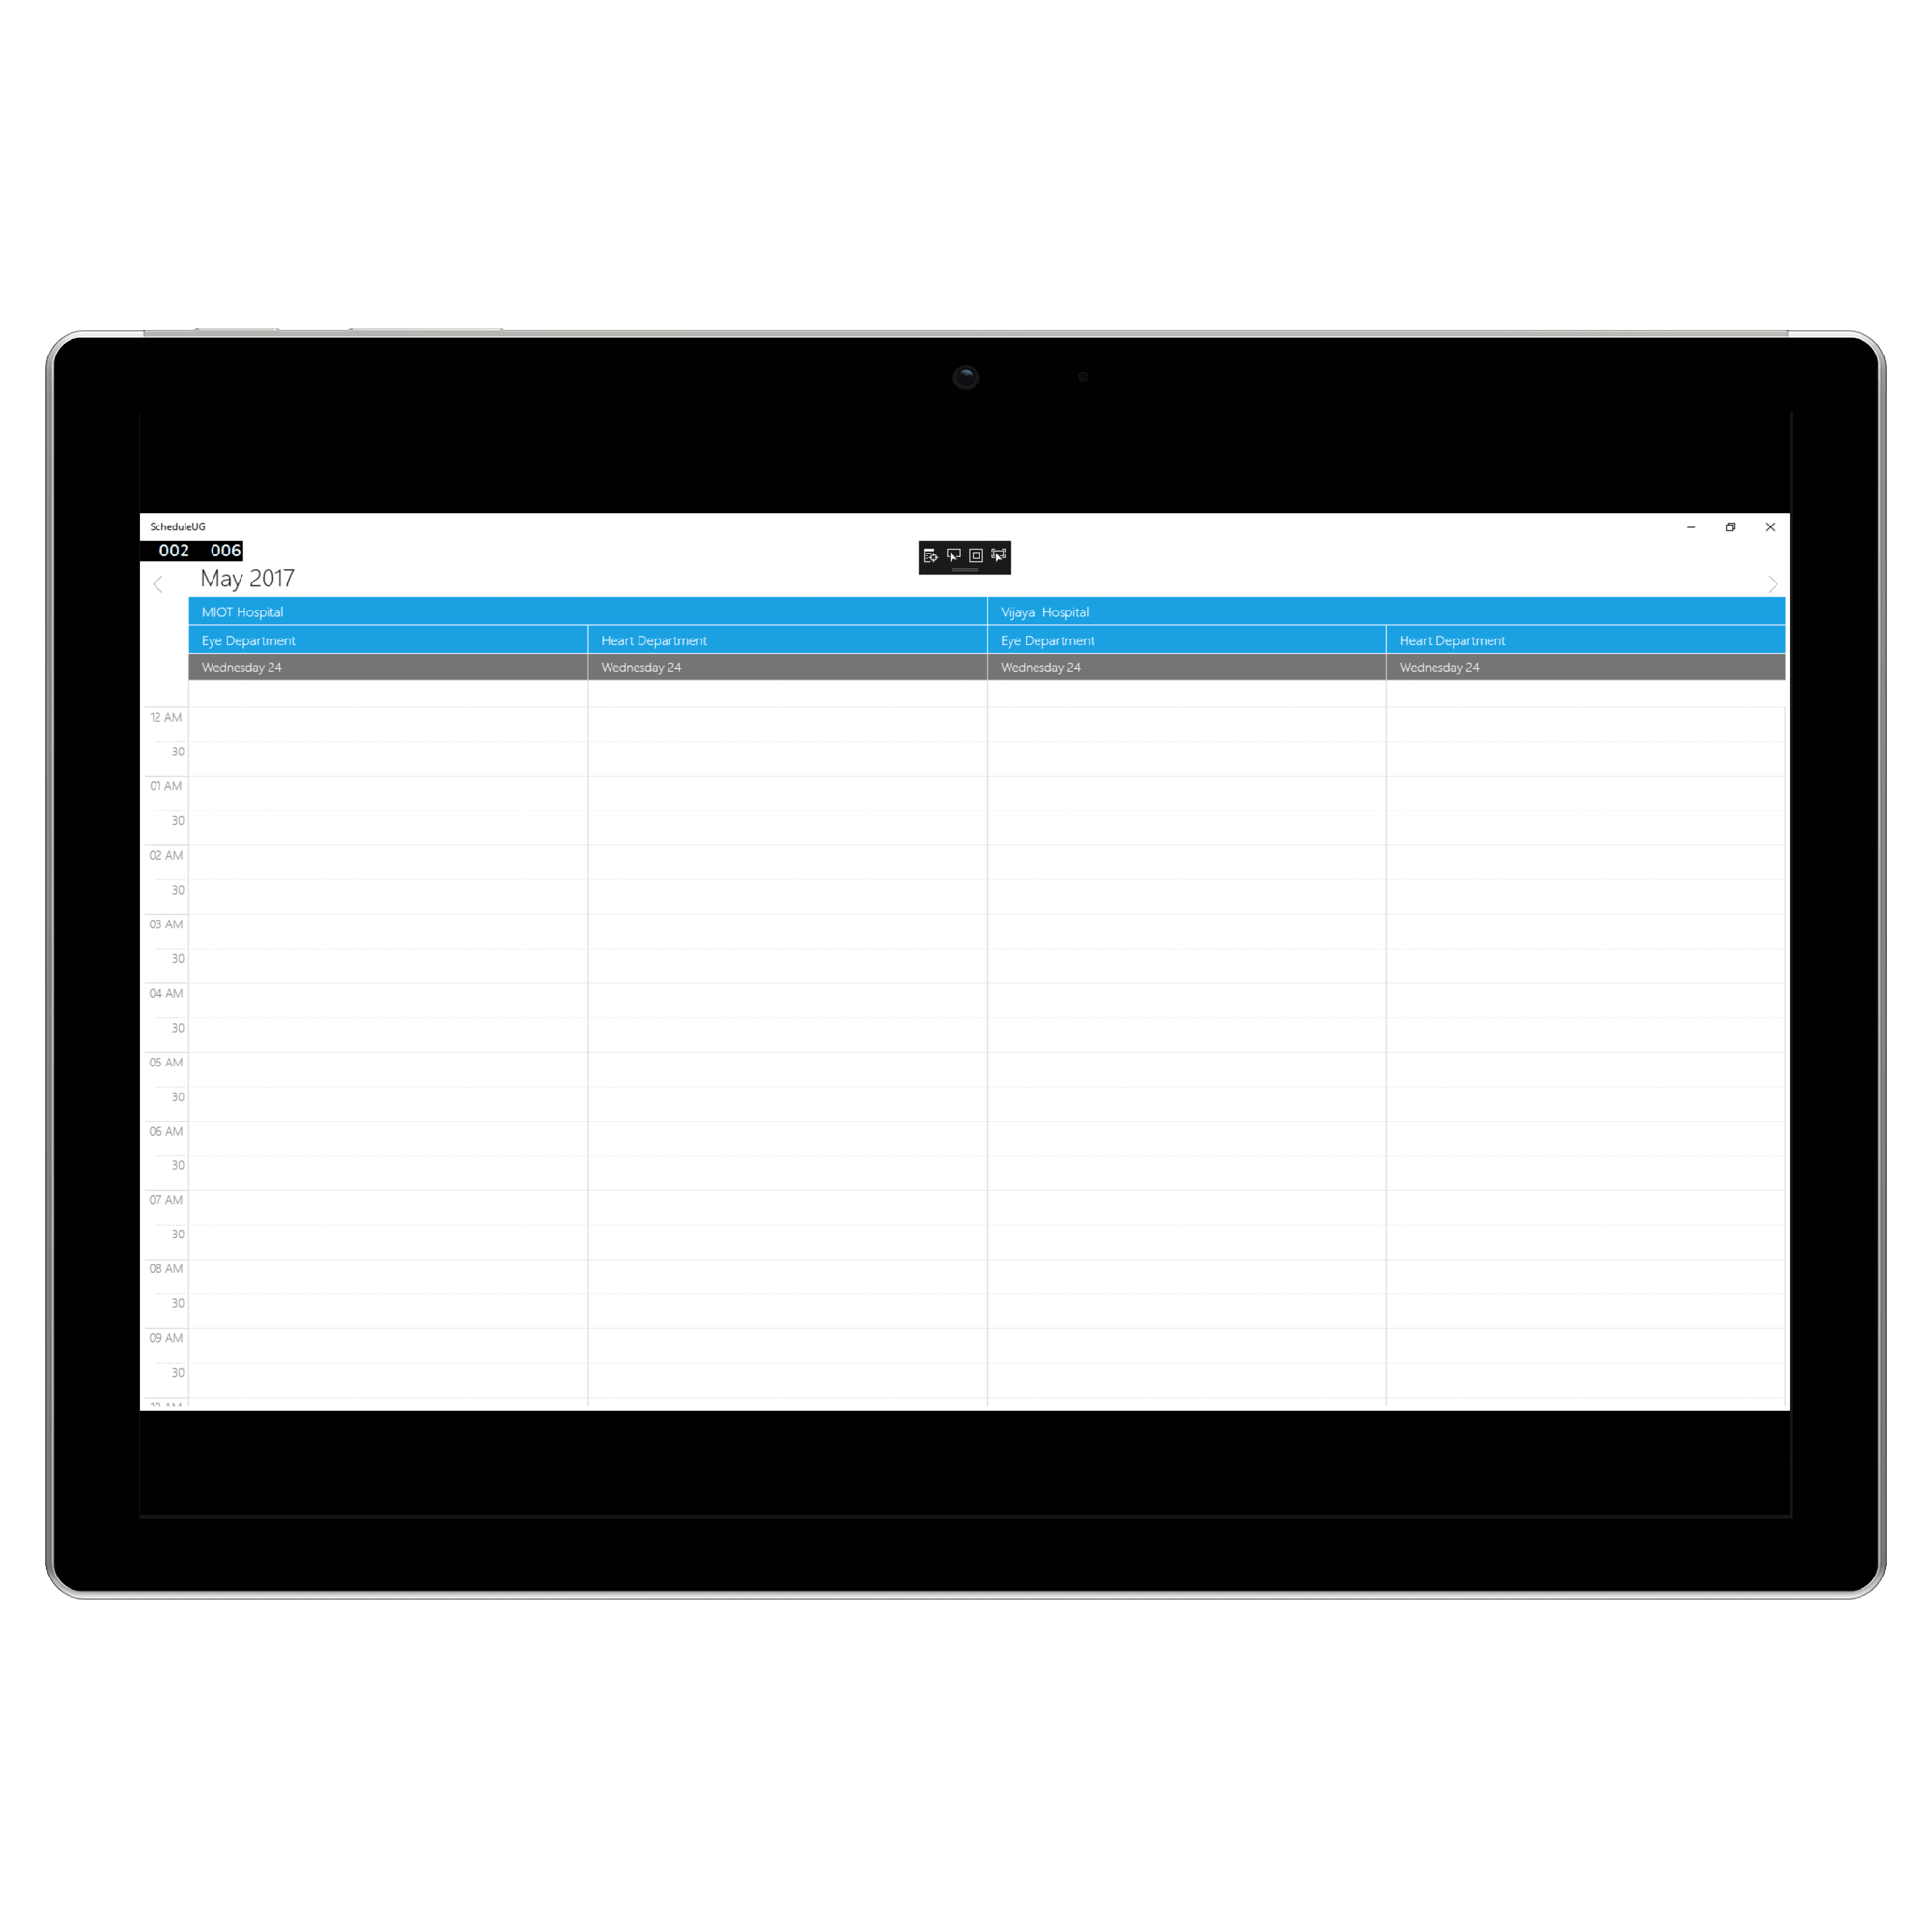
Changing resource order
Order by Date
DayHeaderOrder property is used to set the order by which resources must be displayed. OrderByDate will be displaying the resource based on date.
schedule.ScheduleType = ScheduleType.Day;
            schedule.DayHeaderOrder = DayHeaderOrder.OrderByDate;
<syncfusion:SfSchedule x:Name="schedule" ScheduleType="Day"
Resource="Hospital" DayHeaderOrder="OrderByDate"/>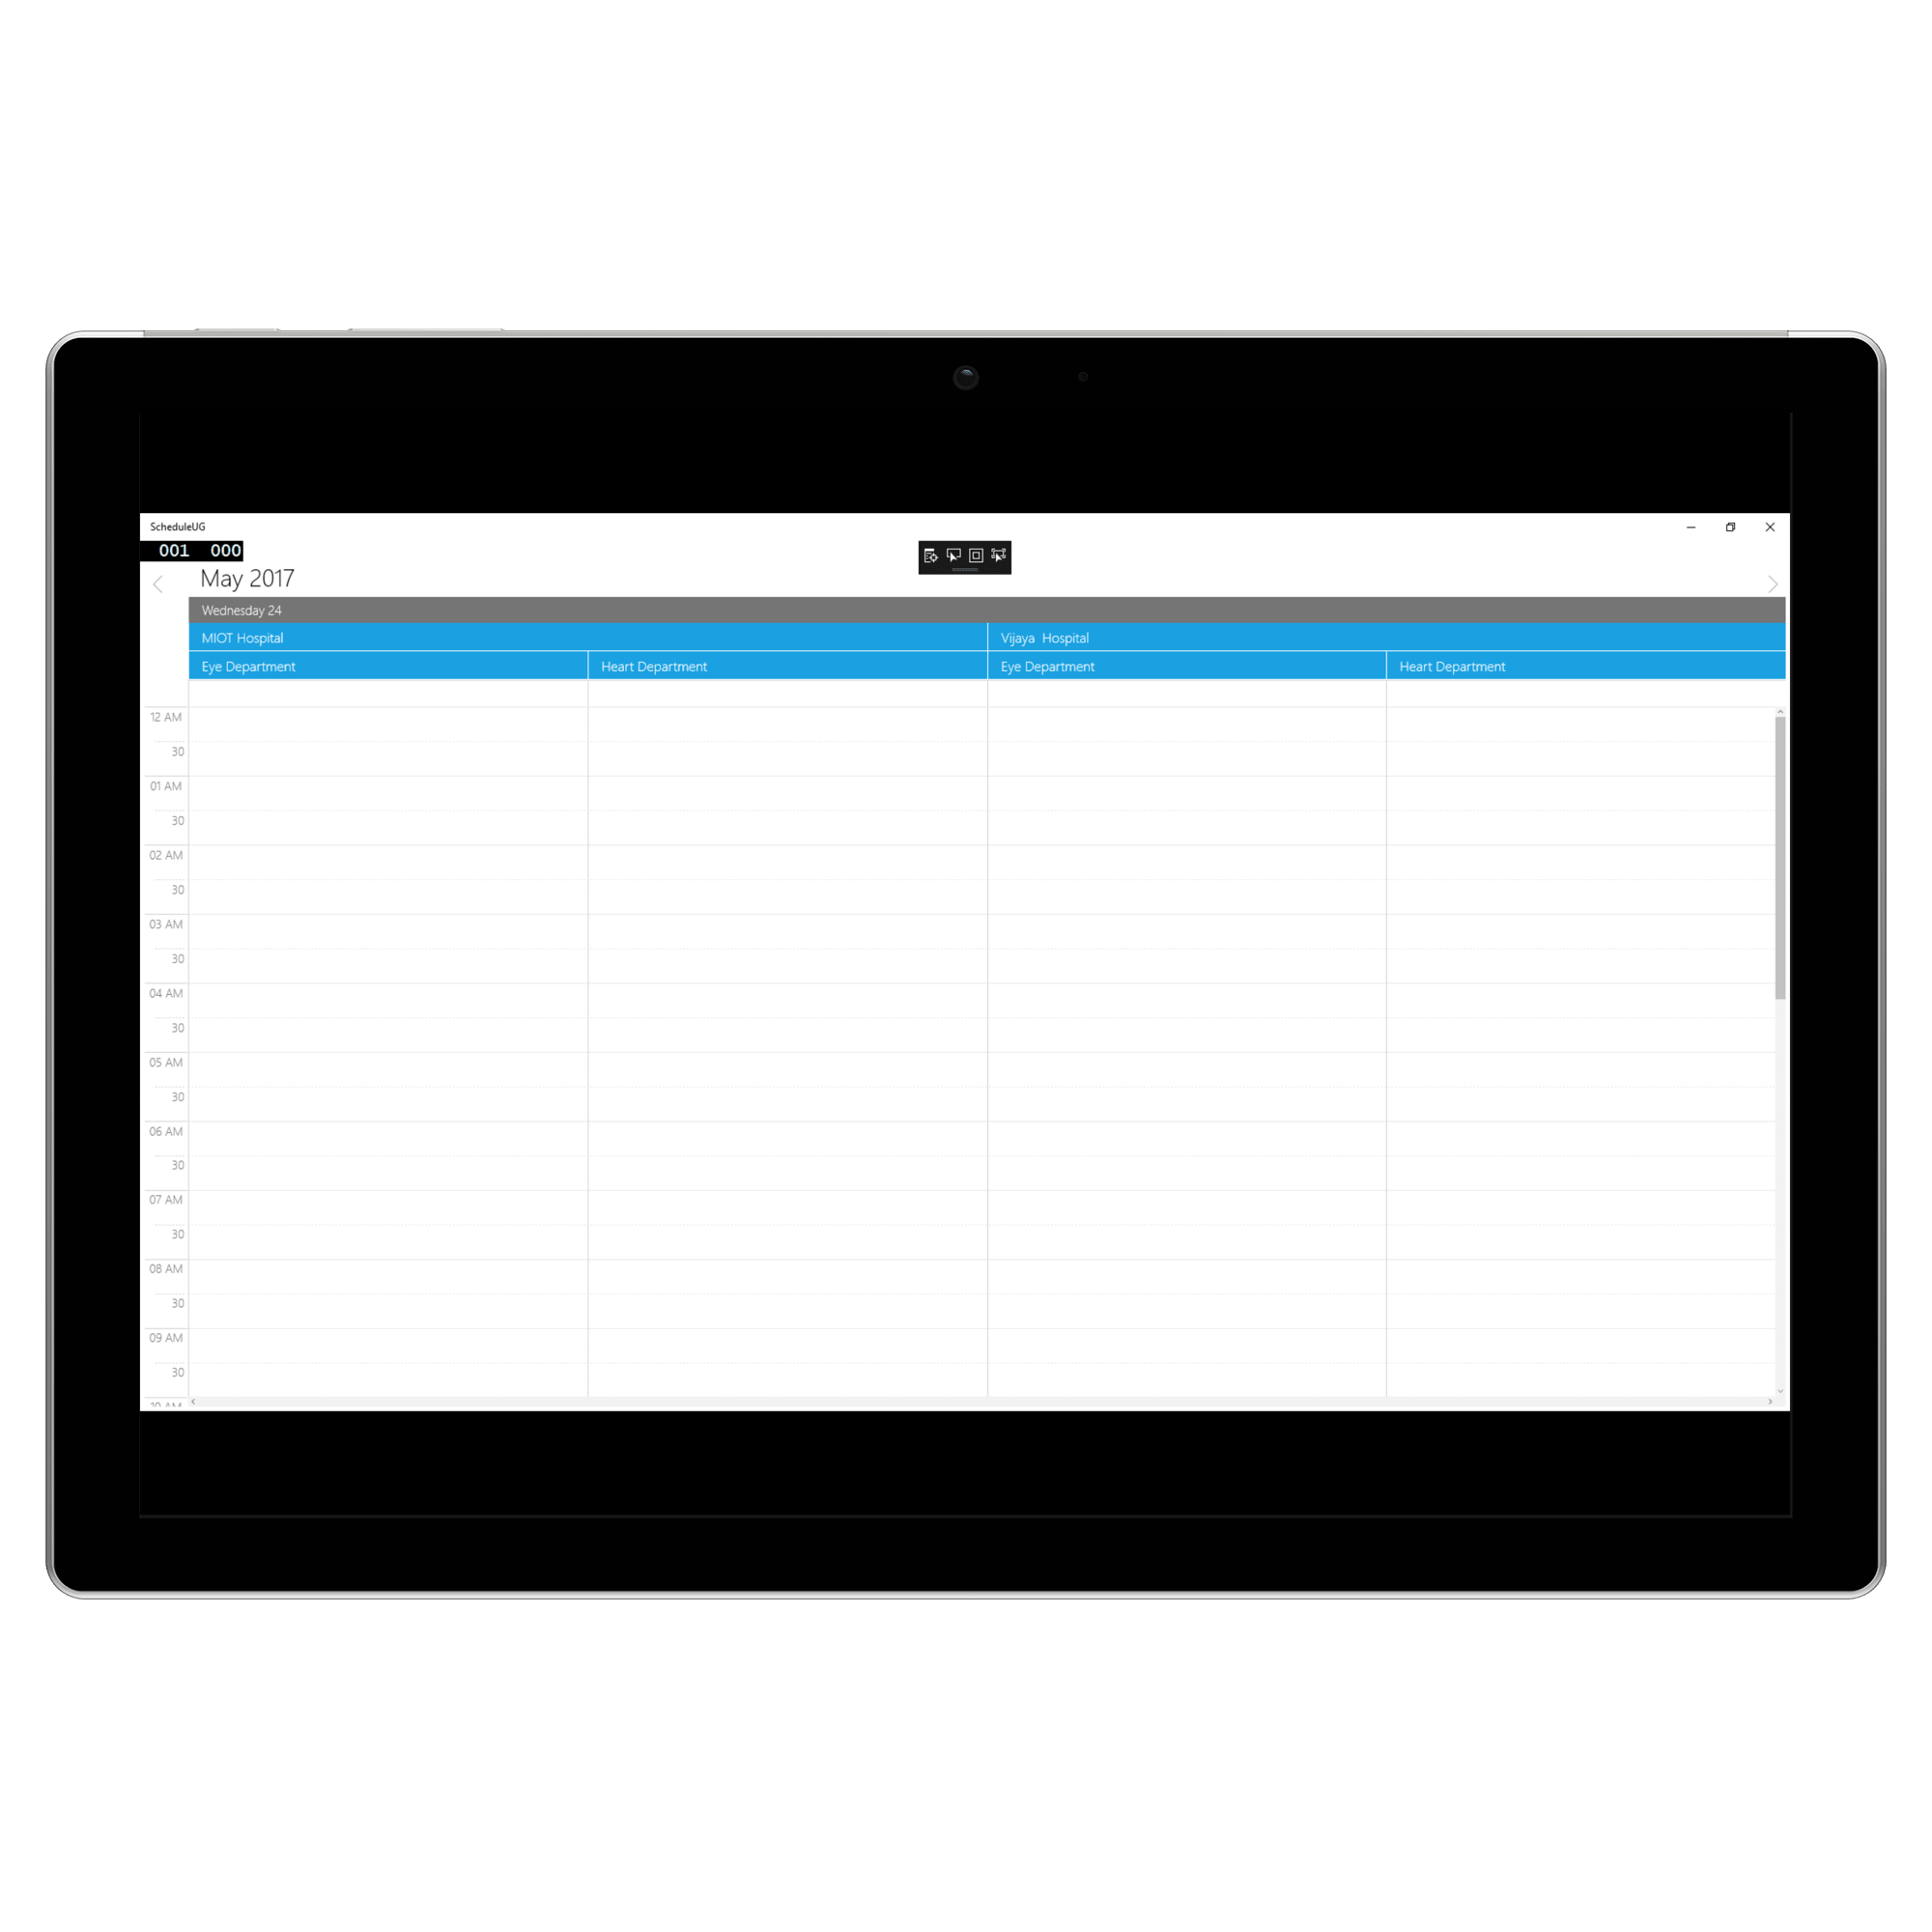
Order by resource
DayHeaderOrder property is used to set the order by which resources must be displayed. OrderByResource will be displaying the resource based on resource collection.
schedule.ScheduleType = ScheduleType.Day;
            schedule.DayHeaderOrder = DayHeaderOrder.OrderByResource;
<syncfusion:SfSchedule x:Name="schedule" ScheduleType="Day"
Resource="Hospital" DayHeaderOrder="OrderByResource"/>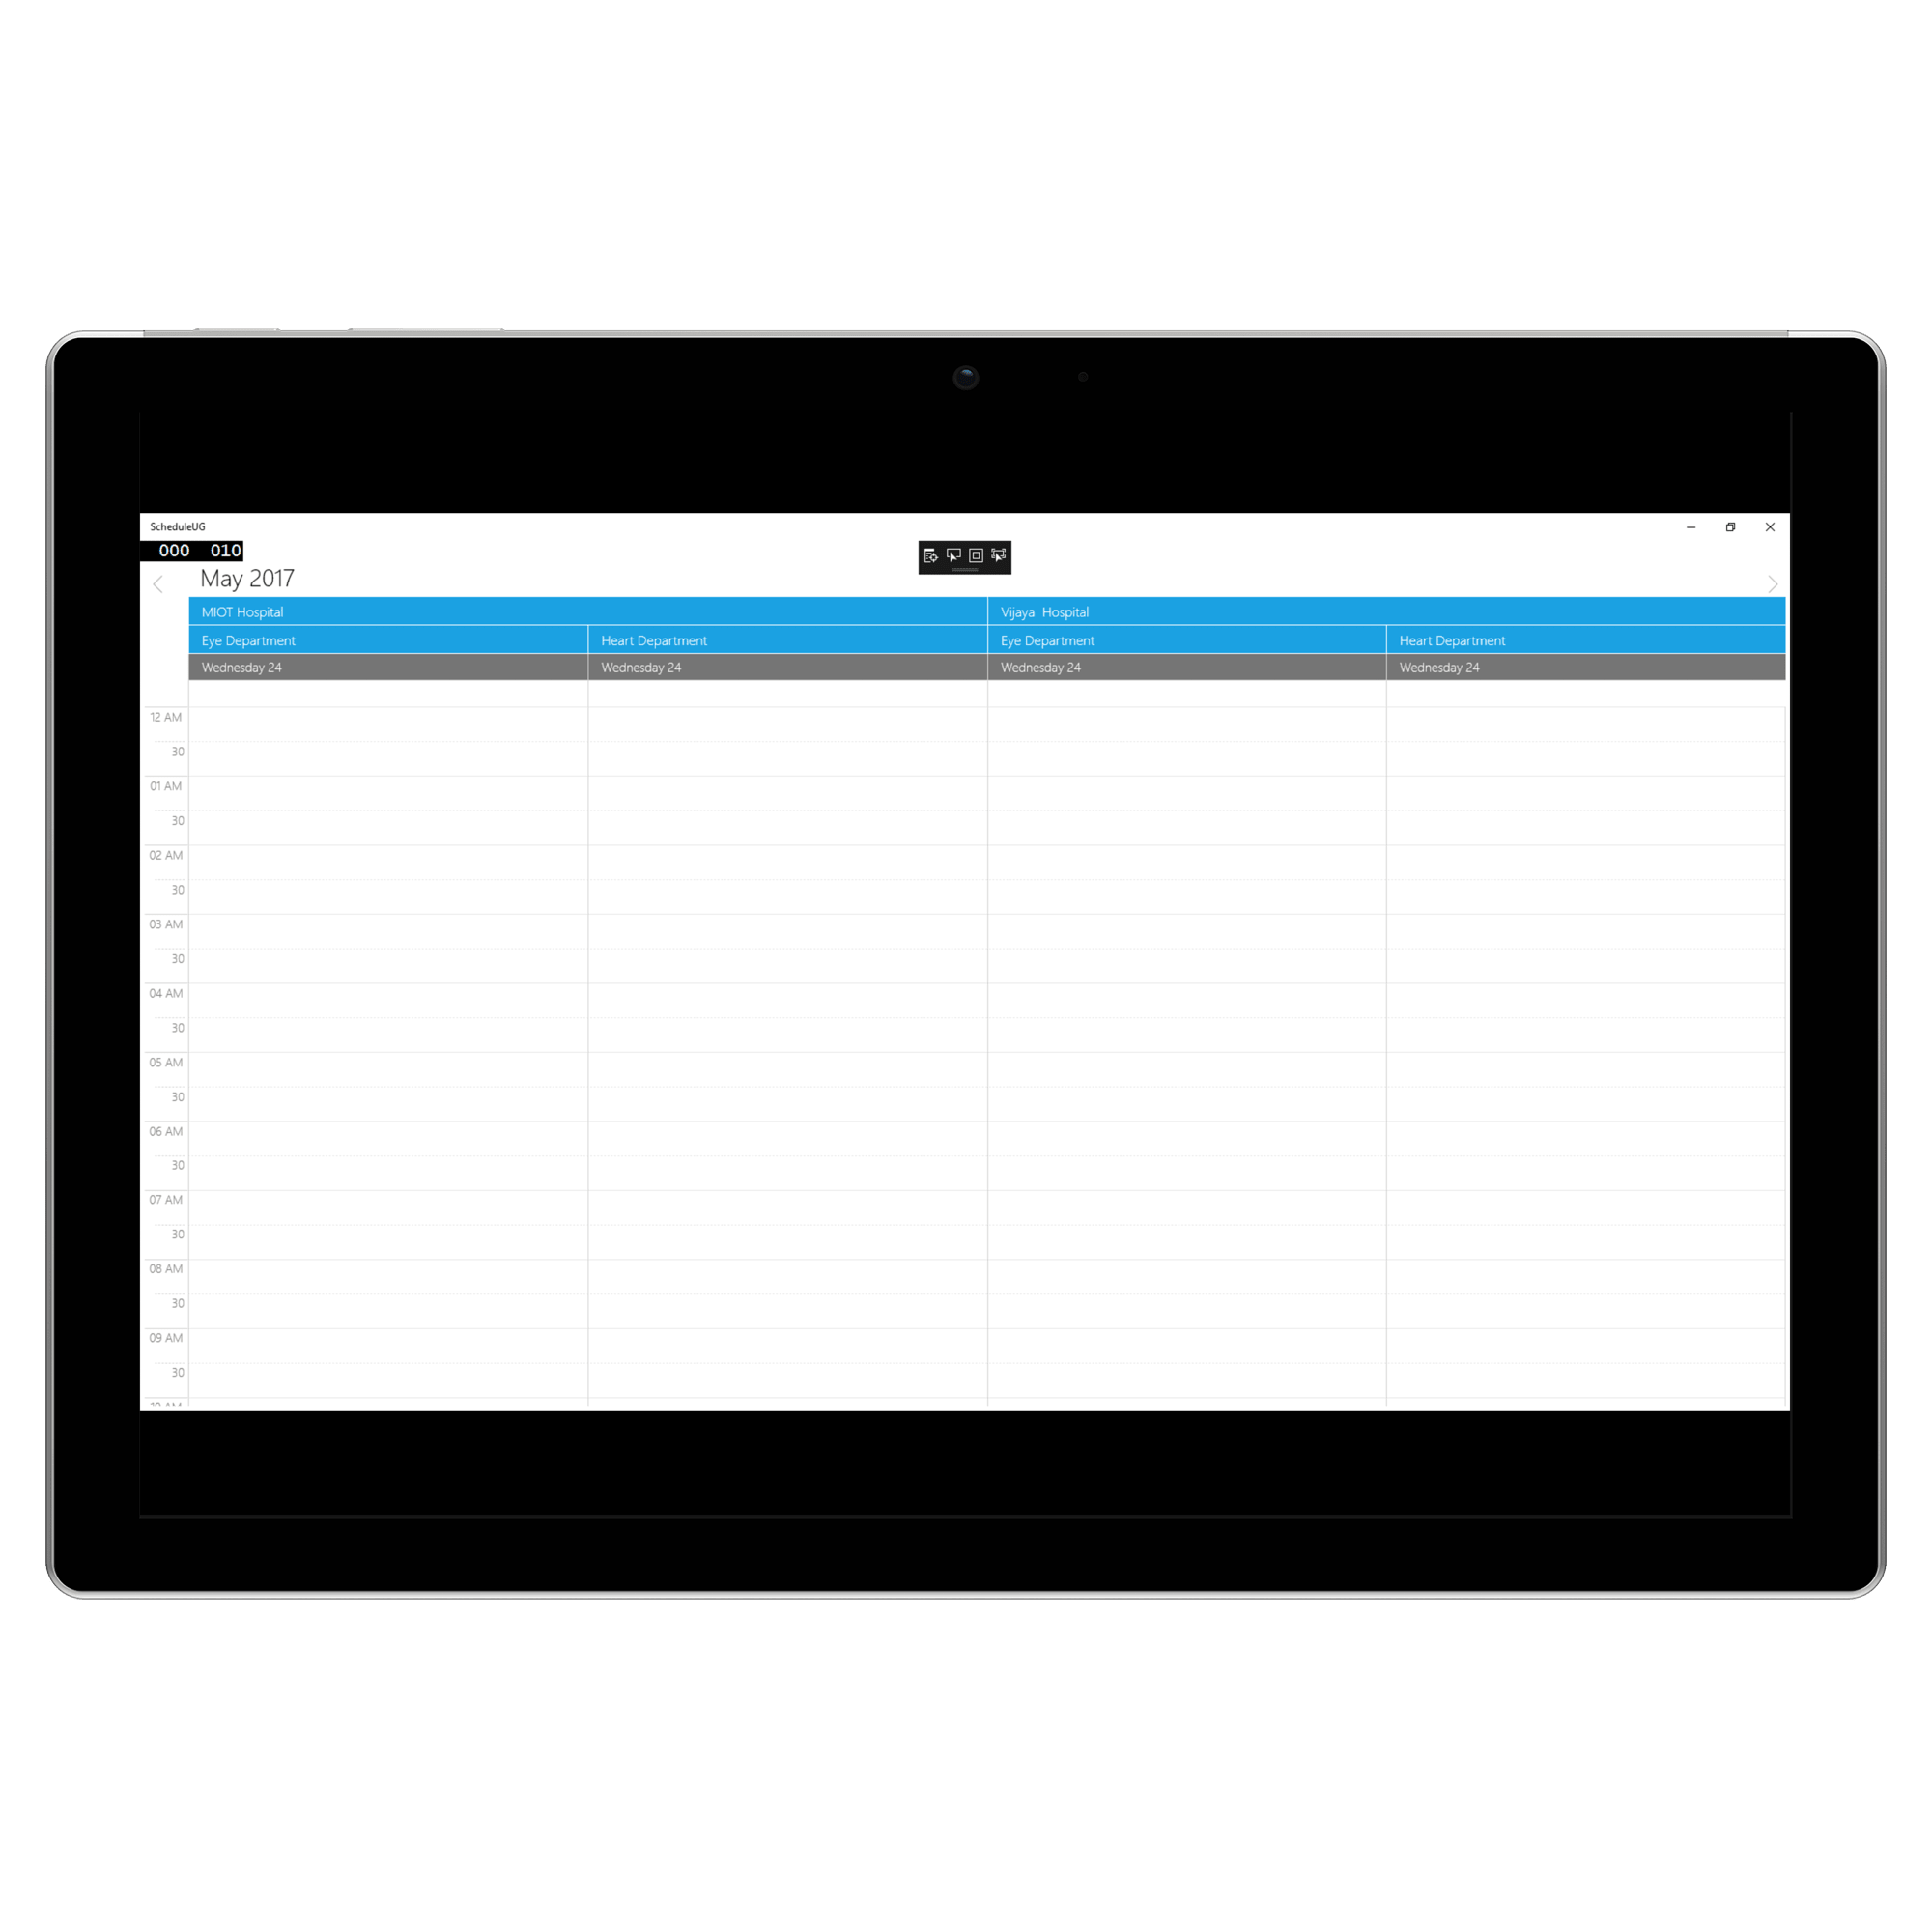
Customizing resource visibility
Column count
This feature supports to specifying the count of resources that needs to be displayed per view. This support can be enabled by using property DayViewColumnCount in SfSchedule. By default, its value is “zero”.
Note
This support is available for Day view alone.
schedule.ScheduleType = ScheduleType.Day;
            schedule.DayViewColumnCount = 5;
<syncfusion:SfSchedule x:Name="schedule" ScheduleType="Day"
Resource="Hospital" DayHeaderOrder="OrderByDate" DayViewColumnCount="5"/>