Notice: After Volume 1 2025 (Mid of March 2025), feature enhancements for this control will no longer be available in the Syncfusion® package. Please switch to the Syncfusion® Toolkit for .NET MAUI for continued support. For a smooth transition, refer to this migration document.
Getting Started with .NET MAUI Tab View
23 Jul 202524 minutes to read
This section guides you through setting up and configuring a SfTabView in your .NET MAUI application. Follow the steps below to add a basic Tab View to your project.
To quickly get started with the .NET MAUI Tab View, watch this video.
Prerequisites
Before proceeding, ensure the following are set up:
- Install .NET 8 SDK or later.
- Set up a .NET MAUI environment with Visual Studio 2022 (v17.3 or later).
Step 1: Create a new .NET MAUI project
- Go to File > New > Project and select the .NET MAUI App template.
- Name the project and choose a location. Then, click Next.
- Select the .NET framework version and click Create.
Step 2: Install the Syncfusion® MAUI Tab View NuGet package
- In Solution Explorer, right-click the project and select Manage NuGet Packages.
- Search for Syncfusion.Maui.TabView and install the latest version.
- Ensure the necessary dependencies are installed correctly, and the project is restored.
Step 3: Register the handler
Syncfusion.Maui.Core NuGet is a dependent package for all Syncfusion® controls of .NET MAUI. In the MauiProgram.cs file, register the handler for Syncfusion® core.
using Microsoft.Extensions.Logging;
using Syncfusion.Maui.Core.Hosting;

namespace TabViewGettingStarted
{
    public static class MauiProgram
    {
        public static MauiApp CreateMauiApp()
        {
            var builder = MauiApp.CreateBuilder();
            builder
            .UseMauiApp<App>()
            .ConfigureSyncfusionCore()
            .ConfigureFonts(fonts =>
            {
                fonts.AddFont("OpenSans-Regular.ttf", "OpenSansRegular");
            });

            return builder.Build();
        }
    }
}
Step 4: Add a basic Tab View
-
To initialize the control, import the Tab View namespace into your code.
-
Initialize SfTabView.
<?xml version="1.0" encoding="utf-8" ?>
<ContentPage
            ...
            xmlns:tabView="clr-namespace:Syncfusion.Maui.TabView;assembly=Syncfusion.Maui.TabView">
    <ContentPage.Content>
        <tabView:SfTabView />
    </ContentPage.Content>
</ContentPage>
using Syncfusion.Maui.TabView;
namespace TabViewGettingStarted
{
public partial class MainPage : ContentPage
{
public MainPage()
{
InitializeComponent();
SfTabView tabView = new SfTabView();
this.Content = tabView;
}
}
}Prerequisites
Before proceeding, ensure the following are set up:
- Install .NET 8 SDK or later.
- Set up a .NET MAUI environment with Visual Studio Code.
- Ensure that the .NET MAUI extension is installed and configured as described here.
Step 1: Create a new .NET MAUI project
- Open the command palette by pressing
Ctrl+Shift+Pand type .NET:New Project and enter. - Choose the .NET MAUI App template.
- Select the project location, type the project name and press Enter.
- Then choose Create project.
Step 2: Install the Syncfusion® MAUI Tab View NuGet package
- Press Ctrl + ` (backtick) to open the integrated terminal in Visual Studio Code.
- Ensure you’re in the project root directory where your .csproj file is located.
- Run the command
dotnet add package Syncfusion.Maui.TabViewto install the Syncfusion® .NET MAUI Tab View package. - To ensure all dependencies are installed, run
dotnet restore.
Step 3: Register the handler
Syncfusion.Maui.Core NuGet is a dependent package for all Syncfusion® controls of .NET MAUI. In the MauiProgram.cs file, register the handler for Syncfusion® core.
using Microsoft.Extensions.Logging;
using Syncfusion.Maui.Core.Hosting;

namespace TabViewGettingStarted
{
    public static class MauiProgram
    {
        public static MauiApp CreateMauiApp()
        {
            var builder = MauiApp.CreateBuilder();
            builder
            .UseMauiApp<App>()
            .ConfigureSyncfusionCore()
            .ConfigureFonts(fonts =>
            {
                fonts.AddFont("OpenSans-Regular.ttf", "OpenSansRegular");
            });

            return builder.Build();
        }
    }
}
Step 4: Add a basic Tab View
-
To initialize the control, import the Tab View namespace into your code.
-
Initialize SfTabView.
<?xml version="1.0" encoding="utf-8" ?>
<ContentPage
            ...
            xmlns:tabView="clr-namespace:Syncfusion.Maui.TabView;assembly=Syncfusion.Maui.TabView">
    <ContentPage.Content>
        <tabView:SfTabView />
    </ContentPage.Content>
</ContentPage>
using Syncfusion.Maui.TabView;
namespace TabViewGettingStarted
{
public partial class MainPage : ContentPage
{
public MainPage()
{
InitializeComponent();
SfTabView tabView = new SfTabView();
this.Content = tabView;
}
}
}Prerequisites
Before proceeding, ensure the following are set up:
- Ensure you have the latest version of JetBrains Rider.
- Install .NET 8 SDK or later.
- Make sure the MAUI workloads are installed and configured as described here.
Step 1: Create a new .NET MAUI project
- Go to File > New Solution, Select .NET (C#) and choose the .NET MAUI App template.
- Enter the Project Name, Solution Name, and Location.
- Select the .NET framework version and click Create.
Step 2: Install the Syncfusion® MAUI Tab View NuGet package
- In Solution Explorer, right-click the project and choose Manage NuGet Packages.
- Search for Syncfusion.Maui.TabView and install the latest version.
- Ensure the necessary dependencies are installed correctly, and the project is restored. If not, open the terminal in Rider and manually run:
dotnet restore.
Step 3: Register the handler
Syncfusion.Maui.Core NuGet is a dependent package for all Syncfusion® controls of .NET MAUI. In the MauiProgram.cs file, register the handler for Syncfusion® core.
using Microsoft.Extensions.Logging;
using Syncfusion.Maui.Core.Hosting;

namespace TabViewGettingStarted
{
    public static class MauiProgram
    {
        public static MauiApp CreateMauiApp()
        {
            var builder = MauiApp.CreateBuilder();
            builder
            .UseMauiApp<App>()
            .ConfigureSyncfusionCore()
            .ConfigureFonts(fonts =>
            {
                fonts.AddFont("OpenSans-Regular.ttf", "OpenSansRegular");
            });

            return builder.Build();
        }
    }
}
Step 4: Add a basic Tab View
-
To initialize the control, import the Tab View namespace into your code.
-
Initialize SfTabView.
<?xml version="1.0" encoding="utf-8" ?>
<ContentPage
            ...
            xmlns:tabView="clr-namespace:Syncfusion.Maui.TabView;assembly=Syncfusion.Maui.TabView">
    <ContentPage.Content>
        <tabView:SfTabView />
    </ContentPage.Content>
</ContentPage>
using Syncfusion.Maui.TabView;
namespace TabViewGettingStarted
{
public partial class MainPage : ContentPage
{
public MainPage()
{
InitializeComponent();
SfTabView tabView = new SfTabView();
this.Content = tabView;
}
}
}Populate tab items in .NET MAUI Tab View
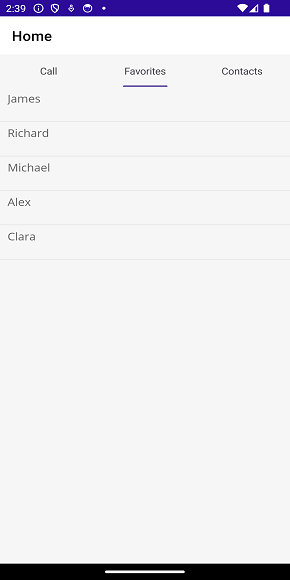
Tab items can be added to the control using the Items property of SfTabView.
<?xml version="1.0" encoding="utf-8" ?>
<ContentPage
. . .
             xmlns:tabView="clr-namespace:Syncfusion.Maui.TabView;assembly=Syncfusion.Maui.TabView">

    <tabView:SfTabView x:Name="tabView">
        <tabView:SfTabView.Items>
            <tabView:SfTabItem Header="Call">
                <tabView:SfTabItem.Content>
                    <Grid BackgroundColor="Red" />
                </tabView:SfTabItem.Content>
            </tabView:SfTabItem>

            <tabView:SfTabItem Header="Favorites">
                <tabView:SfTabItem.Content>
                    <CollectionView>
                        <CollectionView.ItemsSource>
                            <x:Array Type="{x:Type x:String}">
                                <x:String>James</x:String>
                                <x:String>Richard</x:String>
                                <x:String>Michael</x:String>
                                <x:String>Alex</x:String>
                                <x:String>Clara</x:String>
                            </x:Array>
                        </CollectionView.ItemsSource>
                        <CollectionView.ItemTemplate>
                            <DataTemplate>
                                    <Grid Margin="10,5" HeightRequest="40">
                                        <Label
                                            VerticalOptions="Start"
                                            HorizontalOptions="Start"
                                            TextColor="#666666"
                                            FontSize="16"
                                            Text="{Binding}"/>
                                    </Grid>
                            </DataTemplate>
                        </CollectionView.ItemTemplate>
                    </CollectionView>
                </tabView:SfTabItem.Content>
            </tabView:SfTabItem>

            <tabView:SfTabItem Header="Contacts">
                <tabView:SfTabItem.Content>
                    <Grid BackgroundColor="Blue"/>
                </tabView:SfTabItem.Content>
            </tabView:SfTabItem>
        </tabView:SfTabView.Items>
    </tabView:SfTabView>

</ContentPage>
using Syncfusion.Maui.TabView;
namespace TabViewGettingStarted
{
public partial class TabView : ContentPage
{
public TabView ()
{
InitializeComponent ();
var tabView = new SfTabView();
// First tab: Call
var callTab = new SfTabItem { Header = "Call" };
callTab.Content = new Grid
{
BackgroundColor = Colors.Red
};
tabView.Items.Add(callTab);
// Second tab: Favorites
var favoritesTab = new SfTabItem { Header = "Favorites" };
var collectionView = new CollectionView();
// Items source
var itemsSource = new string[] { "James", "Richard", "Michael", "Alex", "Clara" };
collectionView.ItemsSource = itemsSource;
// Item template
collectionView.ItemTemplate = new DataTemplate(() =>
{
var grid = new Grid
{
Margin = new Thickness(10, 5),
HeightRequest = 40
};
var label = new Label
{
VerticalOptions = LayoutOptions.Start,
HorizontalOptions = LayoutOptions.Start,
TextColor = Color.FromArgb("#666666"),
FontSize = 16
};
label.SetBinding(Label.TextProperty, ".");
grid.Children.Add(label);
return grid;
});
favoritesTab.Content = collectionView;
tabView.Items.Add(favoritesTab);
// Third tab: Contacts
var contactsTab = new SfTabItem { Header = "Contacts" };
contactsTab.Content = new Grid
{
BackgroundColor = Colors.Blue
};
tabView.Items.Add(contactsTab);
this.Content = tabView;
}
}
}
NOTE
You can download the getting started project of this demo from GitHub
Populate ItemsSource
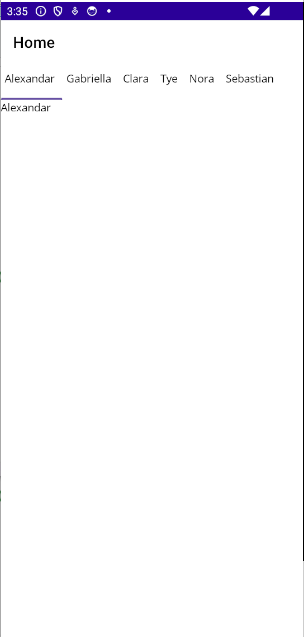
Items can be added to the control using the ItemsSource property of SfTabView.
Objects of any class can be provided as items for SfTabView using ItemsSource. The views corresponding to the objects can be set using the HeaderItemTemplate for the header items and ContentItemTemplate for the content.
Create a Model class using the TabItems collection property, initialized with the required number of data objects, as shown in the following code examples.
public class Model: INotifyPropertyChanged
{

    public event PropertyChangedEventHandler PropertyChanged;

    protected void OnPropertyChanged(string propertyName)
    {
        var handler = PropertyChanged;
        if (handler != null)
            handler(this, new PropertyChangedEventArgs(propertyName));
    }

    private string name;

    public string Name
    {
        get { return name; }
        set
        {
            name = value;
            OnPropertyChanged("Name");
        }
    }
}public class TabItemsSourceViewModel:INotifyPropertyChanged
{
public event PropertyChangedEventHandler PropertyChanged;
protected void OnPropertyChanged(string propertyName)
{
var handler = PropertyChanged;
if (handler != null)
handler(this, new PropertyChangedEventArgs(propertyName));
}
private ObservableCollection<Model> tabItems;
public ObservableCollection<Model> TabItems
{
get { return tabItems; }
set
{
tabItems = value;
OnPropertyChanged("TabItems");
}
}
public TabItemsSourceViewModel()
{
TabItems = new ObservableCollection<Model>();
TabItems.Add(new Model() { Name = "Alexandar" });
TabItems.Add(new Model() { Name = "Gabriella" });
TabItems.Add(new Model() { Name = "Clara"});
TabItems.Add(new Model() { Name = "Tye" });
TabItems.Add(new Model() { Name = "Nora" });
TabItems.Add(new Model() { Name = "Sebastian" });
}
}The following code example binds the collection to the ItemsSource property of SfTabView.
<ContentPage xmlns="http://schemas.microsoft.com/dotnet/2021/maui"
             xmlns:x="http://schemas.microsoft.com/winfx/2009/xaml"
             x:Class="TabViewItemTemplateSample.MainPage"
             xmlns:local="clr-namespace:TabViewItemTemplateSample"
             xmlns:tabView="clr-namespace:Syncfusion.Maui.TabView;assembly=Syncfusion.Maui.TabView">

    <ContentPage.BindingContext>
        <local:TabItemsSourceViewModel />
    </ContentPage.BindingContext>
    <tabView:SfTabView ItemsSource="{Binding TabItems}" >
    </tabView:SfTabView>

    </ContentPage>
using Syncfusion.Maui.TabView;
namespace TabViewItemTemplateSample;
public partial class MainPage : ContentPage
{
TabItemsSourceViewModel model;
SfTabView tabView;
public MainPage()
{
InitializeComponent();
model = new TabItemsSourceViewModel();
this.BindingContext = model;
tabView = new SfTabView();
tabView.ItemsSource = model.TabItems;
this.Content = tabView;
}
}HeaderItemTemplate
By defining the HeaderItemTemplate of the SfTabView, a custom user interface(UI) can be achieved to display the tab header data items.
<tabView:SfTabView ItemsSource="{Binding TabItems}" >
        <tabView:SfTabView.HeaderItemTemplate>
                <DataTemplate >
                    <Label  Padding="5,10,10,10"  Text="{Binding Name}"/>
                 </DataTemplate>
            </tabView:SfTabView.HeaderItemTemplate>
    </tabView:SfTabView>
namespace TabViewItemTemplateSample;
public partial class MainPage : ContentPage
{
TabItemsSourceViewModel model;
SfTabView tabView;
public MainPage()
{
InitializeComponent();
model = new TabItemsSourceViewModel();
this.BindingContext = model;
tabView = new SfTabView();
tabView.ItemsSource = model.TabItems;
tabView.HeaderItemTemplate = new DataTemplate(() =>
{
var nameLabel = new Label { Padding = new Thickness(5,10,10,10)};
nameLabel.SetBinding(Label.TextProperty, "Name");
return nameLabel;
});
this.Content = tabView;
}
}ContentItemTemplate
By defining the ContentItemTemplate of the SfTabView, a custom user interface(UI) can be achieved to display the tab content data items.
<tabView:SfTabView ItemsSource="{Binding TabItems}" >
        <tabView:SfTabView.HeaderItemTemplate>
                <DataTemplate >
                    <Label  Padding="5,10,10,10"  Text="{Binding Name}"/>
                 </DataTemplate>
            </tabView:SfTabView.HeaderItemTemplate>
             <tabView:SfTabView.ContentItemTemplate>
                <DataTemplate>
                     <Label TextColor="Black"  Text="{Binding Name}" />
               </DataTemplate>
        </tabView:SfTabView.ContentItemTemplate>
    </tabView:SfTabView>
namespace TabViewItemTemplateSample;
public partial class MainPage : ContentPage
{
TabItemsSourceViewModel model;
SfTabView tabView;
public MainPage()
{
InitializeComponent();
model = new TabItemsSourceViewModel();
this.BindingContext = model;
tabView = new SfTabView();
tabView.ItemsSource = model.TabItems;
tabView.HeaderItemTemplate = new DataTemplate(() =>
{
var nameLabel = new Label { Padding = new Thickness(5,10,10,10)};
nameLabel.SetBinding(Label.TextProperty, "Name");
return nameLabel;
});
tabView.ContentItemTemplate = new DataTemplate(() =>
{
var nameLabel = new Label { TextColor=Colors.Black };
nameLabel.SetBinding(Label.TextProperty, "Name");
return nameLabel;
});
this.Content = tabView;
}
}
NOTE
You can download the demo from GitHub
NOTE
You can refer to our .NET MAUI Tab View feature tour page for its groundbreaking feature representations. You can also explore our .NET MAUI Tab View example that shows you how to render the .NET MAUI Tab View.
See also
How to load content page to tab page in .NET MAUI Tab View?
How to Load Different Content Page as tab items content in .NET MAUI Tab View?
How to set the BindingContext for .NET MAUI TabItem using various pages?
How to integrate .NET MAUI Tab View with Android native embedding?
How to integrate .NET MAUI Tab View with iOS native embedding?
How to customize .NET MAUI Tab View header with navigation arrows?