How can I help you?
Getting Started with ASP.NET Core Application
ASP.NET Core 1.1 Application Using Visual Studio 2017
System Requirements
To work with ASP.NET Core 1.1 you need to make sure, whether you have installed the following software on your machine
- Visual Studio 2017.
- DotNetCore 1.1 SDK
Configure Syncfusion UI Components in ASP.NET Core Application
You can configure Syncfusion components into an ASP.NET Core Application in following ways.
- Using Syncfusion Project Templates
- Using Syncfusion Project Conversion utility
- Configure the project manually
Using Syncfusion Project Templates
Syncfusion provides the Visual Studio Project Templates for the Syncfusion ASP.NET Core platform to create Syncfusion ASP.NET Core Web Application.
IMPORTANT
The Syncfusion ASP.NET Core project templates are available from v15.2.0.40.
The following steps help you to create the Syncfusion ASP.NET Core Application through the Visual Studio Project Template.
-
To create a Syncfusion ASP.NET Core (Essential JS 1) project, follow either one of the options below:
Option 1:
Click Syncfusion Menu and choose Essential Studio for ASP.NET Core (EJ1) > Create New Syncfusion Project… in Visual Studio.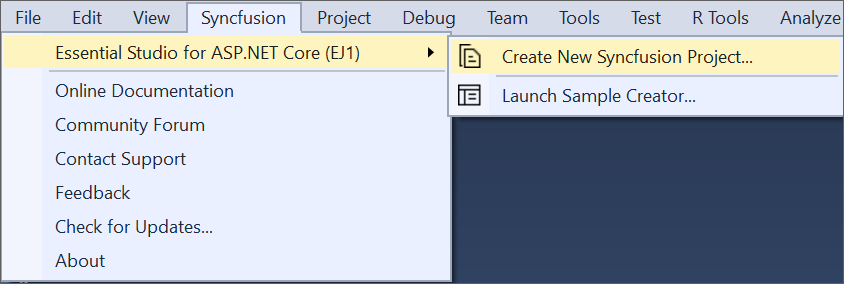
NOTE
In Visual Studio 2019, Syncfusion menu available under Extension in Visual Studio menu.
Option 2:
Choose File > New > Project and navigate to Syncfusion > .NET Core > Syncfusion ASP.NET Core (Essential JS 1) Web Application in Visual Studio.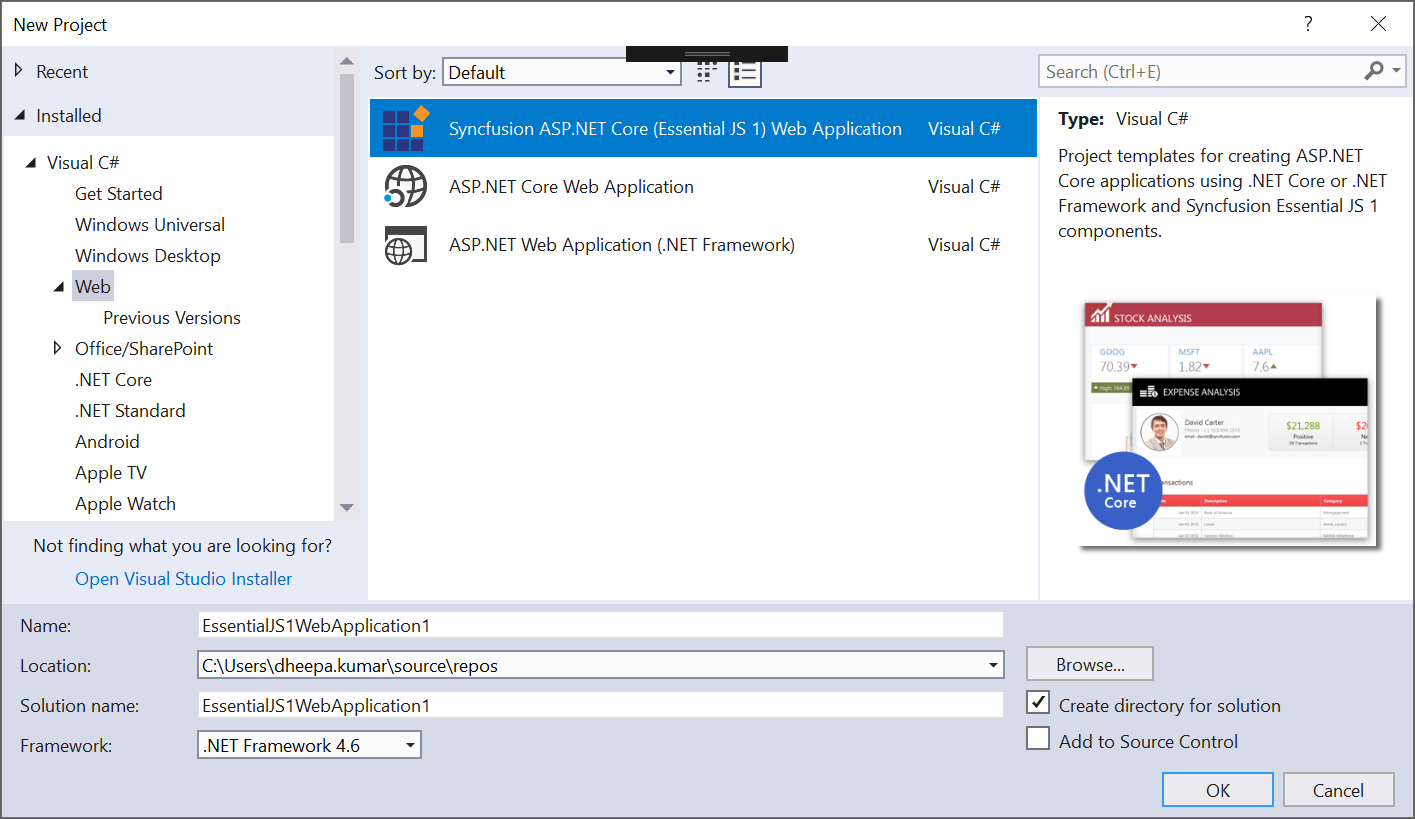
-
Name the Project, choose the destination location when required and set the Framework of the project, then click OK. The Project Configuration Wizard appears.
NOTE
Minimum target Framework version is 4.5.2 for Syncfusion ASP.NET Core Project Templates.
-
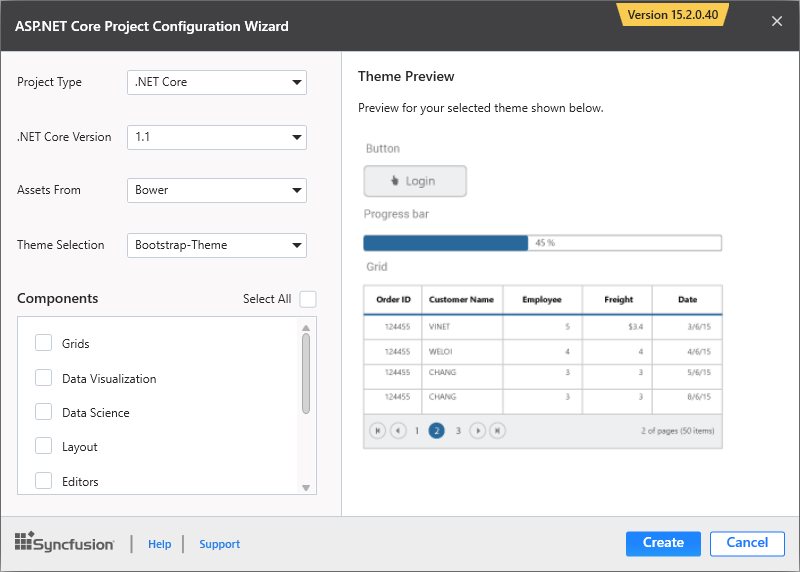
Choose the options to configure the Syncfusion ASP.NET Core Application by using the following Project Configuration dialog.
Project configurations:
Project Type: Select the type of ASP.NET Core Project, either .NET Core or .NET Framework.
.NET Core Version: Select the version of ASP.NET Core Project, either ASP.NET Core 1.0 or ASP.NET Core 1.1.
Assets From: Load the Syncfusion assets to ASP.NET Core Project, either Bower, CDN or Installed Location.
Theme Selection: Choose the required Theme.
Components: Choose the Required Syncfusion components to configure.
-
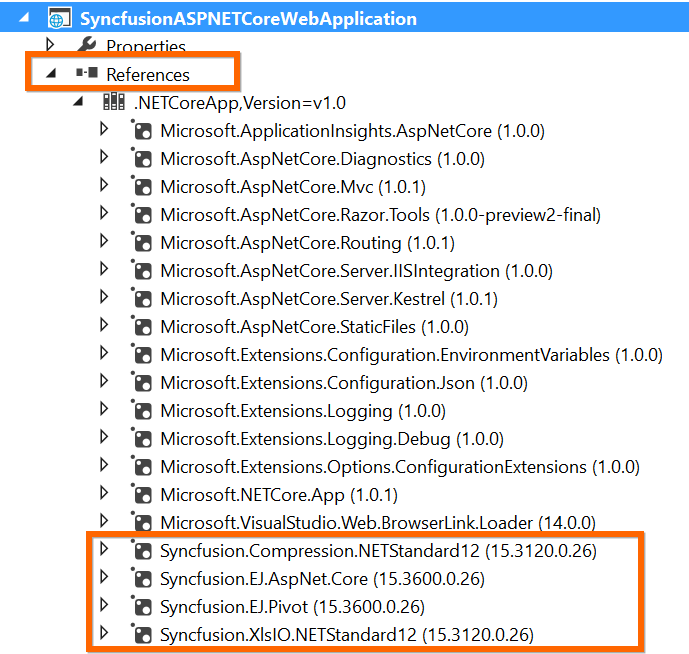
Once you click Create button, the Syncfusion ASP.NET Core Application is created.
-
Required Syncfusion NuGet/Bower packages, Scripts and CSS are added to the Project.
-
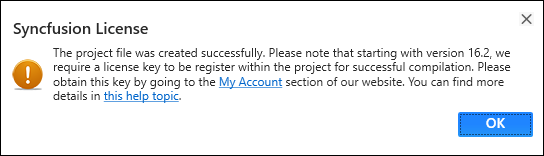
Then, Syncfusion licensing registration required message box will be shown as follow, if you are installed the trial setup or NuGet packages since Syncfusion introduced the licensing system from 2018 Volume 2 (v16.2.0.41) Essential Studio release. Please navigate to the help topic which is shown in the licensing message box to generate and register the Syncfusion license key to your project. Refer to this blog post for understanding the licensing changes introduced in Essential Studio.
Using Syncfusion Project Conversion utility
Syncfusion Project Conversion is a Visual Studio add-in that converts an existing ASP.NET Core application into a Syncfusion ASP.NET Core Web application by adding the required assemblies and resource files.
IMPORTANT
The Syncfusion ASP.NET Core Web Application Project Conversion utility is available from v15.2.0.40.
The following steps help you to use the Syncfusion Project Conversion in the existing ASP.NET Core Web Application.
-
Open an existing Microsoft ASP.NET Core Web Application or create a new Microsoft ASP.NET Core Web Application.
-
To open Project Conversion Wizard, follow either one of the options below:
Option 1:
Click Syncfusion Menu and choose Essential Studio for ASP.NET Core (EJ1) > Convert to Syncfusion ASP.NET Core Application… in Visual Studio.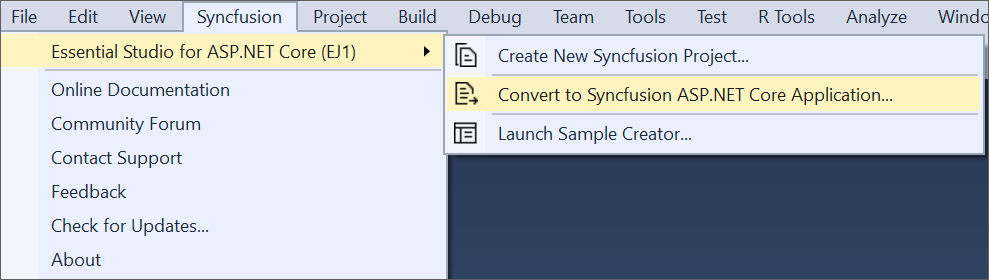
NOTE
In Visual Studio 2019, Syncfusion menu available under Extension in Visual Studio menu.
Option 2:
Right-click the Project from Solution Explorer, select Syncfusion Essential JS 1, and then choose Convert to Syncfusion ASP.NET Core (Essential JS 1) Application… Refer to the following screenshot for more information.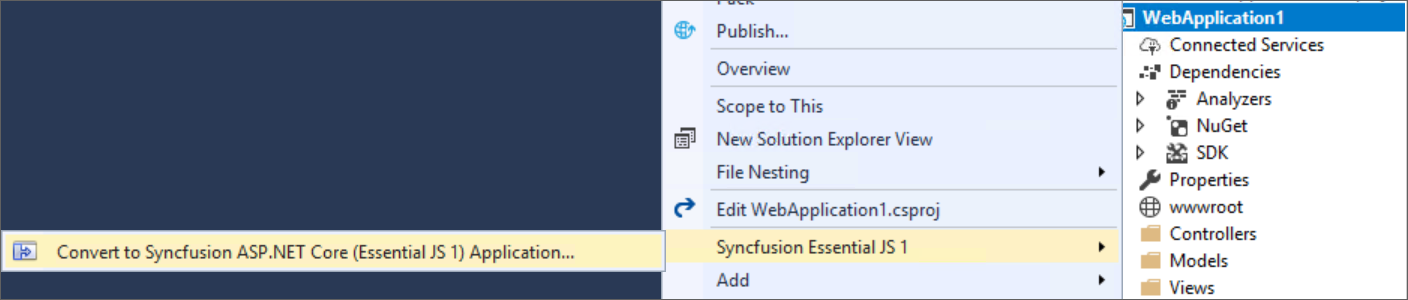
-
Project Conversion Wizard opens to configure the project.
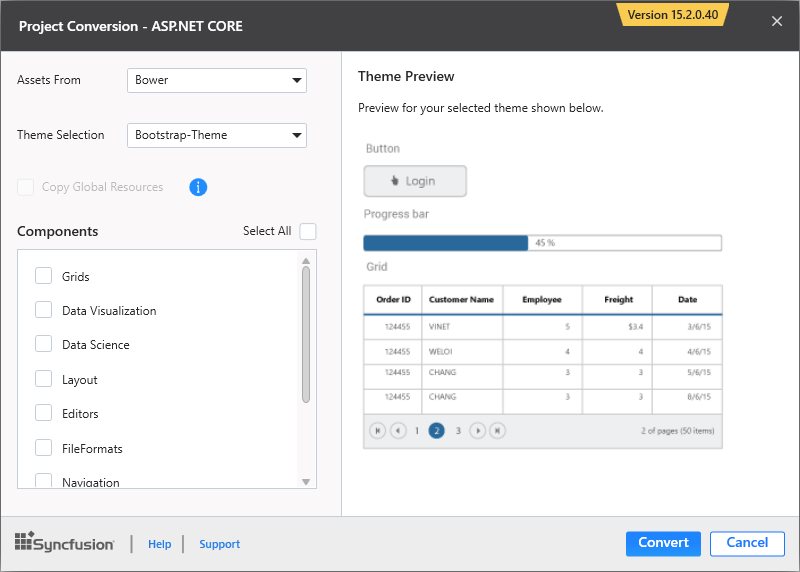
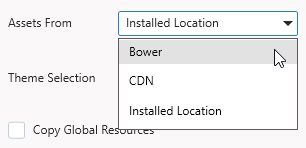
Choose the assets from:
-
Bower - Refer to the assets from Bower package manager.
-
CDN - Refer to the assets from Syncfusion CDN links.
-
Installed Location - Refer to the assets from Syncfusion installed locations.
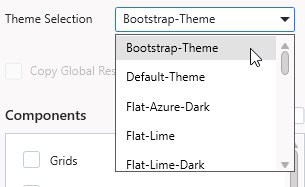
Choose the Theme:
The master page of project will be updated based on selected theme. The Theme Preview section shows the controls preview before convert into a Syncfusion project
Choose Copy Global Resources:

-
-
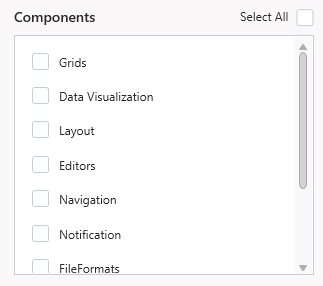
Choose the required controls from Components section and Click the Convert button to convert it into a Syncfusion Project.
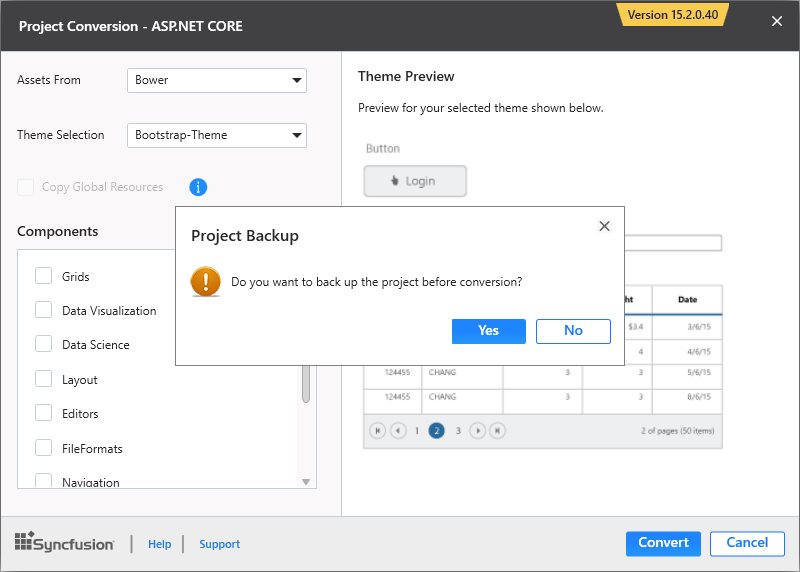
The Project Backup dialog will be opened. If click Yes it will backup the current project before converting it to Syncfusion project. If click No it will convert the project to Syncfusion project without backup.
-
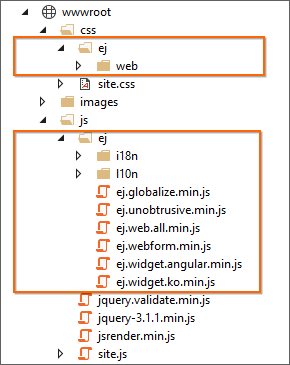
The required Syncfusion NuGet/Bower packages, Scripts and CSS are included in the ASP.NET Core Web Application. Refer to the following screenshots for more information.


Once you converted your ASP.NET Core Web Application to Syncfusion ASP.NET Core Web Application using Syncfusion Visual Studio Extension, Perform the following steps to render the Syncfusion controls to your project.
-
Include the Syncfusion control snippets to any of the view page of your project. Refer the following screenshot for more information.
-
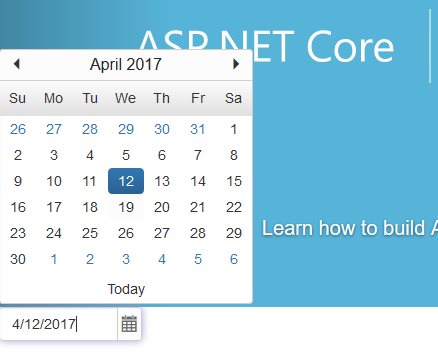
Then run the project and the following output will be displayed.
IMPORTANT
Refer all the required external and internal scripts only once in the page with proper order. Refer this link to know about order of script reference.
Configure the project manually
The following steps helps to create an ASP.NET Core web application to utilize Syncfusion components.
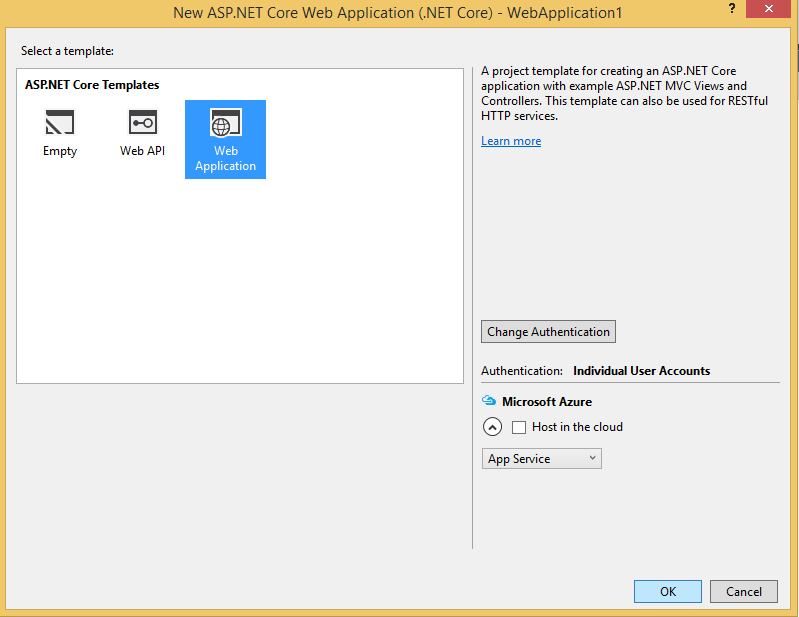
- Open Visual Studio 2017 to create ASP.NET Core web application.
- After project creation, install the Syncfusion NuGet packages in your application by following the below given steps.
The Syncfusion ASP.NET Core NuGet package can be installed from https://www.nuget.org/packages/Syncfusion.EJ.AspNet.Core
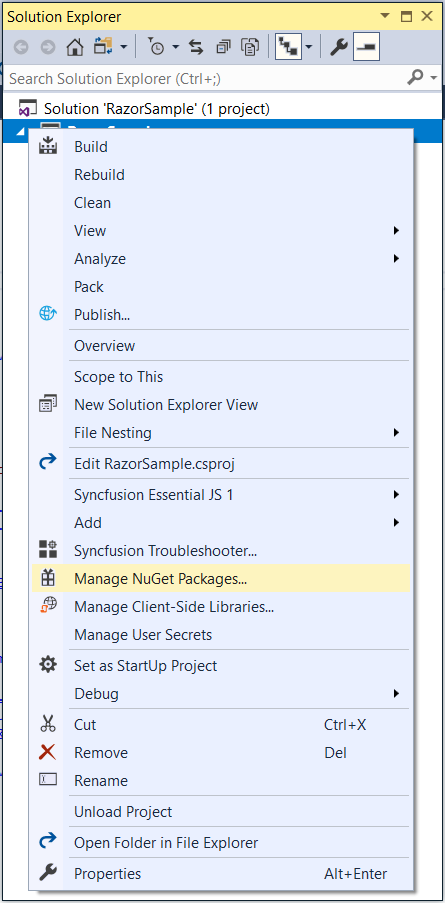
- Right click on your project references and then select “Manage NuGet Package” option.
-
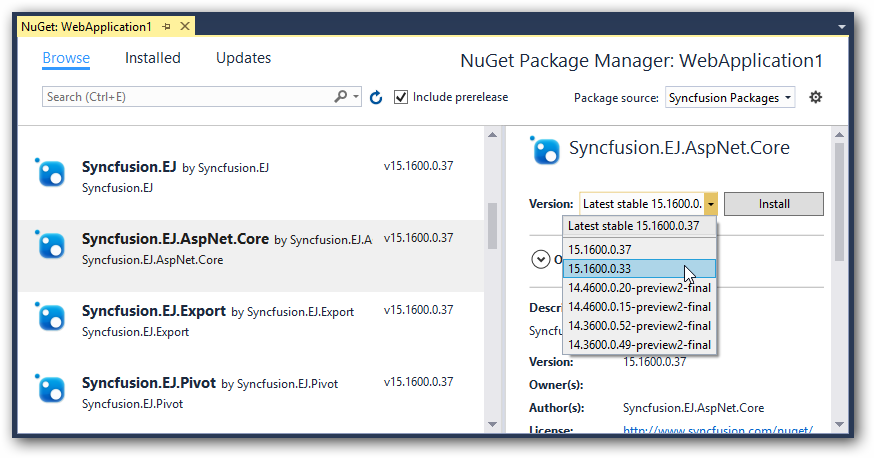
In the new window, choose the “nuget.org” from the package source dropdown. And check the “include prerelease” option.
-
Now, browse and select
Syncfusion.EJ.AspNet.CoreNuGet package from the NuGet solution window and then, install the selected NuGet package in your application.
The ASP.NET Core NuGet packages versioning has been streamlined as 16.1.0.32 in shorter than older versioning (16.1600.0.32) from Volume 1, 2018 service pack 1 release (16.1.0.32). Since all the framework version wise assemblies are grouped into a single package.
The package “Syncfusion.EJ.MVC” renamed into “Syncfusion.EJ.AspNet.Core” from Volume 3, 2016 (14.3.0.49) release. The “preview2-final” keyword removed our Syncfusion packages naming from Volume 1, 2017 (15.1.0.33) release.
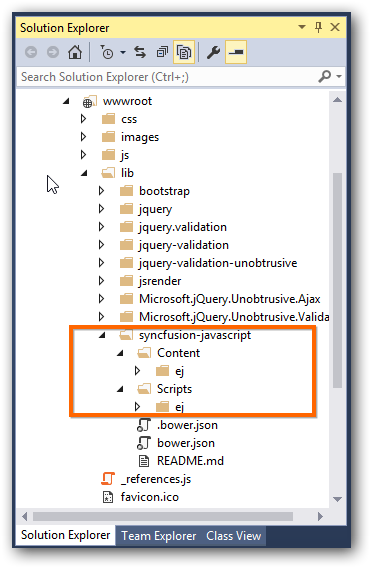
- After successful NuGet installation, open your bower.json file and specify our bower name “syncfusion-javascript” and the value with *. The * specifies the latest version of our scripts and themes files. After, the bower installation has completed, the project folder structure look like a below structure.
- Now open _viewImports.cshtml file from the views folder and add the following namespace for components references and Tag Helper support.
@using Syncfusion.JavaScript

@addTagHelper "*, Syncfusion.EJ"- Refer the necessary scripts and CSS files in your layout.cshtml page from lib -> syncfusion-javascript folder.
NOTE
Include the below mentioned scripts and CSS references under the appropriate environment. (For eg: If your environment is “Development”, then refer the scripts and CSS files under the tag environment names=”Development”). Refer all the required external and internal scripts only once in the page with proper order. Refer this link to know about order of script reference.
<html>

<head>

<link rel="stylesheet" href="~/lib/bootstrap/dist/css/bootstrap.css" />

<link href="~/lib/syncfusion-javascript/Content/ej/web/bootstrap-theme/ej.web.all.min.css" rel="stylesheet" />

<link href="~/lib/syncfusion-javascript/Content/ej/web/responsive-css/ej.responsive.css" rel="stylesheet" />

<script src="~/lib/jquery/dist/jquery.js"></script>

<script src="~/lib/jsrender/jsrender.min.js"></script>

<script src="~/lib/syncfusion-javascript/Scripts/ej/web/ej.web.all.min.js"></script>

</head>

<body>


</body>

</html>
NOTE
jQuery.easing external dependency has been removed from version 14.3.0.49 onwards. Kindly include this jQuery.easing dependency for versions lesser than 14.3.0.49 in order to support animation effects.
- Add ScriptManager to the bottom of the layout.cshtml page. The ScriptManager used to place our control initialization script in the page.
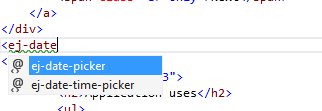
<ej-script-manager></ej-script-manager>- Now open your view page to render our Syncfusion components in Tag Helper syntax.
<ej-date-picker id="datepicker" value="@DateTime.Now"></ej-date-picker>-
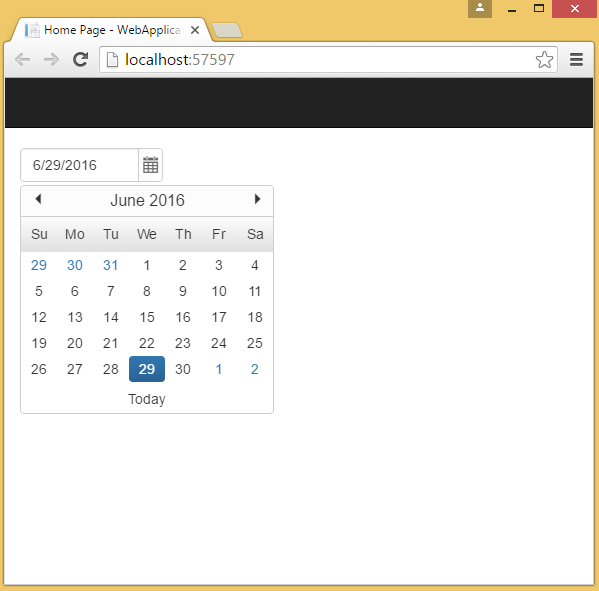
Finally compile your project, after successful compilation then press F5 key to deploy your project.
Syncfusion Project Migration
Syncfusion Project Migration is a Visual Studio add-in that allows you to migrate the existing Syncfusion ASP.NET Core Web Application from one Essential Studio version to another version.
IMPORTANT
The Syncfusion ASP.NET Core Web Application Project Migration utility is available from v15.2.0.40.
The following steps help you to migrate your existing Syncfusion ASP.NET Core Web Application.
-
To open Migration Wizard, follow either one of the options below:
Option 1:
Click Syncfusion Menu and choose Essential Studio for ASP.NET Core (EJ1) > Migrate Project… in Visual Studio.
NOTE
In Visual Studio 2019, Syncfusion menu available under Extension in Visual Studio menu.
Option 2:
Right-click the Syncfusion ASP.NET Core Web Application from Solution Explorer and select Syncfusion Essential JS 1. Choose Migrate the Essential JS 1 Project to Another Version…
-
The Project Migration window appears. You can choose the required Essential Studio version that is installed in the machine.
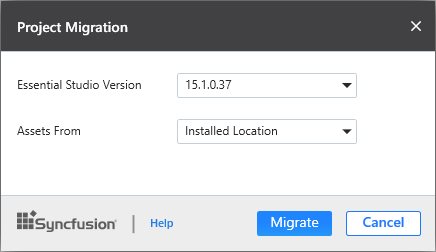
-
The Project Migration window allows you to configure the following options:
i. Essential Studio Version: Select any version from the list of installed versions.
ii. Assets From: Load the Syncfusion assets to ASP.NET Core Project, either Bower, CDN or Installed Location.
-
Click the Migrate Button. The Project Backup dialog will be opened. If click Yes it will backup the current project before migrate the Syncfusion project. If click No it will migrate the project to required Syncfusion version without backup

-
The Syncfusion NuGet/Bower Packages, Scripts and CSS are updated to the corresponding version in the project.