Chips Types in Xamarin Chips
21 Nov 202412 minutes to read
The functionality of chips control differs based on the Type property. No operation can be performed in a chip group unless the Type property is set. The chips control provides four different types, and each has its own functionality. Default value of Type is Input. The types are,
NOTE
Chips are arranged in ChipLayout, which is a type of layout. StackLayout with horizontal orientation is a default type of ChipLayout.
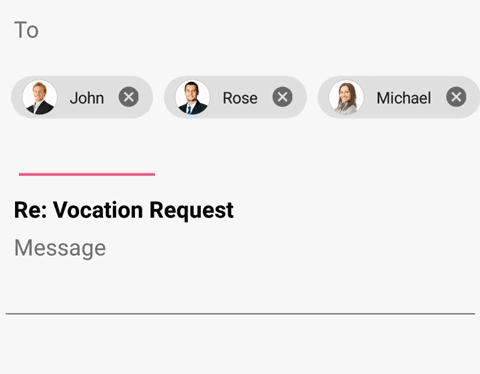
Input
Arranges the chips in a layout and enables the close button for each chip. Using the close button, a chip can be removed from children and layout as well. Additionally, it has support to add an option InputView at the end of the layout, from which users can obtain the chip text for creating a chip at run time.
NOTE
The following code illustrates how to get an input type chip.
<buttons:SfChipGroup
		VerticalOptions="Center"
		x:Name="inputChipGroup" ChipImageWidth="35"
		ItemsSource="{Binding InputItems,Mode=TwoWay}"
		DisplayMemberPath="PersonName"
		ImageMemberPath="PersonImage"
		ShowIcon="True"
		Type="Input"
		ChipPadding="8,8,0,0">
		<buttons:SfChipGroup.InputView>
			<Entry x:Name="entry"
			VerticalOptions="Center" HeightRequest="40"
			FontSize="15"
			WidthRequest="110"
			Completed="Entry_Completed"
			Margin="10,10,0,0">
			</Entry>
		</buttons:SfChipGroup.InputView>
		<buttons:SfChipGroup.ChipLayout>
			<FlexLayout
			HorizontalOptions="Start"
			VerticalOptions="Center"
			Direction="Row"
			Wrap="Wrap"
			JustifyContent="Start"
			AlignContent="Start"
			AlignItems="Start"/>
	</buttons:SfChipGroup.ChipLayout>
</buttons:SfChipGroup>[MainPage.cs]
...
private void Entry_Completed(object sender, EventArgs e)
{
var viewModel = this.BindingContext as ViewModel;
var image = random.Next(1,20);
var name = (sender as InputView).Text;
viewModel.InputItems.Add(new Model() {PersonName=name, PersonImage=Images[image]});
entry.Text = "";
}
..
[ViewModel]
public class ViewModel
{
public ViewModel()
{
InputItems = new ObservableCollection<Model>();
InputItems.Add(new Model() { PersonName = "John", PersonImage = ImageSource.FromResource("ChipType_Sample.Image21.png") });
InputItems.Add(new Model() {PersonName="Rose", PersonImage = ImageSource.FromResource("ChipType_Sample.Image22.png") });
InputItems.Add(new Model() {PersonName="Michael", PersonImage = ImageSource.FromResource("ChipType_Sample.Image23.png") });
}
public ObservableCollection<Model> InputItems
{
get;set;
}
}
[Model]
public class Model:INotifyPropertyChanged
{
private string personName;
public string PersonName
{
get { return personName; }
set { personName = value; OnPropertyChanged("PersonName"); }
}
private ImageSource personImage;
public ImageSource PersonImage
{
get { return personImage; }
set { personImage = value; OnPropertyChanged("PersonImage"); }
}
public event PropertyChangedEventHandler PropertyChanged;
protected void OnPropertyChanged(string propertyName)
{
if (PropertyChanged != null)
{
PropertyChanged(this, new PropertyChangedEventArgs(propertyName));
}
}
}
Download the complete sample here.
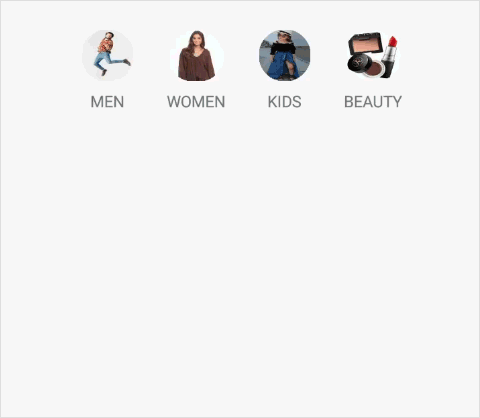
Choice
Allows users to select a single chip from a group of items. Selecting a chip will automatically deselect the previously selected chips. The selected chip color can be customized using the SelectedChipBackgroundColor and SelectedChipTextColor properties. The SelectedItem property holds the instance of recently selected chip.
This selection changes are notified by using SelectionChanging and SelectionChanged events.
You can customize the chip view using ItemTemplate of SfChipGroup.
The following code illustrates how to get choice typed ChipGroup.
<buttons:SfChipGroup
	VerticalOptions="Center"
	ChipImageWidth="40" x:Name="choiceType"
	ItemsSource="{Binding ChoiceItems,Mode=TwoWay}"
	ChipBackgroundColor="Transparent"
	SelectedChipBackgroundColor="Transparent"
	Type="Choice"
	ChipPadding="8,8,0,0">
	<buttons:SfChipGroup.ItemTemplate>
		<DataTemplate>
			<StackLayout>
				<border:SfBorder CornerRadius="20" WidthRequest="40" HeightRequest="40" BorderColor="Transparent" >
					<Image Source="{Binding PersonImage}" Aspect="Fill" VerticalOptions="Center" HorizontalOptions="Center"/>
				</border:SfBorder>
				<Label Text="{ Binding PersonName}" VerticalOptions="Center" HorizontalOptions="Center"/>
			</StackLayout>
		</DataTemplate>
	</buttons:SfChipGroup.ItemTemplate>
	<buttons:SfChipGroup.ChipLayout>
		<FlexLayout
						HorizontalOptions="Start"
						VerticalOptions="Center"
						Direction="Row"
						Wrap="Wrap"
						JustifyContent="Start"
						AlignContent="Start"
						AlignItems="Start"/>
	</buttons:SfChipGroup.ChipLayout>
</buttons:SfChipGroup>[Model]
public class Model : INotifyPropertyChanged
{
private string personName;
public string PersonName
{
get { return personName; }
set { personName = value; OnPropertyChanged("PersonName"); }
}
private ImageSource personImage;
public ImageSource PersonImage
{
get { return personImage; }
set { personImage = value; OnPropertyChanged("PersonImage"); }
}
private ObservableCollection<ImageSource> categoryImage;
public ObservableCollection<ImageSource> CategoryImage
{
get { return categoryImage; }
set { categoryImage = value;
PropertyChanged?.Invoke(this,new PropertyChangedEventArgs("CategoryImage"));
}
}
public event PropertyChangedEventHandler PropertyChanged;
protected void OnPropertyChanged(string propertyName)
{
if (PropertyChanged != null)
{
PropertyChanged(this, new PropertyChangedEventArgs(propertyName));
}
}
}
[ViewModel]
public class ViewModel
{
public ViewModel()
{
ChoiceItems = new ObservableCollection<Model>()
{
new Model()
{
PersonName = "MEN",
PersonImage = ImageSource.FromResource("ChipType_Sample.Mens.Image2.jpg"),
CategoryImage = new ObservableCollection<ImageSource>()
{
ImageSource.FromResource("ChipType_Sample.Mens.Image1.jpg"),
ImageSource.FromResource("ChipType_Sample.Mens.Image2.jpg"),
ImageSource.FromResource("ChipType_Sample.Mens.Image3.jpg"),
ImageSource.FromResource("ChipType_Sample.Mens.Image4.jpg")
}
},
new Model()
{
PersonName = "WOMEN",
PersonImage = ImageSource.FromResource("ChipType_Sample.Girls.Image2.png"),
CategoryImage = new ObservableCollection<ImageSource>()
{
ImageSource.FromResource("ChipType_Sample.Girls.Image1.png"),
ImageSource.FromResource("ChipType_Sample.Girls.Image2.png"),
ImageSource.FromResource("ChipType_Sample.Girls.Image3.png"),
ImageSource.FromResource("ChipType_Sample.Girls.Image4.png"),
ImageSource.FromResource("ChipType_Sample.Girls.Image5.png")
}
},
new Model()
{
PersonName = "KIDS",
PersonImage = ImageSource.FromResource("ChipType_Sample.Kids.download.jpg"),
CategoryImage=new ObservableCollection<ImageSource>
{
ImageSource.FromResource("ChipType_Sample.Kids.Kid1.jpg"),
ImageSource.FromResource("ChipType_Sample.Kids.Kid2.jpg"),
ImageSource.FromResource("ChipType_Sample.Kids.Kid3.jpg"),
ImageSource.FromResource("ChipType_Sample.Kids.Kid4.jpg"),
ImageSource.FromResource("ChipType_Sample.Kids.Kid5.jpg"),
ImageSource.FromResource("ChipType_Sample.Kids.Kid6.jpg")
}
},
new Model()
{
PersonName = "BEAUTY",
PersonImage = ImageSource.FromResource("ChipType_Sample.Makeup.4.jpg"),
CategoryImage=new ObservableCollection<ImageSource>()
{
ImageSource.FromResource("ChipType_Sample.Makeup.1.jpg"),
ImageSource.FromResource("ChipType_Sample.Makeup.2.jpg"),
ImageSource.FromResource("ChipType_Sample.Makeup.3.jpg"),
ImageSource.FromResource("ChipType_Sample.Makeup.4.jpg")
}
}
};
}
public ObservableCollection<Model> ChoiceItems
{
get; set;
}
}
Download the complete sample here.
ChoiceMode
The ChoiceMode property allows user to set the selection mode for Choice type SfChipGroup. The default value of ChoiceMode property is Single. The ChoiceMode supports the following types of selection mode:
Single - At least, one item must be in selected state and the selected item cannot be deselected, if ChoiceMode is Single.
SingleOrNone - Unlike Single, it is possible to deselect the selected item and keep all the items in deselected state.
<ContentPage
    xmlns="http://xamarin.com/schemas/2014/forms"
    xmlns:buttons="clr-namespace:Syncfusion.XForms.Buttons;assembly=Syncfusion.Buttons.XForms"
    xmlns:x="http://schemas.microsoft.com/winfx/2009/xaml"
    xmlns:local="clr-namespace:Chips"
    x:Class="Chips.GettingStarted">
	<ContentPage.Content>
		<buttons:SfChipGroup Type="Choice" ChoiceMode="SingleOrNone">
			<buttons:SfChipGroup.Items>
				<buttons:SfChip Text="Extra Small"/>
				<buttons:SfChip Text="Small"/>
				<buttons:SfChip Text="Medium"/>
				<buttons:SfChip Text="Large"/>
				<buttons:SfChip Text="Extra Large"/>
			</buttons:SfChipGroup.Items>
		</buttons:SfChipGroup>
	</ContentPage.Content>
</ContentPage>
using Syncfusion.XForms.Buttons;
using Xamarin.Forms;
namespace Chips
{
public partial class GettingStarted: ContentPage
{
public GettingStarted()
{
InitializeComponent();
Grid grid = new Grid();
var chipGroup = new SfChipGroup(){Type = SfChipsType.Choice, ChoiceMode = ChoiceMode.SingleOrNone};
grid.Children.Add(chipGroup);
chipGroup.Items.Add(new SfChip(){Text="Extra Small"});
chipGroup.Items.Add(new SfChip(){Text="Small"});
chipGroup.Items.Add(new SfChip(){Text="Medium"});
chipGroup.Items.Add(new SfChip(){Text="Large"});
chipGroup.Items.Add(new SfChip(){Text="Extra Large"});
this.Content = grid;
}
}
}Filter
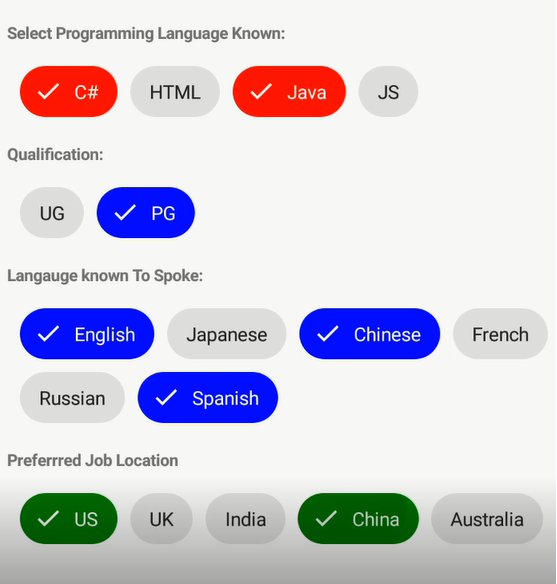
Allows users to select more than one chip in a group of chips. The selected chips are indicated by selection indicator in this type. The selection indicator can be customized using the SelectionIndicatorColorproperty. Use the SelectedItems property to get the list of selected chips.
This selection changes are notified by using SelectionChanging and SelectionChanged events.
The following code illustrates how to get filter typed ChipGroup.
<buttons:SfChipGroup
	Type="Filter"
	ItemsSource="{Binding Languages}"
	SelectedChipBackgroundColor="Red"
	ChipPadding="8,8,0,0"
	SelectionIndicatorColor="White"
	DisplayMemberPath="Name">
	<buttons:SfChipGroup.ChipLayout>
		<FlexLayout
			HorizontalOptions="Start"
			VerticalOptions="Center"
			Direction="Row"
			Wrap="Wrap"
			JustifyContent="Start"
			AlignContent="Start"
			AlignItems="Start"/>
	</buttons:SfChipGroup.ChipLayout>
</buttons:SfChipGroup>[ViewModel]
public class ViewModel : INotifyPropertyChanged
{
private ObservableCollection<Language> languages;
...
public event PropertyChangedEventHandler PropertyChanged;
public ObservableCollection<Language> Languages
{
get
{
return languages;
}
set
{
languages = value;
PropertyChanged?.Invoke(this, new PropertyChangedEventArgs("Languages"));
}
}
...
public ViewModel()
{
Languages = new ObservableCollection<Language>();
Languages.Add(new Language() { Name = "C#" });
Languages.Add(new Language() { Name = "HTML" });
Languages.Add(new Language() { Name = "Java" });
Languages.Add(new Language() { Name = "JS" });
...
}
}
[Language Model]
public class Language
{
public string Name { get; set; }
}
Download the complete sample here.
Action
Action type of SfChipGroup, executes the Command when clicking the chip in SfChipGroup. On its Command action, you can do our desired action.
The Command will execute only for action typed SfChipGroup.
The following code illustrates how to get action typed ChipGroup.
<buttons:SfChipGroup
		VerticalOptions="Center"
		ChipImageWidth="60"
		ItemsSource="{Binding InputItems,Mode=TwoWay}"
		DisplayMemberPath="PersonName"
		ImageMemberPath="PersonImage"
		ShowIcon="True"
		Type="Action" Command="{Binding ActionCommand}"
		ChipPadding="8,8,0,0">
	<buttons:SfChipGroup.ChipLayout>
		<FlexLayout
				HorizontalOptions="Start"
				VerticalOptions="Center"
				Direction="Row"
				Wrap="Wrap"
				JustifyContent="Start"
				AlignContent="Start"
				AlignItems="Start"/>
	</buttons:SfChipGroup.ChipLayout>
</buttons:SfChipGroup>[Model]
public class Model:INotifyPropertyChanged
{
private string personName;
public string PersonName
{
get { return personName; }
set { personName = value; OnPropertyChanged("PersonName"); }
}
private ImageSource personImage;
public ImageSource PersonImage
{
get { return personImage; }
set { personImage = value; OnPropertyChanged("PersonImage"); }
}
private string personMailId;
public string PersonMailId
{
get { return personMailId; }
set { personMailId = value; OnPropertyChanged("PersonMailId"); }
}
...
}
[ViewModel]
public class ViewModel:INotifyPropertyChanged
{
...
public event PropertyChangedEventHandler PropertyChanged;
...
public ObservableCollection<Model> InputItems
{
get; set;
}
public Command ActionCommand { get; set; }
private void ShowPopup(Object obj)
{
//to your desired action
}
public ViewModel()
{
InputItems = new ObservableCollection<Model>();
InputItems.Add(new Model() { PersonName = "John", PersonImage = ImageSource.FromResource("ChipType_Sample.Image1.png"), PersonMailId = "[email protected]" });
InputItems.Add(new Model() { PersonName = "Rose", PersonImage = ImageSource.FromResource("ChipType_Sample.Image2.png"), PersonMailId = "[email protected]" });
ActionCommand = new Command(ShowPopup);
}
}
Download the complete sample here.
See also
How to remove the indicator icon from Xamarin.Forms chip group (SfChipGroup)
How to restrict chip selection in Xamarin
How to select a multiple chips from the Xamarin ChipGroup [SfChipGroup]