How can I help you?
Create your first Form in JavaScript
The Essential JavaScript provides a way to create a Form with the following EJ mobile widgets.
- Textbox
- Numeric Textbox
- Radiobutton
- Checkbox
- Button
In the following guidelines, you are creating a Bill Payment App through that you can learn about the features in the above mentioned widgets.

Bill Payment App

Bill Payment App
Create the necessary layout
In the Bill Payment App, you can use the Textbox control to get the Name of the Person, Email, and Remarks, Numeric Textbox control for Amount field, Radio button for Payment options, Checkbox for the terms and conditions, and Button control to submit the Form. Also you can use the Dialog control for validation and Navigation header on top.
Create an HTML file and paste the following template to it to create a Form.
<div id="header" data-ej-title="Bill Payment" data-role="ejmnavigationbar"></div>
    <div id="ScrollPanel" data-role="ejmscrollpanel">
        <div id="form_sample" class="sample">
            <!--Add Form Element Here-->
            <form id="form1">
                <label>
                    Name of the Person:
                </label>
                <br /><br />
                <div>
                    <!--Textbox-->
                </div>
                <br />
                <label>
                    Amount:
                </label>
                <br /><br />
                <div>
                    <!--Numeric Textbox-->
                </div>
                <br />
                <div>
                    <label>
                        Payment Option:
                    </label>
                </div>
                <br />
                <div>
                    <table class="radio">
                        <tr>
                            <td>
                                <!--Radio Button for Credit-->
                            </td>
                            <td>
                                <!--Radio Button for Debit-->
                            </td>
                        </tr>
                    </table>
                </div>
                <br />
                <label>
                    Email:
                </label>
                <br /><br />
                <div>
                    <!--Add Email Textbox here-->
                </div>
                <br />
                <label>
                    Remarks (Optional):
                </label>
                <br /><br />
                <div>
                    <!--Add Remarks Textbox here-->
                </div>
                <br />
                <div>
                    <table class="check">
                        <tr>
                            <td>
                                <!--Add check box here-->
                            </td>
                        </tr>
                    </table>
                </div>
                <br />
                <div align="center" class="submitbutton">
                    <!--Add submit button here-->
                </div>
            </form>
        </div>
    </div>

    <!--Add dialog control here-->
    <div id="info_msg" data-role="ejmdialog" data-ej-title="Alert" data-ej-leftbuttoncaption="Ok" data-ej-buttontap="exit" data-ej-enablemodal="true">
        <div id="dlgcontent"></div>
    </div>
Add the following styles.
<style>
        .sample {
            padding: 16px;
        }

            .sample .submitbutton {
                text-align: center;
            }

            .sample .chksample {
                display: inline-block;
            }

            .sample label.error {
                color: #FF0000;
            }

        .check td, .radio td {
            min-width: 150px;
        }
    </style>
Add Textbox Control
To render the Textbox control, you need to set “data-role” attribute to “ejmtextbox” to an “input” element.
<!--Textbox-->
                    <input id="user_name" data-ej-type="text" data-role="ejmtextbox" required />
                    <label for="user_name" class="error" generated="true" />
Run this code and you can see the following output.

Form with Essential JS Mobile Textbox
Set Watermark text
The watermark text specifies a short hint that describes the expected value of the input field. This can be achieved by using the “data-ej-watermarktext” attribute.
<input id="user_name" data-ej-type="text" data-role="ejmtextbox" data-ej-watermarktext="User name" required />
Form with Essential JS Mobile Textbox control with watermark text
Add Numeric Textbox Control
To render the Numeric Textbox control, you need to set “data-role” attribute to “ejmnumeric” to an “input” element and set its type attribute to number.
<!--Numeric Textbox-->
                    <input id="amount" data-role="ejmnumeric" data-ej-type="number" required />
                    <label for="amount" class="error" generated="true" />
Form with Essential JS Mobile Numeric Textbox control
A Radio Button control is required for the payment option (credit or debit). To render this control, set data-role attribute to ejmradiobutton to an input element and set its type attribute to radio. By using external label, you can set the text for Radio Button.
<!--Radio Button for Credit-->
                                <input id="credit" name="payoption" data-role="ejmradiobutton" data-ej-checked="true" type="radio" />
                                <label for="credit" class="e-m-input-label">Credit Card</label>

                                <!--Radio Button for Debit-->
                                <input id="debit" name="payoption" data-role="ejmradiobutton" type="radio" />
                                <label for="debit" class="e-m-input-label">Debit Card</label>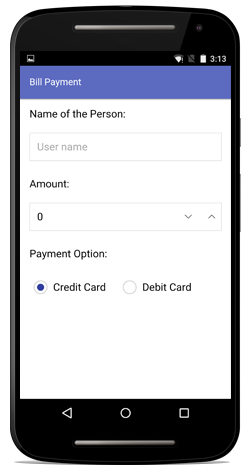
Form with Essential JS Mobile Radio Button control
Add Textbox for E-mail
You can add Textbox for E-mail.
<!--Add Email Textbox here-->
                    <input id="mail" name="mail" data-role="ejmtextbox" data-ej-watermarktext="[email protected]" data-ej-type="email" required />
                    <label for="mail" class="error" generated="true" />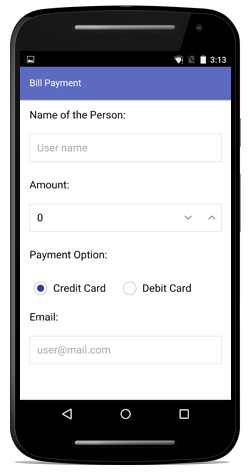
Form with Essential JS Mobile Textbox control
You can add Textbox for Remarks.
<!--Add Remarks Textbox here-->
                    <input name="remarks" data-role="ejmtextbox" data-ej-type="text" data-ej-watermarktext="Remarks" />
Form with Essential JS Mobile
Add Checkbox Control
You can use Checkbox Control for “agree the terms and conditions” option. To render this, set data-role attribute to ejmcheckbox to an input element and set its type attribute to checkbox. By using external labels, you can set the text for the Check box.
<!--Add check box here-->
                                <input id="chkbox" data-role="ejmcheckbox" type="checkbox" />
                                <label for="chkbox" class="e-m-input-label">I accept the terms and conditions</label>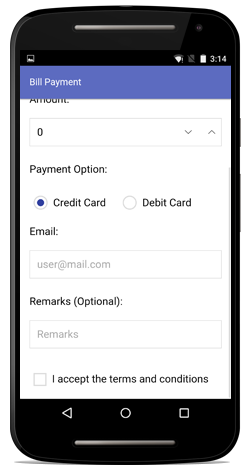
Form with Essential JS Mobile Checkbox control
Add Button Control
You require a Button Control to submit the Form. To render this control, set data-role attribute to ejmbutton to an “input” element. Add the data-ej-text attribute to specify the Button text. By using data-ej-touchend attribute, you can handle the form validation on button click.
<!--Add submit button here-->
                    <input id="btn" name="submit" data-role="ejmbutton" data-ej-text="Pay Bill" type="button" data-ej-touchend="formsubmit" />
Form with Essential JS Mobile Button
Form Validation
The Bill payment is created with required controls and for validation, Essential JavaScript Mobile Dialog control is used to show the status of your payment. Add the below script to your page.
<script type="text/javascript">

        function formsubmit(event) {
            validation();
            $("#form1").submit();
        }

        function exit() {
            if ($("#chkbox").ejmCheckBox("isChecked")) {
                $(".sample input").val("");
                $("#chkbox").ejmCheckBox("model.checked", false);
                $("#btn").val("Pay Bill");
            }
            var dialogObject = $("#info_msg").data("ejmDialog"); // creating instance for dialog
            dialogObject.close(); // close dialog
        }

        function validation() {
            validator = $("#form1").validate({
                debug: true,
                messages: {
                    user_name: { required: "Please enter user name" },
                    amount: { required: "Please enter amount" },
                    mail: { required: "Please enter e-mail" }
                },
                submitHandler: function (form) {
                    var dialogObject = $("#info_msg").data("ejmDialog"); // creating instance for dialog
                    if (!$("#chkbox").ejmCheckBox("isChecked")) {
                        dialogObject.open(); // open dialog
                        $("#dlgcontent").text("Could you please agree our terms and conditions ?");
                    }
                    else {
                        dialogObject.open();
                        $("#dlgcontent").text("Your payment is received successfully");
                    }
                }
            });
        }

    </script>
Form submission without enter any values

Submission with values without acceptance

Final submission with proper values
From the above steps, you have learnt how to create and customize Essential JS mobile Textbox, Numeric Textbox, Maskedit, Radiobutton, checkbox and Button widgets with use case samples. We have more customization properties other than the one used here. To know more about the properties in mentioned mobile widgets please refer the complete documentation page.