How can I help you?
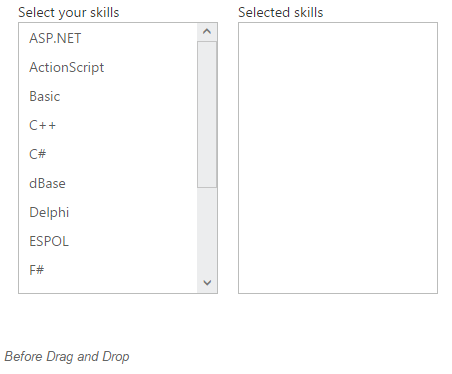
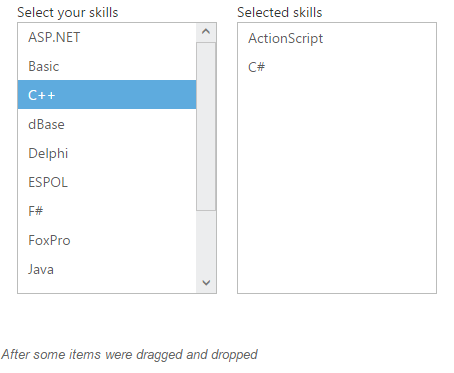
Drag and drop
A list item can be moved from a widget to another ListBox widget. Also the order of list items can be changed. This can be achieved using the drag and drop support.
Transferring a ListBox data to another ListBox
In some scenarios we might want to transfer a ListBox data to another ListBox. In the below steps we will see how to move skills from a ListBox widget to another.
Enable the drag and drop support through allowDrag and allowDrop properties.
<!--listbox1-->
    <div class="control">
        <div>Select your skills</div>
        <ul id="listbox1"></ul>
    </div>

    <!--listbox2-->
    <div class="control">
        <div>Selected skills</div>
        <ul id="listbox2"></ul>
    </div>

    <script type="text/javascript">
        jQuery(function ($) {
            // datasource
            var skillSet = [
               { skill: "ASP.NET" },
               { skill: "ActionScript" },
               { skill: "Basic" },
               { skill: "C++" },
               { skill: "C#" },
               { skill: "dBase" },
               { skill: "Delphi" },
               { skill: "ESPOL" },
               { skill: "F#" },
               { skill: "FoxPro" },
               { skill: "Java" },
               { skill: "J#" },
               { skill: "Lisp" },
               { skill: "Logo" },
               { skill: "PHP" }
            ];

            //create listbox1 - draggable
            $("#listbox1").ejListBox({
                dataSource: skillSet,
                fields: { text: "skill" },
                allowDrag: true
            });
            //create listbox1 – droppable
            $("#listbox2").ejListBox({
                allowDrop: true
            });

        });
    </script>
    <!--define the styles-->
    <style type="text/css" class="cssStyles">
        .control {
            margin-left: 20px;
            float: left;
        }
    </style>
NOTE
The datasource is not set for the second ListBox widget. In the above example we have restricted listbox1 as draggable element and the listbox2 as droppable element. In this case we can’t drag an item from listbox2 to listbox1. If we want to achieve two way drag and drop, we need to enable both allowDrag and allowDrop properties in both ListBox widgets configuration.
Dynamically set data source on drag and drop
In local data binding, while moving the specific item from a ListBox to another, its data source will be updated automatically along with the DOM (which is explained here). But in case of remote binding, only the DOM will be updated. We need to update the data source manually since it’s not possible to update the remote data source. So in this case, we can use itemDrop event to update the datasource of the second ListBox widget based on the dropped items.
Both the ListBox widgets are bound to a remote data source.
<div class="control">
        <ul id="listbox1"></ul>
    </div>
    <div class="control">
        <ul id="listbox2"></ul>
    </div>
    <script type="text/javascript">
        jQuery(function ($) {
            //create data manager
            var dataManager1 = ej.DataManager({
                //ASP.NET Web API
                url: "http://mvc.syncfusion.com/UGService/api/Orders",
                crossDomain: true
            });

            $('#listbox1').ejListBox({
                dataSource: dataManager1,
                fields: { text: "CustomerID" },
                allowDrag: true
            });

            //create data manager
            var dataManager2 = ej.DataManager({
                //OData service
                url: "http://mvc.syncfusion.com/Services/Northwnd.svc/"
            });
            // create query
            var query = ej.Query()
                   .from("Customers").take(10);
            //create listbox2 – droppable
            $('#listbox2').ejListBox({
                dataSource: dataManager2,
                fields: { text: "CustomerID" },
                query: query,
                allowDrop: true,
                itemDrop: "updateDataSource"
            });
        });

        function updateDataSource(args) {
            //update the listbox2's datasource
        }
    </script>
    <!--define the styles-->
    <style type="text/css" class="cssStyles">
        .control {
            margin-left: 20px;
            float: left;
        }
    </style>
In the itemDrop event, we can implement “updateDataSource” function to update the datasource of the second ListBox widget. The “itemDrop” event’s argument contains the details of the dropped item.
Reordering
Item reordering can be done within a ListBox widget by enabling both allowDrag and allowDrop properties.
<ul id="listbox">
        <li>Audi A4</li>
        <li>Audi A5</li>
        <li>Audi A6</li>
        <li>Audi A7</li>
        <li>Audi A8</li>
        <li>BMW 501</li>
        <li>BMW 502</li>
        <li>BMW 503</li>
        <li>Batch</li>
        <li>BMW 507</li>
        <li>BMW 3200</li>
        <li>Cut</li>
    </ul>

    <script type="text/javascript">
        jQuery(function ($) {

            $("#listbox").ejListBox(
                {
                    allowDrag: true,
                    allowDrop: true
                });
        });

    </script>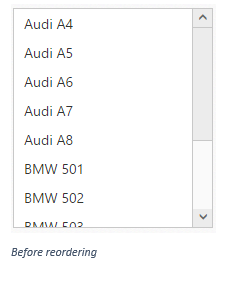

NOTE
The item reordering can be done dynamically without mouse interaction. For that we have provided two APIs namely “moveUp” and “moveDown”.