How can I help you?
Getting Started with JavaScript AutoComplete
This section helps to understand the getting started of the AutoComplete widget with the step-by-step instructions.
Script/CSS reference
Create a new HTML file and include the below code
<!DOCTYPE html>

        <html lang="en" xmlns="http://www.w3.org/1999/xhtml">
        <head>
            <meta charset="utf-8" />
            <title></title>
        </head>
        <body>

        </body>
        </html>
Add link to the CSS file from the specific theme folder to your HTML file within the head section. Refer the built-in theme which is mentioned here.
<head>
            <meta charset="utf-8" />
            <title>Getting Started - Dialog </title>
            <link href="http://cdn.syncfusion.com/32.2.3/js/web/flat-azure/ej.web.all.min.css" rel="stylesheet" />
        </head>
Add links to the CDN Script files with dependencies.
<head>
            <meta charset="utf-8" />
            <title>Getting Started - Dialog</title>
            <link href="http://cdn.syncfusion.com/32.2.3/js/web/flat-azure/ej.web.all.min.css" rel="stylesheet" />
            <script src="http://cdn.syncfusion.com/js/assets/external/jquery-1.10.2.min.js"></script>
            <script src="http://cdn.syncfusion.com/32.2.3/js/web/ej.web.all.min.js"></script>
        </head>
NOTE
In production, we highly recommend you to use our custom script generator to create custom script file with required controls and its dependencies only. Also to reduce the file size further please use GZip compression in your server.
Create an AutoComplete
Add an input element in the HTML file for rendering Autocomplete widget
<body>
                <input type="text" id="autocomplete" />
        </body>
Initialize the AutoComplete widget by adding the following code in script section
$('#autocomplete').ejAutocomplete();Data binding
The data for the suggestion list can be populated using the dataSource property.
See Also
/*Local Data Source*/
        carList = [
               "Audi S6", "Audi S6", "Austin-Healey", "Alfa Romeo", "Aston Martin",
               "BMW 7 ", "Bentley Mulsanne", "Bugatti Veyron",
               "Chevrolet Camaro", "Cadillac ",
               "Duesenberg J ", "Dodge Sprinter",
               "Elantra", "Excavator",
               "Ford Boss 302", "Ferrari 360", "Ford Thunderbird ",
               "GAZ Siber"];

        $('#autocomplete').ejAutocomplete({ dataSource: carList });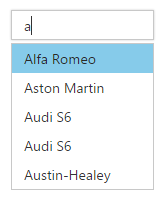
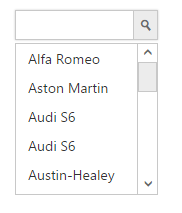
Enable Popup Button
The showPopupButton property helps you to show all the available suggestions on clicking it instead of the search text.
$('#autocomplete').ejAutocomplete({ dataSource: carList, showPopupButton:true });