How can I help you?
Character Settings in ASP.NET MVC DigitalGauge
Appearance
The opacity of the character is adjustable with the help of opacity property. The space between two characters are adjusted with spacing property as like in the segment settings.
@* For Digital Gauge rendering *@

@(Html.EJ().DigitalGauge("DigitalGauge1")

.Width(800)

.Value("Syncfusion")

.Items(it=>

{ it.CharacterSettings(cs => cs

// For setting character opacity

.Opacity(0.3)

// For setting character spacing

.Spacing(3)).Add();

}))
Execute the above code examples to render the DigitalGauge as follows.
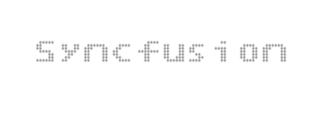
Digital Gauge control with character setting
Count and Type
- The number of text to be displayed can be limited by the attribute called
count. In Digital Gauge five differenttypesof characters are supported. They are as follows,- EightCrossEightDotMatrix
- SevenSegment
- FourteenSegment
- SixteenSegment
- EightCrossEightSquareMatrix.
@(Html.EJ().DigitalGauge("DigitalGauge1")

.Width(800)

.Value("123456789")

.Items(it=>

{ it.CharacterSettings(cs => cs

// For setting character count

.Count(10)

// For setting character spacing

.Spacing(10)

// For setting character type

.Type(CharacterType.SevenSegment))

.SegmentSettings(ss=>

// For setting segment length

ss.Length(8)

// For setting segment width

.Width(1)).Add();

}))
Execute the above code examples to render the DigitalGauge as follows.
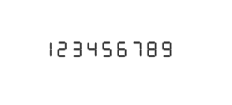
Digital Gauge control with character type as seven segment
Text Positioning
The text in the DigitalGauge is positioned with position object. This object contains two attributes such as x and y. The x variable positions the text in the horizontal axis and the y variable positions the text in the vertical axis.
@* For Digital Gauge rendering *@

@(Html.EJ().DigitalGauge("DigitalGauge1")

// For setting Width and Height

.Width(800).Height(300)

.Frame(fr=>fr

// For setting frame background image

.BackgroundImageUrl("../Content/images/gauge/Board1.jpg"))

.Items(it=> { it.Value("YELLOW")

// For setting segment color

.SegmentSettings(cs=>cs.Color("Yellow"))

.Position(position=>position

// For setting horizontal position

.X(80)

// For setting Vertical position

.Y(10)).Add();}))
Execute the above code examples to render the DigitalGauge as follows.
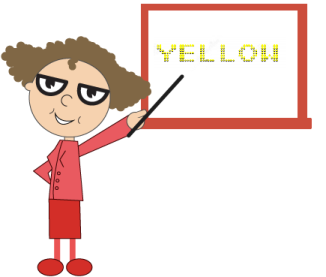
Digital Gauge control with position text based on the background image
Shadow Effects
-
You can add the shadow effects for text using following properties.
-
You can enable/disable the blurring effect for the shadows of the text using
shadow blurproperty. -
You can specify the color of the text shadow using
shadow colorproperty. -
You can set the
x-offsetvalue for the shadow of the text, indicating the location where it needs to be displayed. -
You can set the
y-offsetvalue for the shadow of the text, indicating the location where it needs to be displayed.
-
@* For Digital Gauge rendering*@

@(Html.EJ().DigitalGauge("DigitalGauge1")

// For setting Width and Height

.Width(800)

.Items(it=> { it.Value("WELCOME")

// For setting Shadow blur

.ShadowBlur(20)


// For setting Shadow color  .ShadowColor("Yellow")


// For setting Shadow horizontal offset     .ShadowOffsetX(15)


// For setting Shadow vertical offset .ShadowOffsetY(15)

// For setting segment length and width

.SegmentSettings(cs=>


cs.Length(3) .Width(3)).Add();}))
Execute the above code examples to render the DigitalGauge as follows.

Digital Gauge control with shadow option
Font Customization
You can customize the font of the text as per your requirement. To customize the font, you have to set enableCustomFont. Following font customization options are available.
Font-family- used to set the font-family of the text.
Font-style- used to set the font-style of the text.
Font-size- used to set the font-size of the text.
@* For Digital Gauge rendering *@

@(Html.EJ().DigitalGauge("DigitalGauge1")

.Width(800)

.Value("Syncfusion")

.Items(it=>

{ it.CharacterSettings(cs => cs

// For setting character opacity

.EnableCustomFont(true)

// For setting character spacing

.Font(ft=>ft.FontFamily("Arial").FontStyle(FontStyle.Bold).Size("18px")) ).Add();

}))