Getting Started with WPF Rating
18 Nov 20186 minutes to read
This section explains how to get started with the SfRating control and demonstrates some of its basic customization features.
Assembly deployment
Refer to the Control Dependencies section for the list of assemblies and NuGet packages required to use the SfRating control in a WPF application.
For more information about installing NuGet packages in a WPF application, refer to the following article:
How to install nuget packages
Creating Application with Rating control
In this walkthrough, you will create a WPF application that hosts the SfRating control.
- Creating the project
- Adding the control via the designer
- Adding the control manually in XAML
- Adding the control manually in C#
Creating the project
The following steps describe how to create a WPF project in Visual Studio and add the SfRating control to it.
- Open Visual Studio and click File → New → Project.
- Select WPF App (.NET Framework) or WPF Application (.NET) depending on your target framework.
- Name the project SfRatingSample and click Create.
Adding the control via the designer
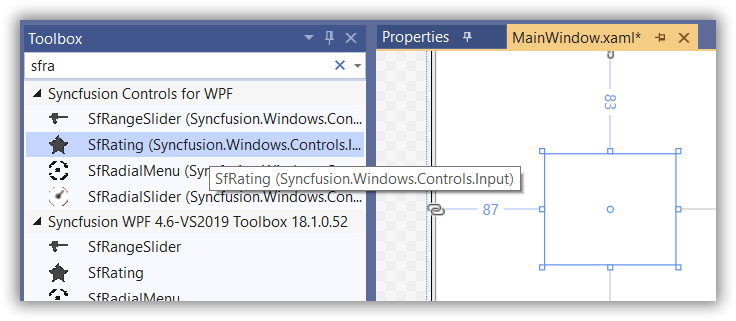
You can add the SfRating control to your application by dragging it from the Toolbox and dropping it onto the designer surface. The required assembly references are added automatically.
- If the Toolbox is not visible, open it from View → Toolbox.
- In the Toolbox search box, type SfRating and locate the control under the Syncfusion WPF tab.
- Drag SfRating onto the designer surface of
MainWindow.xaml.
Adding the control manually in XAML
To add the SfRating control manually in XAML, follow these steps:
-
Add the required assembly references to the project:
- Syncfusion.SfInput.WPF
- Syncfusion.SfShared.WPF
-
Import the Syncfusion WPF namespace
http://schemas.syncfusion.com/wpfin the XAML page. -
Add the SfRating control to the XAML page.
<Window x:Class="SfRatingSample.MainWindow"
        xmlns="http://schemas.microsoft.com/winfx/2006/xaml/presentation"
        xmlns:x="http://schemas.microsoft.com/winfx/2006/xaml"
        xmlns:d="http://schemas.microsoft.com/expression/blend/2008"
        xmlns:mc="http://schemas.openxmlformats.org/markup-compatibility/2006"
        xmlns:local="clr-namespace:SfRatingSample"
        mc:Ignorable="d"
        Title="SfRating Application" Height="450" Width="800"
        xmlns:syncfusion="http://schemas.syncfusion.com/wpf">
    <Grid>
        <syncfusion:SfRating ItemsCount="5" Width="150"/>
    </Grid>
</Window>
Adding the control manually in C#
To add the SfRating control manually in C#, follow these steps:
-
Add the required assembly references to the project:
- Syncfusion.SfShared.WPF
- Syncfusion.SfInput.WPF
-
Import the namespace
Syncfusion.Windows.Controls.Input. -
Create an instance of the
SfRatingcontrol and add it to the window.using System.Windows; using Syncfusion.Windows.Controls.Input; namespace SfRatingSample { /// <summary> /// Interaction logic for MainWindow.xaml /// </summary> public partial class MainWindow : Window { public MainWindow() { InitializeComponent(); //Creating an instance of the SfRating control. SfRating rating = new SfRating() { ItemsCount = 5, Width = 150 }; //Adding SfRating as the window content. this.Content = rating; } } }
Customizing the number of rating items
Use the ItemsCount property to specify the number of rating items displayed in the SfRating control.
The default value of
ItemsCountis0, so no items render until you set this property to a positive integer.
<syncfusion:SfRating ItemsCount="5" Width="150"/>SfRating rating = new SfRating()
{
ItemsCount = 5,
Width = 150
};Setting the value
Use the Value property to specify the currently selected rating. The valid range is from 0 to the value specified by ItemsCount.
By default, the value of this property is
0.
<syncfusion:SfRating ItemsCount="5" Value="3" Width="150"/>SfRating rating = new SfRating()
{
ItemsCount = 5,
Width = 150,
Value = 3
};Setting the selection precision
Use the Precision property to control whether users can select full, half, or exact rating values.
By default, the value of the
Precisionproperty isStandard.
<syncfusion:SfRating ItemsCount="5" Value="3" Precision="Exact" Width="150"/>SfRating rating = new SfRating()
{
ItemsCount = 5,
Width = 150,
Value = 3,
Precision = Syncfusion.Windows.Primitives.Precision.Exact
};
Theme
Rating control supports a variety of built-in themes. Refer to the following articles to learn how to apply themes: