How To
11 Jan 201916 minutes to read
Render UploadBox from code behind
UploadBox can be rendered from the code behind by initializing the required properties in controller and passing those properties via ViewData or Model to the client side
The following code illustrates the rendering of UploadBox using UploadBox properties from code behind.
@{
        Html.EJ().Uploadbox("UploadDefault", (Syncfusion.JavaScript.Models.UploadboxProperties)ViewData["upload"]).Render();
      }
public ActionResult Index()
{
UploadboxProperties upload = new UploadboxProperties();
upload.ExtensionsAllow = ".jpg,.png";
upload.SaveUrl = "SaveDefault";
upload.RemoveUrl = "RemoveDefault";
ViewData["upload"] = upload;
return View();
}
public ActionResult SaveDefault(IEnumerable<HttpPostedFileBase> UploadDefault)
{
foreach (var file in UploadDefault)
{
var fileName = Path.GetFileName(file.FileName);
var destinationPath = Path.Combine(Server.MapPath("~/App_Data"), fileName);
file.SaveAs(destinationPath);
}
return Content("");
}
public ActionResult RemoveDefault(string[] fileNames)
{
foreach (var fullName in fileNames)
{
var fileName = Path.GetFileName(fullName);
var physicalPath = Path.Combine(Server.MapPath("~/App_Data"), fileName);
if (System.IO.File.Exists(physicalPath))
{
System.IO.File.Delete(physicalPath);
}
}
return Content("");
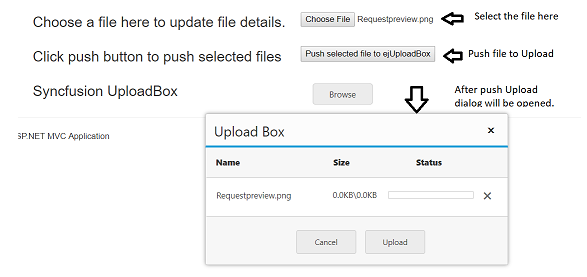
}Upload a file using pushFile property
Raw file details sent from client side will be updated as file details in web method. So, pass the raw file details through push file property and upload the file to server.
The following code illustrates the way to use pushFile property for Upload.
<div id = "ControlRegion">
      <div class="frame">
        <div class="control">
            <table>
                <tbody>
                    <tr>
                        <td>
                            <h3>Choose a file here to update file details.</h3>
                        </td>
                        <td>
                            <input type="file" id="select" />
                        </td>
                   </tr>
                    <tr>
                        <td  style="padding-right:30px">
                            <h3>Click push button to push selected files</h3>
                        </td>
                        <td>
                            <button id="push" onclick="push()">Push selected file to ejUploadBox</button>
                        </td>
                    </tr>
                    <tr>
                    <td>
                        <h3>Syncfusion UploadBox</h3>
                    </td>
                    <td>
                        <div class="posupload">
                            @Html.EJ().Uploadbox("UploadDefault").SaveUrl("SaveDefault").RemoveUrl("RemoveDefault"))
                        </div>
                    </td>
                    </tr>
                </tbody>
            </table>
       </div>
    </div>
    <script>
        var details;
        var fileName;
        $("#select").on("change", function () {
            details = this.files[0]; //get file details selected through input
             fileName = $('input[type=file]').val().replace(/C:\\fakepath\\/i, ''); //get selected filename
        });
        function push() {
            if (fileName && details != null) {
                var Files = { name: fileName, rawFile: details } //Files structure
                var push = $("#UploadDefault").data("ejUploadbox");
                push.setModel({ pushFile: { Files } });//push files to UploadBox
            }
            else
                alert("Please select a file to push");
        }


    </script>
public ActionResult Index()
{
return View();
}
public ActionResult SaveDefault(IEnumerable<HttpPostedFileBase> UploadDefault)
{
var path="";
foreach (var file in UploadDefault)
{
var fileName = Path.GetFileName(file.FileName);
var destinationPath = Path.Combine(Server.MapPath("~/App_Data"), fileName);
path = destinationPath;
file.SaveAs(destinationPath);
}
return Content(path);
}
public ActionResult RemoveDefault(string[] fileNames)
{
foreach (var fullName in fileNames)
{
var fileName = Path.GetFileName(fullName);
var physicalPath = Path.Combine(Server.MapPath("~/App_Data"), fileName);
if (System.IO.File.Exists(physicalPath))
{
System.IO.File.Delete(physicalPath);
}
}
return Content("");
}Choose the file through input and push this file using pushFile property
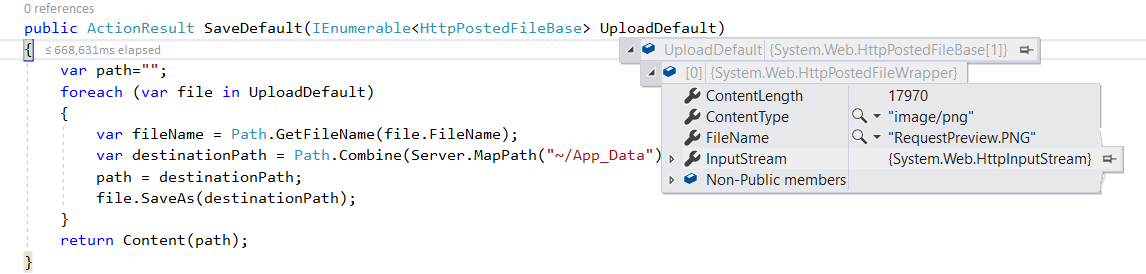
Pass the file details from client side in the below format

Now the file details can be received in the controller as shown below
Use Synchronous upload with drag and drop
Drag and Drop is supported with Synchronous upload from 16.1.0.32 version. Refer to the below given code for uploading a file through drag and drop with Synchronous upload.
@using (Html.BeginForm("SaveSynchronous", "FileUpload", FormMethod.Post, null))
        {
          <div class="control">
          <div class="element">Select a file to upload</div>
          <div class="posupload">
             @Html.EJ().Uploadbox("Synchronous").AllowDragAndDrop(true).AsyncUpload(false)@*Uploading files will be done only on clicking submit button after selecting the files*@
             @Html.EJ().Button("post").Type(ButtonType.Submit).Text("Submit")
        </div>
        <div id="successmsg">@ViewBag.status</div>
        </div>
       }
public ActionResult FileUploadFeatures()
{
if (string.IsNullOrEmpty((string)TempData["status"]))
ViewBag.status = string.Empty;
else
ViewBag.status = (string)TempData["status"];
return View();
}
public ActionResult SaveSynchronous(IEnumerable<HttpPostedFileBase> Synchronous)
{
if (Synchronous != null)
{
foreach (var file in Synchronous)
{
var fileName = Path.GetFileName(file.FileName);
var destinationPath = Path.Combine(Server.MapPath("~/App_Data"), fileName);
file.SaveAs(destinationPath);
}
TempData["status"] = "Successfully Uploaded";
return RedirectToAction("FileUploadFeatures");
}
else
{
TempData["status"] = "Select a file to upload";
return RedirectToAction("FileUploadFeatures");
}
}