How can I help you?
Getting Started with Xamarin TreeMap (SfTreeMap)
8 Jan 202524 minutes to read
This section explains the steps required to configure the TreeMap control in a real-time scenario and provides a walk-through on some of the customization features available in the TreeMap control.
Assembly deployment
After installing Essential Studio® for Xamarin, you can find all the required assemblies in the installation folders, {Syncfusion Essential Studio Installed location} \Essential Studio\{Version #}\Xamarin\lib.
E.g.: C:\Program Files (x86) \Syncfusion\Essential Studio\19.1.0.54\Xamarin\lib
NOTE
Assemblies can be found in unzipped package location(Documents/Syncfusion/{Version #}/Xamarin/lib) in Mac.
Adding SfTreeMap reference
You can add SfTreeMap reference using one of the following methods:
Method 1: Adding SfTreeMap reference from nuget.org
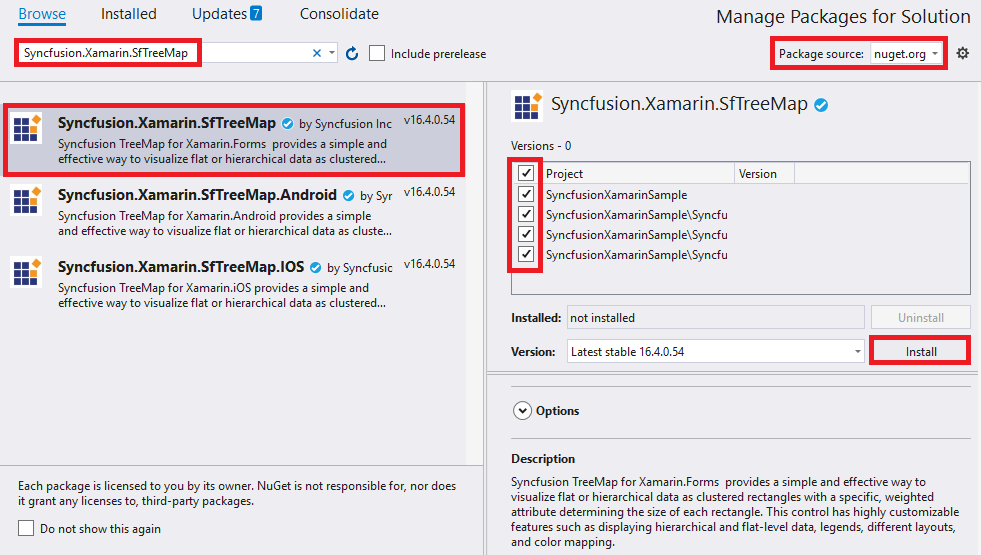
Syncfusion Xamarin components are available in nuget.org. To add SfTreeMap to your project, open the NuGet package manager in Visual Studio, search for Syncfusion.Xamarin.SfTreeMap, and then install it.

NOTE
Install the same version of SfTreeMap NuGet in all the projects.
Method 2: Adding SfTreeMap reference from toolbox
Syncfusion also provides Xamarin Toolbox. Using this toolbox, you can drag the SfTreeMap control to the XAML page. It will automatically install the required NuGet packages and add the namespace to the page. To install Syncfusion Xamarin Toolbox, refer to Toolbox.
Method 3: Adding SfTreeMap assemblies manually from the installed location
If you prefer to manually reference the assemblies instead referencing from NuGet, add the following assemblies in respective projects.
Location: {Installed location}/{version}/Xamarin/lib
| PCL | Syncfusion.SfTreeMap.XForms.dll Syncfusion.Core.XForms.dll Syncfusion.Licensing.dll |
| Android | Syncfusion.SfTreeMap.Android.dll Syncfusion.SfTreeMap.XForms.Android.dll Syncfusion.SfTreeMap.XForms.dll Syncfusion.Core.XForms.dll Syncfusion.Core.XForms.Android.dll Syncfusion.Licensing.dll |
| iOS | Syncfusion.SfTreeMap.iOS.dll Syncfusion.SfTreeMap.XForms.iOS.dll Syncfusion.SfTreeMap.XForms.dll Syncfusion.Core.XForms.dll Syncfusion.Core.XForms.iOS.dll Syncfusion.Licensing.dll |
| UWP | Syncfusion.SfTreeMap.UWP.dll Syncfusion.SfTreeMap.XForms.UWP.dll Syncfusion.SfTreeMap.XForms.dll Syncfusion.Core.XForms.dll Syncfusion.Core.XForms.UWP.dll Syncfusion.Licensing.dll |
NOTE
To know more about obtaining our components, refer to these links for Mac and Windows.
IMPORTANT
Starting with v16.2.0.x, if you reference Syncfusion assemblies from the trial setup or from the NuGet feed, you also have to include a license key in your projects. Please refer to Syncfusion license key to know about registering Syncfusion license key in your Xamarin application to use our components.
NOTE
Currently an additional step is required for UWP project. You need to create an instance of the TreeMap custom renderer. If you are adding the references from toolbox, this step is not needed.
Create an instance of SfTreeMapRenderer in the MainPage constructor of the UWP project as demonstrated in the following code sample.
public MainPage()
{

    new SfTreeMapRenderer ();

    ...

}
Create an instance of SfTreeMapRenderer in the FinishedLaunching overridden method of AppDelegate class in the iOS Project as demonstrated in the following code sample.
public override bool FinishedLaunching(UIApplication app, NSDictionary options)
{

    ...

    new SfTreeMapRenderer ();

    ...

}
Initializing TreeMap
The Treemap control can be configured entirely in C# or using XAML markup.
The first step is to create a TreeMap object.
<?xml version="1.0" encoding="utf-8" ?>
<ContentPage xmlns="http://xamarin.com/schemas/2014/forms"
             xmlns:x="http://schemas.microsoft.com/winfx/2009/xaml"
             xmlns:treemap="clr-namespace:Syncfusion.SfTreeMap.XForms;assembly=Syncfusion.SfTreeMap.XForms"
             x:Class="TreeMap.Page3">
    <ContentPage.Content>
        <treemap:SfTreeMap></treemap:SfTreeMap>
    </ContentPage.Content>
</ContentPage>
public Page3 ()
{
InitializeComponent ();
SfTreeMap treeMap = new SfTreeMap();
this.Content = treeMap;
}Populating TreeMap items
The Treemap items can be populated in two ways using the following properties:
- DataSource
- Items
Using the DataSource property, you can bind the tree map data collection to it. To render leaf nodes for underlying data, levels and leaf item settings have to be specified; it is explained in detail in the Levels
section.
<ContentPage.BindingContext>
        <local:PopulationViewModel></local:PopulationViewModel>
    </ContentPage.BindingContext>

  <treemap:SfTreeMap x:Name="treeMap"  DataSource="{Binding PopulationDetails}" WeightValuePath="Population">
            <treemap:SfTreeMap.LeafItemSettings>
                <treemap:LeafItemSettings  Gap="2" BorderColor="#A9D9F7" LabelPath="Country" >
                </treemap:LeafItemSettings>
            </treemap:SfTreeMap.LeafItemSettings>
            <treemap:SfTreeMap.Levels>
                <treemap:TreeMapFlatLevel  HeaderHeight="20" GroupPath = "Continent" GroupGap =" 5" ShowHeader = "true">
                </treemap:TreeMapFlatLevel>
            </treemap:SfTreeMap.Levels>
        </treemap:SfTreeMap>
public class PopulationViewModel
{
public PopulationViewModel()
{
this.PopulationDetails = new ObservableCollection<PopulationDetail>();
PopulationDetails.Add(new PopulationDetail() { Continent = "Asia", Country = "Indonesia", Growth = 3, Population = 237641326 });
PopulationDetails.Add(new PopulationDetail() { Continent = "Asia", Country = "Russia", Growth = 2, Population = 152518015 });
PopulationDetails.Add(new PopulationDetail() { Continent = "Asia", Country = "Malaysia", Growth = 1, Population = 29672000 });
PopulationDetails.Add(new PopulationDetail() { Continent = "North America", Country = "United States", Growth = 4, Population = 315645000 });
PopulationDetails.Add(new PopulationDetail() { Continent = "North America", Country = "Mexico", Growth = 2, Population = 112336538 });
PopulationDetails.Add(new PopulationDetail() { Continent = "North America", Country = "Canada", Growth = 1, Population = 35056064 });
PopulationDetails.Add(new PopulationDetail() { Continent = "South America", Country = "Colombia", Growth = 1, Population = 47000000 });
PopulationDetails.Add(new PopulationDetail() { Continent = "South America", Country = "Brazil", Growth = 3, Population = 193946886 });
PopulationDetails.Add(new PopulationDetail() { Continent = "Africa", Country = "Nigeria", Growth = 2, Population = 170901000 });
PopulationDetails.Add(new PopulationDetail() { Continent = "Africa", Country = "Egypt", Growth = 1, Population = 83661000 });
PopulationDetails.Add(new PopulationDetail() { Continent = "Europe", Country = "Germany", Growth = 1, Population = 81993000 });
PopulationDetails.Add(new PopulationDetail() { Continent = "Europe", Country = "France", Growth = 1, Population = 65605000 });
PopulationDetails.Add(new PopulationDetail() { Continent = "Europe", Country = "UK", Growth = 1, Population = 63181775 });
}
public ObservableCollection<PopulationDetail> PopulationDetails
{
get;
set;
}
}
public class PopulationDetail
{
public string Continent { get; set; }
public string Country { get; set; }
public double Growth { get; set; }
public double Population { get; set; }
}The Items property accepts a collection of TreeMapItems as input. You can bind tree map items to the Items collection as demonstrated in the following code sample.
<ContentPage.BindingContext>
        <local:DataModel></local:DataModel>
    </ContentPage.BindingContext>

    <ContentPage.Content>
        <treemap:SfTreeMap x:Name="treeMap"  Items = "{Binding TreeMapItems}"></treemap:SfTreeMap>
    </ContentPage.Content>
SfTreeMap treeMap = new SfTreeMap();
DataModel model = new DataModel();
treeMap.Items = model.TreeMapItems;
public class DataModel : BindableObject
{
public static readonly BindableProperty TreeMapItemsProperty =
BindableProperty.Create<DataModel, ObservableCollection<TreeMapItem>>(p => p.TreeMapItems, null, BindingMode.TwoWay, null, null, null, null);
public ObservableCollection<TreeMapItem> TreeMapItems
{
get { return (ObservableCollection<TreeMapItem>)GetValue(TreeMapItemsProperty); }
set { SetValue(TreeMapItemsProperty, value); }
}
public DataModel()
{
this.TreeMapItems = new ObservableCollection<TreeMapItem>();
TreeMapItems.Add(new TreeMapItem() { Label = "Indonesia", ColorWeight = 3, Weight = 237641326 });
TreeMapItems.Add(new TreeMapItem() { Label = "Russia", ColorWeight = 2, Weight = 152518015 });
TreeMapItems.Add(new TreeMapItem() { Label = "United States", ColorWeight = 4, Weight = 315645000 });
TreeMapItems.Add(new TreeMapItem() { Label = "Mexico", ColorWeight = 2, Weight = 112336538 });
TreeMapItems.Add(new TreeMapItem() { Label = "Nigeria", ColorWeight = 2, Weight = 170901000 });
TreeMapItems.Add(new TreeMapItem() { Label = "Egypt", ColorWeight = 1, Weight = 83661000 });
TreeMapItems.Add(new TreeMapItem() { Label = "Germany", ColorWeight = 1, Weight = 81993000 });
TreeMapItems.Add(new TreeMapItem() { Label = "France", ColorWeight = 1, Weight = 65605000 });
TreeMapItems.Add(new TreeMapItem() { Label = "UK", ColorWeight = 1, Weight = 63181775 });
}
}Grouping TreeMap items using levels
You can group TreeMapItems using the following two types of levels:
- TreeMap Flat Level
- TreeMap Hierarchical Level
The Levels are explained in detail in the TreeMapLevels section.
Customizing the appearance of TreeMap by range
You can differentiate the nodes based on their values and colors using RangeColorMapping. You can define the color value range using the From and To properties in Range. The values of From and To properties depend on underlying data bound to the ColorValuePath property.
<treemap:SfTreeMap.LeafItemColorMapping>
                <treemap:RangeColorMapping>
                    <treemap:RangeColorMapping.Ranges>
                        <treemap:Range LegendLabel = "1 % Growth" From = "0" To = "1" Color =  "#77D8D8"  />
                        <treemap:Range LegendLabel = "2 % Growth" From = "0" To = "2" Color =  "#AED960"  />
                        <treemap:Range LegendLabel = "3 % Growth" From = "0" To = "3" Color =  "#FFAF51"  />
                        <treemap:Range LegendLabel = "4 % Growth" From = "0" To = "4" Color =  "#F3D240"  />
                    </treemap:RangeColorMapping.Ranges>
                </treemap:RangeColorMapping>
            </treemap:SfTreeMap.LeafItemColorMapping>
…
ObservableCollection<Range> ranges = new ObservableCollection<Range>();
ranges.Add(new Range() { LegendLabel="1 % Growth", From = 0, To = 1, Color = Color.FromHex("#77D8D8") });
ranges.Add(new Range() { LegendLabel = "2 % Growth", From = 0, To = 2, Color = Color.FromHex("#AED960") });
ranges.Add(new Range() { LegendLabel = "3 % Growth", From = 0, To = 3, Color = Color.FromHex("#FFAF51") });
ranges.Add(new Range() { LegendLabel = "4 % Growth", From = 0, To = 4, Color = Color.FromHex("#F3D240") });
treeMap.LeafItemColorMapping = new RangeColorMapping (){ Ranges = ranges };LeafItemSetting
You can customize the tree map leaf nodes using LeafItemSettings.
<treemap:SfTreeMap.LeafItemSettings>
                <treemap:LeafItemSettings  Gap="2" BorderColor="#A9D9F7" LabelPath="Country" >
                </treemap:LeafItemSettings>
            </treemap:SfTreeMap.LeafItemSettings>
…
LeafItemSettings leafSetting = new LeafItemSettings();
leafSetting.Gap = 2;
leafSetting.BorderColor = Color.FromHex("#A9D9F7");
leafSetting.LabelPath = "Country";
treeMap.LeafItemSettings = leafSetting;Enabling legends
The color value of leaf nodes can be tracked using tree map legend. The legend support is applicable only for the TreeMap whose leaf nodes are colored using RangeColorMapping. Set the value of ShowLegend property to “True” to make legends visible.
Labels for legends
You can customize the labels of legend items using the LegendLabel property in RangeColorMapping.
<treemap:SfTreeMap.LegendSettings>
                <treemap:LegendSettings ShowLegend="True" Size="700,45">
                </treemap:LegendSettings>
            </treemap:SfTreeMap.LegendSettings>
…
LegendSettings legendSettings = new LegendSettings();
legendSettings.ShowLegend = true;
legendSettings.Size = new Size(700, 45);
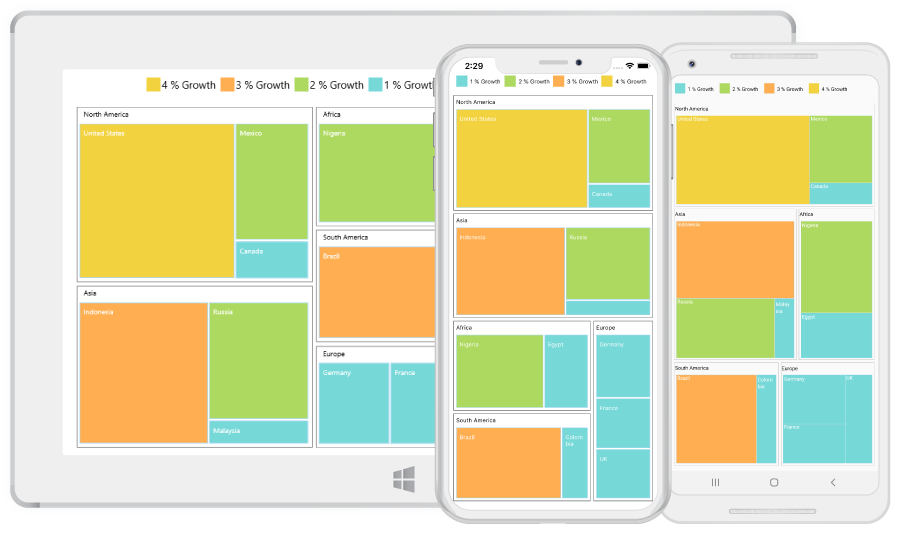
treeMap.LegendSettings = legendSettings;The following code sample helps you reproduce the output.
<ContentPage.BindingContext>
        <local:PopulationViewModel></local:PopulationViewModel>
    </ContentPage.BindingContext>

    <ContentPage.Content>
        <treemap:SfTreeMap x:Name="treeMap"  DataSource="{Binding PopulationDetails}"
        WeightValuePath="Population" ColorValuePath="Growth" LayoutType="Squarified" ShowTooltip="True">
            <treemap:SfTreeMap.LeafItemSettings>
                <treemap:LeafItemSettings OverflowMode="Wrap"  Gap="2" BorderColor="#A9D9F7" LabelPath="Country" >
                </treemap:LeafItemSettings>
            </treemap:SfTreeMap.LeafItemSettings>
            <treemap:SfTreeMap.Levels>
                <treemap:TreeMapFlatLevel  HeaderHeight="20" GroupPath = "Continent" GroupGap =" 5" ShowHeader = "true">
                    <treemap:TreeMapFlatLevel.HeaderStyle>
                        <treemap:Style Color= "Black"/>
                    </treemap:TreeMapFlatLevel.HeaderStyle>
                </treemap:TreeMapFlatLevel>
            </treemap:SfTreeMap.Levels>

            <treemap:SfTreeMap.LegendSettings>
                <treemap:LegendSettings ShowLegend="True"  Size="700,45">
                    <treemap:LegendSettings.LabelStyle>
                        <treemap:Style Color="Black"></treemap:Style>
                    </treemap:LegendSettings.LabelStyle>
                </treemap:LegendSettings>
            </treemap:SfTreeMap.LegendSettings>

            <treemap:SfTreeMap.LeafItemColorMapping>
                <treemap:RangeColorMapping>
                    <treemap:RangeColorMapping.Ranges>
                        <treemap:Range LegendLabel = "1 % Growth" From = "0" To = "1" Color =  "#77D8D8"  />
                        <treemap:Range LegendLabel = "2 % Growth" From = "0" To = "2" Color =  "#AED960"  />
                        <treemap:Range LegendLabel = "3 % Growth" From = "0" To = "3" Color =  "#FFAF51"  />
                        <treemap:Range LegendLabel = "4 % Growth" From = "0" To = "4" Color =  "#F3D240"  />
                    </treemap:RangeColorMapping.Ranges>
                </treemap:RangeColorMapping>
            </treemap:SfTreeMap.LeafItemColorMapping>

        </treemap:SfTreeMap>
    </ContentPage.Content>
PopulationViewModel viewModel = new PopulationViewModel();
SfTreeMap treeMap = new SfTreeMap();
treeMap.BackgroundColor = Color.White;
treeMap.ColorValuePath = "Growth";
treeMap.WeightValuePath = "Population";
treeMap.LayoutType = LayoutTypes.Squarified;
treeMap.ShowTooltip = true;
LeafItemSettings leafSetting = new LeafItemSettings();
leafSetting.Gap = 2;
leafSetting.OverflowMode = LabelOverflowMode.Wrap;
leafSetting.BorderColor = Color.FromHex("#A9D9F7");
leafSetting.LabelPath = "Country";
treeMap.LeafItemSettings = leafSetting;
TreeMapFlatLevel flatLevel = new TreeMapFlatLevel();
flatLevel.HeaderHeight = 20;
flatLevel.GroupPath = "Continent";
flatLevel.GroupGap = 5;
flatLevel.ShowHeader = true;
flatLevel.HeaderStyle = new Syncfusion.SfTreeMap.XForms.Style() { Color = Color.Black };
treeMap.Levels.Add(flatLevel);
LegendSettings legendSettings = new LegendSettings();
legendSettings.ShowLegend = true;
legendSettings.Size = new Size(700, 45);
legendSettings.LabelStyle = new Syncfusion.SfTreeMap.XForms.Style() { Color = Color.Black };
treeMap.LegendSettings = legendSettings;
RangeColorMapping rangeColorMapping = new RangeColorMapping();
Range range1 = new Range();
range1.From = 0;
range1.To = 1;
range1.Color = Color.FromHex("#77D8D8");
range1.LegendLabel = "1 % Growth";
Range range2 = new Range();
range2.From = 0;
range2.To = 2;
range2.Color = Color.FromHex("#AED960");
range2.LegendLabel = "2 % Growth";
Range range3 = new Range();
range3.From = 0;
range3.To = 3;
range3.Color = Color.FromHex("#FFAF51");
range3.LegendLabel = "3 % Growth";
Range range4 = new Range();
range4.From = 0;
range4.To = 4;
range4.Color = Color.FromHex("#F3D240");
range4.LegendLabel = "4 % Growth";
rangeColorMapping.Ranges.Add(range1);
rangeColorMapping.Ranges.Add(range2);
rangeColorMapping.Ranges.Add(range3);
rangeColorMapping.Ranges.Add(range4);
treeMap.LeafItemColorMapping = rangeColorMapping;
treeMap.DataSource = viewModel.PopulationDetails;
this.Content = treeMap;You can find the complete getting-started sample in the following link: Getting-started sample.
The following screenshot illustrates the output of SfTreeMap.
