Getting Started with Xamarin Range Slider (SfRangeSlider)
18 Nov 20185 minutes to read
This section explains you the steps to configure a Xamarin Range Slider (SfRangeSlider) control in a real-time scenario and also provides a walk-through on some of the customization features available in SfRangeSlider control.
Assembly deployment
After installing Essential Studio® for Xamarin, you can find all the required assemblies in the installation folders, {Syncfusion Essential Studio Installed location} \Essential Studio\{Version #}\Xamarin\lib.
E.g.: C:\Program Files (x86) \Syncfusion\Essential Studio\19.1.0.54\Xamarin\lib
Assemblies can be found in unzipped package location(Documents/Syncfusion/{Version #}/Xamarin/lib) in Mac.
Adding SfRangeSlider reference
You can add SfRangeSlider reference using one of the following methods:
Method 1: Adding SfRangeSlider reference from nuget.org
Syncfusion Xamarin components are available in nuget.org. To add SfRangeSlider to your project, open the NuGet package manager in Visual Studio, search for Syncfusion.Xamarin.SfRangeSlider, and then install it.
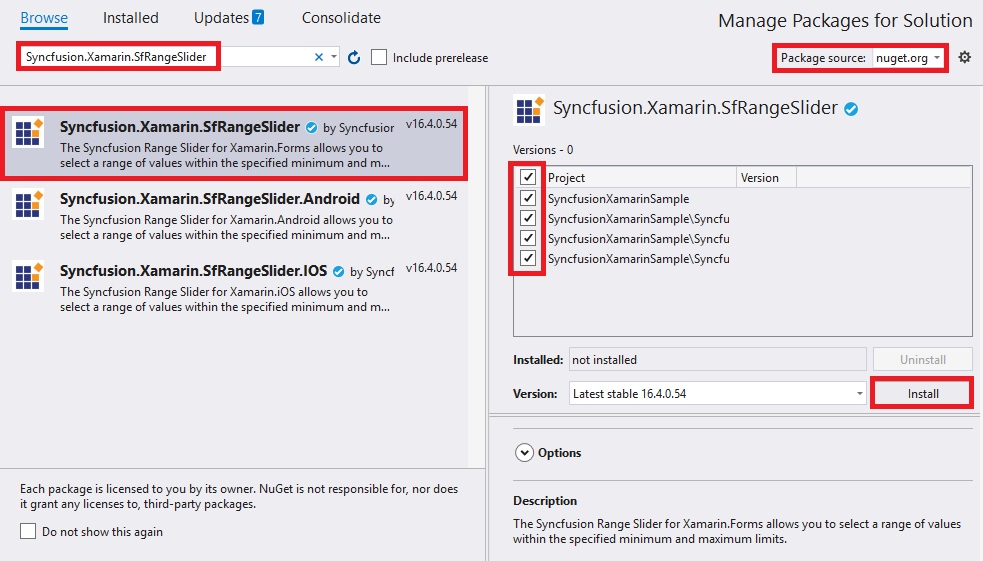
Install the same version of
SfRangeSliderNuGet in all the projects.
Method 2: Adding SfRangeSlider reference from toolbox
Syncfusion also provides Xamarin Toolbox. Using this toolbox, you can drag the SfRangeSlider control to the XAML page. It will automatically install the required NuGet packages and add the namespace to the page. To install Syncfusion Xamarin Toolbox, refer to Toolbox.
Method 3: Adding SfRangeSlider assemblies manually from the installed location
If you prefer to manually reference the assemblies instead referencing from NuGet, add the following assemblies in respective projects.
Location: {Installed location}/{version}/Xamarin/lib
| PCL | Syncfusion.SfRangeSlider.XForms.dll Syncfusion.Core.XForms.dll Syncfusion.Licensing.dll |
| Android | Syncfusion.SfRangeSlider.Android.dll Syncfusion.SfRangeSlider.XForms.Android.dll Syncfusion.SfRangeSlider.XForms.dll Syncfusion.Core.XForms.dll Syncfusion.Core.XForms.Android.dll Syncfusion.Licensing.dll |
| iOS | Syncfusion.SfRangeSlider.iOS.dll Syncfusion.SfRangeSlider.XForms.iOS.dll Syncfusion.SfRangeSlider.XForms.dll Syncfusion.Core.XForms.dll Syncfusion.Core.XForms.iOS.dll Syncfusion.Licensing.dll |
| UWP | Syncfusion.SfInput.UWP.dll Syncfusion.SfShared.UWP.dll Syncfusion.SfRangeSlider.XForms.UWP.dll Syncfusion.SfRangeSlider.XForms.dll Syncfusion.Core.XForms.dll Syncfusion.Core.XForms.UWP.dll Syncfusion.Licensing.dll |
To know more about obtaining our components, refer to these links for Mac and Windows.
Starting with v16.2.0.x, if you reference Syncfusion assemblies from the trial setup or from the NuGet feed, you also have to include a license key in your projects. Please refer to Syncfusion license key to know about registering Syncfusion license key in your Xamarin application to use our components.
Currently an additional step is required for iOS project. You need to create an instance of RangeSlider custom renderer. If you are adding the references from toolbox, this step is not needed.
Create an instance of SfRangeSliderRenderer in the FinishedLaunching overridden method of AppDelegate class in the iOS Project as shown below.
public override bool FinishedLaunching(UIApplication app, NSDictionary options)
{
    new SfRangeSliderRenderer ();
}
Additional step for UWP
This step is required only if the application is deployed in release mode with .NET native tool chain enabled. It is needed for resolving the known Framework issue “Custom controls not rendering in Release mode” in UWP platform. Initializing the SfRangeSlider assembly at the OnLaunched overridden method of the App class in UWP project is the suggested workaround. The following code example demonstrates how to initialize the SfRangeSlider` assembly.
// In App.xaml.cs

protected override void OnLaunched(LaunchActivatedEventArgs e)
{
	…

	rootFrame.NavigationFailed += OnNavigationFailed;

	// you'll need to add `using System.Reflection;`
	List<Assembly> assembliesToInclude = new List<Assembly>();

	//Now, add all the assemblies your app uses
	assembliesToInclude.Add(typeof(SfRangeSliderRenderer).GetTypeInfo().Assembly);

	// replaces Xamarin.Forms.Forms.Init(e);
	Xamarin.Forms.Forms.Init(e, assembliesToInclude);
	…
}- Adding namespace for the added assemblies.
<xmlns:range="clr-namespace:Syncfusion.SfRangeSlider.XForms;assembly=Syncfusion.SfRangeSlider.XForms"/>using Syncfusion.SfRangeSlider.XForms;- Now instantiate and add the SfRangeSlider control with a required optimal name.
<range:SfRangeSlider x:Name="rangeSlider"/>SfRangeSlider rangeSlider=new SfRangeSlider();
this.Content = rangeSlider;Set Range
Xamarin Range Slider (SfRangeSlider) provides option to set single thumb and double thumb. While setting the double thumb, each thumb value can be set using RangeStart and RangeEnd properties.
The
ShowRangeproperty is used to switch between a single thumb and double thumb.
<range:SfRangeSlider x:Name="rangeslider" RangeEnd="20" RangeStart="4" ShowRange="true"/>SfRangeSlider rangeSlider=new SfRangeSlider();
rangeSlider.RangeEnd=20;
rangeSlider.RangeStart=4;
rangeSlider.ShowRange=true;
this.Content = rangeSlider;Restricting Values
SfRangeSlider provides option to restrict slider range between minimum and maximum values. Following code explains how to set the range using Minimum and Maximum properties in the SfRangeSlider.
<range:SfRangeSlider x:Name="rangeslider" Minimum="0" Maximum="24"/>SfRangeSlider rangeSlider=new SfRangeSlider();
rangeSlider.RangeEnd=20;
rangeSlider.RangeStart=4;
rangeSlider.ShowRange=true;
rangeSlider.Minimum=0;
rangeSlider.Maximum=24;
this.Content = rangeSlider;Adding Snapping Mode
The movement of the thumb can be varied in different ways. This is achieved by setting the SnapsTo property.
<range:SfRangeSlider x:Name="rangeslider" SnapsTo="Ticks" StepFrequency="6"/>SfRangeSlider rangeSlider=new SfRangeSlider();
rangeSlider.RangeEnd=20;
rangeSlider.RangeStart=4;
rangeSlider.ShowRange=true;
rangeSlider.Minimum=0;
rangeSlider.Maximum=24;
rangeSlider.SnapsTo=SnapsTo.Ticks;
rangeSlider.StepFrequency=6;
this.Content = rangeSlider;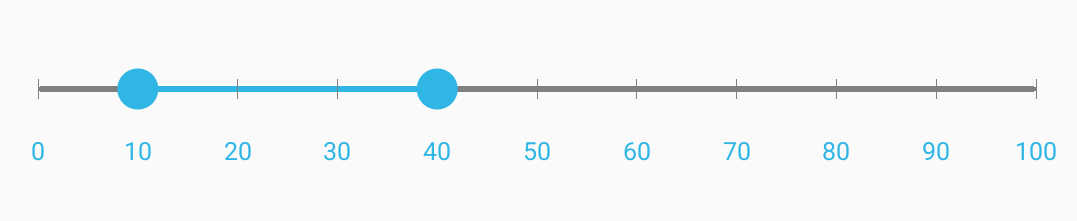
The complete Getting Started sample is available in this link.