Getting Started with WPF Notify Icon
18 Oct 20225 minutes to read
This section provides you an overview of working with NotifyIcon for WPF and provides a walkthrough to configure the NotifyIcon control in a real-time scenario.
Assembly deployment
Refer to the control dependencies section to get the list of assemblies or NuGet package that needs to be added as a reference to use the control in any application.
Further information on installing the NuGet package can be found in the following link:
How to install nuget packages.
You can also use the Syncfusion Reference Manager to refer to the NotifyIcon’s dependent assemblies.
Creating an application with NotifyIcon control
In this walkthrough, you will create a WPF application that contains the NotifyIcon control.
Creating a project
Create a new WPF project to show the NotifyIcon control in Visual Studio.
Adding the control manually in XAML
To add the control manually to the XAML page, follow the given steps:
-
Add the following required assembly references to the project,
- Syncfusion.Shared.WPF
- Syncfusion.Tools.WPF
- Syncfusion.Shared.WPF.Classic
- Syncfusion.Tools.WPF.Classic
-
Import Syncfusion.WPF schema http://schemas.syncfusion.com/wpf in the XAML page or clr-namespace:Syncfusion.Windows.Tools.Controls;assembly=Syncfusion.Tools.Wpf.Classic namespace.
-
Declare the
NotifyIconcontrol in XAML page.<Window xmlns="http://schemas.microsoft.com/winfx/2006/xaml/presentation" xmlns:x="http://schemas.microsoft.com/winfx/2006/xaml" xmlns:d="http://schemas.microsoft.com/expression/blend/2008" xmlns:mc="http://schemas.openxmlformats.org/markup-compatibility/2006" xmlns:local="clr-namespace:NotifyIcon_GettingStarted" xmlns:syncfusion="http://schemas.syncfusion.com/wpf" x:Class="NotifyIcon_GettingStarted.MainWindow" xmlns:tools="clr-namespace:Syncfusion.Windows.Tools.Controls;assembly=Syncfusion.Tools.Wpf.Classic" mc:Ignorable="d" Title="MainWindow" Height="450" Width="800"> <Grid> <syncfusion:NotifyIcon Height="80" Width="150" /> </Grid> </Window>
Adding control manually in C#
To add the control manually in C#, follow the given steps:
-
Add the following required assembly references to the project,
- Syncfusion.Shared.WPF
- Syncfusion.Tools.WPF
- Syncfusion.Shared.WPF.Classic
- Syncfusion.Tools.WPF.Classic
-
Import the
NotifyIconnamespace Syncfusion.Windows.Tools.Controls. -
Create the
NotifyIconcontrol instance and add it to the page.using Syncfusion.Windows.Tools.Controls; using System.Windows; namespace NotifyIcon_GettingStarted { /// <summary> /// Interaction logic for MainWindow.xaml /// </summary> public partial class MainWindow : Window { public MainWindow() { InitializeComponent(); NotifyIcon notifyIcon = new NotifyIcon(); notifyIcon.Height = 80; notifyIcon.Width = 150; this.Content = notifyIcon; } } }
Show the notify icon
You can set the icon to the NotifyIcon control using the Icon property and then display the notify icon by setting the ShowInTaskBar property to true.
<syncfusion:NotifyIcon Name="notify" Header="NotifyIcon" Height="80" ShowInTaskBar="True" Width="150" Icon="images\notifyicon.png" />![]()
Text
You can use the Text property to add text to the NotifyIcon control. It will be shown on the notify icon while hovering.
<syncfusion:NotifyIcon Name="notify" Header="NotifyIcon" Height="80" ShowInTaskBar="True" Width="150" Icon="images\notifyicon.png" Text="Notify me" />notify.Text = "Notify me";
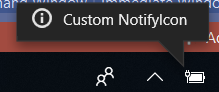
Tooltip
You can show the tooltip for NotifyIcon control by using the ShowBalloonTip method. You can also add a title and text by using the BalloonTipTitle and BalloonTipText properties. You can enable the title by setting the BalloonTipHeaderVisibility property to true.
<syncfusion:NotifyIcon Name="notify" Header="NotifyIcon" Height="80" ShowInTaskBar="True" Width="150"
                       Icon="images\notifyicon.png" Text="Notify me"
                       BalloonTipTitle="Default NotifyIcon" BalloonTipText="Custom NotifyIcon"
                       BalloonTipHeaderVisibility="Visible" />
//Show the balloontip.
notify.ShowBalloonTip(3000);
NOTE
Theme
NotifyIcon supports various built-in themes. Refer to the below links to apply themes for the NotifyIcon,