Liquid Glass Effect in .NET MAUI Chips (SfChip)
27 Jul 20263 minutes to read
The Liquid Glass Effect introduces a modern, translucent design with adaptive color tinting and light refraction, creating a sleek, glass-like user experience that remains clear and accessible. This page explains how to enable and customize the effect in the Syncfusion® .NET MAUI Chips (SfChip) control.
Prerequisites
Before using the SfChip and SfChipGroup, Install the Syncfusion.Maui.Core NuGet packages in your .NET MAUI project. The Syncfusion.Maui.Core package is required for the SfGlassEffectView container used to host the Liquid Glass Effect.
For a step-by-step setup, refer to the Getting Started documentation.
NOTE
- The Liquid Glass Effect is supported only on .NET 10 targeting macOS 26 or higher and iOS 26 or higher.
- It is not supported on Android or Windows.
Apply the Liquid Glass Effect
Follow these steps to enable and configure the Liquid Glass Effect in the SfChipGroup:
Step 1: Enable the effect
Set the EnableLiquidGlassEffect property to true on the SfChipGroup. When enabled, the effect is applied to the chips and to dependent controls (such as the close button on Input-type chips).
Step 2: Set a transparent background
To achieve a glass-like background on the SfChipGroup, set its Background property to Transparent. The background is then treated as a tinted color, ensuring a consistent glass effect across the controls.
Step 3: Place the control over a colorful image or gradient
The effect relies on the pixels behind the control. Place the SfChipGroup over a wallpaper, gradient, or other colorful content to see the tinting and refraction.
Example
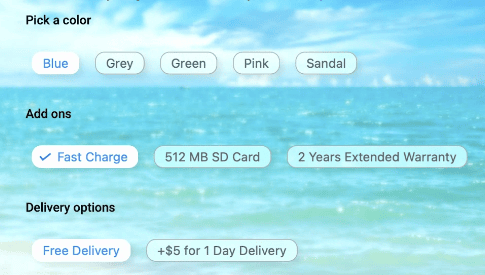
The following example shows an SfChipGroup with the Liquid Glass Effect enabled, placed over a wallpaper image.
<Grid>
    <Image Source="Wallpaper.png"
           Aspect="AspectFill" />
    <chip:SfChipGroup x:Name="filterChips"
                      EnableLiquidGlassEffect="True"
                      Background="Transparent">
        <chip:SfChip Text="Extra Small" />
        <chip:SfChip Text="Small" />
        <chip:SfChip Text="Medium" />
        <chip:SfChip Text="Large" />
        <chip:SfChip Text="Extra Large" />
    </chip:SfChipGroup>
</Grid>
var grid = new Grid();
grid.Children.Add(new Image
{
Source = "Wallpaper.png",
Aspect = Aspect.AspectFill
});
var filterChips = new SfChipGroup
{
EnableLiquidGlassEffect = true,
Background = Colors.Transparent
};
filterChips.Items.Add(new SfChip { Text = "Extra Small" });
filterChips.Items.Add(new SfChip { Text = "Small" });
filterChips.Items.Add(new SfChip { Text = "Medium" });
filterChips.Items.Add(new SfChip { Text = "Large" });
filterChips.Items.Add(new SfChip { Text = "Extra Large" });
grid.Children.Add(filterChips);
Content = grid;The following screenshot illustrates SfChipGroup with the Liquid Glass Effect enabled via EnableLiquidGlassEffect, displayed over a wallpaper background.