Ionic
7 Jun 20237 minutes to read
Introduction
Ionic is an open source Mobile SDK for developing native and progressive web apps. Ionic offers a library of mobile-optimized HTML, CSS and JS components and tools for building highly interactive native and progressive Web apps. Built with Sass, optimized for AngularJS.
Please go through the http://ionicframework.com/ page.
Prerequisites and Compatibility
Prerequisites
While running the ionic it requires Node.js (which includes npm) on your system.
Install Ionic
First install the latest Cordova and Ionic command-line tools in your terminal. Follow the Windows and Mac guides to install required tools for development.
Windows
npm install -g cordova ionicMac
$ sudo npm install -g cordova ionicGetting started
Steps to add the sample and run the application
Get basic application
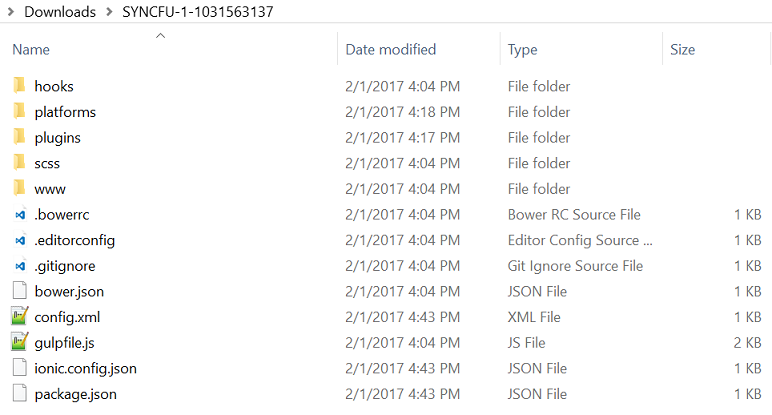
Get Syncfusion blank ionic project from this link. Then extract the project, folder holds following files

Now open command prompt and navigate to this ionic project location, then type npm command for installing node_modules in project
npm installUsing Syncfusion Essential JS controls with Ionic Framework
This step by step guide is used to create a combination of Essential JS UI controls with Ionic Framework.
After install npm, add the Syncfusion JS and CSS file reference in index.html file from www folder location
Adding the required style sheets into CSS folder
In the below specified location, you can find all the required web related theme folders. Copy the folder web in to the www*ej\themes* folder of your application.
(installed location)/Syncfusion/Essential Studio/32.1.19/JavaScript/assets/css
Now, Include the specific theme reference to your HTML file by referring the appropriate ej.web.all.min.css file from a particular theme folder (here, we have referred the default-theme), within html file, head section
<link href="ej/themes/web/default-theme/ej.web.all.min.css" rel="stylesheet">Adding the required JavaScript files
Essential JS widgets requires the following external dependent scripts,
-
jQuery (version supported from 1.7.1)
-
jsrender.min.js
In the below specified location, you can find the dependent script files. Copy and paste it into the www\ej\scripts folder of your application,
(installed location)/Syncfusion/Essential Studio/32.1.19/JavaScript/assets/external
Apart from the above dependent scripts, you need to refer the ej.web.all.min.js file, which contains all the JavaScript components script and globalize library packed together in a minified format.
Copy the ej.web.all.min.js file into the www**ej\scripts** folder.
(installed location)/Syncfusion/Essential Studio/32.1.19/JavaScript/assets/scripts/web
Now, Include the below scripts reference within html file, head section
<script src="ej/scripts/jquery-2.1.4.min.js"></script>
<script src="ej/scripts/jsrender.min.js"></script>
<script src="ej/scripts/ej.web.all.min.js"></script>
Supported jQuery Versions
The following link provides jQuery compatibility information of ej controls
https://help.syncfusion.com/js/control-initialization#supported-jquery-versions
Steps to change application name
Application name of ionic project possible to change by following simple steps
Open config.xml file from ionic project location, here <name> tag is responsible for the app name. Put your required name between this tag.
<name> Syncfusion </name>Initialize control
Add the Syncfusion grid control sample inside the ion-content in index.html file. All the Syncfusion widget’s control directives are prefixed with ej- to avoid conflict with other library directives and its properties are defined using e- prefix followed by the property name.
<div id="BasicGrid" class="ang-grid" ej-grid e-datasource="employeeList" e-allowsorting="true" e-allowpaging="true" e-pagesettings-pagesize="5" e-isresponsive="true" e-minwidth="500" e-allowscrolling="true" e-scrollsettings-height="100%">
  <div e-columns>
    <div e-column e-headertext="Employee ID" e-template="#templateDetails" e-width="90"></div>
    <div e-column e-field="CompanyName" e-headertext="Company Name" e-width="90"></div>
    <div e-column e-field="Phone" e-headertext="Phone" e-width="90"></div>
</div>
Declare angular dependency
Essential JS includes AngularJS directives for all controls in ej.widget.angular.min.js script file. In the below specified location, you can find required script file
Copy the ej.widget.angular.min.js file into the www**ej\scripts** folder.
(installed location)/Syncfusion/Essential Studio/32.1.19/JavaScript/assets/scripts/common
Then include the below scripts reference within html file, head section
<script src="ej/scripts/ej.widget.angular.min.js"></script>All the Essential JS directives have been encapsulated into a single module called ejAngular, so the first step would be to declare dependency for this module within your ionic application. Now open the app.js in the location (www/js) modify codes as below
angular.module('starter', ['ejangular', 'ionic'])Initializing controller
In app.js file, you can create separate controller for each control used in that project. Control properties declared inside the corresponding controller
.controller('GridCtrl', function ($scope, $compile, $document) {

    $scope.dateValue = "2/3/2013";

})
Then add ng-controller attribute in sample holding container as mentioned below
<div ng-controller="GridCtrl">
  <div class="angularbind">
    <div id="control">
      <div id="BasicGrid" class="ang-grid" ej-grid e-datasource="employeeList" e-allowsorting="true" e-allowpaging="true" e-pagesettings-pagesize="5" e-isresponsive="true" e-minwidth="500" e-allowscrolling="true" e-scrollsettings-height="100%">
        <div e-columns>
          <div e-column e-headertext="Employee ID" e-template="#templateDetails" e-width="90"></div>
          <div e-column e-field="CompanyName" e-headertext="Company Name" e-width="90"></div>
          <div e-column e-field="Phone" e-headertext="Phone" e-width="90"></div>
        </div>
      </div>
    </div>
  </div>
</div>
<script type="text/x-jsrender" id="templateDetails">
  <div class="entries"><b>Employee ID: </b></div>
  <div class="entries"><b>Employee Name: </b></div>
  <div class="entries"><b>Gender: </b></div>
</script>
Steps for run your application
Run application in browser
Testing your app in the browser it fast, easy and convenient when your app is in development
cd myApp

ionic serve
Deploy application in device
Android
Deploying app into android device, checkout below system requirements
Requirements for Android
-
Updated Android SDK tools, platform and component dependencies. Available through Android Studio’s SDK Manager
Commands
ionic platform add android

ionic build android

ionic run android
IOS
Requirements for IOS
Deploying app into ios device, checkout this system requirements
-
Xcode 7 or higher
-
iOS 9
-
A free Apple ID or paid Apple Developer account
Commands
$ ionic platform add ios

$ ionic build ios

$ ionic emulate ios