How can I help you?
Getting Started with Angular SPA on ASP.NET Core with .NET CLI
ASP.NET Single Page Application(SPA) helps you to build applications that include significant client-side interactions using HTML 5, CSS 3 and JavaScript.
To getting started with Syncfusion Angular Components, the NPM packages ej-angular2 and syncfusion-javascript helps to seamlessly supports ASP.NET Core environment for our components. The following steps depicts, to create an application in ASP.NET Core using SPA template with Syncfusion Angular Components.
Synopsis
- Prerequisites
- Install the SPA Template
- Install the Dependencies
- Configuration of Syncfusion Angular Component
- Refer the Syncfusion Theme Files
- Render Syncfusion Angular Component
- Adding Dialog Sample
- Run the Application
- Running the Application using Visual Studio 2017
- Sample Application
Prerequisites
- Node.js(v6.x.x or higher)
- NPM(v4.x.x or higher)
- .NET Core SDK 2.1.*
Install the SPA Template
- To create a new application in .NET Core, we should install the Single Page Application(SPA) template by following command.
dotnet new --install Microsoft.AspNetCore.SpaTemplates::*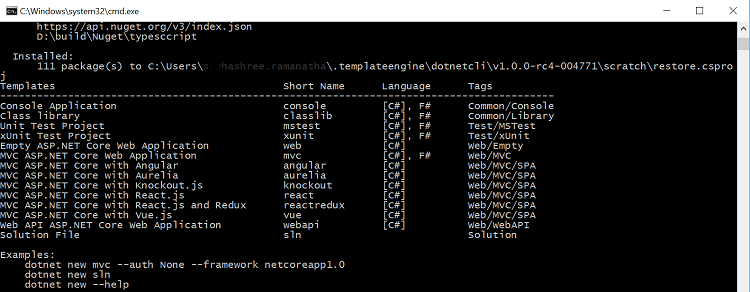
- To generate a new Angular project run the below command in your directory.
dotnet new angularInstall the Dependencies
- To restore the .NET dependencies and install the NPM dependencies, run the below command in your root directory.
dotnet restore
cd ClientApp
npm install
NOTE
To run the ASP.NET in development mode, set the below environment variable using command prompt and restart your command prompt to make the change take effect.
setx ASPNETCORE_ENVIRONMENT "Development"
NOTE
To know more about environment variable refer the link
Configuration of Syncfusion Angular Component
-
Open the project in Visual Studio Code or Visual Studio 2017 to configure the Syncfusion Components.
-
To install Syncfusion JavaScript for Angular components run below commands from
ClientAppfolder.
npm install syncfusion-javascript --save
npm install ej-angular2 --save
npm install --save-dev @types/jquery
npm install --save-dev @types/ej.web.all- And also include the typings
jqueryandej.web.allinClientApp/src/tsconfig.app.jsonfile.
{
  "extends": "../tsconfig.json",
  "compilerOptions": {
    "outDir": "../out-tsc/app",
    "baseUrl": "./",
    "module": "es2015",
    "types": [
      "jquery",
      "ej.web.all"
    ]
  },
  "exclude": [
    "test.ts",
    "**/*.spec.ts"
  ]
}- Syncfusion JavaScript widgets need
window.jQueryobject to render the Angular components, since, we need to import jQuery inClientApp/src/polyfills.tsfile as like the below code snippet.
import * as jquery from 'jquery';
window['jQuery'] = jquery;
window['$'] = jquery;
Refer the Syncfusion Theme Files
- We configured the Syncfusion Angular components and their dependencies. For the appearance we need to include
Syncfusion theme filesfromnode_modulesin style section ofangular-cli.jsonfile. Here, we referred thematerial theme.
{
  "$schema": "./node_modules/@angular/cli/lib/config/schema.json",
  "project": {
    "name": "aspcoresample"
  },
  "apps": [
    {
      "root": "src",
      "outDir": "dist",
      . . .
      . . .
      "styles": [
        "styles.css",
        "../node_modules/bootstrap/dist/css/bootstrap.min.css",
        "./../node_modules/syncfusion-javascript/Content/ej/web/office-365/ej.web.all.min.css"
      ],
      "scripts": [],
      "environmentSource": "environments/environment.ts",
      "environments": {
        "dev": "environments/environment.ts",
        "prod": "environments/environment.prod.ts"
      }
    }
  ],
 . . .
  }
}
Render Syncfusion Angular Component
- To render any Syncfusion Angular Components into the project, we need to import
ej-angular2module intoClientApp/src/app/app.module.tsfile. Refer to the below code snippet.
import { BrowserModule } from '@angular/platform-browser';
import { NgModule } from '@angular/core';
import { FormsModule } from '@angular/forms';
import { HttpClientModule } from '@angular/common/http';
import { RouterModule } from '@angular/router';
import { EJAngular2Module } from 'ej-angular2';
import { AppComponent } from './app.component';
import { NavMenuComponent } from './nav-menu/nav-menu.component';
import { HomeComponent } from './home/home.component';
import { CounterComponent } from './counter/counter.component';
import { FetchDataComponent } from './fetch-data/fetch-data.component';
@NgModule({
declarations: [
AppComponent,
NavMenuComponent,
HomeComponent,
CounterComponent,
FetchDataComponent
],
imports: [
BrowserModule.withServerTransition({ appId: 'ng-cli-universal' }),
HttpClientModule,
FormsModule,
RouterModule.forRoot([
{ path: '', component: HomeComponent, pathMatch: 'full' },
{ path: 'counter', component: CounterComponent },
{ path: 'fetch-data', component: FetchDataComponent },
]), EJAngular2Module.forRoot()
],
providers: [],
bootstrap: [AppComponent]
})
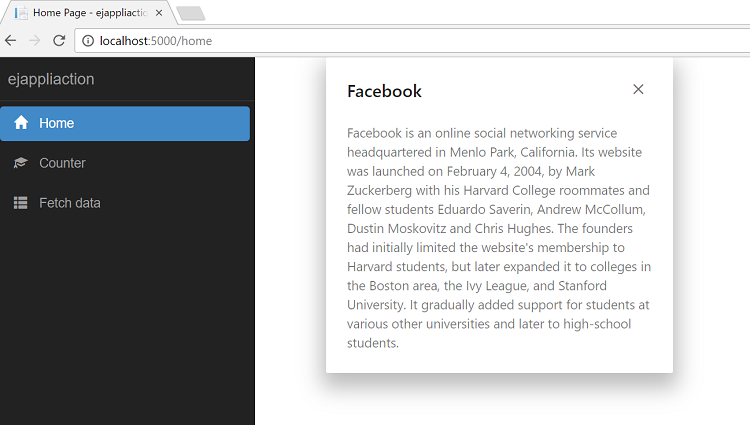
export class AppModule { }Adding Dialog sample
- Render the
ejDialogcomponent inClientApp/src/app/home/home.component.html.
<div id="parent">
	<input id="btnOpen" style="height: 30px" type="button" ej-button class="ejinputtext" value="Click to open Dialog" (click)="onClick($event)" *ngIf="button_display" />
	<ej-dialog id="basicDialog" #dialog title="Facebook" [(enableResize)]="resize" containment="#parent" (close)="onClose($event)">
		Facebook is an online social networking service headquartered in Menlo Park, California. Its website was launched on February
		4, 2004, by Mark Zuckerberg with his Harvard College roommates and fellow students Eduardo Saverin, Andrew McCollum, Dustin
		Moskovitz and Chris Hughes. The founders had initially limited the website's membership to Harvard students, but later
		expanded it to colleges in the Boston area, the Ivy League, and Stanford University. It gradually added support for students
		at various other universities and later to high-school students.
	</ej-dialog>
</div>- Modify the
home.component.tsfile using the below code example.
import { Component, ViewEncapsulation, ViewChild } from '@angular/core';
import { EJComponents } from 'ej-angular2';

@Component({
  selector: 'app-home',
  templateUrl: './home.component.html',
})
export class HomeComponent {
  resize: boolean;
  button_display: boolean;
  @ViewChild('dialog') dialog: EJComponents <any,any>;
    constructor() {
    this.resize = false;
    this.button_display = false;
  }
  //Button click event handler to open the ejDialog
  onClick(event) {
   this.button_display = false;
   this.dialog.widget.element.ejDialog('open');
  }
  //Dialog close event handler
  onClose(event) {
    this.button_display = true;
  }
}
Refer the below codes to create the application.
// Refer the code for home.component.ts file.

import { Component, ViewEncapsulation, ViewChild } from '@angular/core';
import { EJComponents } from 'ej-angular2';

@Component({
  selector: 'app-home',
  templateUrl: './home.component.html',
})
export class HomeComponent {
  resize: boolean;
  button_display: boolean;
  @ViewChild('dialog') dialog: EJComponents <any,any>;
    constructor() {
    this.resize = false;
    this.button_display = false;
  }
  //Button click event handler to open the ejDialog
  onClick(event) {
   this.button_display = false;
   this.dialog.widget.element.ejDialog('open');
  }
  //Dialog close event handler
  onClose(event) {
    this.button_display = true;
  }
}
<!-- Refer the code for home.component.html file -->
<div id="parent" >
<input id="btnOpen" style="height: 30px" type="button" ej-button class="ejinputtext" value="Click to open Dialog" (click)="onClick($event)" *ngIf="button_display" />
<ej-dialog id="basicDialog" #dialog title="Facebook" [(enableResize)]="resize" containment="#parent" (close)="onClose($event)">
Facebook is an online social networking service headquartered in Menlo Park, California. Its website was launched on February
4, 2004, by Mark Zuckerberg with his Harvard College roommates and fellow students Eduardo Saverin, Andrew McCollum, Dustin
Moskovitz and Chris Hughes. The founders had initially limited the website's membership to Harvard students, but later
expanded it to colleges in the Boston area, the Ivy League, and Stanford University. It gradually added support for students
at various other universities and later to high-school students.
</ej-dialog>
</div>// Refer the code for app.module.ts file
import { BrowserModule } from '@angular/platform-browser';
import { NgModule } from '@angular/core';
import { FormsModule } from '@angular/forms';
import { HttpClientModule } from '@angular/common/http';
import { RouterModule } from '@angular/router';
import { EJAngular2Module } from 'ej-angular2';
import { AppComponent } from './app.component';
import { NavMenuComponent } from './nav-menu/nav-menu.component';
import { HomeComponent } from './home/home.component';
import { CounterComponent } from './counter/counter.component';
import { FetchDataComponent } from './fetch-data/fetch-data.component';
@NgModule({
declarations: [
AppComponent,
NavMenuComponent,
HomeComponent,
CounterComponent,
FetchDataComponent
],
imports: [
BrowserModule.withServerTransition({ appId: 'ng-cli-universal' }),
HttpClientModule,
FormsModule,
RouterModule.forRoot([
{ path: '', component: HomeComponent, pathMatch: 'full' },
{ path: 'counter', component: CounterComponent },
{ path: 'fetch-data', component: FetchDataComponent },
]), EJAngular2Module.forRoot()
],
providers: [],
bootstrap: [AppComponent]
})
export class AppModule { }// Refer the code for angular-cli.json file.
{
"$schema": "./node_modules/@angular/cli/lib/config/schema.json",
"project": {
"name": "aspcoresample"
},
"apps": [
{
"root": "src",
"outDir": "dist",
"assets": [
"assets"
],
"index": "index.html",
"main": "main.ts",
"polyfills": "polyfills.ts",
"test": "test.ts",
"tsconfig": "tsconfig.app.json",
"testTsconfig": "tsconfig.spec.json",
"prefix": "app",
"styles": [
"styles.css",
"../node_modules/bootstrap/dist/css/bootstrap.min.css",
"./../node_modules/syncfusion-javascript/Content/ej/web/office-365/ej.web.all.min.css"
],
"scripts": [],
"environmentSource": "environments/environment.ts",
"environments": {
"dev": "environments/environment.ts",
"prod": "environments/environment.prod.ts"
}
}
],
"e2e": {
"protractor": {
"config": "./protractor.conf.js"
}
},
"lint": [
{
"project": "src/tsconfig.app.json",
"exclude": "**/node_modules/**"
},
{
"project": "src/tsconfig.spec.json",
"exclude": "**/node_modules/**"
},
{
"project": "e2e/tsconfig.e2e.json",
"exclude": "**/node_modules/**"
}
],
"test": {
"karma": {
"config": "./karma.conf.js"
}
},
"defaults": {
"styleExt": "css",
"component": {},
"build": {
"progress": true
}
}
}// Refer the code for polyfills.ts (src/polyfills.ts)
/**
* This file includes polyfills needed by Angular and is loaded before the app.
* You can add your own extra polyfills to this file.
*
* This file is divided into 2 sections:
* 1. Browser polyfills. These are applied before loading ZoneJS and are sorted by browsers.
* 2. Application imports. Files imported after ZoneJS that should be loaded before your main
* file.
*
* The current setup is for so-called "evergreen" browsers; the last versions of browsers that
* automatically update themselves. This includes Safari >= 10, Chrome >= 55 (including Opera),
* Edge >= 13 on the desktop, and iOS 10 and Chrome on mobile.
*
* Learn more in https://angular.io/guide/browser-support
*/
/***************************************************************************************************
* BROWSER POLYFILLS
*/
/** IE9, IE10 and IE11 requires all of the following polyfills. **/
// import 'core-js/es6/symbol';
// import 'core-js/es6/object';
// import 'core-js/es6/function';
// import 'core-js/es6/parse-int';
// import 'core-js/es6/parse-float';
// import 'core-js/es6/number';
// import 'core-js/es6/math';
// import 'core-js/es6/string';
// import 'core-js/es6/date';
// import 'core-js/es6/array';
// import 'core-js/es6/regexp';
// import 'core-js/es6/map';
// import 'core-js/es6/weak-map';
// import 'core-js/es6/set';
/** IE10 and IE11 requires the following for NgClass support on SVG elements */
// import 'classlist.js'; // Run `npm install --save classlist.js`.
/** IE10 and IE11 requires the following for the Reflect API. */
// import 'core-js/es6/reflect';
/** Evergreen browsers require these. **/
// Used for reflect-metadata in JIT. If you use AOT (and only Angular decorators), you can remove.
import 'core-js/es7/reflect';
/**
* Required to support Web Animations `@angular/platform-browser/animations`.
* Needed for: All but Chrome, Firefox and Opera. https://caniuse.com/web-animation
**/
// import 'web-animations-js'; // Run `npm install --save web-animations-js`.
/**
* By default, zone.js will patch all possible macroTask and DomEvents
* user can disable parts of macroTask/DomEvents patch by setting following flags
*/
// (window as any).__Zone_disable_requestAnimationFrame = true; // disable patch requestAnimationFrame
// (window as any).__Zone_disable_on_property = true; // disable patch onProperty such as onclick
// (window as any).__zone_symbol__BLACK_LISTED_EVENTS = ['scroll', 'mousemove']; // disable patch specified eventNames
/*
* in IE/Edge developer tools, the addEventListener will also be wrapped by zone.js
* with the following flag, it will bypass `zone.js` patch for IE/Edge
*/
// (window as any).__Zone_enable_cross_context_check = true;
/***************************************************************************************************
* Zone JS is required by default for Angular itself.
*/
import 'zone.js/dist/zone'; // Included with Angular CLI.
import * as jquery from 'jquery';
window['jQuery'] = jquery;
window['$'] = jquery;
/***************************************************************************************************
* APPLICATION IMPORTS
*/// Refer the code for tsconfig.app.json(src/tsconfig.app.json)
{
"extends": "../tsconfig.json",
"compilerOptions": {
"outDir": "../out-tsc/app",
"baseUrl": "./",
"module": "es2015",
"types": [
"jquery",
"ej.web.all"
]
},
"exclude": [
"test.ts",
"**/*.spec.ts"
]
}Run the Application
- Now run the application with below command in application folder.
dotnet runRunning the Application using Visual Studio 2017
- Open the
.csprojfile which is in project folder and then pressCtrl+F5to launch the application in a browser.
Sample Application
We have prepared .NET CLI Application with the above steps. Refer to the link for application
Getting Started with .NET CLI. Run the below commands at the root of the application, to launch the application.
`dotnet restore`

cd ClientApp

`npm install`

cd..

`dotnet run`