How can I help you?
Getting Started with Angular SPA on ASP.NET Core using Yeoman Generator
ASP.NET Single Page Application(SPA) helps you to build applications that include significant client-side interactions using HTML 5, CSS 3 and JavaScript.
To getting started with Syncfusion Angular Components, the NPM packages ej-angular2 and syncfusion-javascript helps to seamlessly supports ASP.NET Core environment for our components. The following steps depicts, to create an application in ASP.NET Core using SPA template with Syncfusion Angular Components.
Yeoman Generator is DEPRECATED now. So, we suggest you to refer the Getting Started with .NET CLI document to create ASP .NET Core SPA Application.
Synopsis
- Prerequisites
- Install the SPA Template using Yeoman Generator
- Configuration of Syncfusion Angular Component
- Bundling Syncfusion JavaScript Theme Files
- Adding Dialog Sample
- Run the Application
Prerequisites
- Node.js(v6.x.x or higher)
- NPM(v4.x.x or higher)
- .NET Core SDK 1.1
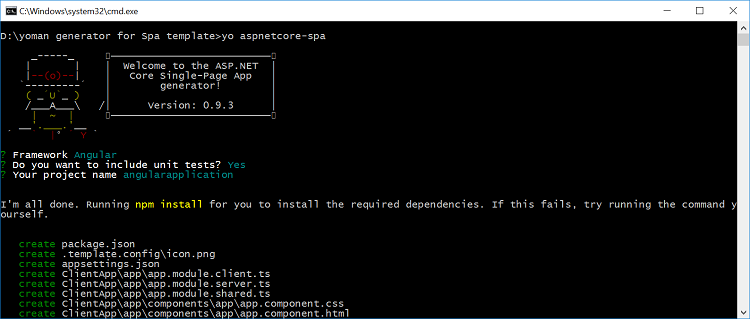
Install the SPA Template using Yeoman Generator
- To install the SPA Template using Yeoman generator in globally, run the below command in command prompt
npm install -g yo generator-aspnetcore-spa- To Create a new project on SPA Template, run the below command in your directory and select the
framework
yo aspnetcore-spaNOTE
The yeoman generator automatically fetch its .NET and NPM dependencies.
NOTE
To run the ASP.NET in development mode, set the below environment variable using command prompt and restart your command prompt to make the change take effect
setx ASPNETCORE_ENVIRONMENT "Development"
NOTE
To know more about environment variable refer the link
Configuration of Syncfusion Angular Component
-
Open the project in Visual Studio Code or Visual Studio 2017 to configure the Syncfusion Components
-
To install Syncfusion JavaScript for Angular components run below commands from sample’s root folder.
npm install syncfusion-javascript --save
npm install ej-angular2 --save
npm install --save-dev @types/jquery
npm install --save-dev @types/ej.web.all- Import
ej-angular2module intoapp.module.shared.tsfile
import { NgModule } from '@angular/core';
. . .
. . .
import { EJAngular2Module } from 'ej-angular2';

@NgModule({
bootstrap: [ AppComponent ],
declarations: [AppComponent,NavMenuComponent,CounterComponent,FetchDataComponent,HomeComponent],
imports: [
...
RouterModule.forRoot([
{ path: '', redirectTo: 'home', pathMatch: 'full' },
{ path: 'home', component: HomeComponent },
{ path: 'counter', component: CounterComponent },
{ path: 'fetch-data', component: FetchDataComponent },
{ path: '**', redirectTo: 'home' }
]),
EJAngular2Module.forRoot()
]
})
export class AppModule {
}- Syncfusion JavaScript components need
jQueryto render the control, so import jQuery inClientApp/boot-client.tsfile which we already configured in our webpack angular seed application.
import 'reflect-metadata';
import 'zone.js';
import { enableProdMode } from '@angular/core';
import { platformBrowserDynamic } from '@angular/platform-browser-dynamic';
import * as $ from 'jquery';
window['jQuery'] = $;
window['$'] = $
import 'jsrender';
import { AppModule } from './app/app.module.client';
...
...- If you are using templates like grid, to render that component, we need to install and import dependency
jsrenderinClientApp/boot-client.tsfile. Run the below command to install jsrender.
npm install jsrender --saveNOTE
If we run our application, we will get the following error.
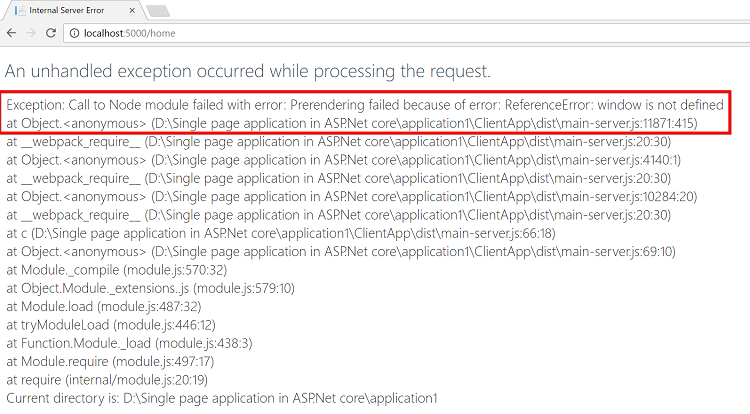
- To overcome this issue, modify the
Views/Home/index.cshtmlfile is referred as below.
@{
ViewData["Title"] = "Home Page";
}

<!--To overcome the issue "ReferenceError: window is not defined"-->
<app asp-ng2-prerender-module="ClientApp/dist/main-server">Loading...</app>

<script src="~/dist/vendor.js" asp-append-version="true"></script>
@section scripts {
<script src="~/dist/main-client.js" asp-append-version="true"></script>
}
Bundling Syncfusion JavaScript Theme Files
- we can bundle
syncfusion-javascripttheme file intovendor.css. Refer to the below code snippet to import the theme file inwebpack.config.vendor.js
module.exports = (env) => {
    const extractCSS = new ExtractTextPlugin('vendor.css');
    const isDevBuild = !(env && env.prod);
    const sharedConfig = {
        stats: { modules: false },
        resolve: { extensions: ['.js'] },
        module: {
            rules: [
                { test: /\.(png|woff|woff2|eot|ttf|svg)(\?|$)/, use: 'url-loader?limit=100000' },
                {
                    test: /\.(png|jpe?g|gif|cur|svg|woff|woff2|ttf|eot|ico)$/,
                    loader: 'file-loader?name=assets/[name].[hash].[ext]'
                },
            ]
        },
        entry: {
            vendor: [
                '@angular/animations',
                '@angular/common',
                '@angular/compiler',
                '@angular/core',
                '@angular/forms',
                '@angular/http',
                '@angular/platform-browser',
                '@angular/platform-browser-dynamic',
                '@angular/router',
                'bootstrap',
                'syncfusion-javascript/Content/ej/web/material/ej.web.all.min.css',
                'bootstrap/dist/css/bootstrap.css',
                'es6-shim',
                'es6-promise',
                'event-source-polyfill',
                'jquery',
                'zone.js',
            ]
        },
        . . .
. . .- Syncfusion JavaScript theme files have more type of image files. To bundle these type files, we can use
file-loader. Run the below command to install file-loader package.
npm install file-loader --save-dev- Also configure the
webpack.config.vendor.jsfile as like below code snippet.
module.exports = (env) => {
    const extractCSS = new ExtractTextPlugin('vendor.css');
    const isDevBuild = !(env && env.prod);
    const sharedConfig = {
        stats: { modules: false },
        resolve: { extensions: ['.js'] },
        module: {
            rules: [
                { test: /\.(png|woff|woff2|eot|ttf|svg)(\?|$)/, use: 'url-loader?limit=100000' },
                {
                    test: /\.(png|jpe?g|gif|cur|svg|woff|woff2|ttf|eot|ico)$/,
                    loader: 'file-loader?name=assets/[name].[hash].[ext]'
                },
            ]
        },
        . . .
. . .- To bundle the Syncfusion JavaScript Theme file, run the below command in your command prompt
npm run buildNOTE
If you change the theme in
webpack.config.jsfile , run th above command to bundle the new theme in application
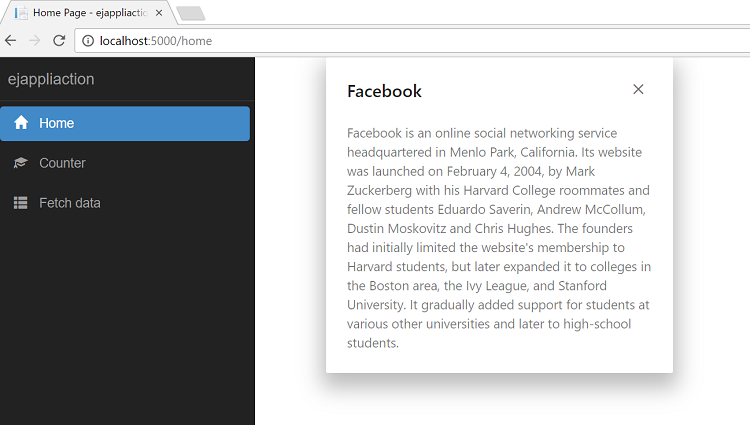
Adding Dialog sample
- Import the
ejDialogcomponent inhome.component.html
<div id="parent" >
	<input id="btnOpen" style="height: 30px" type="button" ej-button class="ejinputtext" value="Click to open Dialog" (click)="onClick($event)" *ngIf="button_display" />
	<ej-dialog id="basicDialog" #dialog title="Facebook" [(enableResize)]="resize" containment="#parent" (close)="onClose($event)">
		Facebook is an online social networking service headquartered in Menlo Park, California. Its website was launched on February
		4, 2004, by Mark Zuckerberg with his Harvard College roommates and fellow students Eduardo Saverin, Andrew McCollum, Dustin
		Moskovitz and Chris Hughes. The founders had initially limited the website's membership to Harvard students, but later
		expanded it to colleges in the Boston area, the Ivy League, and Stanford University. It gradually added support for students
		at various other universities and later to high-school students.
	</ej-dialog>
</div>- Create sample component using the below code example in
home.component.ts
import { Component, ViewChild } from '@angular/core';
import { EJComponents } from 'ej-angular2';

@Component({
  selector: 'home',
  templateUrl: './home.component.html'
})
export class HomeComponent {
  resize: boolean;
  button_display: boolean;
  @ViewChild('dialog') dialog: EJComponents<any, any>;
  constructor() {
    this.resize = false;
    this.button_display = false;
  }
  //Button click event handler to open the ejDialog
  onClick(event) {
    this.button_display = false;
    this.dialog.widget.element.ejDialog('open');
  }
  //Dialog close event handler
  onClose(event) {
    this.button_display = true;
  }
}
Refer the below codes to create the application
// Refer this code for home.component.ts file

import { Component, ViewChild } from '@angular/core';
import { EJComponents } from 'ej-angular2';

@Component({
  selector: 'home',
  templateUrl: './home.component.html'
})
export class HomeComponent {
  resize: boolean;
  button_display: boolean;
  @ViewChild('dialog') dialog: EJComponents<any, any>;
  constructor() {
    this.resize = false;
    this.button_display = false;
  }
  //Button click event handler to open the ejDialog
  onClick(event) {
    this.button_display = false;
    this.dialog.widget.element.ejDialog('open');
  }
  //Dialog close event handler
  onClose(event) {
    this.button_display = true;
  }
}
<!-- Refer the code for home.component.html file -->
<div id="parent" >
<input id="btnOpen" style="height: 30px" type="button" ej-button class="ejinputtext" value="Click to open Dialog" (click)="onClick($event)" *ngIf="button_display" />
<ej-dialog id="basicDialog" #dialog title="Facebook" [(enableResize)]="resize" containment="#parent" (close)="onClose($event)">
Facebook is an online social networking service headquartered in Menlo Park, California. Its website was launched on February
4, 2004, by Mark Zuckerberg with his Harvard College roommates and fellow students Eduardo Saverin, Andrew McCollum, Dustin
Moskovitz and Chris Hughes. The founders had initially limited the website's membership to Harvard students, but later
expanded it to colleges in the Boston area, the Ivy League, and Stanford University. It gradually added support for students
at various other universities and later to high-school students.
</ej-dialog>
</div>// Refer the code to import EJAngular2Module in app.module.shared.ts
import { NgModule } from '@angular/core';
import { RouterModule } from '@angular/router';
import { AppComponent } from './components/app/app.component'
import { NavMenuComponent } from './components/navmenu/navmenu.component';
import { HomeComponent } from './components/home/home.component';
import { FetchDataComponent } from './components/fetchdata/fetchdata.component';
import { CounterComponent } from './components/counter/counter.component';
import { EJAngular2Module } from 'ej-angular2';
export const sharedConfig: NgModule = {
bootstrap: [ AppComponent ],
declarations: [
AppComponent,
NavMenuComponent,
CounterComponent,
FetchDataComponent,
HomeComponent
],
imports: [
RouterModule.forRoot([
{ path: '', redirectTo: 'home', pathMatch: 'full' },
{ path: 'home', component: HomeComponent },
{ path: 'counter', component: CounterComponent },
{ path: 'fetch-data', component: FetchDataComponent },
{ path: '**', redirectTo: 'home' }
]),
EJAngular2Module.forRoot()
]
};
export class AppModule {
}// Refer this code to import 'jQuery' in 'boot.client.ts'
import 'reflect-metadata';
import 'zone.js';
import { enableProdMode } from '@angular/core';
import { platformBrowserDynamic } from '@angular/platform-browser-dynamic';
import * as $ from 'jquery';
window['jQuery'] = $;
window['$'] = $
import 'jsrender';
import { AppModule } from './app/app.module.client';
if (module['hot']) {
module['hot'].accept();
module['hot'].dispose(() => {
// Before restarting the app, we create a new root element and dispose the old one
const oldRootElem = document.querySelector('app');
const newRootElem = document.createElement('app');
oldRootElem.parentNode.insertBefore(newRootElem, oldRootElem);
modulePromise.then(appModule => appModule.destroy());
});
} else {
enableProdMode();
}
// Note: @ng-tools/webpack looks for the following expression when performing production
// builds. Don't change how this line looks, otherwise you may break tree-shaking.
const modulePromise = platformBrowserDynamic().bootstrapModule(AppModule);<!-- Refer the code for index.cshtml file -->
@{
ViewData["Title"] = "Home Page";
}
<!--To overcome the issue "ReferenceError: window is not defined"-->
<app asp-ng2-prerender-module="ClientApp/dist/main-server">Loading...</app>
<script src="~/dist/vendor.js" asp-append-version="true"></script>
@section scripts {
<script src="~/dist/main-client.js" asp-append-version="true"></script>
}// Refer this code for package.json file
{
"name": "WebApplicationBasic",
"version": "0.0.0",
"scripts": {
"build": "webpack",
"test": "karma start ClientApp/test/karma.conf.js"
},
"dependencies": {
"@angular/animations": "4.1.2",
"@angular/common": "4.1.2",
"@angular/compiler": "4.1.2",
"@angular/core": "4.1.2",
"@angular/forms": "4.1.2",
"@angular/http": "4.1.2",
"@angular/platform-browser": "4.1.2",
"@angular/platform-browser-dynamic": "4.1.2",
"@angular/platform-server": "4.1.2",
"@angular/router": "4.1.2",
"@types/node": "7.0.18",
"angular2-template-loader": "0.6.2",
"aspnet-prerendering": "^2.0.5",
"aspnet-webpack": "^1.0.29",
"awesome-typescript-loader": "3.1.3",
"bootstrap": "3.3.7",
"css": "2.2.1",
"css-loader": "0.28.1",
"ej-angular2": "^15.2.43",
"es6-shim": "0.35.3",
"event-source-polyfill": "0.0.9",
"expose-loader": "0.7.3",
"extract-text-webpack-plugin": "2.1.0",
"file-loader": "0.11.1",
"html-loader": "0.4.5",
"isomorphic-fetch": "2.2.1",
"jquery": "3.2.1",
"json-loader": "0.5.4",
"preboot": "4.5.2",
"raw-loader": "0.5.1",
"reflect-metadata": "0.1.10",
"rxjs": "5.4.0",
"style-loader": "0.17.0",
"syncfusion-javascript": "^15.2.43",
"to-string-loader": "1.1.5",
"typescript": "2.3.2",
"url-loader": "0.5.8",
"webpack": "2.5.1",
"webpack-hot-middleware": "2.18.0",
"webpack-merge": "4.1.0",
"zone.js": "0.8.10"
},
"devDependencies": {
"@types/chai": "3.5.2",
"@types/ej.web.all": "^15.2.0",
"@types/jasmine": "2.5.47",
"@types/jquery": "^2.0.46",
"chai": "3.5.0",
"jasmine-core": "2.6.1",
"karma": "1.7.0",
"karma-chai": "0.1.0",
"karma-chrome-launcher": "2.1.1",
"karma-cli": "1.0.1",
"karma-jasmine": "1.1.0",
"karma-webpack": "2.0.3"
}
}Run the Application
- Now run the application with below command and navigate to http://localhost:5000/ to see the output window.
dotnet runRunning the Application using Visual Studio 2017
- Open the
.csprojfile which is in project folder and then pressCtrl+F5to launch the application in a browser.