SfDataForm
The Xamarin DataForm (SfDataForm) control helps editing the data fields of any data object. It can be used to develop various forms such as login, reservation, data entry, etc. Key features includes the following:
- Layout and grouping: Supports to linear, grid layout and floating label layout with grouping support. Supports customizing the layout with different heights for each item.
- Caption customization: Supports loading the image as caption for the editor.
- Editors: Built-in support for text, numeric, numeric up-down, picker, date picker, time picker, switch,drop-down,autoComplete and checkbox editors.
- Custom editor: Supports loading the custom editors.
- Validation: Built-in support to validate the data based on the INotifyDataErrorInfo and data annotations. It also programmatically supports validation handling.
Getting Started with Xamarin DataForm (SfDataForm)
11 Jun 202624 minutes to read
This section explains the quick overview to use the Xamarin DataForm (SfDataForm) (SfDataForm) for Xamarin.Forms in your application.
Assembly deployment
After installing Essential Studio® for Xamarin, you can find all the required assemblies in the installation folders, {Syncfusion Essential Studio Installed location} \Essential Studio\{Version #}\Xamarin\lib.
E.g.: C:\Program Files (x86) \Syncfusion\Essential Studio\19.1.0.54\Xamarin\lib
NOTE
Assemblies can be found in unzipped package location(Documents/Syncfusion/{Version #}/Xamarin/lib) in Mac.
Adding SfDataForm reference
You can add SfDataForm reference using one of the following methods:
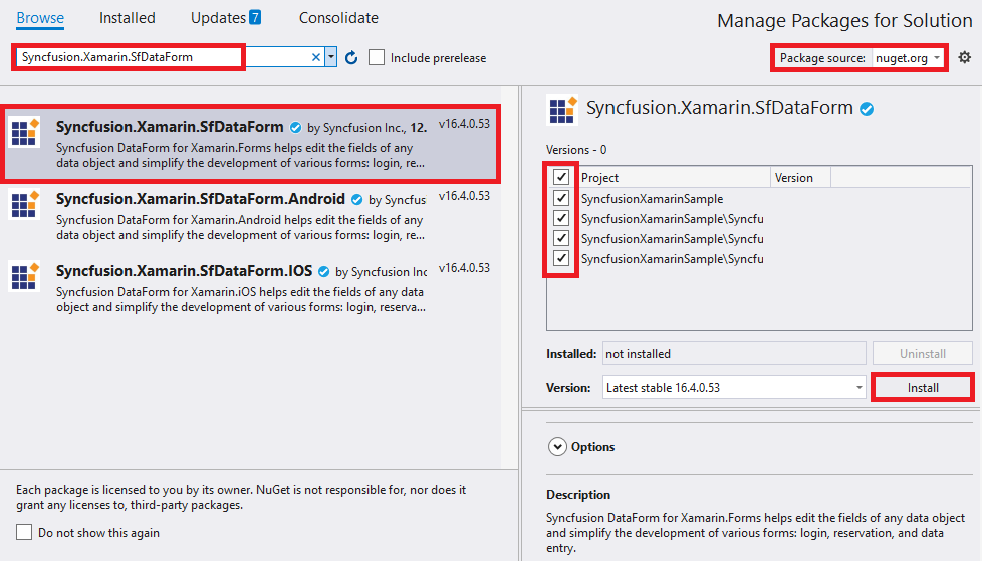
Method 1: Adding SfDataForm reference from nuget.org
Syncfusion Xamarin components are available in nuget.org. To add SfDataForm to your project, open the NuGet package manager in Visual Studio, search for Syncfusion.Xamarin.SfDataForm, and then install it.
NOTE
Install the same version of SfDataForm NuGet in all the projects.
Method 2: Adding SfDataForm reference from toolbox
Syncfusion also provides Xamarin Toolbox. Using this toolbox, you can drag the SfDataForm control to the XAML page. It will automatically install the required NuGet packages and add the namespace to the page. To install Syncfusion Xamarin Toolbox, refer to Toolbox.
Method 3: Adding SfDataForm assemblies manually from the installed location
If you prefer to manually reference the assemblies instead referencing from NuGet, add the following assemblies in respective projects.
Location: {Installed location}/{version}/Xamarin/lib
| PCL | Syncfusion.SfDataForm.XForms.dll Syncfusion.SfNumericTextBox.XForms.dll Syncfusion.SfNumericUpDown.XForms.dll Syncfusion.SfComboBox.XForms.dll Syncfusion.SfAutoComplete.XForms.dll Syncfusion.Buttons.XForms.dll Syncfusion.SfMaskedEdit.XForms.dll Syncfusion.Core.XForms.dll Syncfusion.Licensing.dll System.ComponentModel.Annotations |
| Android | Syncfusion.SfDataForm.XForms.dll Syncfusion.SfDataForm.XForms.Android.dll Syncfusion.SfNumericTextBox.Android.dll Syncfusion.SfNumericTextBox.XForms.dll Syncfusion.SfNumericTextBox.XForms.Android.dll Syncfusion.SfNumericUpDown.XForms.dll Syncfusion.SfNumericUpDown.XForms.Android.dll Syncfusion.SfComboBox.XForms.dll Syncfusion.SfComboBox.XForms.Android.dll Syncfusion.SfAutoComplete.XForms.dll Syncfusion.SfAutoComplete.XForms.Android.dll Syncfusion.Buttons.XForms.dll Syncfusion.Buttons.XForms.Android.dll Syncfusion.SfMaskedEdit.XForms.dll Syncfusion.SfMaskedEdit.XForms.Android.dll Syncfusion.Core.XForms.dll Syncfusion.Core.XForms.Android.dll Syncfusion.Licensing.dll |
| iOS | Syncfusion.SfDataForm.XForms.dll Syncfusion.SfDataForm.XForms.iOS.dll Syncfusion.SfNumericTextBox.XForms.dll Syncfusion.SfNumericTextBox.XForms.iOS.dll Syncfusion.SfNumericUpDown.XForms.dll Syncfusion.SfNumericUpDown.XForms.iOS.dll Syncfusion.SfComboBox.XForms.dll Syncfusion.SfComboBox.XForms.iOS.dll Syncfusion.SfAutoComplete.XForms.dll Syncfusion.SfAutoComplete.XForms.iOS.dll Syncfusion.Buttons.XForms.dll Syncfusion.Buttons.XForms.iOS.dll Syncfusion.SfMaskedEdit.XForms.dll Syncfusion.SfMaskedEdit.XForms.iOS.dll Syncfusion.Core.XForms.dll Syncfusion.Core.XForms.iOS.dll Syncfusion.Licensing.dll |
| UWP | Syncfusion.SfDataForm.XForms.dll Syncfusion.SfDataForm.XForms.UWP.dll Syncfusion.SfInput.UWP.dll Syncfusion.SfShared.UWP.dll Syncfusion.SfNumericTextBox.XForms.UWP.dll Syncfusion.SfNumericTextBox.XForms.dll Syncfusion.SfNumericUpDown.XForms.UWP.dll Syncfusion.SfNumericUpDown.XForms.dll Syncfusion.SfComboBox.XForms.dll Syncfusion.SfComboBox.XForms.UWP.dll Syncfusion.SfAutoComplete.XForms.dll Syncfusion.SfAutoComplete.XForms.UWP.dll Syncfusion.Buttons.XForms.dll Syncfusion.Buttons.XForms.UWP.dll Syncfusion.SfMaskedEdit.XForms.dll Syncfusion.SfMaskedEdit.XForms.UWP.dll Syncfusion.Core.XForms.dll Syncfusion.Core.XForms.UWP.dll Syncfusion.Licensing.dll |
NOTE
To know more about obtaining our components, refer to these links for Mac and Windows.
IMPORTANT
Starting with v16.2.0.x, if you reference Syncfusion assemblies from the trial setup or from the NuGet feed, you also have to include a license key in your projects. Please refer to Syncfusion license key to know about registering Syncfusion license key in your Xamarin application to use our components.
Launching the data form on each platform
To use the data form inside an application, each platform application must initialize the data form renderer. This initialization step varies from platform to platform and is discussed in the following sections:
Android
The Android launches the data form without any initialization and is enough to only initialize the Xamarin.Forms Framework to launch the application.
NOTE
If you are adding the references from toolbox, this step is not needed.
iOS
To launch the data form in iOS, call the SfDataFormRenderer.Init() in the FinishedLaunching overridden method of the AppDelegate class after the Xamarin.Forms Framework initialization and before the LoadApplication is called, as demonstrated in the following code example:
public override bool FinishedLaunching(UIApplication app, NSDictionary options)
{
    …
    global::Xamarin.Forms.Forms.Init ();
    SfDataFormRenderer.Init();
    LoadApplication (new App ());
    …
}
Universal Windows Platform (UWP)
The UWP launches the data form without any initialization and is enough to only initialize the Xamarin.Forms Framework to launch the application.
ReleaseMode issue in UWP platform
The known Framework issue in UWP platform is that the custom controls will not render when deployed the application in Release Mode.
The above problem can be resolved by initializing the data form assemblies in App.xaml.cs file in UWP project as in the following code snippet:
// In App.xaml.cs

protected override void OnLaunched(LaunchActivatedEventArgs e)
{
    …

    rootFrame.NavigationFailed += OnNavigationFailed;

    // you'll need to add `using System.Reflection;`
    List<Assembly> assembliesToInclude = new List<Assembly>();

    //Now, add all the assemblies your app uses
    assembliesToInclude.Add(typeof(SfDataFormRenderer).GetTypeInfo().Assembly);
    assembliesToInclude.Add(typeof(SfNumericTextBoxRenderer).GetTypeInfo().Assembly);
    assembliesToInclude.Add(typeof(SfNumericUpDownRenderer).GetTypeInfo().Assembly);
    assembliesToInclude.Add(typeof(SfSegmentedControlRenderer).GetTypeInfo().Assembly);
    assembliesToInclude.Add(typeof(SfComboBoxRenderer).GetTypeInfo().Assembly);
    assembliesToInclude.Add(typeof(SfCheckBoxRenderer).GetTypeInfo().Assembly);
    assembliesToInclude.Add(typeof(SfRadioButtonRenderer).GetTypeInfo().Assembly);
    assembliesToInclude.Add(typeof(SfMaskedEditRenderer).GetTypeInfo().Assembly);
    assembliesToInclude.Add(typeof(SfTextInputLayoutRenderer).GetTypeInfo().Assembly);
    assembliesToInclude.Add(typeof(SfAutoCompleteRenderer).GetTypeInfo().Assembly);

    // replaces Xamarin.Forms.Forms.Init(e);
    Xamarin.Forms.Forms.Init(e, assembliesToInclude);

    …
}
Supported platforms
- Android
- iOS
- Windows (UWP)
Creating the data form
In this section, you will create Xamarin.Forms application with SfDataForm. The control should be configured entirely in C# code.
- Creating the project.
- Adding data form in Xamarin.Forms.
- Creating data object.
- Setting data object.
Creating the project
Create a new BlankApp (.Net Standard) application in Xamarin Studio or Visual Studio for Xamarin.Forms.
Adding data form in Xamarin.Forms
To add the data form to your application, follow the steps:
- Add required assemblies as discussed in assembly deployment section.
- Import the control namespace as
xmlns:dataForm="clr-namespace:Syncfusion.XForms.DataForm;assembly=Syncfusion.SfDataForm.XFormsin XAML Page. - Create an instance of data form control and add as a view to the linear layout.
<?xml version="1.0" encoding="utf-8" ?>
<ContentPage xmlns="http://xamarin.com/schemas/2014/forms"
             xmlns:x="http://schemas.microsoft.com/winfx/2009/xaml"
             xmlns:local="clr-namespace:GettingStarted"
             xmlns:dataForm="clr-namespace:Syncfusion.XForms.DataForm;assembly=Syncfusion.SfDataForm.XForms"
             x:Class="GettingStarted.MainPage">
        <dataForm:SfDataForm x:Name="dataForm"/>
</ContentPage>
using Syncfusion.XForms.DataForm;
using Xamarin.Forms;
namespace GettingStarted
{
public partial class MainPage : ContentPage
{
SfDataForm dataForm;
public MainPage()
{
InitializeComponent();
dataForm = new SfDataForm();
}
}
}Creating data object
The SfDataForm is a data edit control so, create a data object to edit the data object.
Here, the data object named ContactsInfo created with some properties.
public class ContactsInfo
{
    private string firstName;
    private string middleName;
    private string lastName;
    private string contactNo;
    private string email;
    private string address;
    private DateTime? birthDate;
    private string groupName;

    public ContactsInfo()
    {

    }

    public string FirstName
    {
        get { return this.firstName; }
        set
        {
            this.firstName = value;
        }
    }

    public string MiddleName
    {
        get { return this.middleName; }
        set
        {
            this.middleName = value;
        }
    }
    public string LastName
    {
        get { return this.lastName; }
        set
        {
            this.lastName = value;
        }
    }

    public string ContactNumber
    {
        get { return contactNo; }
        set
        {
            this.contactNo = value;
        }
    }

    public string Email
    {
        get { return email; }
        set
        {
            email = value;
        }
    }

    public string Address
    {
        get { return address; }
        set
        {
            address = value;
        }
    }

    public DateTime? BirthDate
    {
        get { return birthDate; }
        set
        {
            birthDate = value;
        }
    }

    public string GroupName
    {
        get { return groupName; }
        set
        {
            groupName = value;
        }
    }
}
NOTE
If you want your data model to respond to property changes, then implement
INotifyPropertyChangedinterface in your model class.
Create a model repository class with ContactsInfo property initialized with required data in a new class file as shown in the following code example and save it ViewModel.cs file:
public class ViewModel
{
    private ContactsInfo contactsInfo;
    public ContactsInfo ContactsInfo
    {
        get { return this.contactsInfo; }
        set { this.contactsInfo = value; }
    }
    public ViewModel()
    {
        this.contactsInfo = new ContactsInfo();
    }
}
Setting data object
To populate the labels and editors in the data form, set the DataObject property.
<?xml version="1.0" encoding="utf-8" ?>
<ContentPage xmlns="http://xamarin.com/schemas/2014/forms"
             xmlns:x="http://schemas.microsoft.com/winfx/2009/xaml"
             xmlns:local="clr-namespace:GettingStarted"
             xmlns:dataForm="clr-namespace:Syncfusion.XForms.DataForm;assembly=Syncfusion.SfDataForm.XForms"
             x:Class="GettingStarted.MainPage">
    <ContentPage.BindingContext>
        <local:ViewModel/>
    </ContentPage.BindingContext>
	<dataForm:SfDataForm x:Name="dataForm"
						 DataObject="{Binding ContactsInfo}"/>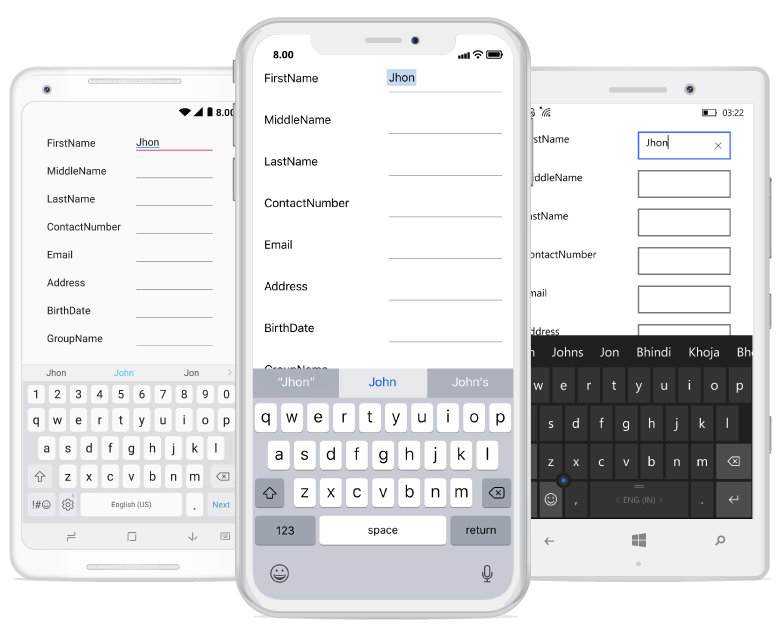
</ContentPage>dataForm.DataObject = new ContactsInfo();Now, run the application to render the data form to edit the data object as in the following screenshot:
You can download the entire source code of this demo for Xamarin.Forms from here DataFormGettingStarted.
Defining editors
The data form control automatically generates DataFormItems (which has UI settings of data field) when the data object set to the SfDataForm.DataObject property. The DataFormItem encapsulates the layout and editor setting for the data field appearing in the data form. When the DataFormItems are generated, you can handle the SfDataForm.AutoGeneratingDataFormItem event to customize or cancel the DataFormItem.
The type of input editor generated for the data field depends on the type and attribute settings of the property. The following table lists the DataFormItem and its constraints for generation:
| Generated DataFormItem Type | Data Type / Attribute |
|---|---|
| Default DataFormItem generated for the String type and the properties with [DataType(DataType.Text)], [DataType(DataType.MultilineText)] and [DataType(DataType.Password)] attributes. | |
| Generated for the Int or Double type property. [DataType(DataType.Currency)]. [DataType("Percent")] | |
| Generated for the DateTime type property. [DataType(DataType.Date)]. [DataType(DataType.DateTime)]. | |
| Generated for the DataTime type property. [DataType(DataType.Time)]. | |
| Generated for the Enum type property. [EnumDataTypeAttribute] | |
| Generated for the Enum type property. [EnumDataTypeAttribute] | |
| Generated for the Bool type property. [BoolDataTypeAttribute] | |
| Generated for the PhoneNumber type property. [DataType(DataType.PhoneNumber)] | |
| Generated for the Enum type property. [EnumDataTypeAttribute] | |
| Generated for the Enum type property. [EnumDataTypeAttribute] |
The following list of editors are supported:
| Editor | Data Type/Attribute | Input control loaded |
|---|---|---|
| Text | The String type property and any other type apart from the following specified cases. | |
| MultilineText | The String type property with multi line text. [DataType(DataType.Multiline)] | |
| Numeric | Int or Double type property. | |
| Percent | The Int or Double type Property with percent value. [DataType("Percent")]]. | |
| Currency | The Int or Double type property with currency value. [DataType(DataType.Currency)]. | |
| Date | The DateTime type property with date value. [DataType(DataType.Date)] [DataType(DataType.DateTime)] | |
| Time | Property with [DataType(DataType.Time)] attribute. | |
| NumericUpDown | Int or Double type property. | |
| Segment | Enum type property. | |
| Bool | Bool type property. | |
| Switch | Bool type property. | |
| Picker | Enum and List type property. [EnumDataTypeAttribute] | |
| DropDown | Enum and List type property. [EnumDataTypeAttribute] | |
| AutoComplete | Enum and List type property. [EnumDataTypeAttribute] | |
| Password | The String type property with [DataType(DataType.Password)] attribute. | |
| RadioGroup | Enum and List type property. [EnumDataTypeAttribute] | |
| MaskedEditText | Property with [DataType(DataType.PhoneNumber)] attribute. |
Layout options
Label position
By default, the data form arranges the label at left side and input control at the right side. You can change the label position by setting the SfDataForm.LabelPosition property. You can position the label from left to top of the input control by setting the LabelPosition as Top.
<dataForm:SfDataForm LabelPosition="Top"/>dataForm.LabelPosition = LabelPosition.Top;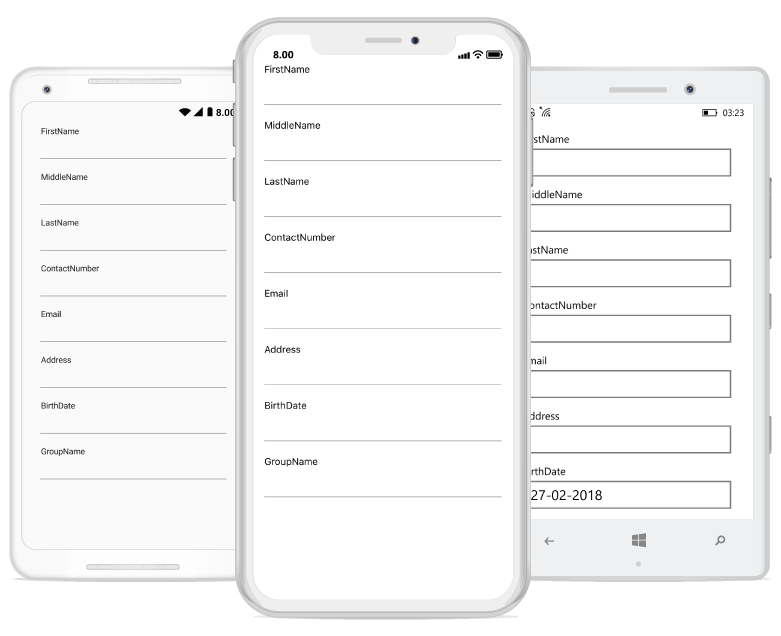
Grid layout
By default, the data form arranges one data field per row. It is possible to have more than one date field per row by setting the ColumnCount property which provides grid like layout for the data form.
<dataForm:SfDataForm ColumnCount="2"/>dataForm.ColumnCount = 2;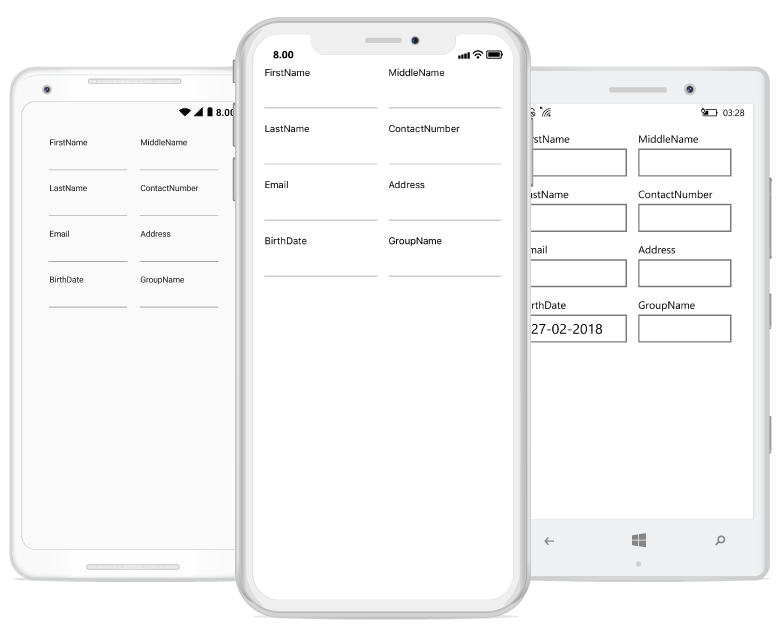
Loading DataForm inside StackLayout
StackLayout positions the child elements one after another either horizontally or vertically. Space of the StackLayout depends on the HorizontalOptions and VerticalOptions properties. Views in a stack layout can be sized based on space in the layout using layout options.
The DataForm control can be loaded inside any layout such as Grid, StackLayout, etc. When loading DataForm inside a StackLayout, set the HorizontalOptions and VerticalOptions properties of DataForm, and set parent(StackLayout) of DataForm to LayoutOptions.FillAndExpand.
Refer to the following code example to load the DataForm control inside a StackLayout. Set the VerticalOptions and HorizontalOptions of the StackLayout and DataForm to FillAndExpand.
<StackLayout x:Name="stackLayout" VerticalOptions="FillAndExpand" HorizontalOptions="FillAndExpand">
    <dataForm:SfDataForm x:Name="dataForm" VerticalOptions="FillAndExpand" HorizontalOptions="FillAndExpand"/>
</StackLayout>
public partial class MainPage : ContentPage
{
StackLayout StackLayout;
SfDataForm dataForm;
public MainPage()
{
InitializeComponent();
stackLayout = new StackLayout();
stackLayout.VerticalOptions = LayoutOptions.FillAndExpand;
stackLayout.HorizontalOptions = LayoutOptions.FillAndExpand;
dataForm = new SfDataForm();
dataForm.DataObject = new ContactInfo();
dataForm.VerticalOptions = LayoutOptions.FillAndExpand;
dataForm.HorizontalOptions = LayoutOptions.FillAndExpand;
stackLayout.Children.Add(dataform);
this.Content = stackLayout;
}
}
Loading DataForm with customized height and width
The DataForm can be loaded with specific height and width inside different layouts using the SfDataForm.HeightRequest and SfDataForm.WidthRequest properties.
<dataForm:SfDataForm x:Name="dataForm" WidthRequest="300"
        HeightRequest="300"
        VerticalOptions="CenterAndExpand"
HorizontalOptions="Center"/>dataForm.HeightRequest = 300;
dataForm.WidthRequest = 300;
dataForm.VerticalOptions = LayoutOptions.CenterAndExpand;
dataForm.HorizontalOptions = LayoutOptions.Center;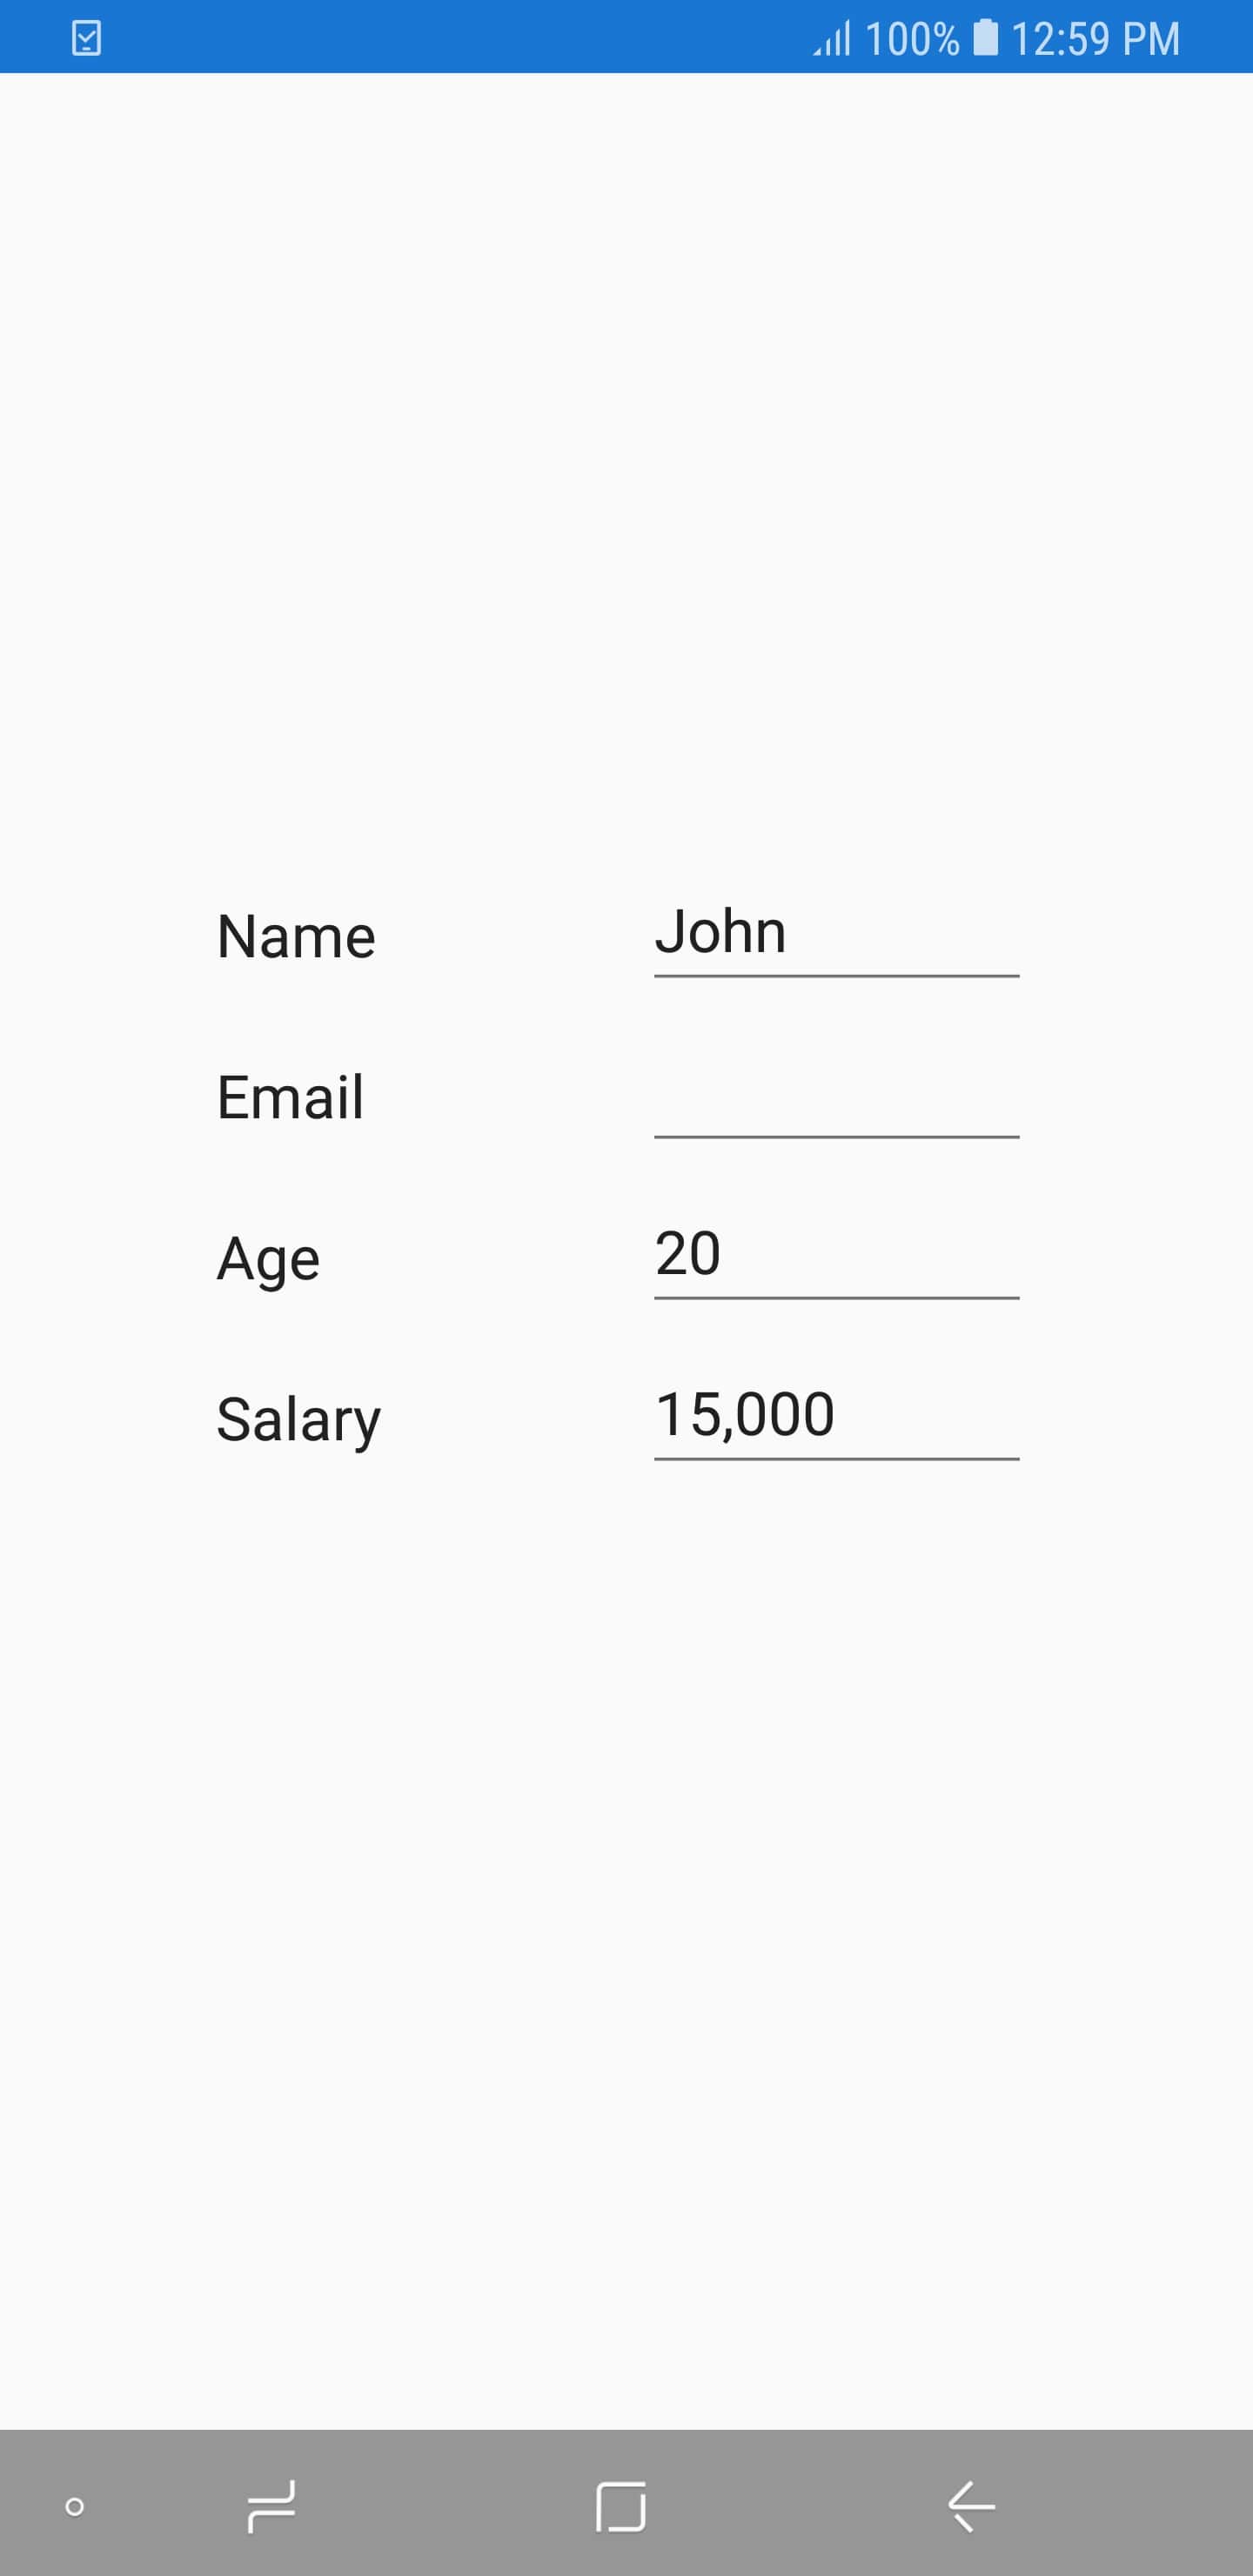
Editing
By default, the data form enables editing of the data field. You can disable editing by setting the IsReadOnly property of the data form. You can enable or disable editing for a particular data field by setting the IsReadOnly property of DataFormItem in the AutoGeneratingDataFormItem event. The data field editing behavior can also be defined by using EditableAttribute
Additional Help Resources
The Xamarin.Forms SfDataForm Knowledge Base section contains responses to some of the most common questions that other customers have asked us before. So this will be a good place to search for topics that are not covered in the user guide.
Similar to the Knowledge Base, the forum section also contains responses to questions that other customers have asked us in the past.
See also
How to render DataForm using MVVMCross in Xamarin.Forms
How to render DataForm using RealmObject in Xamarin.Forms
How to render DataForm using ReactiveUI in Xamarin.Forms
How to bind data object in Xamarin.Forms DataForm (SfDataForm) using Fresh MVVM framework
How to bind data object in Xamarin.Forms DataForm(SfDataForm) using Prism framework
How to import and export data objects from SQLite Offline database into Dataform (SfDataForm)
How to render DataForm using FSharp application in Xamarin.Forms
How to bind JSON data to Xamarin.Forms DataForm (SfDataForm)