Getting Started with Xamarin CheckBox (SfCheckBox)
25 Nov 202412 minutes to read
This section explains the steps required to configure the Xamarin CheckBox (SfCheckBox) control in a real-time scenario and provides a walk-through on some of the customization features available in Xamarin CheckBox (SfCheckBox) control.
Assembly deployment
After installing Essential Studio® for Xamarin, you can find all the required assemblies in the installation folders, {Syncfusion Essential Studio Installed location} \Essential Studio\{Version #}\Xamarin\lib.
E.g.: C:\Program Files (x86) \Syncfusion\Essential Studio\19.1.0.54\Xamarin\lib
NOTE
Assemblies can be found in unzipped package location(Documents/Syncfusion/{Version #}/Xamarin/lib) in Mac.
Adding SfCheckBox reference
You can add SfCheckBox reference using one of the following methods:
Method 1: Adding SfCheckBox reference from nuget.org
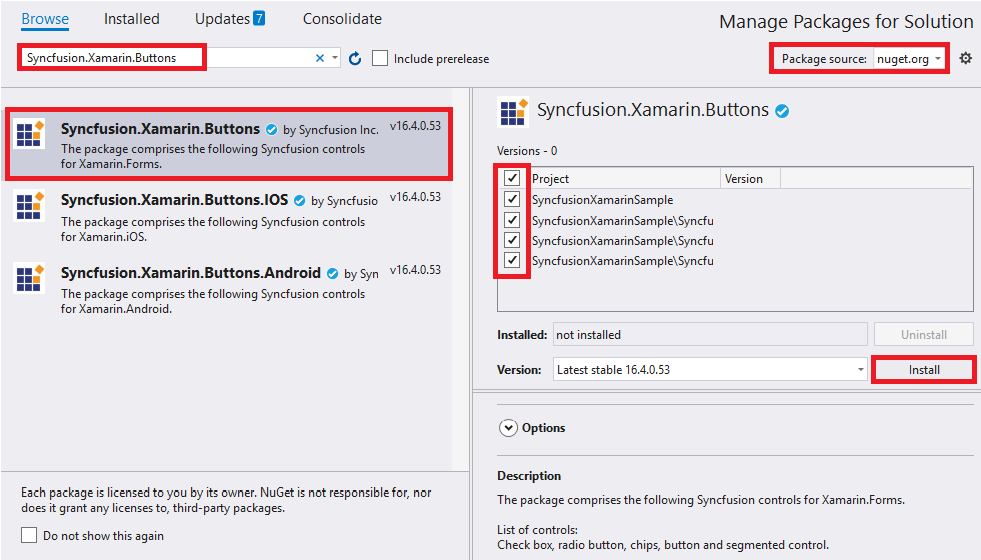
Syncfusion Xamarin components are available in nuget.org. To add SfCheckBox to your project, open the NuGet package manager in Visual Studio, search for Syncfusion.Xamarin.Buttons, and then install it.
NOTE
- Install the same version of
SfCheckBoxNuGet in all the projects.- In addition, you need to install the Syncfusion.Xamarin.Buttons.WPF package for Xamarin.Forms WPF platform only.
Method 2: Adding SfCheckBox reference from toolbox
Syncfusion also provides Xamarin Toolbox. Using this toolbox, you can drag the SfCheckBox control to the XAML page. It will automatically install the required NuGet packages and add the namespace to the page. To install Syncfusion Xamarin Toolbox, refer to Toolbox.
Method 3: Adding SfCheckBox assemblies manually from the installed location
If you prefer to manually reference the assemblies instead referencing from NuGet, add the following assemblies in respective projects.
Location: {Installed location}/{version}/Xamarin/lib
| PCL | Syncfusion.Buttons.XForms.dll Syncfusion.Core.XForms.dll Syncfusion.Licensing.dll |
| Android | Syncfusion.Buttons.XForms.dll Syncfusion.Buttons.XForms.Android.dll Syncfusion.Core.XForms.dll Syncfusion.Core.XForms.Android.dll Syncfusion.Licensing.dll |
| iOS | Syncfusion.Buttons.XForms.dll Syncfusion.Buttons.XForms.iOS.dll Syncfusion.Core.XForms.dll Syncfusion.Core.XForms.iOS.dll Syncfusion.Licensing.dll |
| UWP | Syncfusion.Buttons.XForms.dll Syncfusion.Buttons.XForms.UWP.dll Syncfusion.Core.XForms.dll Syncfusion.Core.XForms.UWP.dll Syncfusion.Licensing.dll |
| WPF | Syncfusion.Buttons.XForms.dll Syncfusion.Buttons.XForms.WPF.dll Syncfusion.Core.XForms.dll Syncfusion.Core.XForms.WPF.dll Syncfusion.Licensing.dll |
NOTE
To know more about obtaining our components, refer to these links for Mac and Windows.
IMPORTANT
Starting with v16.2.0.x, if you reference Syncfusion assemblies from the trial setup or from the NuGet feed, you also have to include a license key in your projects. Please refer to Syncfusion license key to know about registering Syncfusion license key in your Xamarin application to use our components.
NOTE
If you are adding the references from toolbox, this step is not needed.
Additional step for iOS
To launch SfCheckBox in iOS, call the SfCheckBoxRenderer.Init() in FinishedLaunching overridden method of AppDelegate class in iOS Project, as demonstrated in the following code example.
public override bool FinishedLaunching(UIApplication app, NSDictionary options)
{
    global::Xamarin.Forms.Forms.Init();
    LoadApplication(new App());
    Syncfusion.XForms.iOS.Buttons.SfCheckBoxRenderer.Init();
    return base.FinishedLaunching(app, options);
}
Additional step for UWP
This step is required only if the application is deployed in Release mode with .NET native tool chain enabled. It is for resolving the known Framework issue “Custom controls not rendering in Release mode” in UWP platform. Initializing the SfCheckBox assembly at OnLaunched overridden method of the App class in UWP project is the suggested work around, as demonstrated in the following code example.
protected override void OnLaunched(LaunchActivatedEventArgs e)
{
    .....
    rootFrame.NavigationFailed += OnNavigationFailed;
    // Add `using System.Reflection;`
    List<Assembly> assembliesToInclude = new List<Assembly>();
    //Now, add all the assemblies that your app uses
    assembliesToInclude.Add(typeof(SfCheckBoxRenderer).GetTypeInfo().Assembly);
    // replaces Xamarin.Forms.Forms.Init(e);
    Xamarin.Forms.Forms.Init(e, assembliesToInclude);
    .....
}
Additional step for WPF
To launch the check box in WPF, call the SfCheckBoxRenderer.Init() method in the MainWindow constructor of the MainWindow class after the Xamarin.Forms framework has been initialized and before the LoadApplication method is called as demonstrated in the following code sample.
public partial class MainWindow : FormsApplicationPage
{
     public MainWindow()
     {
            InitializeComponent();

            Forms.Init();

            Syncfusion.XForms.WPF.Buttons.SfCheckBoxRenderer.Init();

            LoadApplication(new App());
     }
}
Create a Simple SfCheckBox
The Xamarin CheckBox (SfCheckBox) control is configured entirely in C# code or by using XAML markup. The following steps explain how to create a SfCheckBox and configure its elements.
Add namespace for referred assemblies
xmlns:syncfusion="clr-namespace:Syncfusion.XForms.Buttons;assembly=Syncfusion.Buttons.XForms"using Syncfusion.XForms.Buttons;Refer SfCheckBox control with declared suffix name for Namespace
<?xml version="1.0" encoding="utf-8" ?>
<ContentPage xmlns="http://xamarin.com/schemas/2014/forms"
             xmlns:x="http://schemas.microsoft.com/winfx/2009/xaml"
             xmlns:local="clr-namespace:GettingStarted"
	     xmlns:syncfusion="clr-namespace:Syncfusion.XForms.Buttons;assembly=Syncfusion.Buttons.XForms"
	     x:Class="GettingStarted.MainPage">
    <ContentPage.Content>
        <StackLayout>
              <syncfusion:SfCheckBox x:Name="checkBox"/>
        </StackLayout>
    </ContentPage.Content>
</ContentPage>
using Syncfusion.XForms.Buttons;
using Xamarin.Forms;
namespace GettingStarted
{
public partial class MainPage : ContentPage
{
public MainPage()
{
InitializeComponent();
StackLayout stackLayout = new StackLayout();
SfCheckBox checkBox = new SfCheckBox();
stackLayout.Children.Add(checkbox);
this.Content = stackLayout;
}
}
}Setting caption
The check box caption can be defined using the Text property of SfCheckBox. This caption normally describes the meaning of the check box and it displays next to check box.
<syncfusion:SfCheckBox x:Name="checkBox" IsChecked="True" Text="CheckBox"/>SfCheckBox checkBox = new SfCheckBox();
checkBox.IsChecked = true;
checkBox.Text = "CheckBox";
Change the check box state
The three visual states of SfCheckBox are:
- Checked
- Unchecked
- Indeterminate
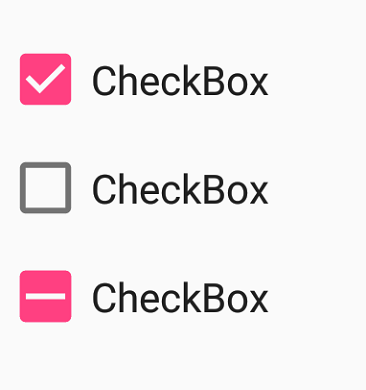
You can change the state of the check box using the IsChecked property of SfCheckBox. In checked state, a tick mark is added to the visualization of check box.
| State | Property | Value |
| checked | IsChecked | true |
| unchecked | IsChecked | false |
| indeterminate | IsChecked | null |
NOTE
For the check box, to report the indeterminate state, set the
IsThreeStateproperty to true.
Check box can be used as a single or as a group. A single check box mostly used for a binary yes/no choice, such as “Remember me?”, login scenario, or a terms of service agreement.
<syncfusion:SfCheckBox x:Name="checkBox" Text="I agree to the terms of services for this site" IsChecked="True"/>SfCheckBox checkBox = new SfCheckBox();
checkBox.Text = "I agree to the terms of services for this site";
checkBox.IsChecked = true;
Multiple check boxes can be used as a group for multi-select scenarios in which a user chooses one or more items from the group of choices that are not mutually exclusive.
<Label x:Name="label" Text="Pizza Toppings" />
<syncfusion:SfCheckBox x:Name="pepperoni" Text="Pepperoni"/>
<syncfusion:SfCheckBox x:Name="beef" Text="Beef" IsChecked="True"/>
<syncfusion:SfCheckBox x:Name="mushroom" Text="Mushrooms"/>
<syncfusion:SfCheckBox x:Name="onion" Text="Onions" IsChecked="True"/>
Label label = new Label();
label.Text = "Pizza Toppings";
SfCheckBox pepperoni= new SfCheckBox();
pepperoni.Text = "Pepperoni";
SfCheckBox beef= new SfCheckBox();
beef.Text = "Beef";
beef.IsChecked = true;
SfCheckBox mushroom = new SfCheckBox();
mushroom.Text = "Mushrooms";
SfCheckBox onion = new SfCheckBox();
onion.Text = "Pepperoni";
onion.IsChecked = true;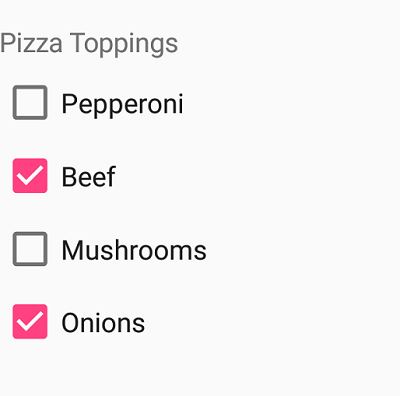
Indeterminate
The SfCheckBox allows an indeterminate state in addition to the checked and unchecked state. The indeterminate state of the check box is enabled by setting the IsThreeState property of the control to True.
NOTE
When the
IsThreeStateproperty is set toFalseandIsCheckedproperty is set tonullthen the check box will be in unchecked state.
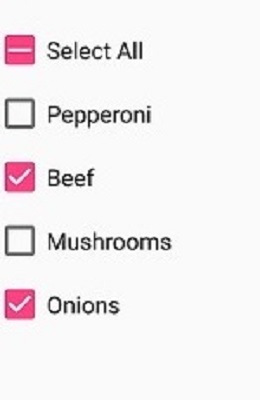
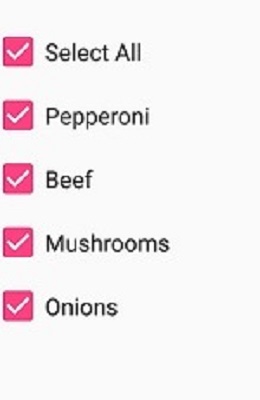
The indeterminate state is used when a group of sub-choices has both checked and unchecked states. In the following example, the “Select all” checkbox has the IsThreeState property set to true. The “Select all” checkbox is checked if all child elements are checked, unchecked if all the child elements are unchecked, and indeterminate otherwise.
<syncfusion:SfCheckBox x:Name="selectAll" Text="Select All" IsChecked="{x:Null}" StateChanged="SelectAll_StateChanged"/>
<syncfusion:SfCheckBox x:Name="pepperoni" Text="Pepperoni" StateChanged="CheckBox_StateChanged"/>
<syncfusion:SfCheckBox x:Name="beef" Text="Beef" IsChecked="True" StateChanged="CheckBox_StateChanged"/>
<syncfusion:SfCheckBox x:Name="mushroom" Text="Mushrooms" StateChanged="CheckBox_StateChanged"/>
<syncfusion:SfCheckBox x:Name="onion" Text="Onions" IsChecked="True" StateChanged="CheckBox_StateChanged"/>
bool skip = false;
SfCheckBox selectAll, pepperoni, beef, mushroom, onion;
selectAll = new SfCheckBox();
selectAll.StateChanged += SelectAll_StateChanged;
selectAll.Text = "Select All";
pepperoni = new SfCheckBox();
pepperoni.StateChanged += CheckBox_StateChanged;
pepperoni.Text = "Pepperoni";
beef = new SfCheckBox();
beef.StateChanged += CheckBox_StateChanged;
beef.Text = "Beef";
beef.IsChecked = true;
mushroom = new SfCheckBox();
mushroom.StateChanged += CheckBox_StateChanged;
mushroom.Text = "Mushrooms";
onion = new SfCheckBox();
onion.StateChanged += CheckBox_StateChanged;
onion.Text = "Onions";
onion.IsChecked = true;
private void SelectAll_StateChanged(object sender, StateChangedEventArgs e)
{
if (!skip)
{
skip = true;
pepperoni.IsChecked = beef.IsChecked = mushroom.IsChecked = onion.IsChecked = e.IsChecked;
skip = false;
}
}
private void CheckBox_StateChanged(object sender, StateChangedEventArgs e)
{
if (!skip)
{
skip = true;
if (pepperoni.IsChecked.Value && beef.IsChecked.Value && mushroom.IsChecked.Value && onion.IsChecked.Value)
selectAll.IsChecked = true;
else if (!pepperoni.IsChecked.Value && !beef.IsChecked.Value && !mushroom.IsChecked.Value && !onion.IsChecked.Value)
selectAll.IsChecked = false;
else
selectAll.IsChecked = null;
skip = false;
}
}
This demo can be downloaded from this link.