How can I help you?
Getting Started with UWP Ribbon (SfRibbon(Touch Ribbon))
25 May 20217 minutes to read
This section explains you on how to add SfRibbon in your application.
Add Ribbon
Create a Universal Windows Platform project in Visual Studio and refer to the following assemblies.
- Syncfusion.SfRibbon.UWP
1.Include the namespace for Syncfusion.SfRibbon.UWP assembly in MainPage.xaml
<Page xmlns="http://schemas.microsoft.com/winfx/2006/xaml/presentation"

xmlns:x="http://schemas.microsoft.com/winfx/2006/xaml"

xmlns:Ribbon="using:Syncfusion.UI.Xaml.Controls.SfRibbon">
2.Now add the SfRibbon control with a required optimal name using the included namespace
<Page xmlns:Ribbon="using:Syncfusion.UI.Xaml.Controls.SfRibbon">

<Grid Background="{ThemeResource ApplicationPageBackgroundThemeBrush}">

<Ribbon:SfRibbon x:Name="_ribbon"/>

</Grid>

</Page>
SfRibbon _ribbon = new SfRibbon();Dim _ribbon As New SfRibbon()Execute the above code to render the following output.

Add Ribbon Tab
SfRibbon control accept RibbonTab as children.The following code example illustrates on how to add RibbonTab
<Page xmlns:ribbon="using:Syncfusion.UI.Xaml.Controls.SfRibbon">

<Grid Background="{ThemeResource ApplicationPageBackgroundThemeBrush}">

<ribbon:SfRibbon x:Name="_ribbon">

<ribbon:SfRibbonTab Caption="Home"/>

<ribbon:SfRibbonTab Caption="Insert"/>

</ribbon:SfRibbon>

</Grid>

</Page>SfRibbon _ribbon = new SfRibbon();
_ribbon.Items.Add(new SfRibbonTab() { Caption = "Home" });
_ribbon.Items.Add(new SfRibbonTab() { Caption = "Insert" });Dim _ribbon As New SfRibbon()
_ribbon.Items.Add(New SfRibbonTab() With {.Caption = "Home"})
_ribbon.Items.Add(New SfRibbonTab() With {.Caption = "Insert"})Execute the above code to render the following output.

How to capture the click of SfRibbonTab?
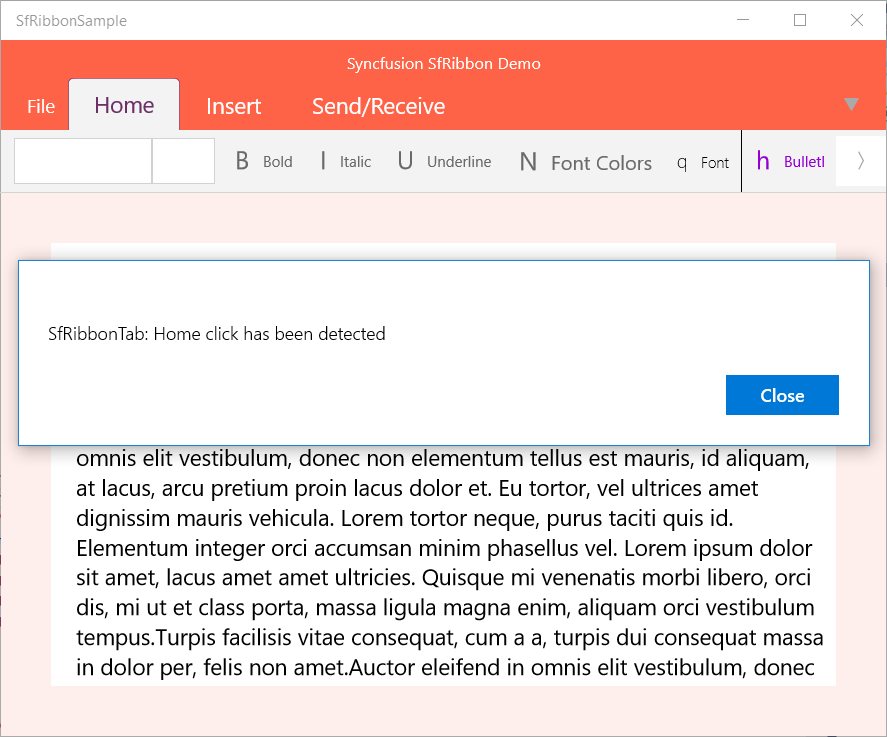
SfRibbonTab’s click can be identified by using the event named Tapped as like below
<syncfusion:SfRibbonTab Caption="Sales" Tapped="SfRibbonTab_Tapped">private async void SfRibbonTab_Tapped(object sender, TappedRoutedEventArgs e)
{
var dialog = new MessageDialog("SfRibbonTab:" + " " + (sender as SfRibbonTab).Caption.ToString() + " " + "click has been detected");
await dialog.ShowAsync();
}
Add Ribbon Bar
RibbonTab accepts RibbonBar as children, here five RibbonBar Controls are added inside “HOME” RibbonTab
<Page xmlns:ribbon="using:Syncfusion.UI.Xaml.Controls.SfRibbon">

<Grid Background="{ThemeResource ApplicationPageBackgroundThemeBrush}">

<ribbon:SfRibbon x:Name="_ribbon">

<ribbon:SfRibbonTab Caption="Home">

<ribbon:SfRibbonBar  Header="New"/>

<ribbon:SfRibbonBar  Header="Delete"/>

</ribbon:SfRibbonTab>

<ribbon:SfRibbonTab Caption="Insert"/>

</ribbon:SfRibbon>

</Grid>

</Page>SfRibbon _ribbon = new SfRibbon();
SfRibbonTab _ribbonTab = new SfRibbonTab() { Caption = "Home" };
_ribbonTab.Items.Add(new SfRibbonBar() { Header = "New" });
_ribbonTab.Items.Add(new SfRibbonBar() { Header = "Delete" });
_ribbon.Items.Add(_ribbonTab);
_ribbon.Items.Add(new SfRibbonTab() { Caption = "Insert" });Dim _ribbon As New SfRibbon()
Dim _ribbonTab As New SfRibbonTab() With {.Caption = "Home"}
_ribbonTab.Items.Add(New SfRibbonBar() With {.Header = "New"})
_ribbonTab.Items.Add(New SfRibbonBar() With {.Header = "Delete"})
_ribbon.Items.Add(_ribbonTab)
_ribbon.Items.Add(New SfRibbonTab() With {.Caption = "Insert"})Execute the above code to render the following output.

Add Ribbon controls to RibbonBar
The following code example illustrates on how to add ribbon controls to the Ribbon bar from code-behind and XAML,
<Page xmlns:Ribbon="using:Syncfusion.UI.Xaml.Controls.SfRibbon">

<Grid Background="{ThemeResource ApplicationPageBackgroundThemeBrush}">

<ribbon:SfRibbon x:Name="_ribbon">

<ribbon:SfRibbonTab Caption="Home">

<ribbon:SfRibbonBar>

<ribbon:SfRibbonButton Icon="Assets/Bold.png"/>

</ribbon:SfRibbonBar>

<ribbon:SfRibbonBar>

<ribbon:SfRibbonButton Icon="Assets/Bullets.png"/>

</ribbon:SfRibbonBar>

</ribbon:SfRibbonTab>

<ribbon:SfRibbonTab Caption="Insert"/>

</ribbon:SfRibbon>

</Grid>

</Page>SfRibbon _ribbon = new SfRibbon();
SfRibbonTab _ribbonTab = new SfRibbonTab() { Caption = "Home" };
SfRibbonBar _ribbonBar = new SfRibbonBar();
_ribbonBar.Items.Add(new SfRibbonButton() { Icon = new BitmapImage(new Uri("ms-appx:/Assets/Bold.png", UriKind.RelativeOrAbsolute)) });
SfRibbonBar _ribbonBar1 = new SfRibbonBar();
_ribbonBar1.Items.Add(new SfRibbonButton() { Icon = new BitmapImage(new Uri("ms-appx:/Assets/Bullets.png", UriKind.RelativeOrAbsolute)) });
_ribbonTab.Items.Add(_ribbonBar);
_ribbonTab.Items.Add(_ribbonBar1);
_ribbon.Items.Add(_ribbonTab);
_ribbon.Items.Add(new SfRibbonTab() { Caption = "Insert" });Dim _ribbon As New SfRibbon()
Dim _ribbonTab As New SfRibbonTab() With {.Caption = "Home"}
Dim _ribbonBar As New SfRibbonBar()
_ribbonBar.Items.Add(New SfRibbonButton() With {.Icon = New BitmapImage(New Uri("ms-appx:/Assets/Bold.png", UriKind.RelativeOrAbsolute))})
Dim _ribbonBar1 As New SfRibbonBar()
_ribbonBar1.Items.Add(New SfRibbonButton() With {.Icon = New BitmapImage(New Uri("ms-appx:/Assets/Bullets.png", UriKind.RelativeOrAbsolute))})
_ribbonTab.Items.Add(_ribbonBar)
_ribbonTab.Items.Add(_ribbonBar1)
_ribbon.Items.Add(_ribbonTab)
_ribbon.Items.Add(New SfRibbonTab() With {.Caption = "Insert"})Execute the above code to render the following output.

Configure QAT
QAT items can be added as follows,
<ribbon:SfRibbon x:Name="_ribbon" QATVisibility="Visible">

<ribbon:SfRibbon.QuickAccessToolBar>

<ribbon:QuickAccessToolBar DisplayItemsCount="3">

<Grid>

<StackPanel Orientation="Horizontal" x:Name="PART_QAT">

<ribbon:SfRibbonButton Icon="Assets/Undo.png">

</ribbon:SfRibbonButton>

<ribbon:SfRibbonButton Icon="Assets/Redo.png">

</ribbon:SfRibbonButton>

</StackPanel>

</Grid>

</ribbon:QuickAccessToolBar>

</ribbon:SfRibbon.QuickAccessToolBar>
You can limit the number of viewable items in QAT by setting DisplayItemsCount property. When the total number of items exceeds DisplayItemsCount, scroll QAT for viewing the items.

Configure BackStage
BackStageButton and BackStage TabItems can be added as follows,
<ribbon:SfRibbon.BackStage>

<ribbon:SfBackstage>

<ribbon:SfBackStageTabItem Header="Save" Icon="Assets/Save.png"/>

<ribbon:SfBackStageButton Label="Exit" Icon="Assets/Exit.png"/>

</ribbon:SfBackstage>

</ribbon:SfRibbon.BackStage>