How can I help you?
Getting Started with PHP Ribbon
To get start with the Ribbon control using PHP wrapper classes, either of the following prerequisites needs to be installed in your machine to deploy and run those samples locally.
In this section, let’s see how to create, deploy and run the Ribbon samples using Xampp server.
Creating a Sample Folder
Usually, the Xampp gets installed in C:\ drive. Now, create a new sample folder namely RibbonPHP within C:\\xampp\\htdocs and place all the below mentioned folders within it.
- Scripts - Includes all the script files necessary to render the control. [Optional, if cdn links are used in the sample]
- CSS - Includes all the required stylesheet files. [Optional, if cdn links are used in the sample]
- PHP Class Libraries - Includes the individual PHP wrapper class files for all the controls. [Mandatory]
- Sample PHP file (with .php extension). [Mandatory]
Adding Scripts and CSS files
The required scripts and CSS files can be copied into the above created sample folder namely RibbonPHP and then can be manually referred on the sample page or else the cdn links can be referred directly. In case, if you are manually referring the scripts and CSS files in your PHP sample, refer this topic to know how to copy the required scripts and CSS from the installed location.
Adding PHP Class libraries
Copy the PHP class libraries into your sample folder, which are the collection of PHP wrapper files created individually for all the controls in order to access and process its server-side values and then send it back to the client-side. These libraries are available within the following installed location -
- (Installed Location)\Syncfusion\Essential Studio\33.1.44\PHP\Src
Create a PHP file
Create a first PHP file in Xampp and name it appropriately with .php extension and also place it under the newly created sample folder RibbonPHP. For example, say Index.php with the initial code as shown below -
<!DOCTYPE html>
    <html>
        <head>
            <title>Getting Started - Ribbon</title>
            <!--Dependency files references-->
        </head>
        <body>
            <?php
            ?>
        </body>
    </html>
Scripts and CSS references
Ribbon has the following external script dependency and these should be referred before ej Script files
-
jQuery1.7.1 and later versions
Also Ribbon have internal dependencies which includes ej.core libraries and child controls. For getting started, you can refer ej.web.all.min.js which includes ej.core and all Syncfusion JavaScript controls.
Add the specific theme reference to your HTML file by referring the appropriate ej.web.all.min.css which contains ej.widgets.core.min.css (layout related CSS) and ej.theme.min.css (theme related CSS) for all the Syncfusion controls.
Refer the required scripts and CSS files in your PHP page as mentioned below in order to render the Ribbon control -
<!DOCTYPE html>
    <html>
        <head>
                <title>Getting Started - Ribbon</title>
                <link href="http://cdn.syncfusion.com/33.1.44/js/web/flat-azure/ej.web.all.min.css" rel="stylesheet" />
                <!-- To load ribbon sample level icons -->
                <link href="http://cdn.syncfusion.com/33.1.44/js/web/ribbon-css/ej.icons.css" rel="stylesheet" />
                <script src="http://cdn.syncfusion.com/js/assets/external/jquery-3.0.0.min.js"></script>
                <script src="http://cdn.syncfusion.com/33.1.44/js/web/ej.web.all.min.js"></script>
        </head>
        <body>
            <?php
            ?>
        </body>
    </html>
Here, the CDN links are used. In case, if the individual scripts are required to render the Ribbon control, refer here.
NOTE
- In case if you don’t want to use
ej.web.all.min.jsfile, you can use ourcustom script generatorto create custom script file with required controls and its dependencies only- Ribbon’s sample level icons can be loaded using
ej.icons.CSSfrom this CDN or from the location (installed location)\ Syncfusion\Essential Studio\33.1.44\JavaScript\assets\css\web\ribbon-css”.
AutoLoad file reference
Include the PHP AutoLoad file reference within the body section of the PHP page.
<!DOCTYPE html>
    <html>
        <head>
                <title>Getting Started - Ribbon</title>
                <link href="http://cdn.syncfusion.com/33.1.44/js/web/flat-azure/ej.web.all.min.css" rel="stylesheet" />
                <!-- To load ribbon sample level icons -->
                <link href="http://cdn.syncfusion.com/33.1.44/js/web/ribbon-css/ej.icons.css" rel="stylesheet" />
                <script src="http://cdn.syncfusion.com/js/assets/external/jquery-3.0.0.min.js"></script>
                <script src="http://cdn.syncfusion.com/33.1.44/js/web/ej.web.all.min.js"></script>
        </head>
        <body>
            <?php require_once 'EJ\AutoLoad.php'; ?>
        </body>
    </html>
Control Initialization
Create the Ribbon control object by accessing the Ribbon namespace EJ\\Ribbon using new keyword. Define its properties and then output the Ribbon control by echoing the result object.
Ribbon can be initialized with Application Tab and UL list is needed for binding menu to application menu which can be specified through menuItemID which denotes id of UL.
Define the Application Tab with type as menu to render simple Ribbon control.
<body>
                <ul id="ribbonmenu">
                <li>
                <a>FILE</a>
                    <ul>
                    <li><a>New</a></li>
                    <li><a>Open</a></li>
                    <li><a>Save</a></li>
                    <li><a>Print</a></li>
                    </ul>
                </li>
                </ul>
                <?php
                require_once 'EJ\AutoLoad.php';
                $ribbon = new  \EJ\Ribbon('defaultRibbon');
                $aTab = new \EJ\Ribbon\ApplicationTab();
                $aTab->type('menu')->menuItemID('ribbonmenu');
                echo $ribbon ->width('500px')->applicationTab($aTab)->render();
            ?>
            </body>
NOTE
1.Set the required
widthto Ribbon, else default parent container or window width will be considered.
2.It is mandatory to define the render() method at last as given in the above syntax, in order to display the Ribbon on the browser.
Adding Tabs
Tab is a set of related groups which are combined into single item. For creating Tab, id and text properties should be specified.
<body>
                <ul id="ribbonmenu">
                <li>
                <a>FILE</a>
                    <ul>
                    <li><a>New</a></li>
                    <li><a>Open</a></li>
                    <li><a>Save</a></li>
                    <li><a>Print</a></li>
                    </ul>
                </li>
                </ul>
                <?php
                require_once 'EJ\AutoLoad.php';
                $ribbon = new  \EJ\Ribbon('defaultRibbon');
                $aTab = new \EJ\Ribbon\ApplicationTab();
                $aTab->type('menu')->menuItemID('ribbonmenu');
                $hometab  = new \EJ\Ribbon\Tab();
                $hometab->id('home')->text('HOME');
                echo $ribbon ->width('500px')->applicationTab($aTab)->tabs(array($hometab))->render();
            ?>
            </body>
Configuring Groups
List of controls are combined as logical groups into Tab. Group alignment type as row/column, Default is row.
Create group item with text specified and add content group to Groups collection with ejButton control settings.
<body>
                <ul id="ribbonmenu">
                <li>
                <a>FILE</a>
                    <ul>
                    <li><a>New</a></li>
                    <li><a>Open</a></li>
                    <li><a>Save</a></li>
                    <li><a>Print</a></li>
                    </ul>
                </li>
                </ul>
                <?php
                require_once 'EJ\AutoLoad.php';
                $ribbon = new  \EJ\Ribbon('defaultRibbon');
                $aTab = new \EJ\Ribbon\ApplicationTab();
                $aTab->type('menu')->menuItemID('ribbonmenu');
                $hometab  = new \EJ\Ribbon\Tab();
                $clipboard1  = new \EJ\Ribbon\Group();
                $grpcontent = new \EJ\Ribbon\Content();
                $contentgroup=new \EJ\Ribbon\ContentGroup();
                $btnsettings=array('contentType'=>'imageonly','prefixIcon'=>'e-icon e-ribbon e-new');
                $contentgroup->id('new')->text('New')->buttonSettings($btnsettings);
                $grpcontent->groups(array($contentgroup));
                $clipboard1->text('New')->content(array($grpcontent));
                $hometab->id('home')->text('HOME')->groups(array($clipboard1));
                echo $ribbon ->width('500px')->applicationTab($aTab)->tabs(array($hometab))->render();
            ?>
            </body>
Adding Controls to Group
Syncfusion JavaScript Controls can be added to group’s content with corresponding type specified like button, split button, toggle button, dropdown list, gallery, custom, etc. Default type is button.
Create button controls as array of objects as mentioned with the following code.
<body>
                <ul id="ribbonmenu">
                <li>
                <a>FILE</a>
                    <ul>
                    <li><a>New</a></li>
                </ul>
                </li>
                </ul>
                <ul id="split">
                <li><span>Paste</span></li>
                </ul>
                <?php
                require_once 'EJ\AutoLoad.php';
                $Json = '[{
                    "value": 1,
                    "text": "Segoe UI"
                }, {
                    "value": 2,
                    "text": "Arial"
                }]';
                $Json = json_decode($Json,true);
                $ribbon = new  \EJ\Ribbon('defaultRibbon');
                $aTab = new \EJ\Ribbon\ApplicationTab();
                $aTab->type('menu')->menuItemID('ribbonmenu');
                $hometab  = new \EJ\Ribbon\Tab();
                $clipboard  = new \EJ\Ribbon\Group();
                $grpcontent1 = new \EJ\Ribbon\Content();
                $grpcontentpaste = new \EJ\Ribbon\Content();
                $contentgroup1=new \EJ\Ribbon\ContentGroup();
                $splitButtonSettings=array('contentType'=>'imageonly','targetID'=>'split','buttonMode'=>'dropdown','arrowPosition'=>'bottom','prefixIcon'=>'e-icon e-ribbon e-ribbonpaste');
                $contentgroup1->id('paste')->text('Paste')->splitButtonSettings($splitButtonSettings);
                $default2= new \EJ\Ribbon\Defaults();
                $default2->width(50)->height(70)->type('splitbutton');
                $grpcontentpaste->groups(array($contentgroup1))->defaults($default2);
                $contentgroup2=new \EJ\Ribbon\ContentGroup();
                $dropdownSettings=array('dataSource'=>$Json,'width'=> 100,'value'=> "1");
                $contentgroup2->id('fontfamily')->type('dropdownlist')->dropdownSettings($dropdownSettings);
                $grpcontent1->groups(array($contentgroup2));
                $clipboard->text('SplitButton & Dropdown')->alignType('columns')->content(array($grpcontentpaste,$grpcontent1));
                $hometab->id('home')->text('HOME')->groups(array($clipboard));
                echo $ribbon ->width('500px')->applicationTab($aTab)->tabs(array($hometab))->render();
            ?>
            </body>
Running the PHP file
The above created sample is now ready to run. Therefore, open the XAMPP control panel and start the Apache module as shown in the below image -
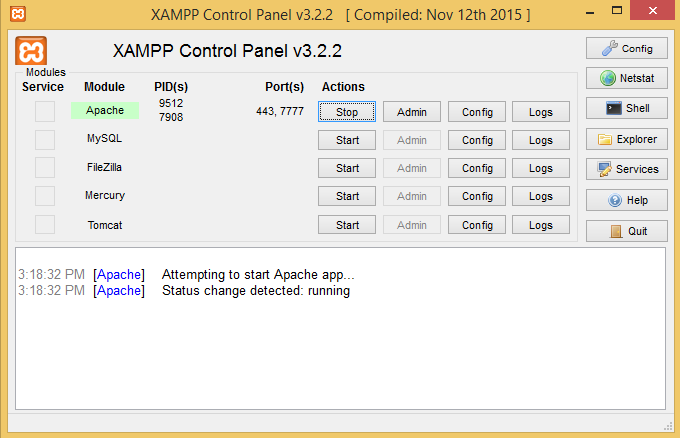
Now, the sample can be run directly on the browser through localhost with appropriate port numbers, on which the Apache server is currently listening. For example, say if the Apache is configured to listen on port 7777, then type http://localhost:7777/ on your browser and press enter. Also, make sure that your sample folder is present within this location C:\\xampp\\htdocs as mentioned earlier.
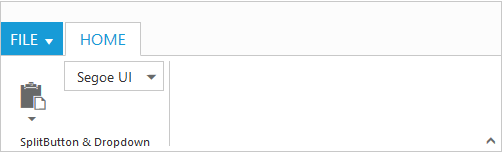
The following Ribbon output shows up on the browser, when you type http://localhost:7777/RibbonPHP/index.php and press enter -
NOTE
In case, if you face any problem with default port 80 while running your sample, make the Apache to listen on some other different ports. The port number changes needs to be done on both the
httpd.confandhttpd-ssl.conffiles, in order to get rid of this problem.(Refer here)