Connecting Firebase Realtime Database to Blazor Data Grid
The Blazor DataGrid supports binding data from a Firebase Realtime Database using the REST API. This approach provides a lightweight, language-agnostic solution for working with cloud-hosted JSON databases without requiring external SDKs.
What is Firebase Realtime Database?
Firebase Realtime Database is a cloud-hosted, NoSQL database that stores data as JSON. Unlike Firestore which uses collections and documents, the Realtime Database organizes data in a hierarchical JSON structure with nodes and keys, making it ideal for applications requiring simple setup, direct JSON manipulation, and real-time synchronization across multiple clients.
Key Benefits of Firebase Realtime Database
- Simple Setup: Minimal configuration required; no complex SDKs or dependencies.
- REST API Access: Language-agnostic HTTP endpoints for CRUD operations.
- Real-Time Synchronization: Automatic updates via WebSocket connections and polling mechanisms.
- Hierarchical JSON Structure: Familiar JSON format for organizing and accessing data.
- Low Latency: Optimized for fast read/write operations with automatic sync.
- Offline Capabilities: Built-in offline persistence with automatic synchronization when connectivity is restored.
- Flexible Security Rules: Fine-grained access control at the database path level.
- Lightweight Integration: No heavy SDK installation; works directly with HttpClient.
What is Firebase Realtime Database REST API?
Firebase Realtime Database REST API is a set of HTTP endpoints that allow applications to access the Realtime Database directly using standard REST calls (GET, POST, PUT, DELETE, PATCH). Ideal for .NET applications that require direct control over network requests and need to avoid SDK dependencies.
Prerequisites
Ensure the following software, accounts, and packages are in place before proceeding:
| Software/Package | Version | Purpose |
|---|---|---|
| Visual Studio 2026 | 18.0 or later | Development IDE with Blazor workload |
| .NET SDK | net10.0 or compatible | Runtime and build tools |
| Firebase Account | Active account | Cloud project hosting and Realtime Database |
| Google Cloud Project | Active project | Required for Firebase services and configuration |
| Syncfusion.Blazor.Grid | 34.2.2 | DataGrid and UI components |
| Syncfusion.Blazor.Themes | 34.2.2 | Styling for DataGrid components |
| HttpClient | Built-in (.NET) | REST API communication |
Setting Up the Firebase Realtime Database Environment
Step 1: Create a Firebase Project and Realtime Database
Firebase projects host the Realtime Database and manage authentication, storage, and other cloud services.
Instructions:
-
Access Firebase Console
- Navigate to Firebase Console.
- Sign in with your Google account.
-
Create a New Firebase Project
- Click the “Add Project” button.
- Enter project name:
librarymanagement(or preferred name). - Accept the terms and click “Create Project” and wait for completion.
-
Create a Realtime Database
- In the Firebase Console, navigate to “Build” → “Realtime Database”.
- Click “Create Database” button.
- Choose the database location (select the location closest to the users).
- Set security rules to “Start in Test Mode” for development (update rules for production).
- Click “Enable” and wait for the database to initialize.
-
Note the Database URL
- After creation, the database URL appears at the top:
https://your-project-id-default-rtdb.firebaseio.com/ - Save the URL - required for configuration.
- After creation, the database URL appears at the top:
-
Create the Database Structure
- In the Realtime Database Console, an empty root node appears.
- Click the ”+” (Add) button to create a new node named “Books”.
- This creates the hierarchical structure:
root/Books/.
-
Add Sample Data (Using Data Import or Manual Entry)
- The database structure will be populated with sample data in Step 3 using the JSON file
The Realtime Database structure is now ready with the Books node.
Step 2: Generate Database Secret for Authentication
Database secrets enable secure REST API access to the Realtime Database.
Instructions:
-
Access Project Settings
- In Firebase Console, click the Settings gear icon (⚙️) in the top-left.
- Select “Project Settings”.
- Navigate to the “Service Accounts” tab.
-
Generate Database Secret
- Scroll down to “Realtime Database Secrets” section.
- Click the “Show” button next to the database secret.
- Copy the secret key (this is the authentication token).
- Important: Save this secret securely—it grants full access to the database.
-
Store the Database Secret
- For development: Store in
appsettings.Development.jsonorappsettings.json. - For production: Use secure credential storage (Azure Key Vault, AWS Secrets Manager).
-
Never commit secrets to version control (add to
.gitignore).
- For development: Store in
The database secret is now available for REST API authentication.
Step 3: Configure Initial Data Import
Initial data seeding adds sample book records to the Realtime Database for development and testing.
Instructions:
-
Prepare Sample Data File
- Create or obtain a JSON file in the project root.
- The file should contain the database structure with sample records:
{
  "Books": {
    "BOOK001": {
      "bookId": "BOOK001",
      "title": "The Great Gatsby",
      "author": "F. Scott Fitzgerald",
      "isbn": "978-0743273565",
      "category": "Fiction",
      "publishDate": "1925-04-10",
      "language": "English",
      "totalCopies": 5,
      "availableCopies": 3,
      "location": "Section A-1",
      "status": "Available",
      "lastUpdated": "2026-02-17T10:00:00Z"
    },
    "BOOK002": {
      "bookId": "BOOK002",
      "title": "To Kill a Mockingbird",
      "author": "Harper Lee",
      "isbn": "978-0061120084",
      "category": "Fiction",
      "publishDate": "1960-07-11",
      "language": "English",
      "totalCopies": 4,
      "availableCopies": 2,
      "location": "Section B-2",
      "status": "Available",
      "lastUpdated": "2026-02-17T10:00:00Z"
    },
    "BOOK003": {
      "bookId": "BOOK003",
      "title": "1984",
      "author": "George Orwell",
      "isbn": "978-0451524935",
      "category": "Dystopian Fiction",
      "publishDate": "1949-06-08",
      "language": "English",
      "totalCopies": 6,
      "availableCopies": 4,
      "location": "Section C-1",
      "status": "Available",
      "lastUpdated": "2026-02-17T10:00:00Z"
    }
  }
}-
Import Data Using Firebase Console
- In Realtime Database Console, click the three-dot menu (⋮) at the top
- Select “Import JSON”
- Upload or paste the contents of JSON file.
- Click “Import” to load the sample data into the database
-
Verify Data Import
- The database should now display the hierarchical structure:
-
root > Books > BOOK001, BOOK002, BOOK003(and their respective fields)
The sample data is now loaded into the Realtime Database.
Step 4: Update Database Security Rules
Security rules control read/write access to the Realtime Database paths.
Instructions:
-
Access Security Rules
- In Realtime Database Console, click the “Rules” tab at the top.
-
Update Rules for Development
- For development testing, replace the default rules with:
{
  "rules": {
    "Books": {
      ".read": true,
      ".write": true
    }
  }
}- Click “Publish” to apply the rules
-
Update Rules for Production
- For production, implement proper authentication:
{
  "rules": {
    "Books": {
      ".read": "root.child('auth').child(auth.uid).exists()",
      ".write": "root.child('auth').child(auth.uid).exists()"
    }
  }
}- This restricts access to authenticated users only
- Click “Publish” to apply the rules
Step 5: Install Required NuGet Packages
NuGet packages are software libraries that add functionality to the Blazor application. For Realtime Database integration, only Blazor components are required (HttpClient is built-in).
Prerequisites for this step:
- A new Blazor Web Application created using the default template
- The project automatically generates essential files:
Program.cs,appsettings.json,wwwrootfolder, andComponentsfolder - For this guide, a Blazor application named Grid_Firebase_Realtime has been created
Method 1: Using Package Manager Console
- Open Visual Studio 2026.
- Navigate to Tools → NuGet Package Manager → Package Manager Console.
- Run the following commands:
Install-Package Syncfusion.Blazor.Grid -Version 34.2.2
Install-Package Syncfusion.Blazor.Themes -Version 34.2.2
Method 2: Using NuGet Package Manager UI
- Open Visual Studio 2026 → Tools → NuGet Package Manager → Manage NuGet Packages for Solution.
- Search for and install each package individually:
- Syncfusion.Blazor.Grid (version 34.2.2)
- Syncfusion.Blazor.Themes (version 34.2.2)
All required packages are now installed. No external Firebase SDK is needed.
Step 6: Create the Data Model
A data model is a C# class that represents the structure of a Realtime Database record. This model defines the properties that correspond to the fields in the Books node.
Instructions:
- Create a new folder named
Modelsin the Blazor application project. - Inside the
Modelsfolder, create a new file named Book.cs. - Define the Book class with the following code:
using System;

namespace Grid_Firebase_Realtime.Models
{
    /// <summary>
    /// Represents a Book record in the Firebase Realtime Database.
    /// Maps to a document in the Books node with flexible field structure.
    /// </summary>
    public class Book
    {
        /// <summary>
        /// Gets or sets the unique identifier for the book.
        /// Example: "BOOK001"
        /// </summary>
        public string BookId { get; set; }

        /// <summary>
        /// Gets or sets the title of the book.
        /// </summary>
        public string Title { get; set; }

        /// <summary>
        /// Gets or sets the author's name.
        /// </summary>
        public string Author { get; set; }

        /// <summary>
        /// Gets or sets the ISBN (International Standard Book Number).
        /// </summary>
        public string ISBN { get; set; }

        /// <summary>
        /// Gets or sets the category or genre of the book.
        /// Example: "Fiction", "Non-Fiction", "Science"
        /// </summary>
        public string Category { get; set; }

        /// <summary>
        /// Gets or sets the publication date of the book.
        /// Stored as ISO 8601 format string in the database.
        /// </summary>
        public string PublishDate { get; set; }

        /// <summary>
        /// Gets or sets the language of the book.
        /// Example: "English", "Spanish", "French"
        /// </summary>
        public string Language { get; set; }

        /// <summary>
        /// Gets or sets the total number of copies available in the library.
        /// </summary>
        public int TotalCopies { get; set; }

        /// <summary>
        /// Gets or sets the number of copies currently available for checkout.
        /// </summary>
        public int AvailableCopies { get; set; }

        /// <summary>
        /// Gets or sets the location or shelf where the book is stored.
        /// Example: "Section A-1"
        /// </summary>
        public string Location { get; set; }

        /// <summary>
        /// Gets or sets the current status of the book.
        /// Possible values: "Available", "CheckedOut", "Reserved", "Damaged"
        /// </summary>
        public string Status { get; set; }

        /// <summary>
        /// Gets or sets the timestamp of the last update to this record.
        /// Stored as ISO 8601 format string in the database.
        /// </summary>
        public string LastUpdated { get; set; }
    }
}
Explanation:
- The
Bookclass directly maps to a record in the Realtime Database’sBooksnode. - Each property represents a field in the JSON object.
- All properties use standard C# conventions (PascalCase) which match the JSON fields after deserialization.
- Nullable strings (
?suffix) indicate optional fields that may not be present in all records. - DateTime fields are stored as ISO 8601 format strings in the JSON database for compatibility.
- No special attributes are required for REST API JSON deserialization.
The data model has been successfully created in Models/Book.cs.
Step 7: Configure the Firebase Connection String
A Firebase Realtime Database connection requires the database URL and authentication secret. This configuration is managed in the appsettings.json file.
Instructions:
- Open the
appsettings.jsonfile in the project root. - Add a new section for Firebase configuration with the database URL and secret:
{
  "Firebase": {
    "RealtimeDatabaseURL": "https://your-project-id-default-rtdb.firebaseio.com/",
    "DatabaseSecret": "your-database-secret-key-here"
  },
  "Logging": {
    "LogLevel": {
      "Default": "Information",
      "Microsoft.AspNetCore": "Warning"
    }
  },
  "AllowedHosts": "*"
}
Configuration Details:
| Setting | Value | Purpose |
|---|---|---|
Firebase:RealtimeDatabaseURL |
https://your-project-id-default-rtdb.firebaseio.com/ |
Base URL of the Realtime Database (with trailing slash). |
Firebase:DatabaseSecret |
Custom database secret | Authentication token for REST API access. |
Important Security Notes:
-
Development: Store secrets in
appsettings.Development.json(local machine only). -
Production: Use secure credential storage:
- Azure Key Vault
- AWS Secrets Manager
- Environment variables
-
Never Commit: Add
appsettings.*.jsonwith secrets to.gitignore.
Example .gitignore entry:
# Firebase configuration and credentials
appsettings.Development.json
appsettings.Production.json
*.backup
The Firebase connection configuration is now in place in appsettings.json.
Step 8: Create the Firebase Service Class
The Firebase service class manages REST API calls to the Realtime Database. It handles all interactions via standard HTTP requests without requiring any external SDKs.
Instructions:
- Create a new folder named
Servicesin the Blazor application project. - Inside the
Servicesfolder, create a new file named FirebaseService.cs. - Define the FirebaseService class with the following code:
using System.Text.Json;
using Grid_Firebase_Realtime.Models;

namespace Grid_Firebase_Realtime.Services
{
    /// <summary>
    /// Service class for interacting with Firebase Realtime Database via REST API.
    /// Handles all CRUD operations and data retrieval without external SDKs.
    /// </summary>
    public class FirebaseService
    {
        private readonly HttpClient _httpClient;
        private readonly string _databaseURL;
        private readonly string _databaseSecret;
        private const string BooksNode = "Books";
        private const string BookIdPrefix = "BOOK";
        private const int BookIdStartNumber = 1;

        /// <summary>
        /// Initializes a new instance of the FirebaseService class.
        /// </summary>
        /// <param name="httpClient">HttpClient instance for making REST API calls</param>
        /// <param name="configuration">Configuration containing Firebase settings</param>
        public FirebaseService(HttpClient httpClient, IConfiguration configuration)
        {
            _httpClient = httpClient;
            _databaseURL = configuration["Firebase:RealtimeDatabaseURL"];
            _databaseSecret = configuration["Firebase:DatabaseSecret"];

            if (string.IsNullOrEmpty(_databaseURL) || string.IsNullOrEmpty(_databaseSecret))
            {
                throw new ArgumentException("Firebase configuration is missing. Ensure 'Firebase:RealtimeDatabaseURL' and 'Firebase:DatabaseSecret' are configured in appsettings.json");
            }
            if (_databaseURL.EndsWith("/"))
            {
                _databaseURL = _databaseURL.TrimEnd('/');
            }
        }

        /// <summary>
        /// Constructs the Firebase REST API URL with authentication parameter
        /// </summary>
        private string BuildUrl(string path, bool includeAuth = true)
        {
            string url = $"{_databaseUrl}/{path}.json";
            if (includeAuth && !string.IsNullOrEmpty(_databaseSecret))
            {
                url += $"?auth={_databaseSecret}";
            }
            return url;
        }

        /// <summary>
        /// Retrieves all books from the Realtime Database.
        /// Makes a REST GET request to the Books node.
        /// </summary>
        /// <returns>List of Book objects</returns>
        public async Task<List<Book>> GetBooksAsync()
        {
            try
            {
                string url = BuildUrl(BooksNode);
                var response = await _httpClient.GetAsync(url);

                if (response.IsSuccessStatusCode)
                {
                    string content = await response.Content.ReadAsStringAsync();

                    if (content == "null")
                    {
                        return new List<Book>();
                    }

                    var options = new JsonSerializerOptions
                    {
                        PropertyNameCaseInsensitive = true
                    };

                    var booksDict = JsonSerializer.Deserialize<Dictionary<string, Book>>(content, options);

                    if (booksDict == null || booksDict.Count == 0)
                    {
                        return new List<Book>();
                    }

                    return booksDict.Select(item => new Book
                    {
                        BookId = item.Key,
                        Title = item.Value.Title,
                        Author = item.Value.Author,
                        ISBN = item.Value.ISBN,
                        Category = item.Value.Category,
                        PublishDate = item.Value.PublishDate,
                        Language = item.Value.Language,
                        TotalCopies = item.Value.TotalCopies,
                        AvailableCopies = item.Value.AvailableCopies,
                        Location = item.Value.Location,
                        BorrowedBy = item.Value.BorrowedBy,
                        Status = item.Value.Status,
                        LastUpdated = item.Value.LastUpdated
                    }).ToList();
                }
                else
                {
                    string errorContent = await response.Content.ReadAsStringAsync();
                    Console.WriteLine($"Firebase API Error: {response.StatusCode} - {errorContent}");
                    return new List<Book>();
                }
            }
            catch (Exception ex)
            {
                Console.WriteLine($"Error fetching books: {ex.Message}");
                throw new Exception($"Error fetching books: {ex.Message}");
            }
        }

        /// <summary>
        /// Inserts a new book into the Firebase database.
        /// </summary>
        /// <param name="book">The book object to insert</param>
        /// <returns>The inserted book with generated BookId</returns>
        public async Task<Book> InsertBookAsync(Book book)
        {
            // Handle logic to add a new book to the database
        }

        /// <summary>
        /// Updates an existing book in the Firebase database.
        /// </summary>
        /// <param name="bookId">The ID of the book to update</param>
        /// <param name="book">The updated book object</param>
        /// <returns>True if the book was updated successfully; otherwise, false</returns>
        public async Task<bool> UpdateBookAsync(string bookId, Book book)
        {
            // Handle logic to update an existing book to the database
        }

        /// <summary>
        /// Deletes a book from the Firebase database.
        /// </summary>
        /// <param name="bookId">The ID of the book to delete</param>
        /// <returns>True if the book was deleted successfully; otherwise, false</returns>
        public async Task<bool> DeleteBookAsync(string bookId)
        {
            // Handle logic to delete an existing book from the database
        }
    }
}
Explanation:
- The
FirebaseServiceclass manages all REST API interactions with the Realtime Database. - The
HttpClientinstance is used to make HTTP requests (GET, POST, PUT, DELETE).
The Firebase service class has been successfully created in Services/FirebaseService.cs.
Step 9: Register Services in Program.cs
The Program.cs file is where application services are registered and configured. This file must be updated to enable HttpClient, Firebase service, and Blazor components.
Instructions:
- Open the
Program.csfile at the project root. - Add the following code to register services and configure the application:
using Grid_Firebase_Realtime.Components;
using Grid_Firebase_Realtime.Services;
using Syncfusion.Blazor;

var builder = WebApplication.CreateBuilder(args);

// Add services to the container.
builder.Services.AddRazorComponents()
    .AddInteractiveServerComponents();

// Register Blazor services
builder.Services.AddSyncfusionBlazor();

// Register HttpClient for Firebase REST API calls
builder.Services.AddHttpClient<FirebaseService>();

// Register Firebase Realtime Database service for dependency injection
builder.Services.AddScoped<FirebaseService>();

var app = builder.Build();

// Configure the HTTP request pipeline.
if (!app.Environment.IsDevelopment())
{
    app.UseExceptionHandler("/Error", createScopeForErrors: true);
    app.UseHsts();
}

app.UseHttpsRedirection();

app.UseAntiforgery();

app.MapStaticAssets();
app.MapRazorComponents<App>()
    .AddInteractiveServerRenderMode();

app.Run();
Explanation:
-
builder.Services.AddHttpClient<FirebaseService>();: RegistersHttpClientfor use inFirebaseService -
builder.Services.AddScoped<FirebaseService>();: RegistersFirebaseServicewith scoped lifetime (creates a new instance per HTTP request)
The service registration has been completed successfully in Program.cs.
Integrating Blazor DataGrid
Step 1: Configure Blazor DataGrid Components
Syncfusion is a library that provides pre-built UI components like DataGrid, which is used to display data in a table format.
Instructions:
- The Syncfusion.Blazor package was installed in Step 5 of the previous heading.
- Import the required namespaces in the
Components/_Imports.razorfile:
@using Grid_Firebase_Realtime.Models
@using Grid_Firebase_Realtime.Services
@using Syncfusion.Blazor.Grids
@using Syncfusion.Blazor.Data
@using Syncfusion.Blazor.DropDowns- Add the stylesheet and scripts in the
Components/App.razorfile. Find the<head>section and add:
<!-- Blazor Stylesheet -->
<link href="_content/Syncfusion.Blazor.Themes/tailwind3.css" rel="stylesheet" />

<!-- Blazor Scripts -->
<script src="_content/Syncfusion.Blazor.Core/scripts/syncfusion-blazor.min.js" type="text/javascript"></script>
For this project, the tailwind3 theme is used. A different theme can be selected or the existing theme can be customized based on project requirements. Refer to the Blazor Components Appearance documentation to learn more about theming and customization options.
Blazor components are now configured and ready to use. For additional guidance, refer to the Grid component’s getting‑started documentation.
Step 2: Update the Blazor DataGrid
The Home.razor component displays the book data in a Blazor DataGrid with search, filter, sort, and pagination capabilities.
Instructions:
- Open the file named
Home.razorin theComponents/Pagesfolder. - Replace the entire file content with the following code to create a DataGrid with bulk import functionality:
@page "/"
@using System.Collections
@using System.Text.Json
@rendermode InteractiveServer
@inject FirebaseService FirebaseService

<PageTitle>Library Management</PageTitle>

<!-- Grid Section -->
<div class="row">
   <div class="col-md-12">
      <div class="card shadow-sm">
            <div class="card-body p-0">

               <SfGrid @ref="_grid" TValue="Book" AllowPaging="true" AllowSorting="true" AllowFiltering="true" AllowGrouping="true" Toolbar="@ToolbarItems">
                  <SfDataManager AdaptorInstance="@typeof(CustomAdaptor)" Adaptor="Adaptors.CustomAdaptor"></SfDataManager>

                  <GridColumns>
                     //columns configuration
                  </GridColumns>
               </SfGrid>

            </div>
      </div>
   </div>
</div>

@code {
   // CustomAdaptor class will be added in the next step
}
Component Explanation:
-
@rendermode InteractiveServer: Enables interactive server-side rendering for real-time updates -
@inject FirebaseService: Injects the FirebaseService to access database methods -
<SfGrid>: The DataGrid component that displays books in rows and columns -
<GridColumns>: Defines individual columns with field mappings, types, and formatting
The Home component has been successfully updated with the DataGrid and CustomAdaptor.
Step 3: Implement the CustomAdaptor
The Blazor DataGrid can bind data from a Firebase Realtime database using DataManager and set the Adaptor property to CustomAdaptor for scenarios that require full control over data operations.
The CustomAdaptor is a bridge between the DataGrid and the database. It handles all data operations including reading, searching, filtering, sorting, paging, and CRUD operations. Each operation in the CustomAdaptor’s ReadAsync method handles specific grid functionality. The Blazor DataGrid sends operation details to the API through a DataManagerRequest object. These details can be applied to the data source using methods from the DataOperations class.
Instructions:
- Open the
Components/Pages/Home.razorfile. - Add the following
CustomAdaptorclass code inside the@codeblock:
@code {

   public static FirebaseService? _firebaseService { get; set; }

   /// <summary>
   /// CustomAdaptor class bridges DataGrid interactions with database operations.
   /// This adaptor handles all data retrieval and manipulation for the DataGrid.
   /// </summary>
   public class CustomAdaptor : DataAdaptor
   {
      public FirebaseService? FirebaseService
      {
            get => _firebaseService;
            set => _firebaseService = value;
      }

      public override async Task<object> ReadAsync(DataManagerRequest dataManagerRequest, string? key = null)
      {
         try
         {
            // Fetch all books from the Firebase database
            IEnumerable dataSource = await _firebaseService!.GetBooksAsync();

            // Apply search operation if search criteria exists
            if (dataManagerRequest.Search != null && dataManagerRequest.Search.Count > 0)
            {
               dataSource = DataOperations.PerformSearching(dataSource, dataManagerRequest.Search);
            }

            // Apply filter operation if filter criteria exists
            if (dataManagerRequest.Where != null && dataManagerRequest.Where.Count > 0)
            {
               dataSource = DataOperations.PerformFiltering(dataSource, dataManagerRequest.Where, dataManagerRequest.Where[0].Operator);
            }

            // Apply sort operation if sort criteria exists
            if (dataManagerRequest.Sorted != null && dataManagerRequest.Sorted.Count > 0)
            {
               dataSource = DataOperations.PerformSorting(dataSource, dataManagerRequest.Sorted);
            }

            // Calculate total record count before paging for accurate pagination
            int totalRecordsCount = dataSource.Cast<Book>().Count();

            // Apply paging skip operation
            if (dataManagerRequest.Skip != 0)
            {
               dataSource = DataOperations.PerformSkip(dataSource, dataManagerRequest.Skip);
            }

            // Apply paging take operation to retrieve only the requested page size
            if (dataManagerRequest.Take != 0)
            {
               dataSource = DataOperations.PerformTake(dataSource, dataManagerRequest.Take);
            }

            // Handling Group operation in CustomAdaptor.
            if (dataManagerRequest.Group != null)
            {
               foreach (var group in dataManagerRequest.Group)
               {
                     dataSource = DataUtil.Group<Book>(dataSource, group, dataManagerRequest.Aggregates, 0, dataManagerRequest.GroupByFormatter);
               }
            }

            // Return the result with total count for pagination metadata
            return dataManagerRequest.RequiresCounts
               ? new DataResult() { Result = dataSource, Count = totalRecordsCount }
               : (object)dataSource;
         }
         catch (Exception ex)
         {
            Console.WriteLine($"ReadAsync Error: {ex.Message}");
            throw new Exception($"An error occurred while retrieving data: {ex.Message}");
         }
      }
   }
}
The CustomAdaptor class has been successfully implemented with all data operations.
Common methods in data operations
-
ReadAsync(DataManagerRequest) - Retrieve and process records (search, filter, sort, page, group)
- PerformSearching - Applies search criteria to the collection.
- PerformFiltering - Filters data based on conditions.
- PerformSorting - Sorts data by one or more fields.
- PerformSkip - Skips a defined number of records for paging.
- PerformTake - Retrieves a specified number of records for paging.
- PerformAggregation – Calculates aggregate values such as Sum, Average, Min, and Max.
Step 4: Add Toolbar with CRUD and Search Options
The toolbar provides buttons for adding, editing, deleting records, and searching the data.
Instructions:
- Open the
Components/Pages/Home.razorfile. - Update the
<SfGrid>component to include the Toolbar property with CRUD and search options:
<SfGrid TValue="Book"
        AllowPaging="true"
        AllowSorting="true"
        AllowFiltering="true"
        Toolbar="@ToolbarItems">
    <SfDataManager AdaptorInstance="@typeof(CustomAdaptor)" Adaptor="Adaptors.CustomAdaptor"></SfDataManager>

    <!-- Grid columns configuration -->
</SfGrid>- Add the toolbar items list in the
@codeblock:
@code {
    private List<string> ToolbarItems = new List<string> { "Add", "Edit", "Delete", "Update", "Cancel", "Search"};

    // CustomAdaptor class code...
}
Toolbar Items Explanation:
| Item | Function |
|---|---|
Add |
Opens a form to add a new book record. |
Edit |
Enables editing of the selected record. |
Delete |
Deletes the selected record from the database. |
Update |
Saves changes made to the selected record. |
Cancel |
Cancels the current edit or add operation. |
Search |
Displays a search box to find records. |
The toolbar has been successfully added.
Step 5: Running the Application
Build the Application
- Open the terminal or Package Manager Console.
- Navigate to the project directory.
- Run the following command:
dotnet buildRun the Application
Execute the following command:
dotnet runAccess the Application
- Open a web browser.
- Navigate to
https://localhost:5001(or the port shown in the terminal). - The library management application is now running and ready to use.
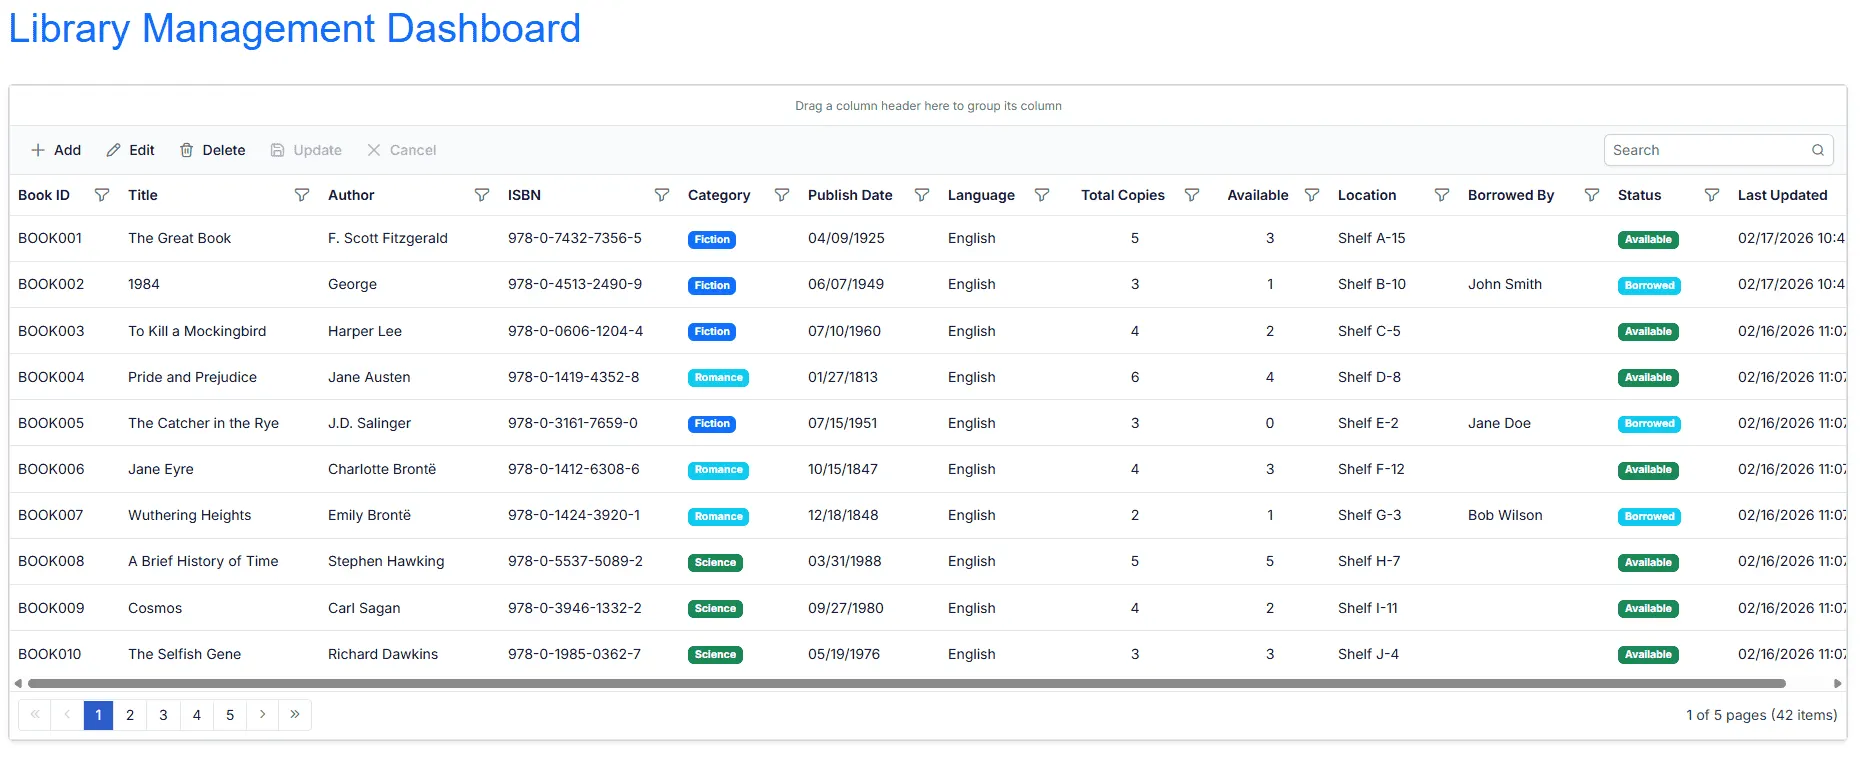
Step 6: Implement Paging Feature
Paging divides large datasets into smaller pages to improve performance and usability.
Instructions:
- The paging feature is already partially enabled in the
<SfGrid>component with AllowPaging=”true”. - The page size is configured with GridPageSettings.
- No additional code changes are required from the previous steps.
<SfGrid TValue="Book"
        AllowPaging="true">
    <SfDataManager AdaptorInstance="@typeof(CustomAdaptor)" Adaptor="Adaptors.CustomAdaptor"></SfDataManager>
    <GridPageSettings PageSize="10"></GridPageSettings>

    <!-- Grid columns configuration -->
</SfGrid>- Update the
ReadAsyncmethod in theCustomAdaptorclass to handle paging:
@code {

    /// <summary>
    /// CustomAdaptor class to handle grid data operations with Firebase Realtime
    /// </summary>
    public class CustomAdaptor : DataAdaptor
    {
        public static FirebaseService? _firebaseService { get; set; }
        public FirebaseService? FirebaseService
        {
            get => _firebaseService;
            set => _firebaseService = value;
        }

        public override async Task<object> ReadAsync(DataManagerRequest dataManagerRequest, string? key = null)
        {
            IEnumerable dataSource = await _firebaseService!.GetBooksAsync();

            int totalRecordsCount = dataSource.Cast<Book>().Count();

            // Handling Paging
            if (dataManagerRequest.Skip != 0)
            {
                dataSource = DataOperations.PerformSkip(dataSource, dataManagerRequest.Skip);
            }

            if (dataManagerRequest.Take != 0)
            {
                dataSource = DataOperations.PerformTake(dataSource, dataManagerRequest.Take);
            }

            return dataManagerRequest.RequiresCounts
                ? new DataResult() { Result = dataSource, Count = totalRecordsCount }
                : (object)dataSource;
        }
    }
}
Fetches book data by calling the GetBooksAsync method, which is implemented in the FirebaseService.cs file.
/// <summary>
/// Retrieves all books from the Realtime database
/// </summary>
/// <returns>List of all books</returns>
public async Task<List<Book>> GetBooksAsync()
{
    try
    {
        string url = BuildUrl(BooksNode);
        var response = await _httpClient.GetAsync(url);

        if (response.IsSuccessStatusCode)
        {
            string content = await response.Content.ReadAsStringAsync();

            if (content == "null")
            {
                return new List<Book>();
            }

            var options = new JsonSerializerOptions
            {
                PropertyNameCaseInsensitive = true
            };

            var booksDict = JsonSerializer.Deserialize<Dictionary<string, Book>>(content, options);

            if (booksDict == null || booksDict.Count == 0)
            {
                return new List<Book>();
            }

            return booksDict.Select(item => new Book
            {
                BookId = item.Key,
                Title = item.Value.Title,
                Author = item.Value.Author,
                ISBN = item.Value.ISBN,
                Category = item.Value.Category,
                PublishDate = item.Value.PublishDate,
                Language = item.Value.Language,
                TotalCopies = item.Value.TotalCopies,
                AvailableCopies = item.Value.AvailableCopies,
                Location = item.Value.Location,
                BorrowedBy = item.Value.BorrowedBy,
                Status = item.Value.Status,
                LastUpdated = item.Value.LastUpdated
            }).ToList();
        }
        else
        {
            string errorContent = await response.Content.ReadAsStringAsync();
            Console.WriteLine($"Firebase API Error: {response.StatusCode} - {errorContent}");
            return new List<Book>();
        }
    }
    catch (Exception ex)
    {
        Console.WriteLine($"Error fetching books: {ex.Message}");
        throw new Exception($"Error fetching books: {ex.Message}");
    }
}
How Paging Works:
- The DataGrid displays 10 records per page (as set in
GridPageSettings). - Navigation buttons allow the user to move between pages.
- When a page is requested, the
ReadAsyncmethod receives skip and take values. - The
DataOperations.PerformSkip()andDataOperations.PerformTake()methods handle pagination. - Only the requested page of records is transmitted from the server.
Paging feature is now active with 10 records per page.
Step 7: Implement Searching Feature
Searching allows the user to find records by entering keywords in the search box.
Instructions:
- Ensure the toolbar includes the “Search” item.
- No additional code changes are required.
<SfGrid TValue="Book"
        AllowPaging="true"
        Toolbar="@ToolbarItems">
    <SfDataManager AdaptorInstance="@typeof(CustomAdaptor)" Adaptor="Adaptors.CustomAdaptor"></SfDataManager>
    <GridPageSettings PageSize="10"></GridPageSettings>
    <!-- Grid columns configuration -->
</SfGrid>- Update the
ReadAsyncmethod in theCustomAdaptorclass to handle searching:
@code {
    private List<string> ToolbarItems = new List<string> { "Search"};

    /// <summary>
    /// CustomAdaptor class to handle grid data operations with Firebase Realtime
    /// </summary>
    public class CustomAdaptor : DataAdaptor
    {
        public static FirebaseService? _firebaseService { get; set; }
        public FirebaseService? FirebaseService
        {
            get => _firebaseService;
            set => _firebaseService = value;
        }

        public override async Task<object> ReadAsync(DataManagerRequest dataManagerRequest, string? key = null)
        {
            IEnumerable dataSource = await _firebaseService!.GetBooksAsync();

            // Handling Search
            if (dataManagerRequest.Search != null && dataManagerRequest.Search.Count > 0)
            {
                dataSource = DataOperations.PerformSearching(dataSource, dataManagerRequest.Search);
            }

            int totalRecordsCount = dataSource.Cast<Book>().Count();
            // Handling Paging
            if (dataManagerRequest.Skip != 0)
            {
                dataSource = DataOperations.PerformSkip(dataSource, dataManagerRequest.Skip);
                //Add custom logic here if needed and remove above method
            }

            if (dataManagerRequest.Take != 0)
            {
                dataSource = DataOperations.PerformTake(dataSource, dataManagerRequest.Take);
                //Add custom logic here if needed and remove above method
            }

            return dataManagerRequest.RequiresCounts
                ? new DataResult() { Result = dataSource, Count = totalRecordsCount }
                : (object)dataSource;
        }
    }
}
How Searching Works:
- When the user enters text in the search box and presses Enter, the DataGrid sends a search request to the CustomAdaptor.
- The
ReadAsyncmethod receives the search criteria indataManagerRequest.Search. - The
DataOperations.PerformSearching()method filters the data based on the search term. - Results are returned and displayed in the DataGrid.
Searching feature is now active.
Step 8: Implement Filtering Feature
Filtering allows the user to restrict data based on column values using a menu interface.
Instructions:
- Open the
Components/Pages/Home.razorfile. - Add the AllowFiltering property and GridFilterSettings to the
<SfGrid>component:
<SfGrid TValue="Book"
        AllowPaging="true"
        AllowFiltering="true"
        Toolbar="@ToolbarItems">
    <SfDataManager AdaptorInstance="@typeof(CustomAdaptor)" Adaptor="Adaptors.CustomAdaptor"></SfDataManager>

    <GridFilterSettings Type="Syncfusion.Blazor.Grids.FilterType.Menu"></GridFilterSettings>

    <!-- Grid columns configuration -->
</SfGrid>- Update the
ReadAsyncmethod in theCustomAdaptorclass to handle filtering:
/// <summary>
/// CustomAdaptor class to handle grid data operations with Firebase Realtime
/// </summary>
public class CustomAdaptor : DataAdaptor
{
    public static FirebaseService? _firebaseService { get; set; }
    public FirebaseService? FirebaseService
    {
        get => _firebaseService;
        set => _firebaseService = value;
    }

    public override async Task<object> ReadAsync(DataManagerRequest dataManagerRequest, string? key = null)
    {
        IEnumerable dataSource = await _firebaseService!.GetBooksAsync();

        // Handling Search
        if (dataManagerRequest.Search != null && dataManagerRequest.Search.Count > 0)
        {
            dataSource = DataOperations.PerformSearching(dataSource, dataManagerRequest.Search);
        }

        // Handling Filtering
        if (dataManagerRequest.Where != null && dataManagerRequest.Where.Count > 0)
        {
            dataSource = DataOperations.PerformFiltering(dataSource, dataManagerRequest.Where, dataManagerRequest.Where[0].Operator);
        }

        int totalRecordsCount = dataSource.Cast<Book>().Count();
        // Handling Paging
        if (dataManagerRequest.Skip != 0)
        {
            dataSource = DataOperations.PerformSkip(dataSource, dataManagerRequest.Skip);
            //Add custom logic here if needed and remove above method
        }

        if (dataManagerRequest.Take != 0)
        {
            dataSource = DataOperations.PerformTake(dataSource, dataManagerRequest.Take);
            //Add custom logic here if needed and remove above method
        }

        return dataManagerRequest.RequiresCounts
            ? new DataResult() { Result = dataSource, Count = totalRecordsCount }
            : (object)dataSource;
    }

}
How Filtering Works:
- Click on the dropdown arrow in any column header to open the filter menu.
- Select filtering criteria (equals, contains, greater than, less than, etc.).
- Click the “Filter” button to apply the filter.
- The
ReadAsyncmethod receives the filter criteria indataManagerRequest.Where. - Results are filtered accordingly and displayed in the DataGrid.
Filtering feature is now active.
Step 9: Implement Sorting Feature
Sorting enables the user to arrange records in ascending or descending order based on column values.
Instructions:
- Open the
Components/Pages/Home.razorfile. - Add the AllowSorting property to the
<SfGrid>component:
<SfGrid TValue="Book"
        AllowPaging="true"
        AllowSorting="true"
        AllowFiltering="true"
        Toolbar="@ToolbarItems">
    <SfDataManager AdaptorInstance="@typeof(CustomAdaptor)" Adaptor="Adaptors.CustomAdaptor"></SfDataManager>

     <GridPageSettings PageSize="10"></GridPageSettings>
     <GridFilterSettings Type="Syncfusion.Blazor.Grids.FilterType.Menu"></GridFilterSettings>

    <!-- Grid columns configuration -->
</SfGrid>- Update the
ReadAsyncmethod in theCustomAdaptorclass to handle sorting:
/// <summary>
/// CustomAdaptor class to handle grid data operations with Firebase Realtime
/// </summary>
public class CustomAdaptor : DataAdaptor
{
    public static FirebaseService? _firebaseService { get; set; }
    public FirebaseService? FirebaseService
    {
        get => _firebaseService;
        set => _firebaseService = value;
    }

    public override async Task<object> ReadAsync(DataManagerRequest dataManagerRequest, string? key = null)
    {
        IEnumerable dataSource = await _firebaseService!.GetBooksAsync();

        // Handling Search
        if (dataManagerRequest.Search != null && dataManagerRequest.Search.Count > 0)
        {
            dataSource = DataOperations.PerformSearching(dataSource, dataManagerRequest.Search);
        }

        // Handling Filtering
        if (dataManagerRequest.Where != null && dataManagerRequest.Where.Count > 0)
        {
            dataSource = DataOperations.PerformFiltering(dataSource, dataManagerRequest.Where, dataManagerRequest.Where[0].Operator);
        }

         // Handling Sorting
        if (dataManagerRequest.Sorted != null && dataManagerRequest.Sorted.Count > 0)
        {
            dataSource = DataOperations.PerformSorting(dataSource, dataManagerRequest.Sorted);
        }

        int totalRecordsCount = dataSource.Cast<Book>().Count();
        // Handling Paging
        if (dataManagerRequest.Skip != 0)
        {
            dataSource = DataOperations.PerformSkip(dataSource, dataManagerRequest.Skip);
            //Add custom logic here if needed and remove above method
        }

        if (dataManagerRequest.Take != 0)
        {
            dataSource = DataOperations.PerformTake(dataSource, dataManagerRequest.Take);
            //Add custom logic here if needed and remove above method
        }

        return dataManagerRequest.RequiresCounts
            ? new DataResult() { Result = dataSource, Count = totalRecordsCount }
            : (object)dataSource;
    }

}
How Sorting Works:
- Click on the column header to sort in ascending order.
- Click again to sort in descending order.
- The
ReadAsyncmethod receives the sort criteria indataManagerRequest.Sorted. - Records are sorted accordingly and displayed in the DataGrid.
Sorting feature is now active.
Step 10: Implement Grouping Feature
Grouping organizes records into hierarchical groups based on column values.
Instructions:
- Open the
Components/Pages/Home.razorfile. - Add the AllowGrouping property to the
<SfGrid>component:
<SfGrid TValue="Book"
        AllowPaging="true"
        AllowSorting="true"
        AllowFiltering="true"
        AllowGrouping="true"
        Toolbar="@ToolbarItems">
    <SfDataManager AdaptorInstance="@typeof(CustomAdaptor)" Adaptor="Adaptors.CustomAdaptor"></SfDataManager>
     <GridPageSettings PageSize="10"></GridPageSettings>
     <GridFilterSettings Type="Syncfusion.Blazor.Grids.FilterType.Menu"></GridFilterSettings>
    <!-- Grid columns  -->
</SfGrid>- Update the
ReadAsyncmethod in theCustomAdaptorclass to handle grouping:
/// <summary>
/// CustomAdaptor class to handle grid data operations with Firebase Realtime
/// </summary>
public class CustomAdaptor : DataAdaptor
{
    public static FirebaseService? _firebaseService { get; set; }
    public FirebaseService? FirebaseService
    {
        get => _firebaseService;
        set => _firebaseService = value;
    }

    public override async Task<object> ReadAsync(DataManagerRequest dataManagerRequest, string? key = null)
    {
        IEnumerable dataSource = await _firebaseService!.GetBooksAsync();

        // Handling Search
        if (dataManagerRequest.Search != null && dataManagerRequest.Search.Count > 0)
        {
            dataSource = DataOperations.PerformSearching(dataSource, dataManagerRequest.Search);
        }

        // Handling Filtering
        if (dataManagerRequest.Where != null && dataManagerRequest.Where.Count > 0)
        {
            dataSource = DataOperations.PerformFiltering(dataSource, dataManagerRequest.Where, dataManagerRequest.Where[0].Operator);
        }

         // Handling Sorting
        if (dataManagerRequest.Sorted != null && dataManagerRequest.Sorted.Count > 0)
        {
            dataSource = DataOperations.PerformSorting(dataSource, dataManagerRequest.Sorted);
        }

        int totalRecordsCount = dataSource.Cast<Book>().Count();

        // Handling Paging
        if (dataManagerRequest.Skip != 0)
        {
            dataSource = DataOperations.PerformSkip(dataSource, dataManagerRequest.Skip);
            //Add custom logic here if needed and remove above method
        }

        if (dataManagerRequest.Take != 0)
        {
            dataSource = DataOperations.PerformTake(dataSource, dataManagerRequest.Take);
            //Add custom logic here if needed and remove above method
        }

        // Handling Group operation in CustomAdaptor.
        if (dataManagerRequest.Group != null)
        {
            foreach (var group in dataManagerRequest.Group)
            {
                dataSource = DataUtil.Group<Book>(dataSource, group, dataManagerRequest.Aggregates, 0, dataManagerRequest.GroupByFormatter);
            }
        }

        return dataManagerRequest.RequiresCounts
            ? new DataResult() { Result = dataSource, Count = totalRecordsCount }
            : (object)dataSource;
    }
}
How Grouping Works:
- Columns can be grouped by dragging the column header into the group drop area.
- Each group can be expanded or collapsed by clicking on the group header.
- The
ReadAsyncmethod receives the grouping instructions throughdataManagerRequest.Group. - The grouping operation is processed using DataUtil.Group, which organizes the records into hierarchical groups based on the selected column.
- Grouping is performed after search, filter, and sort operations, ensuring the grouped data reflects all applied conditions.
- The processed grouped result is then returned to the Grid and displayed in a structured, hierarchical format.
Grouping feature is now active.
Step 11: Perform CRUD Operations
CustomAdaptor methods enable users to create, read, update, and delete records directly from the DataGrid. Each operation calls corresponding data layer methods in FirebaseService.cs to execute commands.
Add the Grid EditSettings and Toolbar configuration to enable create, read, update, and delete (CRUD) operations.
<SfGrid TValue="Book"
        AllowPaging="true"
        AllowSorting="true"
        AllowFiltering="true"
        AllowGrouping="true"
        Toolbar="@ToolbarItems">
    <SfDataManager AdaptorInstance="@typeof(CustomAdaptor)" Adaptor="Adaptors.CustomAdaptor"></SfDataManager>
     <GridPageSettings PageSize="10"></GridPageSettings>
     <GridFilterSettings Type="Syncfusion.Blazor.Grids.FilterType.Menu"></GridFilterSettings>
     <GridEditSettings AllowEditing="true" AllowAdding="true" AllowDeleting="true" Mode="EditMode.Normal"></GridEditSettings>
    <!-- Grid columns  -->
</SfGrid>
Add the toolbar items list in the @code block:
@code {
    private List<string> ToolbarItems = new List<string> { "Add", "Edit", "Delete", "Update", "Cancel", "Search"};

    // CustomAdaptor class code...
}
Insert
Record insertion allows new books to be added directly through the DataGrid component. The adaptor processes the insertion request, performs any required business‑logic validation, and saves the newly created record to the Firebase Realtime database.
In Home.razor, implement the InsertAsync method to handle record insertion within the CustomAdaptor class:
public class CustomAdaptor : DataAdaptor
{
    public override async Task<object?> InsertAsync(DataManager dataManager, object value, string? key = null)
    {
        try
        {
            if (value is Book newBook)
            {
                var result = await _firebaseService!.InsertBookAsync(newBook);
                return result;
            }
            return default;
        }
        catch (Exception ex)
        {
            Console.WriteLine($"Error in Insert operation: {ex.Message}");
            throw;
        }
    }
}
In Services/FirebaseService.cs, implement the insert method:
public async Task<Book> InsertBookAsync(Book book)
{
    try
    {
        // Auto-generate BookId if not provided
        if (string.IsNullOrEmpty(book.BookId))
        {
            book.BookId = await GenerateBookIdAsync();
        }

        // Set LastUpdated to current UTC time
        book.LastUpdated = DateTime.UtcNow;

        // Serialize book to JSON
        string jsonContent = JsonSerializer.Serialize(book);
        var content = new StringContent(jsonContent, System.Text.Encoding.UTF8, "application/json");

        // Insert book into Firebase
        string url = BuildUrl($"{BooksNode}/{book.BookId}");
        var response = await _httpClient.PutAsync(url, content);

        if (!response.IsSuccessStatusCode)
        {
            throw new Exception($"Failed to insert book: {response.StatusCode}");
        }

        return book;
    }
    catch (Exception ex)
    {
        throw new Exception($"Error inserting book: {ex.Message}");
    }
}

private async Task<string> GenerateBookIdAsync()
{
    try
    {
        var existingBooks = await GetBooksAsync();

        int maxNumber = existingBooks
            .Where(book => !string.IsNullOrEmpty(book.BookId) && book.BookId.StartsWith(BookIdPrefix))
            .Select(book =>
            {
                string numberPart = book.BookId.Substring(BookIdPrefix.Length);
                if (int.TryParse(numberPart, out int number))
                    return number;
                return 0;
            })
            .DefaultIfEmpty(BookIdStartNumber - 1)
            .Max();

        int nextNumber = maxNumber + 1;
        string newBookId = $"{BookIdPrefix}{nextNumber:D3}";
        return newBookId;
    }
    catch (Exception ex)
    {
        throw new Exception($"Error generating BookId: {ex.Message}");
    }
}
Helper methods explanation:
-
GenerateBookIdAsync(): A new BookId is generated in the format BOOK001, BOOK002, etc.
What happens behind the scenes:
- The form data is collected and validated in the CustomAdaptor’s
InsertAsync()method. - The
FirebaseService.InsertBookAsync()method is called. - A unique BookId is auto-generated if not provided.
- The LastUpdated is set to the current UTC time.
-
PutAsync()adds the document to the Realtime collection. - The DataGrid automatically refreshes to display the new record.
Now the new book is persisted to the database and reflected in the grid.
Update
Record modification allows book details to be updated directly within the DataGrid. The adaptor processes the edited row, validates the updated values, and applies the changes to the Firebase Realtime database while ensuring data integrity is preserved.
In Home.razor, implement the UpdateAsync method to handle record updates within the CustomAdaptor class:
public class CustomAdaptor : DataAdaptor
{
    public override async Task<object?> UpdateAsync(DataManager dataManager, object value, string? keyField, string key)
    {
        try
        {
            if (value is Book book)
            {
                var result = await _firebaseService!.UpdateBookAsync(book.BookId, book);
                return result ? value : default;
            }
            return default;
        }
        catch (Exception ex)
        {
            Console.WriteLine($"Error in Update operation: {ex.Message}");
            throw;
        }
    }
}
In Services/FirebaseService.cs, implement the update method:
public async Task<bool> UpdateBookAsync(string bookId, Book book)
{
    try
    {
        // Set LastUpdated to current UTC time
        book.LastUpdated = DateTime.UtcNow;

        // Serialize book to JSON
        string jsonContent = JsonSerializer.Serialize(book);
        var content = new StringContent(jsonContent, System.Text.Encoding.UTF8, "application/json");

        // Update book in Firebase
        string url = BuildUrl($"{BooksNode}/{bookId}");
        var response = await _httpClient.PutAsync(url, content);

        if (!response.IsSuccessStatusCode)
        {
            throw new Exception($"Failed to update book: {response.StatusCode}");
        }

        return true;
    }
    catch (Exception ex)
    {
        throw new Exception($"Error updating book: {ex.Message}");
    }
}
What happens behind the scenes:
- The modified data is collected from the form.
- The CustomAdaptor’s
UpdateAsync()method is called. - The
FirebaseService.UpdateBookAsync()method is called. -
PutAsync()updates only the specified fields. - The method returns true if the document was modified successfully.
- The DataGrid refreshes to display the updated record.
Now modifications are synchronized to the database and reflected in the grid UI.
Delete
Record deletion allows books to be removed directly from the DataGrid. The adaptor captures the delete request, executes the corresponding DELETE operation, and updates both the database and the grid to reflect the removal.
In Home.razor, implement the RemoveAsync method to handle record deletion within the CustomAdaptor class:
public class CustomAdaptor : DataAdaptor
{
    public override async Task<object?> RemoveAsync(DataManager dataManager, object value, string? keyField, string key)
    {
        try
        {
            await _firebaseService!.DeleteBookAsync(value as string);
            return value;
        }
        catch (Exception ex)
        {
            Console.WriteLine($"Error in Delete operation: {ex.Message}");
            throw;
        }
    }
}
In Services/FirebaseService.cs, implement the delete method:
public async Task<bool> DeleteBookAsync(string? bookId)
{
    try
    {
        if (string.IsNullOrEmpty(bookId))
        {
            return false;
        }

        // Delete book from Firebase
        string url = BuildUrl($"{BooksNode}/{bookId}");
        var response = await _httpClient.DeleteAsync(url);

        if (!response.IsSuccessStatusCode)
        {
            throw new Exception($"Failed to delete book: {response.StatusCode}");
        }

        return true;
    }
    catch (Exception ex)
    {
        throw new Exception($"Error deleting book: {ex.Message}");
    }
}
What happens behind the scenes:
- The user selects a record and clicks “Delete”.
- A confirmation dialog appears (built into the DataGrid).
- If confirmed, the CustomAdaptor’s
RemoveAsync()method is called. - The
FirebaseService.DeleteBookAsync()method is called. -
DeleteAsync()removes the document from the Realtime collection. - The method returns true if the document was deleted successfully.
- The DataGrid refreshes to remove the deleted record from the UI.
Now books are removed from the database and the grid UI reflects the changes immediately.
Batch Update
Batch operations combine multiple insert, update, and delete actions into a single request, minimizing network overhead and ensuring transactional consistency by applying all changes atomically to the Firebase Realtime database.
In Home.razor, implement the BatchUpdateAsync method to handle multiple record updates in a single request within the CustomAdaptor class:
public class CustomAdaptor : DataAdaptor
{
    public override async Task<object> BatchUpdateAsync(DataManager dataManager, object changedRecords, object addedRecords, object deletedRecords, string? keyField, string key, int? dropIndex)
    {
        // Process updated records
        if (changedRecords != null)
        {
            foreach (var record in (IEnumerable<Book>)changedRecords)
            {
                var book = record as Book;
                if (book != null)
                {
                    await _firebaseService!.UpdateBookAsync(book.BookId, book);
                }
            }
        }

        // Process newly added records
        if (addedRecords != null)
        {
            foreach (var record in (IEnumerable<Book>)addedRecords)
            {
                await _firebaseService!.InsertBookAsync(record as Book);
            }
        }

        // Process deleted records
        if (deletedRecords != null)
        {
            foreach (var record in (IEnumerable<Book>)deletedRecords)
            {
                await _firebaseService!.DeleteBookAsync((record as Book)?.BookId);
            }
        }
        return key;
    }
}
This method is triggered when the DataGrid is operating in Batch Edit mode.
What happens behind the scenes:
- The DataGrid collects all added, edited, and deleted records in Batch Edit mode.
- The combined batch request is passed to the CustomAdaptor’s
BatchUpdateAsync()method. - Each modified record is processed using
FirebaseService.UpdateBookAsync(). - Each newly added record is saved using
FirebaseService.InsertBookAsync(). - Each deleted record is removed using
FirebaseService.DeleteBookAsync(). - All service operations persist changes to the Firebase Realtime database.
- The DataGrid refreshes to display the updated, added, and removed records in a single response.
Now the adaptor supports bulk modifications with atomic database synchronization. All CRUD operations are now fully implemented, enabling comprehensive data management capabilities within the Blazor DataGrid.
Reference links
- InsertAsync(DataManager, object) - Create new records in Realtime database
- UpdateAsync(DataManager, object, string, string) - Edit existing records in Realtime database
- RemoveAsync(DataManager, object, string, string) - Delete records from Realtime database
- BatchUpdateAsync(DataManager, object, object, object, string, string, int?) - Handle bulk operations
Step 12: Complete code
Here is the complete and final Home.razor component with all features integrated:
@page "/"
@using System.Collections
@rendermode InteractiveServer
@inject FirebaseService FirebaseService

<PageTitle>Library Management</PageTitle>

<div class="container-fluid mt-4">
    <div class="row mb-4">
        <div class="col-md-12">
            <h1 class="text-primary">
                <i class="bi bi-book"></i> Library Management Dashboard
            </h1>
        </div>
    </div>

    <div class="row">
        <div class="col-md-12">
            <div class="card shadow-sm">
                <div class="card-body p-0">
                    <SfGrid TValue="Book" AllowPaging="true" AllowSorting="true" AllowFiltering="true" Toolbar="@ToolbarItems">

                        <SfDataManager AdaptorInstance="@typeof(CustomAdaptor)" Adaptor="Adaptors.CustomAdaptor"></SfDataManager>

                        <GridPageSettings PageSize="10"></GridPageSettings>
                        <GridFilterSettings Type="Syncfusion.Blazor.Grids.FilterType.Menu"></GridFilterSettings>
                        <GridEditSettings AllowAdding="true" AllowEditing="true" AllowDeleting="true" Mode="EditMode.Normal"></GridEditSettings>

                        <GridColumns>
                            <GridColumn Field=@nameof(Book.BookId) HeaderText="Book ID" IsPrimaryKey="true" IsIdentity="true" Width="110"></GridColumn>
                            <GridColumn Field=@nameof(Book.Title) HeaderText="Title" Width="200" ValidationRules="@(new ValidationRules { Required = true })"></GridColumn>
                            <GridColumn Field=@nameof(Book.Author) HeaderText="Author" Width="180"></GridColumn>
                            <GridColumn Field=@nameof(Book.ISBN) HeaderText="ISBN" Width="180"></GridColumn>
                            <GridColumn Field=@nameof(Book.Category) HeaderText="Category" Width="120" EditType="EditType.DropDownEdit" EditorSettings="@CategoryDropDownParams">
                                <Template>
                                    @{
                                        var book = context as Book;
                                        var badgeClass = GetCategoryBadgeClass(book?.Category);
                                    }
                                    <span class="@badgeClass">@book?.Category</span>
                                </Template>
                            </GridColumn>
                            <GridColumn Field=@nameof(Book.PublishDate) HeaderText="Publish Date" Type="ColumnType.DateTime" Format="MM/dd/yyyy" Width="140"></GridColumn>
                            <GridColumn Field=@nameof(Book.Language) HeaderText="Language" Width="120"></GridColumn>
                            <GridColumn Field=@nameof(Book.TotalCopies) HeaderText="Total Copies" Type="ColumnType.Integer" Width="150" TextAlign="TextAlign.Center"></GridColumn>
                            <GridColumn Field=@nameof(Book.AvailableCopies) HeaderText="Available" Type="ColumnType.Integer" Width="120" TextAlign="TextAlign.Center"></GridColumn>
                            <GridColumn Field=@nameof(Book.Location) HeaderText="Location" Width="130"></GridColumn>
                            <GridColumn Field=@nameof(Book.BorrowedBy) HeaderText="Borrowed By" Width="150"></GridColumn>
                            <GridColumn Field=@nameof(Book.Status) HeaderText="Status" EditType="EditType.DropDownEdit" EditorSettings="@StatusDropDownParams" Width="120">
                                <Template>
                                    @{
                                        var book = context as Book;
                                        var badgeClass = GetStatusBadgeClass(book?.Status);
                                    }
                                    <span class="@badgeClass">@book?.Status</span>
                                </Template>
                            </GridColumn>
                            <GridColumn Field=@nameof(Book.LastUpdated) HeaderText="Last Updated" Type="ColumnType.DateTime" Format="MM/dd/yyyy HH:mm" Width="160"></GridColumn>
                        </GridColumns>
                    </SfGrid>
                </div>
            </div>
        </div>
    </div>
</div>
- Set IsPrimaryKey to true for a column that contains unique values.
- If the database includes an auto-generated column, set IsIdentity for that column to disable editing during add or update operations.
- The EditType property can be used to specify the desired editor for each column. 🔗
- The behavior of default editors can be customized using the EditorSettings property of the
GridColumncomponent. 🔗- Type property of the
GridColumncomponent specifies the data type of a grid column.- The Template property that allows rendering custom elements in a column instead of the default field value. 🔗
@code {
    private List<string> ToolbarItems = new List<string> { "Add", "Edit", "Delete", "Update", "Cancel", "Search" };

    private CustomAdaptor? _customAdaptor;

    protected override void OnInitialized()
    {
        // Initialize the CustomAdaptor with the injected FirebaseService
        _customAdaptor = new CustomAdaptor { FirebaseService = FirebaseService };
    }

    /// <summary>
    /// CustomAdaptor class to handle grid data operations with Firebase Realtime Database
    /// </summary>
    public class CustomAdaptor : DataAdaptor
    {
        public static FirebaseService? _firebaseService { get; set; }
        public FirebaseService? FirebaseService
        {
            get => _firebaseService;
            set => _firebaseService = value;
        }

        public override async Task<object> ReadAsync(DataManagerRequest dataManagerRequest, string? key = null)
        {
            try
            {
                // Fetch all books from the Firebase database
                IEnumerable dataSource = await _firebaseService!.GetBooksAsync();

                // Apply search operation if search criteria exists
                if (dataManagerRequest.Search != null && dataManagerRequest.Search.Count > 0)
                {
                    dataSource = DataOperations.PerformSearching(dataSource, dataManagerRequest.Search);
                }

                // Apply filter operation if filter criteria exists
                if (dataManagerRequest.Where != null && dataManagerRequest.Where.Count > 0)
                {
                    dataSource = DataOperations.PerformFiltering(dataSource, dataManagerRequest.Where, dataManagerRequest.Where[0].Operator);
                }

                // Apply sort operation if sort criteria exists
                if (dataManagerRequest.Sorted != null && dataManagerRequest.Sorted.Count > 0)
                {
                    dataSource = DataOperations.PerformSorting(dataSource, dataManagerRequest.Sorted);
                }

                // Calculate total record count before paging for accurate pagination
                int totalRecordsCount = dataSource.Cast<Book>().Count();

                // Apply paging skip operation
                if (dataManagerRequest.Skip != 0)
                {
                    dataSource = DataOperations.PerformSkip(dataSource, dataManagerRequest.Skip);
                }

                // Apply paging take operation to retrieve only the requested page size
                if (dataManagerRequest.Take != 0)
                {
                    dataSource = DataOperations.PerformTake(dataSource, dataManagerRequest.Take);
                }

                // Handling Group operation in CustomAdaptor.
                if (dataManagerRequest.Group != null)
                {
                    foreach (var group in dataManagerRequest.Group)
                    {
                        dataSource = DataUtil.Group<Book>(dataSource, group, dataManagerRequest.Aggregates, 0, dataManagerRequest.GroupByFormatter);
                    }
                }

                // Return the result with total count for pagination metadata
                return dataManagerRequest.RequiresCounts
                    ? new DataResult() { Result = dataSource, Count = totalRecordsCount }
                    : (object)dataSource;
            }
            catch (Exception ex)
            {
                Console.WriteLine($"ReadAsync Error: {ex.Message}");
                throw new Exception($"An error occurred while retrieving data: {ex.Message}");
            }
        }

        public override async Task<object?> InsertAsync(DataManager dataManager, object value, string? key = null)
        {
            try
            {
                if (value is Book newBook)
                {
                    var result = await _firebaseService!.InsertBookAsync(newBook);
                    return result;
                }
                return default;
            }
            catch (Exception ex)
            {
                Console.WriteLine($"Error in Insert operation: {ex.Message}");
                throw;
            }
        }

        public override async Task<object?> UpdateAsync(DataManager dataManager, object value, string? keyField, string key)
        {
            try
            {
                if (value is Book book)
                {
                    var result = await _firebaseService!.UpdateBookAsync(book.BookId, book);
                    return result ? value : default;
                }
                return default;
            }
            catch (Exception ex)
            {
                Console.WriteLine($"Error in Update operation: {ex.Message}");
                throw;
            }
        }

        public override async Task<object?> RemoveAsync(DataManager dataManager, object value, string? keyField, string key)
        {
            try
            {
                await _firebaseService!.DeleteBookAsync(value as string);
                return value;
            }
            catch (Exception ex)
            {
                Console.WriteLine($"Error in Delete operation: {ex.Message}");
                throw;
            }
        }

        public override async Task<object> BatchUpdateAsync(DataManager dataManager, object changedRecords, object addedRecords, object deletedRecords, string? keyField, string key, int? dropIndex)
        {
            // Process updated records
            if (changedRecords != null)
            {
                foreach (var record in (IEnumerable<Book>)changedRecords)
                {
                    var book = record as Book;
                    if (book != null)
                    {
                        await _firebaseService!.UpdateBookAsync(book.BookId, book);
                    }
                }
            }

            // Process newly added records
            if (addedRecords != null)
            {
                foreach (var record in (IEnumerable<Book>)addedRecords)
                {
                    await _firebaseService!.InsertBookAsync(record as Book);
                }
            }

            // Process deleted records
            if (deletedRecords != null)
            {
                foreach (var record in (IEnumerable<Book>)deletedRecords)
                {
                    await _firebaseService!.DeleteBookAsync((record as Book)?.BookId);
                }
            }
            return key;
        }
    }

    /// <summary>
    /// Provides a list of category options used as a data source for the Category dropdown editor in the grid.
    /// </summary>
    private static List<Book> CustomCategories = new List<Book> {
        new Book() { Category = "Fiction" },
        new Book() { Category = "Non-Fiction" },
        new Book() { Category = "Science" },
        new Book() { Category = "Technology" },
        new Book() { Category = "History" },
        new Book() { Category = "Biography" },
        new Book() { Category = "Romance" },
        new Book() { Category = "Mystery" },
        new Book() { Category = "Education" },
    };

    /// <summary>
    /// Provides a list of status options used as a data source for the Status dropdown editor in the grid.
    /// </summary>
    private static List<Book> CustomStatus = new List<Book> {
        new Book() { Status = "Available" },
        new Book() { Status = "Borrowed" },
        new Book() { Status = "Reserved" },
        new Book() { Status = "Lost" },
        new Book() { Status = "Damaged" },
        new Book() { Status = "Maintenance" },
    };

    /// <summary>
    /// Dropdown editor settings configured with category options for the Category column in grid edit mode.
    /// </summary>
    private IEditorSettings CategoryDropDownParams = new DropDownEditCellParams
    {
        Params = new DropDownListModel<object, object>() { DataSource = CustomCategories, Query = new Syncfusion.Blazor.Data.Query() },
    };

    /// <summary>
    /// Dropdown editor settings configured with status options for the Status column in grid edit mode.
    /// </summary>
    private IEditorSettings StatusDropDownParams = new DropDownEditCellParams
    {
        Params = new DropDownListModel<object, object>() { DataSource = CustomStatus, Query = new Syncfusion.Blazor.Data.Query() },
    };

    /// <summary>
    /// Gets the appropriate badge CSS class for the Category column based on the category value.
    /// </summary>
    /// <param name="category">The book category</param>
    /// <returns>Bootstrap badge CSS class string</returns>
    private string GetCategoryBadgeClass(string? category)
    {
        return category switch
        {
            "Fiction" => "badge bg-primary",
            "Non-Fiction" => "badge bg-info",
            "Science" => "badge bg-success",
            "Technology" => "badge bg-warning",
            "History" => "badge bg-danger",
            "Biography" => "badge bg-secondary",
            "Romance" => "badge bg-info",
            "Mystery" => "badge bg-dark",
            "Education" => "badge bg-info",
            _ => "badge bg-secondary"
        };
    }

    /// <summary>
    /// Gets the appropriate badge CSS class for the Status column based on the status value.
    /// </summary>
    /// <param name="status">The book status</param>
    /// <returns>Bootstrap badge CSS class string</returns>
    private string GetStatusBadgeClass(string? status)
    {
        return status switch
        {
            "Available" => "badge bg-success",
            "Borrowed" => "badge bg-info",
            "Reserved" => "badge bg-primary",
            "Lost" => "badge bg-danger",
            "Damaged" => "badge bg-warning",
            "Maintenance" => "badge bg-secondary",
            _ => "badge bg-secondary"
        };
    }
}
Complete Sample Repository
A complete, working sample implementation is available in the GitHub repository.
Summary
This guide demonstrates how to:
- Create a Firebase Project and Realtime Database. 🔗
- Generate Database Secret for Authentication. 🔗
- Configure Initial Data Import. 🔗
- Install necessary NuGet packages. 🔗
- Create data models mapping to Firebase document structure. 🔗
- Configure connection strings. 🔗
- Implement Firebase Service Class for data access. 🔗
- Register Services in Program.cs 🔗
- Create a Blazor component with a DataGrid that supports searching, filtering, sorting, paging, and CRUD operations. 🔗
- Handle bulk operations and batch updates. 🔗
The application now provides a complete, modern solution for managing library book data with Firebase Realtime Database’s cloud-hosted JSON storage and Blazor DataGrid’s comprehensive data management capabilities.