How can I help you?
Setup Private NuGet Server
28 Jan 20257 minutes to read
Overview
This document will explain the steps for configuring a private NuGet server, pushing or removing the NuGet packages from the private NuGet server, and configuring the private NuGet feed in Visual Studio.
Private NuGet server and package usage
Setup the private NuGet and perform the NuGet CLI to publish the custom NuGet packages into the private NuGet server. CI/CD uses this to refer to the assemblies from private NuGet server.
How to prepare a private NuGet server
Set up a Private NuGet Server using IIS and publish the NuGet packages. To build a Private NuGet server, please follow these steps.
- Create an ASP.NET Web application with NuGet Server.
- Host the application in Internet Information Services (IIS).
- Add Syncfusion® packages to the feed.
- Remove Syncfusion® packages from the feed.
- Configure the private NuGet feed to Visual Studio.
Create an ASP.NET Web application with NuGet Server
-
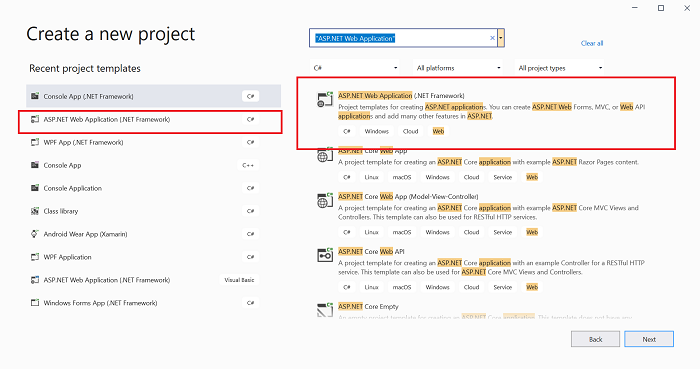
Open the Visual Studio, select Create a New Project, search for ASP.NET Web Application (.NET Framework), and click Next.
-
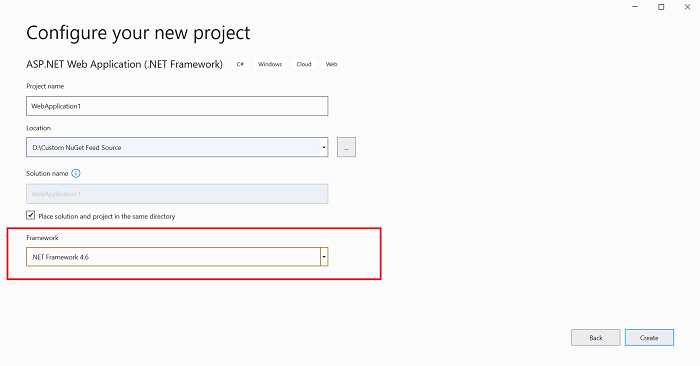
Select .NET Framework 4.6 in the Framework dropdown, give the project a suitable name, and click Create.
-
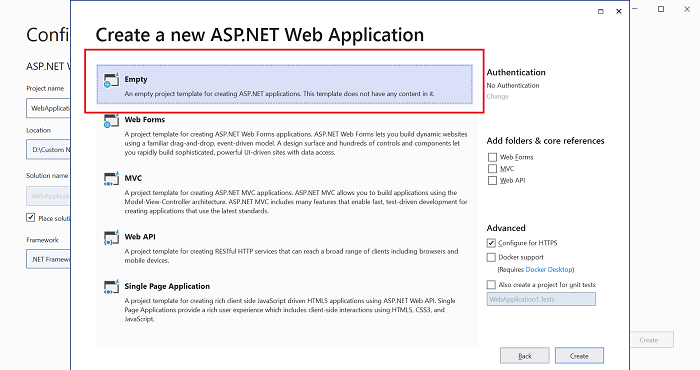
Select Empty project template and click Create.
-
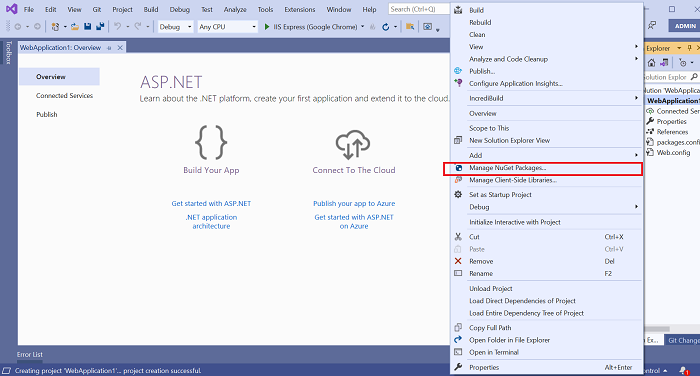
Once project created, right-click on the project, and select Manage NuGet Packages.
-
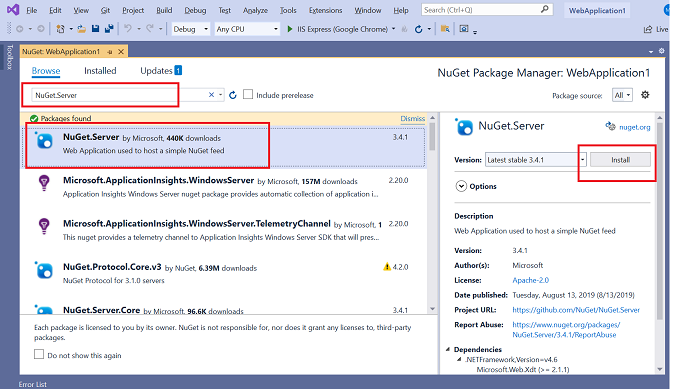
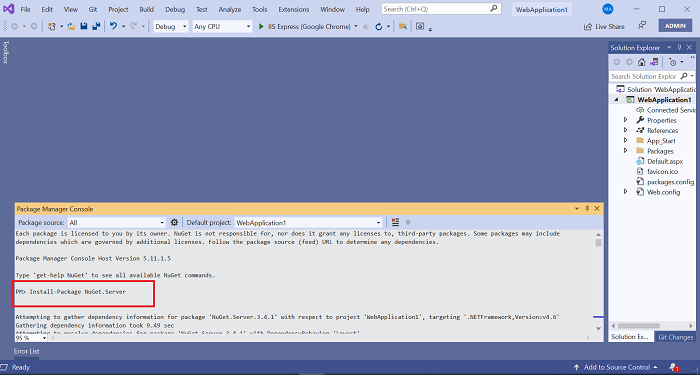
Go to the Browse tab, search for NuGet.Server and install the most recent version. NuGet.Server can also be installed using the Package Manager Console with the command Install-Package NuGet.Server.
Package Manager Console
NOTE
When the NuGet.Server package installation is finished, it may not overwrite the existing elements but instead, create duplicates. When you try to run the project later, the duplicates will cause an Internal Server Error.
For example: If your web.config contains
before installing NuGet.Server, the package does not overwrite it but instead inserts a new one . In that case, remove the element with an older framework version. -
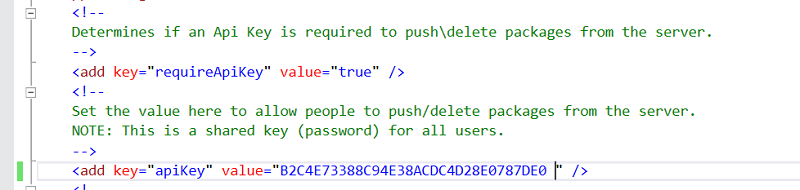
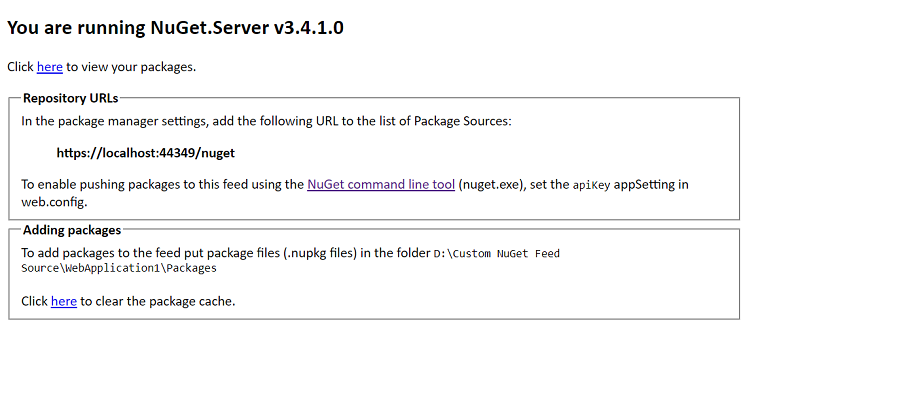
After installing the NuGet.Server package, web.config contains an empty appSetting/apiKey value. Pushing packages to the feed is disabled when apiKey is omitted or blank. Set the apiKey to a value (ideally a strong password) and add a key called appSettings/requireApiKey with the value true to enable this capability.
-
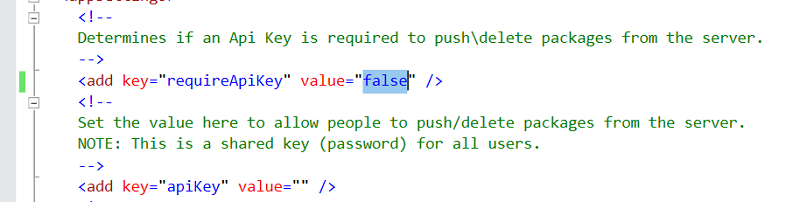
Set requireApiKey to false if your server is already secured or if you don’t need an API key for any other reason (for example, when using a private server on a local team network). After that, any user with access to the server can push packages.
-
The packages are(.nupkg files) placed where the application was published. You can also change the packages folder by providing a specific path to packagesPath in web.config.

-
To overwrite the package without deleting it, enable the allowOverrideExistingPackageOnPush as true.

-
Run the application in Visual Studio. The URLs for the package feed are provided on the home page as follows.
-
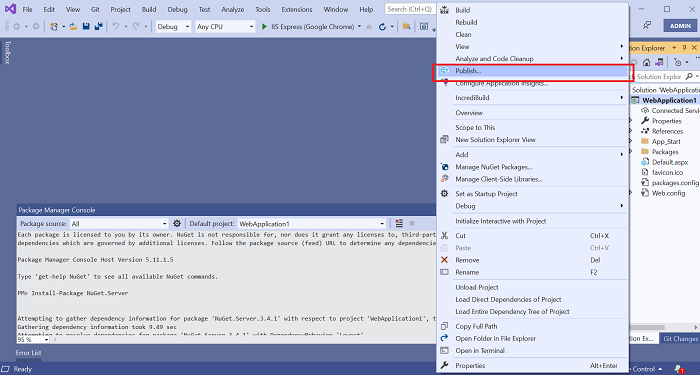
Right-click on the project and select Publish.
-
Click Next after selecting the Folder target for publishing.

-
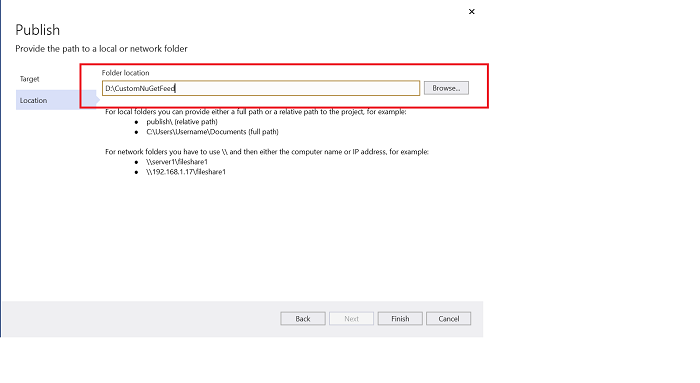
Enter a specific location for the Folder and click Finish.
-
Host the application to Internet Information Services (IIS) after testing your local deployment.
Hosting the application in Internet Information Services (IIS)
Follow these steps to configure the application in IIS.
-
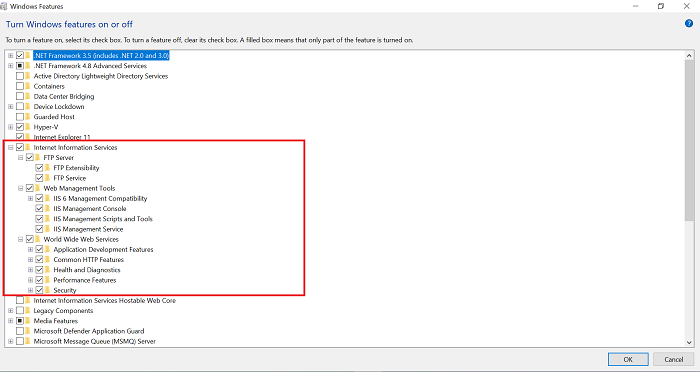
Go to Control Panel, then Programs and Features, and then Turn Windows Features on or off. Select Internet Information Services completely and click Ok.
-
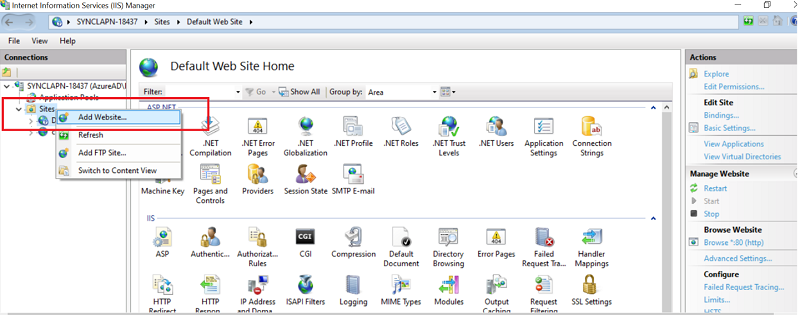
Open Internet Information Service (IIS) Manager. Select Add Website from the Sites list by right-clicking on it.
-
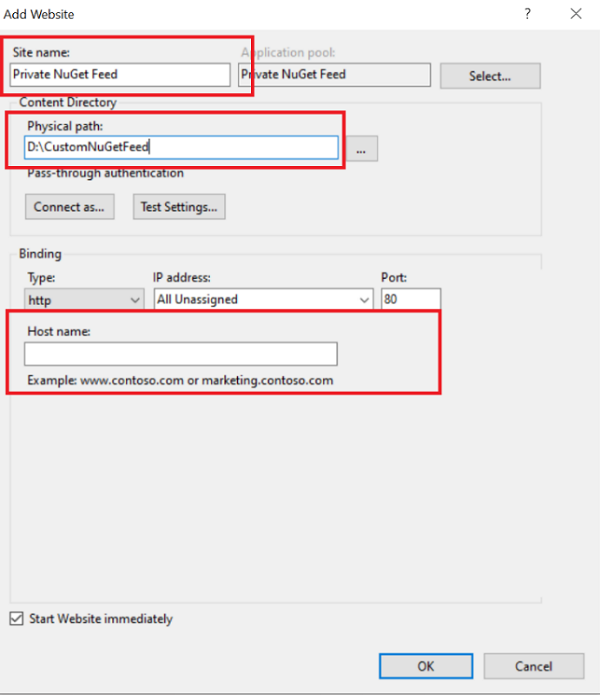
Enter the following details and create a Website.
a. Site Name.
b. Physical Path (Above ASP.NET web application published folder).
c. Binding Type (HTTPS\HTTPS).
d. IP address.
e. Port Number and Host Name (Use your internal or private host name or domain name), then click Ok.HTTPS Binding:
NOTE
You must provide your organization’s SSL certificate for HTTPS binding type.

HTTP Binding:
-
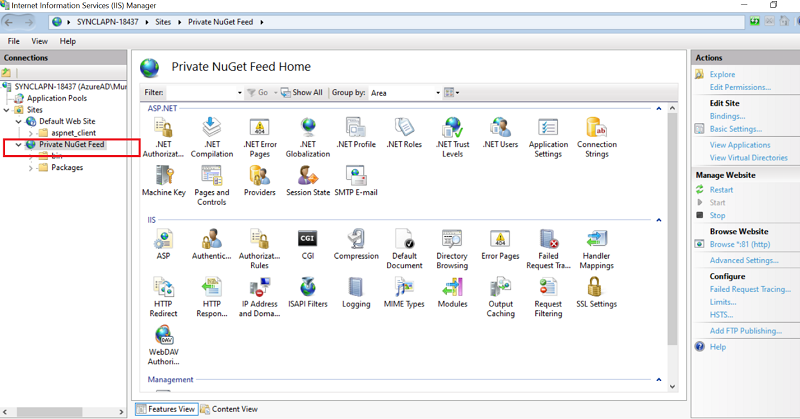
Your site will be hosted in the Sites list.
Publish the NuGet package to the feed
Use NuGet.exe to push NuGet packages in the private feed. The URL for pushing packages is http://<domain/nuget> using the NuGet push command.
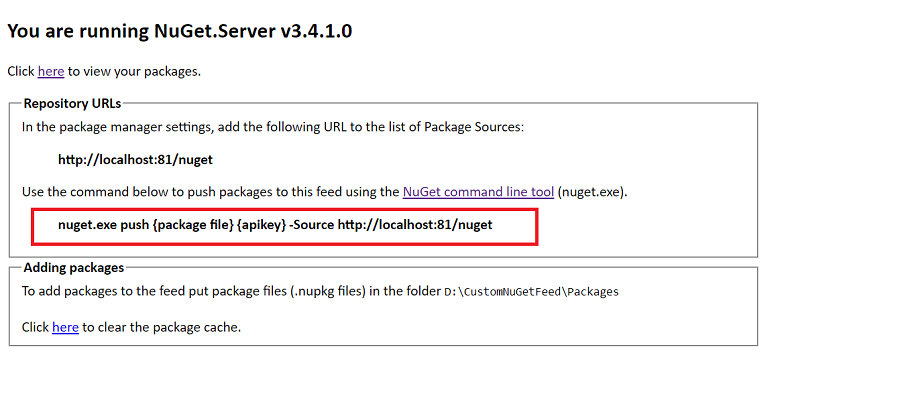
Example: NuGet.exe push “D:\NuGet\Syncfusion.Tools.WPF.20.1.0.55.nupkg” B2C4E73388C94E38ACDC4D28E0787DE0 -Source http://localhost:81/nuget

NOTE
The APIkey is stored in the web.config file.
Remove the NuGet package from the feed
Use NuGet.exe to delete the NuGet packages from the feed. The NuGet delete command removes the package from the private NuGet feed.
Example: NuGet.exe delete Syncfusion.Tools.WPF 20.1.0.55 -Source http://localhost:81/NuGet/ -apikey B2C4E73388C94E38ACDC4D28E0787DE0

Add private NuGet feed
To add the private NuGet feed link using Visual Studio.
-
Launch Visual Studio, right-click the project, and choose Manage NuGet Packages.
-
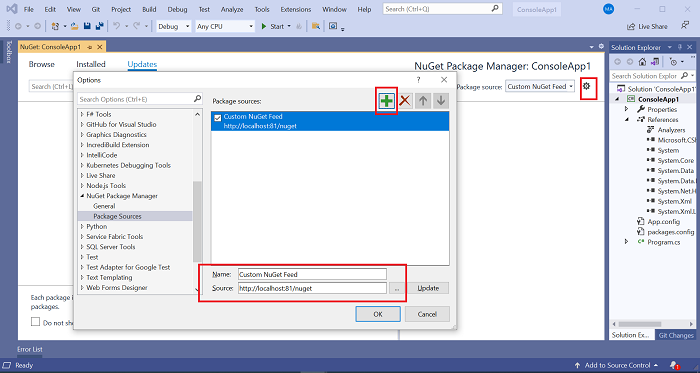
Click + after selecting the Package Manager setting and select Okay after providing your NuGet Feed’s Name and Source (URL).
NOTE
- Make the Private NuGet feed listed as the first package source before NuGet.org as shown in the following image (If NuGet.org is listed first, the NuGet packages you add to your private NuGet feed are referred from NuGet.org instead of the private NuGet feed).
- So, make sure you have provided the Private NuGet Feed as the first in the package source list to use the NuGet packages from the private NuGet feed configured.
- If the NuGet package pushed to a private feed has any other NuGet package as dependency, and if it’s not present in any of the private feeds, it will be automatically restored from NuGet.org.

-
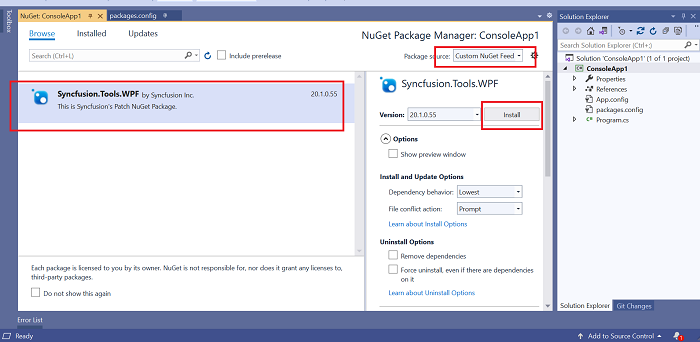
Select the Browse tab, and your NuGet packages from your Private NuGet feed will now be listed. Click Install to install the Syncfusion® packages from your Private NuGet feed.
Add private NuGet feed to the project
The private NuGet feed link requires only for a specific project. Add this private feed link in your application location.
For that, create a NuGet.config file in the root location of the application with the following content.
<?xml version="1.0" encoding="utf-8"?>
<configuration>
  <packageRestore>
    <add key="enabled" value="True" />
    <add key="automatic" value="True" />
  </packageRestore>
  <packageSources>
    <add key="CustomNuGet" value=" http://localhost:81/nuget/" />
    <add key="nuget.org" value="https://api.nuget.org/v3/index.json" protocolVersion="3" />
  </packageSources>
  <bindingRedirects>
    <add key="skip" value="False" />
  </bindingRedirects>
</configuration>
NOTE
Replace the actual private server feed link for the CustomNuGet.