Customization in WPF ToolBar
18 Nov 20185 minutes to read
This section describes how to customize the appearance of a ToolBar.
Customizing the floating ToolBar
This section demonstrates how to customize a floating ToolBar by applying a FloatingToolBarStyle to the ToolBarManager and defining toolbar items.
<syncfusion:ToolBarManager FloatingToolBarStyle="{StaticResource toolstyle}" >

<syncfusion:ToolBarTrayAdv >

<syncfusion:ToolBarAdv x:Name="Tooladv" ToolBarName="Standard" >

<Button syncfusion:ToolBarAdv.Icon="Images\NewDocumentHS.png" >

<Image Source="Images\NewDocumentHS.png" Width="16" Height="16"/>

</Button>

<Button>

<Image Source="Images\openHS.png" Width="16" Height="16" />

</Button>

<Button>

<Image Source="Images\InsertPictureHS.png" Width="16" Height="16" syncfusion:ToolBarAdv.IsAvailable="False"/>

</Button>

<Button>

<Image Source="Images\InsertHyperlinkHS.png" Width="16" Height="16"/>

</Button>

<Button>

<Image Source="Images\TableHS.png" Width="16" Height="16"/>

</Button>

</syncfusion:ToolBarAdv>

</syncfusion:ToolBarTrayAdv>

</syncfusion:ToolBarManager>
Customizing Foreground
The Foreground property of ToolBarAdv control can be used to customize the floating ToolBar text foreground.
The following code illustrates how to set the value of the foreground property:
<shared:ToolBarManager x:Name="toolBarManager">
        <shared:ToolBarManager.TopToolBarTray>
            <shared:ToolBarTrayAdv VerticalAlignment="Top">
                <shared:ToolBarAdv ToolBarName="Standard" Foreground="Red">
                    <Button shared:ToolBarAdv.Label="New Document" Height="22" Width="22" shared:ToolBarAdv.Icon="Images/NewDocumentHS.png" ToolTip="New">
                        <Image Source="Images/NewDocumentHS.png" Width="16" Height="16" />
                    </Button>
                    <Button  shared:ToolBarAdv.Label="Open Document" Height="22" Width="22" shared:ToolBarAdv.Icon="Images/openHS.png" ToolTip="Open">
                        <Image Source="Images/openHS.png"  Width="16" Height="16"/>
                    </Button>
                    <Button  shared:ToolBarAdv.Label="Save Document" Height="22" Width="22" shared:ToolBarAdv.Icon="Images/saveHS.png" ToolTip="Save">
                        <Image Source="Images/saveHS.png"  Width="16" Height="16"/>
                    </Button>
                    <Button  shared:ToolBarAdv.Label="Save Document" Height="22" Width="22" shared:ToolBarAdv.Icon="Images/saveAllHS.png" ToolTip="SaveAll">
                        <Image Source="Images/saveAllHS.png"  Width="16" Height="16"/>
                    </Button>
                    <shared:ToolBarItemSeparator  />
                    <Button  shared:ToolBarAdv.Label="Print Document"  Height="22" Width="22" shared:ToolBarAdv.Icon="Images/PrintHS.png" ToolTip="Print">
                        <Image Source="Images/PrintHS.png"  Width="16" Height="16"/>
                    </Button>
                </shared:ToolBarAdv>
            </shared:ToolBarTrayAdv>
        </shared:ToolBarManager.TopToolBarTray>
    </shared:ToolBarManager>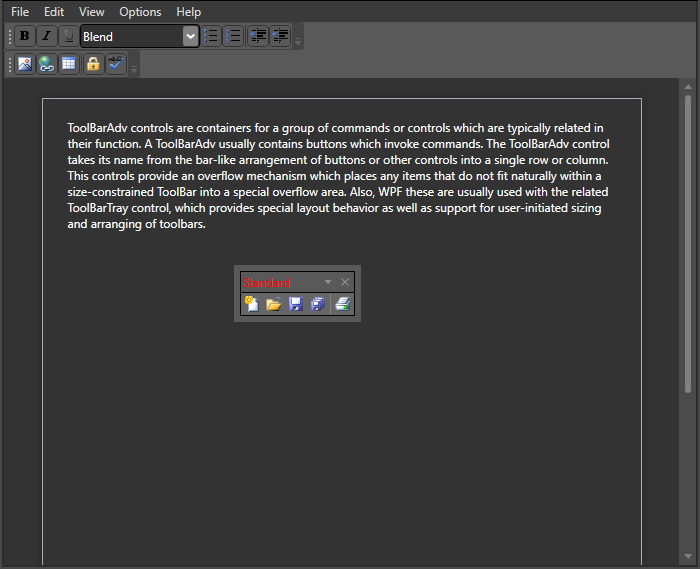
To preview the foreground on a floating toolbar, you must first detach the toolbar by clicking its gripper. See ToolBar state for instructions.
Customizing a FrameworkElement’s style
This section demonstrates how to customize a ToolBar by loading an external ResourceDictionary that contains style definitions.
ToolBarAdv toolBar = new ToolBarAdv();

toolBar.ControlsResourceDictionary = new ResourceDictionary()

{

Source = new Uri("ControlsResouce.xaml", UriKind.RelativeOrAbsolute)

};
Theme
ToolBar supports various built-in themes. Apply a theme to the ToolBar using the links below.
