Getting Started with WPF Digital Gauge (SfDigitalGauge)
9 Jul 20265 minutes to read
This section explains the steps required to configure the SfDigitalGauge and also explains how to add basic elements of SfDigitalGauge through various APIs available within it.
Adding gauge references
You can add gauge references using one of the following methods:
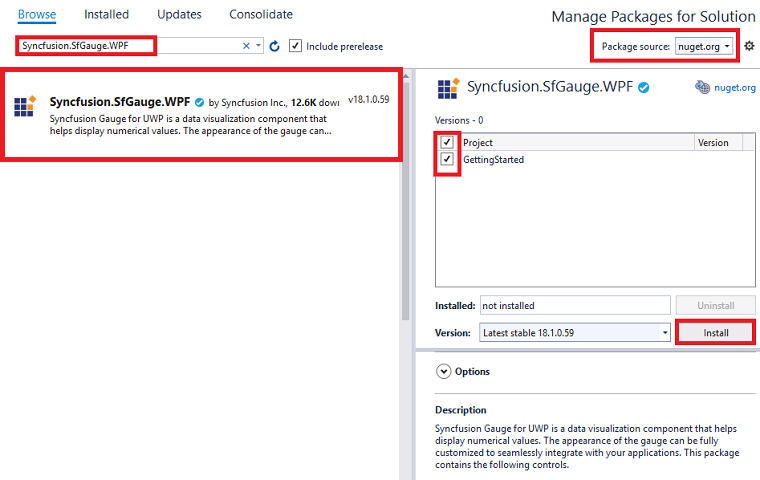
Method 1: Adding gauge reference from nuget.org
Syncfusion WPF components are available in nuget.org. To add gauge to your project, open the NuGet package manager in Visual Studio, search for Syncfusion.SfGauge.WPF, and then install it.
Method 2: Adding gauge reference from toolbox
You can drag the digital gauge control from the toolbox and drop it onto the designer. It will add the required assembly references automatically and add the namespace to the page.
Method 3: Adding gauge assemblies manually from the installed location
If you prefer to manually reference the assemblies instead of referencing them from NuGet, add the following assemblies to the respective projects.
Location: {Installed location}/{version}/WPF/Assemblies
You can refer to this link to know about the assemblies required for adding gauge to your project.
Initialize gauge
You can initialize the SfDigitalGauge control with a required optimal name using the included namespace.
xmlns:syncfusion="clr-namespace:Syncfusion.UI.Xaml.Gauges;assembly=Syncfusion.SfGauge.Wpf"using Syncfusion.UI.Xaml.Gauges;Initialize the digital gauge control.
<syncfusion:SfDigitalGauge/>SfDigitalGauge digitalgauge = new SfDigitalGauge();
this.Content = digitalgauge;Run the above code, and the default SfDigitalGauge will be displayed as follows. The UI of the digital gauge can be customized by adding segments and passing values, which will be explained in the next section.
Displaying Values
The SfDigitalGauge control provides options to display special characters or values using the Value property.
<syncfusion:SfDigitalGauge Value="1 2 3 4" />SfDigitalGauge digitalgauge = new SfDigitalGauge();
digitalgauge.Value = "1 2 3 4";
this.Content = digitalgauge;Setting character type
By using the CharacterType property, you can set the segments for the digital gauge. The digital characters can be drawn in the following four different segment types:
• EightCrossEightDotMatrix
• SegmentFourteen
• SegmentSeven
• SegmentSixteen
<syncfusion:SfDigitalGauge Value="1 2 3 4" CharacterType="EightCrossEightDotMatrix"/>SfDigitalGauge digitalgauge = new SfDigitalGauge();
digitalgauge.CharacterType = CharacterType.EightCrossEightDotMatrix;
this.Content = digitalgauge;Configuring properties
The CharacterHeight, CharacterWidth, and CharacterStroke properties are used to display characters, which can be customized as shown in the following code snippets.
<syncfusion:SfDigitalGauge CharacterHeight="60" CharacterWidth="25"
                      CharacterStroke="#146CED"/>
SfDigitalGauge digitalgauge = new SfDigitalGauge();
digitalgauge.CharacterHeight = 60;
digitalgauge.CharacterWidth = 25;
digitalgauge.CharacterStroke = (SolidColorBrush)new BrushConverter().ConvertFrom("#146CED");
this.Content = digitalgauge;The following code example is the complete code of the previous configurations.
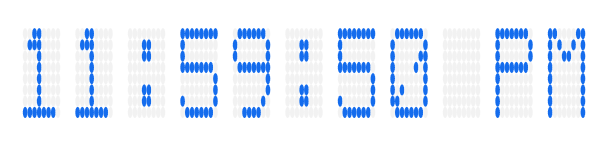
<syncfusion:SfDigitalGauge Value="11:59:50 PM"
                      Height="100"
                      Width="375"
                      DimmedBrush="#F2F2F2"
                      CharacterHeight="60"
                      CharacterWidth="25"
                      HorizontalAlignment="Center"
                      VerticalAlignment="Center"
                      CharacterType="EightCrossEightDotMatrix"
                      CharacterStroke="#146CED" />
SfDigitalGauge digitalgauge = new SfDigitalGauge();
digitalgauge.Height = 100;
digitalgauge.Width = 375;
digitalgauge.Value = "11:59:50 PM";
digitalgauge.CharacterHeight = 60;
digitalgauge.CharacterWidth = 25;
digitalgauge.HorizontalAlignment = HorizontalAlignment.Center;
digitalgauge.VerticalAlignment = VerticalAlignment.Center;
digitalgauge.CharacterType = CharacterType.EightCrossEightDotMatrix;
digitalgauge.CharacterStroke = (SolidColorBrush)new BrushConverter().ConvertFrom("#146CED");
digitalgauge.DimmedBrush = (SolidColorBrush)new BrushConverter().ConvertFrom("#F2F2F2");
this.Content = digitalgauge;The following screenshot illustrates the result of the previous codes.
You can find the complete getting started sample from this link.
Theme
SfDigitalGauge supports various built-in themes. Refer to the below links to apply themes for the SfDigitalGauge,
